You can perform stocktakes using Excel spreadsheets for offline counting and bulk data entry, helping facilitate efficient inventory counts especially for large catalogs or multi-person counting teams. This improves your retail operations by enabling flexible count data collection, with properly configured Excel stocktake workflows typically reducing count time and improving data entry efficiency through spreadsheet management.
Understanding Excel stocktake functionality involves recognizing file format requirements, data preparation steps, and import processes to help retail operators focus on the right offline counting workflows, ensuring your retail strategy consistently drives better stocktake efficiency and count accuracy outcomes.
The requirements to perform an Excel Stocktake are quite simple - you just need a computer running Microsoft Excel. Compared to the Browser Stocktake method, the Excel Upload method is largely performed externally to Retail Express:
- Use the Retail Express software to generate the Stocktake File
- Manually enter the count quantities into the spreadsheet (if you have a Barcode Scanner you can use the Excel Scan method instead)
- Save the file
- Upload the file back into Retail Express (the inventory levels are adjusted at this point)
Did you know?:If you have a mobile device (tablet or smartphone) you can use the Retail Express Mobile Stocktake App to perform a Stock Take!
Using the Stocktake Method option you can choose what stock you're counting:
- Stock on Hand - available stock, plus any stock that's allocated to a sale (layby) or transfer
- Available Stock only
Stocktake Methods (defining which stock is being counted)
The Stocktake Method you select depends on what stock you will be counting - Available and Allocated stock, or Available stock only. What option is selected will also affect what count value is available to use in the Stock Adjustment process (defined when uploading the file).
This method is selected at the point of creating the Excel file.
Allocated stock is stock that is either sold but not yet Fulfilled (e.g. a Layby) or stock allocated to a transfer to another Outlet.
Method | Stock calculation | Details |
Adjust Stock On Hand | Available = Total count - Allocated | The system looks at the total products that were counted during the Stocktake, and from that value deducts the Allocated stock. Whatever is remaining is assumed to be the correct value for the Available stock, and processes a Stock Adjustment to bring the Available qty to the equivalent of that number. E.g. There are 10 products counted, and 2 are layby products (Allocated stock). It assumes that 8 products are Available. If the system has recorded there are only 7 products currently in the Available status a stock adjustment is processed to increase Available stock by 1. The system now shows 8 Available, 2 Allocated for a total of 10 SOH. if you choose Include Picked Qty you will need to ensure that you have included any Picked stock in the count (it will be deducted in the calculation similar to Allocated). |
Adjust Available | Available = Total count | Whatever stock is counted is the Available stock. Allocated stock is not factored into this calculation, and therefore should not be counted e.g. Laybys, stock awaiting transfer. E.g. There are 10 products counted, the system has only 7 in the Available status. A stock adjustment is created to increase the Available stock by 3, so that Available now shows 10. Include Picked Qty should not be used with this method. |
Stocktake Update Methods (defining which stock is being adjusted)
The Stocktake Update Method defines what stock is being adjusted, compared to the Stocktake Method which relates to which stock is being counted. The values are dependant on the Stocktake Method selected when the Stocktake was created - for example how the Stock On Hand figure was calculated.
What Stocktake Update Method you select directly affects the update to the quantity levels in Retail Express, so it's essential you choose carefully.
Method | Excel field | Details |
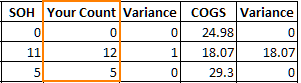
Absolute | Your Count | Updates the Available quantity with the figure entered into the "Your Count" column as an absolute quantity e.g. if the value was 5 the stock will be adjusted to equal 5. |
Variance | Variance | The Available Quantity will be adjusted by the calculated difference displayed in the Variance column. If there is a 0 variance the product will not be adjusted. The difference is calculated from what stock was expected (Stock on Hand) compared to what stock was counted (Your Count). For example, if there were 2 products expected but only 1 was counted a stock adjustment will be processed for -1, to reduce the stock from 2 to 1. |
Process a Stocktake (Excel Upload method)
Follow the steps below to process a Stocktake using the Retail Express Excel Stocktake file.
Step 1 - Generate an Excel Stocktake File
To begin your stocktake by setting the filters and stocktake options:
- Navigate to Inventory > Stock Take > Create Stock Take
- Enter valid User Account details and click Log In
Access to the Create Stock Take feature is controlled through the Staff Profile Security feature "Stock Take"; for any queries please consult your System Administrator
- Use the filters to generate your file (see below for detailed information on each filter and option)
- Select a Stock Take Method
The method you select is extremely important and will determine which products you count - all stock on hand or Available stock only. See the Stocktake Methods section above for detailed information. Selecting the incorrect version can affect the accuracy of your Stocktake.
- Click Create Excel File

- A file will begin downloading to your computer - this is your Excel Stocktake File. Depending on the number of products you have selected it may take a minute for the file to generate and begin downloading.
Proceed onto the next section in this article for information on how to use this file.
Stocktake Filters
Option | Details |
Sort Results By | The order in which the products are displayed on the Results page e.g. by Supplier, Supplier SKU, Description |
Then Sort By | After the first Sort By result, what secondary option should the products be ordered e.g. if Supplier was selected in the first option and then Description, the products would be displayed in order of Supplier, with the products for each supplier appearing in alphabetical order |
Product PLU | Used to filter the stock take to an individual selection only i.e. Product ID, Supplier SKU, or for multiple products with the same style code, Manufacturer SKU |
Include Disabled Products | If products that have been marked as Disabled should be included in the results (note: this will affect the 5000 product limit) |
Default Counts to Zero | Should be used with caution. When the products are initially filtered the stocktake process leaves the count field blank for all products. Products that aren't counted and have a blank "Count" field will be ignored when the Stocktake is approved - no inventory adjustment takes place. Ticking this option means that all products will automatically have a Count value of "0". When the stocktake is taken and submitted, any products with a Count value of zero will have their inventory levels reset back to zero. |
Include Picked Qty | Includes into the SOH quantity any products currently in the "Picked" status of an Internal Transfer (refer to the article on Stock Transfers for more information) Should only be used when the Stock Take Method has been set to "Adjust Stock On Hand" method |
Include Additional Barcodes | Tick this option to include additional product barcodes in your stocktake (otherwise products utilising an additional barcode may not be found when scanned). |
Show only Negative Stock | Display only products where the SOH level is a negative |
Include Core Products | The main or Core product lines only |
Stock Take Method | This is an extremely important selection and will determine what stock should be counted - all stock on hand or available stock only. Refer to the Stocktake Methods section above for detailed information. |
Step 2 - Using the Excel Stocktake file
Once you have generated and downloaded your Excel stocktake file it's time to begin the stocktake.
Do not change the information contained within any other columns of the spreadsheet - especially the figures in the SOH, COGS or Variance columns. These columns are populated with purpose built formulas directly from your Back Office. Changing these values will cause errors and potentially incorrect values to be applied to your stocktake.
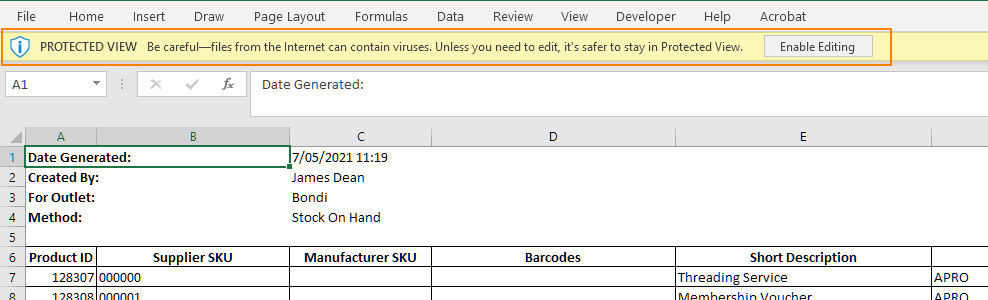
- Open the Excel Stocktake File downloaded in the previous step
Depending on your version of Excel you may encounter a warning about the file being corrupt. This message is due to the .xls format being an older Excel file format - click Yes to the warning to proceed.
- By default the file will open in Protected View. Click Enable Editing to unlock the file
- Count your stock and enter the value into the Your Count column for the products as you count them
- Enter a value of 0 (zero) for any products that should have their inventory reset
Any Products for which you do not enter a Your Count value (i.e. the field is blank) will be ignored by the Stocktake and not updated. To set the stock level back to zero you will need to enter a 0 (zero) into the field.
- Save the file in .csv format (as per the instructions below). The upload file cannot be in any other format.
It's recommended to save your file frequently to save your progress as you go (reducing the risk of losing any data).
Saving the Stocktake file
Excel 2007 and above
To save in Excel 2007 and above:
- Click Save > Save As > Other Formats
- At the bottom of the "Save As" window, change the Save as Type to CSV (Comma delimited)(*.csv)
- Give the stocktake file a relevant name
- Select a location for the file to be saved e.g. Desktop
- Click Save
- Select Yes to the popup will appear asking if you want to keep this format
Excel 2003
To save in Excel 2003:
- Click File > Save As
- At the bottom of the "Save As" window, change the Save as Type to CSV (Comma delimited)(*.csv)
- Give the stocktake a relevant name
- Select a location for the file to be saved e.g. Desktop
- Click Save
- Select Yes to the popup will appear asking if you want to keep this format
Step 3 - Uploading the Excel Stocktake file into Retail Express
Once the upload file has been created you can upload it into Retail Express to update the stock levels for your products.
Quantities are updated immediately when the file is uploaded - there's no "Authorisation" process for Excel stocktakes.
If you have processed sales while the Stocktake was underway you will need to either adjust the Stocktake file prior to upload, or enter Manual Adjustments into Retail Express afterwards. Refer to the Stocktake - Processing sales/trading while performing a stocktake article for detailed information on this process.
To upload the Stock Take Excel File:
- Log into Retail Express
- Navigate to Inventory > Stock Take > Create Stock Take
- Enter valid User Account details and click Log In
- Click the Skip to Upload button in the bottom left-hand corner

- Click Browse and locate the Stocktake Excel file
- Select the Outlet for the Stocktake
- Select an Update Method
Ensure you select the correct method to ensure the adjustments to the Inventory are processed correctly. Refer to the Stocktake Update Methods section above for detailed information
- Enter any Comments as required e.g. the name of the staff responsible for the count
- Click Submit Stocktake
The result will be applied to your Inventory levels immediately. To report on the Stocktake refer to the Stock Take Report.