You can rapidly expand your product catalog through Mass Upload product creation in Retail Express, which enables bulk product setup from Excel files for efficient catalog buildout. This bulk creation approach helps retail operators onboard new product lines and establish initial catalogs quickly, with effective mass upload use typically achieving significantly faster catalog expansion compared to individual product creation across Australian retail operations.
Mass Upload product creation in Retail Express enables retail operators to create hundreds of products simultaneously through structured Excel templates, helping ensure consistent product data and efficient catalog establishment. This bulk creation capability helps ensure your retail operations can quickly establish comprehensive product catalogs while maintaining data quality and supporting efficient business launch or product line expansion.
If you have a lot of products, you need a way to manage them in bulk quickly. The Mass Download and Mass Upload features let you view products in Microsoft Excel so you can quickly make changes as required.
You can also manage products in bulk using Product Search & Management.
The majority of product fields are available to edit in the Mass Download/Mass Upload file, allowing you to easily change prices, adjust stock levels and modify product attributes. Changes are immediately applied once the file is uploaded back into Retail Express. If the product doesn't already exist, a new product will be created for you.
Download Mass Upload Template
To create new products it's recommended to start with a blank template so you don't accidentally affect any existing products in the system. The same column structure is used in the Mass Download (discussed further below).
- Navigate to Inventory > Mass Upload
- You will be on the Get Excel Template tab by default
- Make your selections from the Search Fields
- Click Get Excel Template
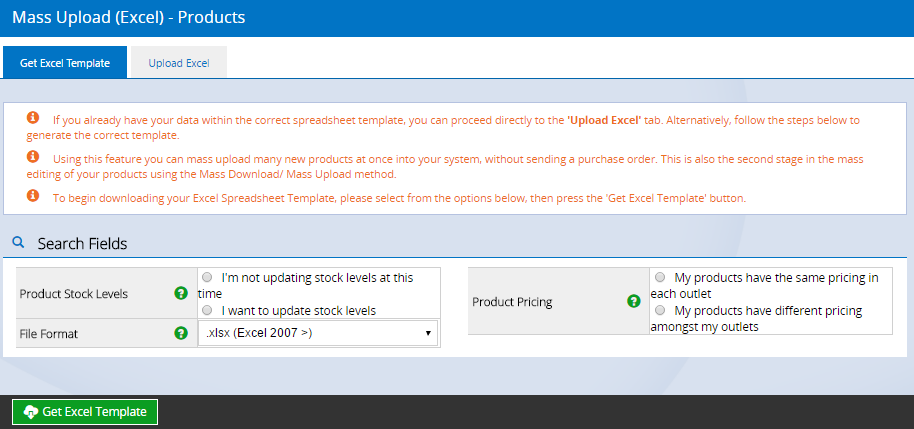
Search Fields | Description |
Product Stock Levels | You can upload your initial stock quantity for your products if required, however it's entirely optional. If you select "I'm not updating stock levels at this time" the template will only contain the Product Master tab i.e. global product fields If you select "I want to update stock levels" you will be prompted to select the Outlets you wish to enter stock levels for. |
Product Pricing | If you only have a single Outlet, or you will be using the same price across all Outlets, select "My products have the same pricing in each Outlet". If you would like to enter specific prices for different Outlets select "My products have different pricing amongst my Outlets". You will be prompted to select the Outlets you wish to enter stock levels for. |
Hold Ctrl to select multiple Outlets.
Create New Products
Open the file downloaded in the previous step. You may need to click Enable Editing before you can make any changes to the file. If the Outlet tab is locked, navigate to File > Info > Protect Workbook > Unprotect (you'll need to click the Unprotect option for each Outlet in the file).

The Template structure is as follows:
- Product Master - contains all the global information for the product e.g. Supplier SKU, Prices, Product Attributes etc.
- Outlet Tab/s - if you have selected an option that included Outlets, each of the Outlets selected will have their own tab in the spreadsheet; on this tab you will be able to enter Outlet-specific information e.g. Prices, Quantity etc.

Product Master tab
The Product Master worksheet contains product information shared across all outlets in Retail Express e.g. Short Description (product name).
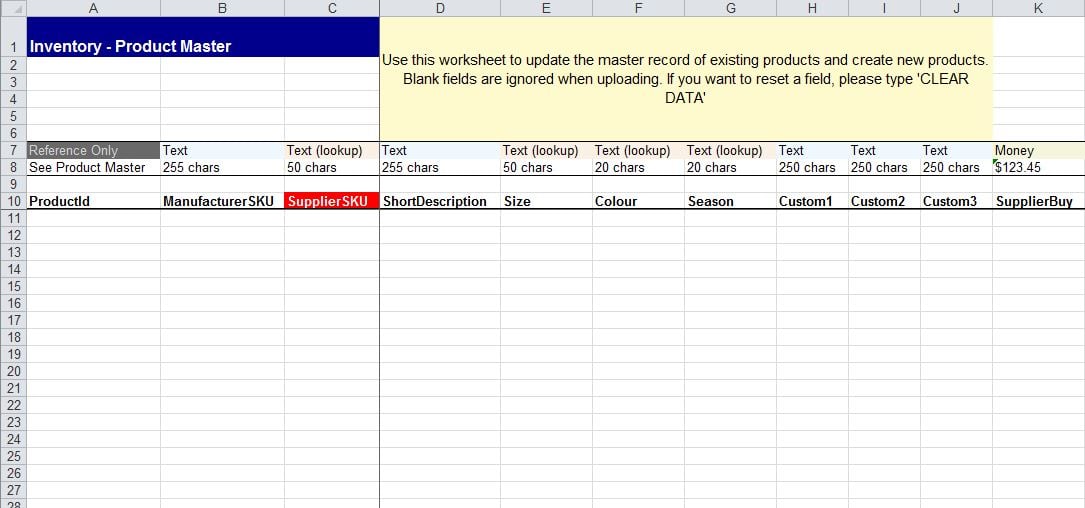
Each column includes information on:
- The Type of field e.g. Text, Money, Date etc. This will help determine the format of the information you enter
- The Characters, displayed either as a number of characters (e.g. 50 chars) or an exact format (e.g. Money is required to have a dollar sign with two decimal places).
- Field information i.e. the data required for that column. Mandatory fields
Do not change the layout of the template, that is, remove columns or rows, or change any headings. Doing so will impact your ability to upload the file back into Retail Express.
Important Notes
:
- Column A is the Product ID - a unique ID generated automatically by Retail Express when products are created; this column should not be modified (whether it's blank to create new products or if populated when editing existing products).
- There are several mandatory fields that must be completed for a product to be uploaded:
- Supplier SKU
- Short Description (Product Name)
- Buy Price Ex
- POS Price
- Product Type
- Supplier
For information on each of these fields refer to Products - Edit Product Details.
When creating a product, each product is contained on its own row (you cannot use multiple rows for a single product).
To create a product:
- Click into the first row (each product has its own row, multiple rows cannot be used for a single product
- Enter the Mandatory Fields above
- Enter any additional information for the product
- Continue creating new products on the next row
- Repeat for all new products
- Save the file
If you are copying/pasting data from another file use the Paste Values Only option in Excel to ensure data is formatted correctly e.g. if a supplier provides you with a product spreadsheet.
Tips for creating a product:
- Use the Manufacturer SKU column to group products of the same style together (like the Polo Shirts in the screenshot below)
- The Supplier SKU needs to be unique for each products
- If you have multiple barcodes for a single product enter the main barcode into the Supplier SKU field; you'll be able to enter additional barcodes once the product has been created in Retail Express

Outlet Worksheet
Outlet tabs will be displayed if you selected either of the following options when downloading the template:
- My products have different pricing amongst my Outlets
- I want to update Stock Levels
A separate tab will be created for each Outlet selected when downloading the template.

The Outlet tab has a slightly different layout to the Product Master. A lot of the fields are marked as "Reference Only", meaning when using the file in the Mass Download update method, you can use those fields to understand which product you're updating.
You do not need to enter information into the columns marked as Reference Only.
To enter Outlet-specific information:
- Enter the Supplier SKU (this will need to match a product on the Product Master tab)
- Enter information into the remaining columns not marked as Reference Only (all fields except Supplier SKU are optional)
- Save the file
The fields you can update are:
Field | Details |
Supplier SKU | Required - the barcode of the product (matching the product code on Product Master) - this instructs Retail Express which product to update |
MinQty | Minimum Quantity - used if tracking a minimum quantity for reordering/replenishing purposes |
Qty | Quantity - used if uploading the stock quantities into Retail Express |
Discount information | Discount Price, Start and End Dates |
Bin Location | The Bin Location, used if tracking the location of the product within an Outlet/Warehouse |
Includes Tax | Enter True or False to indicate whether the product is taxablel |
Once you have finished entering all of the information in the different worksheets, make sure to save the file in preparation for upload.
Upload the file
Uploading the file into Retail Express will create and update products immediately. Therefore we always recommend that if you have existing products in Retail Express that you take a backup via Mass Download so you have a point to restore to if required.
It's recommended to take a backup of your products via Mass Download before you upload a Mass Upload file.
Once products are created in Retail Express they cannot be deleted (you can overwrite the fields if required).

Tips for performing a Mass Upload:
- Each product within your Excel file must have a unique Supplier SKU - if the Supplier SKU already exists in Retail Express (either as a Supplier SKU or additional barcode) you will either be prevented from uploading the file, or the incorrect product will be updated.
- Many barcode scanners do not read a 'Space' character. If you are using a barcode scanner to read your Supplier SKU or Manufacturer SKU, you will need to ensure there are no spaces in these cells.
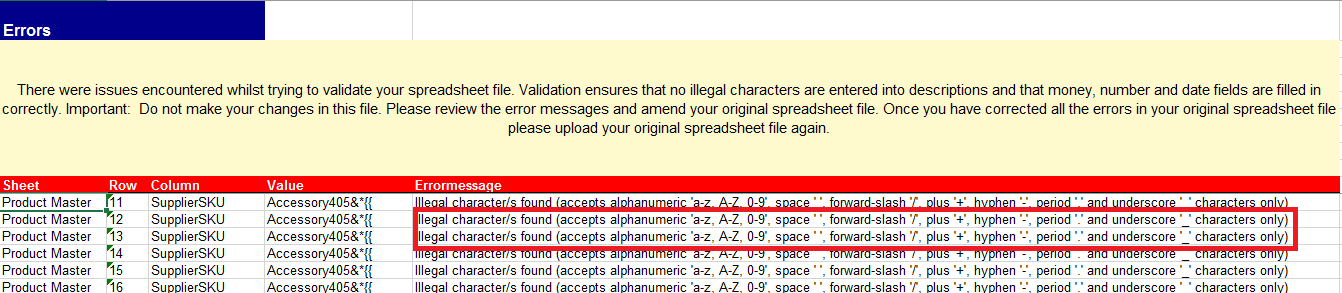
- Ensure your Mass Upload file has no 'illegal' characters (eg: &, *, {) within the spreadsheet. These symbols can cause errors during the upload, or the system to behave unexpectedly
To perform a Mass Upload:
- Navigate to Inventory > Mass Upload
- Click the Upload Excel tab at the top
-
- Click Browse for File
- Locate the file you saved in a previous step
- The option Update the supplier SKU using the Product ID is used when editing existing products; as we're creating new products leave this option unticked
- Tick Update Inventory if you have entered a Quantity for the products on the Outlet tab/s
- Click Upload
- A status bar will show the progress of your upload.
- The results will be displayed - either Success or an error (depending on the number of errors you will see them either on the screen or be prompted to download a file - see below for more information)
- If successful, you will see a message indicating how many products were created/updated, and how many Outlet-specific products were updated.
Upload Errors
An unsuccessful upload will display one of two types of errors:
- Actionable Errors
- Downloadable Errors
Actionable Errors
Actionable errors usually means there are only a few errors so you can take action straight away. The errors are displayed directly on-screen, often with an action that can be applied to fix the error e.g. Create a size

The above error example can be actioned by clicking the Action hyperlink "Create Size 'Largest'". The system will perform the required action, and the screen will refresh to remove the action you've just completed.
Once all errors are actioned, follow the steps to upload the Mass Upload file again.
Downloadable Errors
If there are a lot of errors, you will be prompted to download the entire list in an Error spreadsheet. To use the error spreadsheet:
- Follow the prompts to download the errors
- Review the error messages
- You will need to either amend your Mass Upload file, or make changes in Back Office e.g. create sizes, colours, or other missing data
- Save your updated file
- Follow the steps to reupload the Mass Upload template
Frequently Asked Questions
Quite often when uploading Mass Uploading files into Retail Express you may come across the error example:
Brand 'Colony' not found. Possible match 'Colony ' found in system error
This issue is generally caused by a trailing space either in-front of the word or after the word. In the above example you can see there is a trailing space at the end of the word Colony between the letter y and the single quote.
This is easily fixed by:
- Navigate to Settings > Attributes
- Select the relevant attribute i.e Brand in this situation
- Scroll down the list of the attributes until you find the appropriate one
- Click the Edit button
- Remove the unnecessary space
- Click the blue tick icon to update
- Re-upload the Mass upload file
Want more information? Find related articles here:
- Create a Product Manually