You can maintain transfer accuracy and resolve receiving discrepancies through the Transfer Variance Manager in Retail Express, which enables systematic handling of quantity differences between dispatched and received stock. This variance management capability helps retail operators address damaged goods, missing items, or counting errors, with proper variance resolution typically improving inventory accuracy and reducing unexplained stock discrepancies across Australian retail operations.
The Transfer Variance Manager in Retail Express provides retail operators with structured workflows for documenting and processing transfer variances, helping ensure accurate inventory reconciliation and supporting accountability throughout the transfer process. This variance tracking helps ensure your retail operations maintain reliable stock records while providing clear audit trails for transfer discrepancies and supporting effective resolution of inter-store inventory issues.
The Transfer Variance Manager allows you to manage and action variances within your internal stock transfers by recording a GRA value - Goods Received Anomalies. The process works in a similar way to the Purchase Order Exception Manager and how it allows you to manage Purchase Order variances. Variances can include:
- Damaged stock
- Lost stock or simply stock that was not sent, but was requested
Entering Variances
To enter your variances, you would need to complete the Transfer as per normal with the Receive Or Make Available in Back Office or Receive Available Stock in POS. The receiving stock will be made Available and the variances will be sent to the Variance Manager.
When receiving a transfer within either POS or Back Office, you can enter the quantity of items that did not arrive, then action them via the GRA.
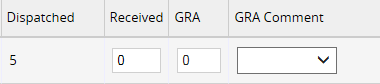
Processing a Variance via Back Office:
Use the GRA box:
Processing a Variance via POS:
Use the Receiving Variance box:
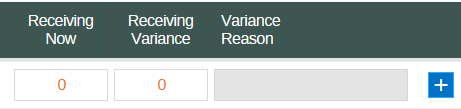
For example, if 10 of an item were requested but only 9 arrived, Received or Receiving Now would be 9 and GRA or Receiving Variance would be 1.
Variance Reasons and available Actions
Before you can complete the Transfer, you must enter a reason (GRA Comment for Back Office, Variance Reason for POS). The reason chosen will determine how you can handle these variances later through the Variance Manager, and unlock a variety of different actions. If the action is not available for the selected reason, the box will be greyed out.
Available Actions based on the Variance Reason
Did Not Arrive - Still Required
(DNA Req) | Did Not Arrive - Not Required
(DNA NR) | Faulty - Still Required
(FAU Req) |
Re-send | Return | Re-Pick |
Re-Pick | Write-Off | Re-Order |
Re-Order | Store Found | |
Store Found | | |
Stock added to the No Action Required column will be released from the Variance Manager, ready to be reprocessed by the store receiving the Transfer.
Inventory Movements
When selecting an action, the following changes will take place to the inventory within Retail Express.
Click the heading to expand the details.
Re-send | Reverses the re-send quantity for this item back to the picked stage so that it can be re-dispatched. |
Re-Pick | Reverses the transfer for that item back to the sending store, reducing the quantity on the transfer by the re-pick quantity. A stock adjustment will be created for the re-pick quantity at the sending store. A new In Progress transfer will be created for this item at the stage of 'Picked'. If multiple products exist on the Transfer. If this is the only product, the original Transfer will be changed back to Incomplete. |
Re-Order | Reverses the transfer for that item back to the sending store, reducing the quantity on the transfer by the re-order quantity. A stock adjustment will be created for the re-order quantity at the sending store. A new In Progress transfer will be created for this item at the stage of 'Allocated'. If this is the only product on the original Transfer, it will be changed back to Incomplete. |
Store Found | Makes the item available at the receiving store. |
Return | Reverses the transfer for that item back to the sending store, reducing the quantity on the transfer by the return quantity. The rest can be received. If no other items the transfer will be closed. |
Write-Off | Reverses the transfer for that item back to the sending store, reducing the quantity on the transfer by the write-off quantity. A stock adjustment will be created for the write-off quantity at the sending store. |
Store Found | Makes the item available at the receiving store |
Re-Pick | A new In Progress transfer will be created for this item at the stage of 'Picked'. If the faulty stock needs to be written-off this should be done manually. |
Re-Order | A new In Progress transfer will be created for this item at the stage of 'Allocated'. If the faulty stock needs to be written-off this should be done manually. |
Issue | Creates a new transfer from the sending store, to the receiving store, for the over receipt quantity. This transfer will be fully received and made available. |
Using the Variance Manager
To use the Variance Manager:
- Navigate to to Inventory > Transfer Management > Variance Manager
- Enter a specific Transfer Number or click Search to show all variances
- The Variance quantity will be displayed in the GRA column
- Enter the value to be actioned in the appropriate white box
Reminder: The actions, and resulting inventor movements, are based on the Reason chosen earlier
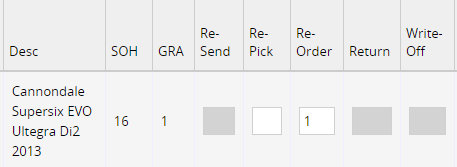
- Click Save Changes
Related Articles:
- How to create Transfer via the Upload Method
- POS - Create a Transfer
- For advanced information about inventory movements on Transfers: Reports - Track inventory using the Inventory Movement Log