Creating Purchase Orders in Retail Express enables greater inventory control, by being able to see your stock on order with your suppliers and expected delivery dates. This can aid in planning sales or expected time frames for delivery to your customers.
Retail Express has several different methods for creating Purchase Orders, including:
- Create a single Purchase Order - typically referred to as "Creating a Manual Purchase Order" (explained in detail within this article)
- Creating multiple Purchase Orders using the PO Upload feature (click here for more information)
- Automatically create Purchase Orders using the Stock Replenishment feature for restocking to minimum stock levels, to replace existing sales or by an advanced calculation to suggest re-order quantities (you can even schedule orders to be created automatically on a recurring basis)
Create a Purchase Order
To create a Purchase Order manually:
You can set Suppliers as Enabled/Disabled in Settings > Suppliers. All Suppliers are Active/enabled by default. Users can disable suppliers in the back office, providing better control over supplier visibility and preventing the creation of purchase orders from inactive suppliers ensuring accuracy in supplier management.
- Navigate to Inventory > PO Management > Create PO
- Select Create a PO Manually
- Click New PO
- Select the Outlet and Supplier from the dropdown boxes
You can also create a PO from the PO Manager by clicking Create New PO.
- Enter the Supplier Invoice No
This field is optional, but if using an Accounting Integration with Retail Express the Supplier Invoice Number will synchronise to your accounting package
- Click Create
- The PO Items tab will load
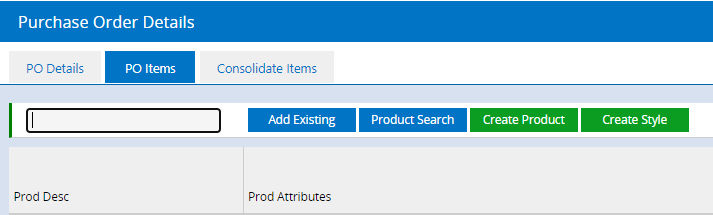
- To add a product to the Purchase Order you can do either of the following:
- Click Product Search to perform an advanced search for your required product
- Click the blank field and either scan or manually type your product code
You can enter a Supplier SKU, Manufacturer SKU or Product ID
- Once the product has been selected the Add Item to PO window will be displayed
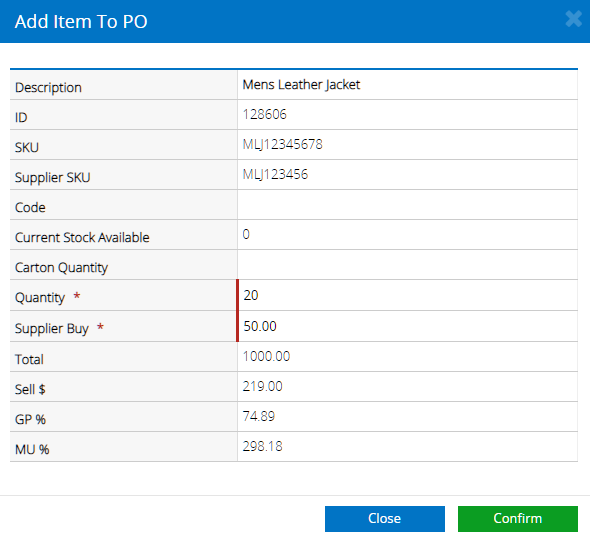
- Enter a Quantity (the number of units to be ordered)
- Enter the Supplier Buy if the buy price for the product has been changed
The Supplier Buy price is the product price in the Supplier's currency - for more information refer to the article "What is the difference between Supplier Buy and Buy Price Ex")
- Click Confirm to add the product to the Order
- Repeat the steps for additional products to be ordered
- Click the PO Details tab to edit the details of the order

- Select a Purchase Order Template
If you are ordering multiple products of a matching style (but with varying colours and sizes), or if ordering Packages, it's recommended to use the Matrix template
- Enter the remaining information as required e.g. an ETA date for the expected arrival date of the stock
- Click Save Changes
Your Purchase Order will be allocated a reference number ("PO ID") at this point
- Click the Consolidate Items tab to add items from outstanding Incomplete Purchase Orders for the same supplier
- A list of products will be displayed; tick the check box at the end of the column to select the items
Click the tick box in the header row to select all products
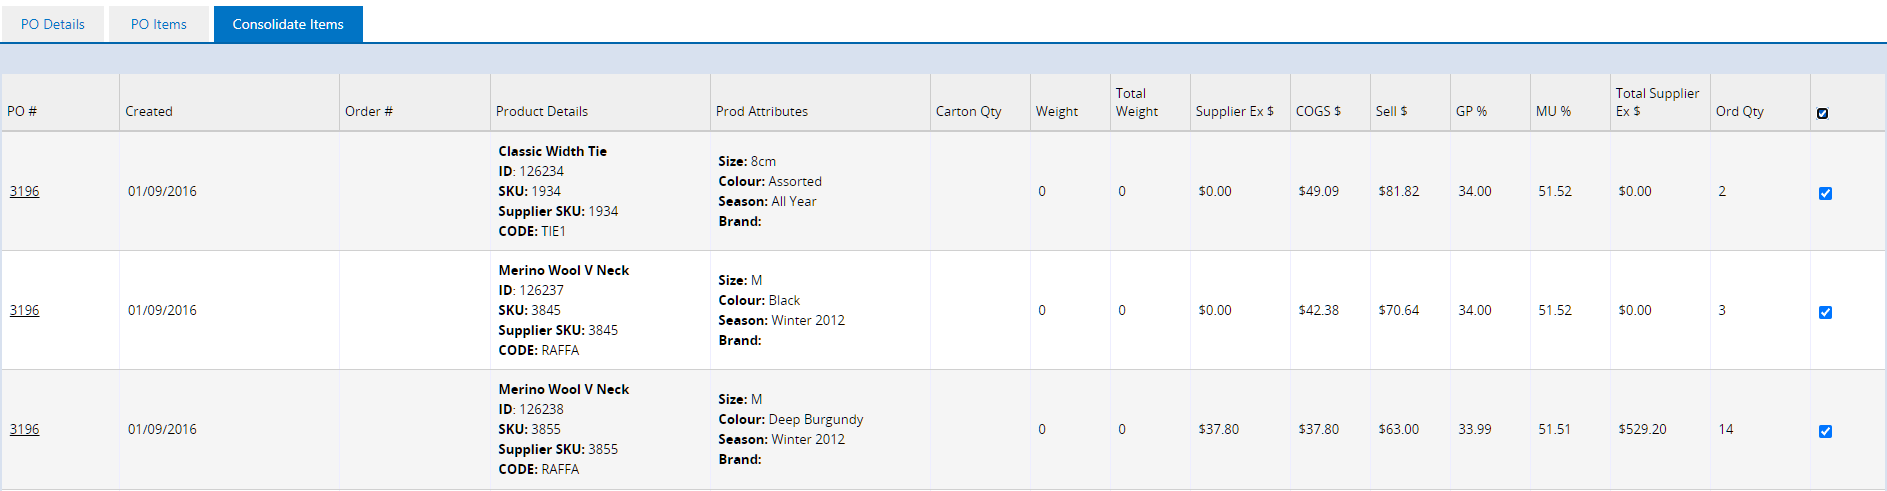
- Click Move to current PO
- To save the Purchase Order without ordering the stock click Update
- To place the stock on order click Place On-Order
When the stock is placed On-Order the inventory levels will be updated to reflect that an order has been made for these products. Purchase Orders cannot be received without the order first being marked as On-Order.
- To receive the stock immediately, click Quick Receive
For instructions on using this feature please refer to the Quick Receive article. To use the Full Stock Receipt feature you will need to first place the PO "On-Order" and then receive it after
- Click Email/Preview PO to email the Purchase Order to your Supplier

- Click Print to print a physical copy of the Purchase Order
Purchase Order Detail Fields

Field | Details |
PO ID | The unique Purchase Order number auto-generated by Retail Express |
PO Status | The status field may show any of the following: - Available - the stock has been received and Made Available for sale
- Back-Order - during receipt of PO the setting "Automatically put discrepancies onto backorder" was selected for products not supplied
- Cancelled - PO is cancelled
- Incomplete - PO has not yet been marked as on-order
- On-Order - PO is flagged as on-order with the supplier
- Received - PO has been received but not yet had stock made available for sale
- Receiving in Progress - the stock receipt process has been started and saved
- Legacy fields (no longer used) - Ready to be Sent, Saved, Sent, WIP
|
Outlet | The location the PO has been raised for (this could be a Store or Warehouse) |
Sailed Date | The date the shipment left the country (international orders) or business. Can also be used for other dates |
Supplier | The Supplier being ordered from. Learn more about Suppliers |
Deposit Due Date | Enter the date by which the Deposit value must be paid |
Supplier Invoice No | Invoice Number. This may be provided Prior to shipment of PO or entered at the time of stock receipt. If using an Accounting Integration with Retail Express this number will be sent to the Accounting system. |
Balance Due Date | The date by which the remainder of the PO value must be paid |
Supplier Comments | Default comments for the Supplier as configured via Settings > Supplier |
Purchase Order Template | Used to select between the standard default template and the PO Matrix template with Packages Exploded (i.e. a variation that has more detail on products grouped together by Manufacturer SKU or in a Package - products in a package are listed individually within the Package section). |
Update Transfers on PO Receipt | The status a Transfer should be created with when automatically created by receiving a PO. For Purchase Orders created through Stock Replenishment, when consolidating orders (stock for multiple Outlets ordered together then Transferred to the Outlets) you can automatically select a Transfer Stage for Transfers created automatically when the stock is received. |
Customer Invoice No | Non-editable field. This field is auto-populated with the Order Number from POS that created the PO as a result of the "Auto Generate PO" settings configured in the Global Settings > Outlet section. |
Customer Invoice Reference | Non-editable field. This field is auto-populated with customer details and comments related to the sale referenced in the 'Customer Invoice No' |
Original Time of Departure | The date on which the Products were shipped by Supplier. This field can be configured per supplier to display on the Purchase Order. |
Container Number | The shipping container number for the PO, or other tracking numbers |
Deliver To | The Outlet details as configured in Settings > Locations/Outlets > Outlets |
Shipping Status | The current status of an order after shipment has occurred |
Shipment Type | Shipping container type. Learn more about Shipment Types |
Invoice Docs | Supplier Invoice Documents provided with the shipment |
Packing List Docs | Packing List documents provided with the shipment |
Internal Comments | A free text field used to enter your own comments about this PO for reference |
Packing Dec Docs | Packing Declaration Documents provided with the Shipment |
Fumes Docs | Fumigation documents provided with the shipment |
COO Docs | Certificate of Origin documents, generally an integral part of international export documents |
B/L Docs | Bill of Loading documents issued by a carrier, (or its agent) to the shipper as a contract of carriage of goods |
Deposit | The amount (in your local currency) of the deposit paid for the PO |
Shipping Terms | Auto-populated from the Supplier details configured via Settings > Suppliers |
FOB Currency | The currency in which items are invoiced out as |
Payment Terms | Auto-populated from the Supplier details configured via Settings > Suppliers |
ETA Date | ETA as provided by the Supplier or Courier. This date is viewable in various areas, most importantly in the POS within Advanced Product Search. |
Shipping Port | Auto-populated from the Supplier details configured via Settings > Suppliers |
External Order ID | If the PO was generated through an external ordering system using the Inventory Management API, you can include an External Order Reference so you can identify the order in the other system. |
Country of Origin | Auto-populated from the Supplier details configured via Settings > Suppliers |
Purchase Order Templates
When sending the Purchase Order there are two templates available to use. Each one serves a different purpose depending on your product configuration and the needs of your suppliers.
To set a default template for a supplier navigate to Settings > Suppliers. For more information refer to the Settings - Suppliers article.
Click on the headings below to see detailed information on each template (including a sample Purchase Order).
After changing the template on the Purchase Order ensure you click Save Changes to use the newly selected Template.
Default PO Template
Each product is listed individually, with no grouping.
PO Matrix with Packages Exploded Template
Products are grouped together on the order depending on whether they are part of either of the following:
- A "Style" i.e. two or more products sharing the same ManufacturerSKU
- A package - a product containing one or more components (other products within the system)
Default Template
The Default Template has a very simple layout - each product has its own line. The downside is that when ordering styles or packages, the Purchase Order can be much larger and longer to view, compared with the Matrix Template.
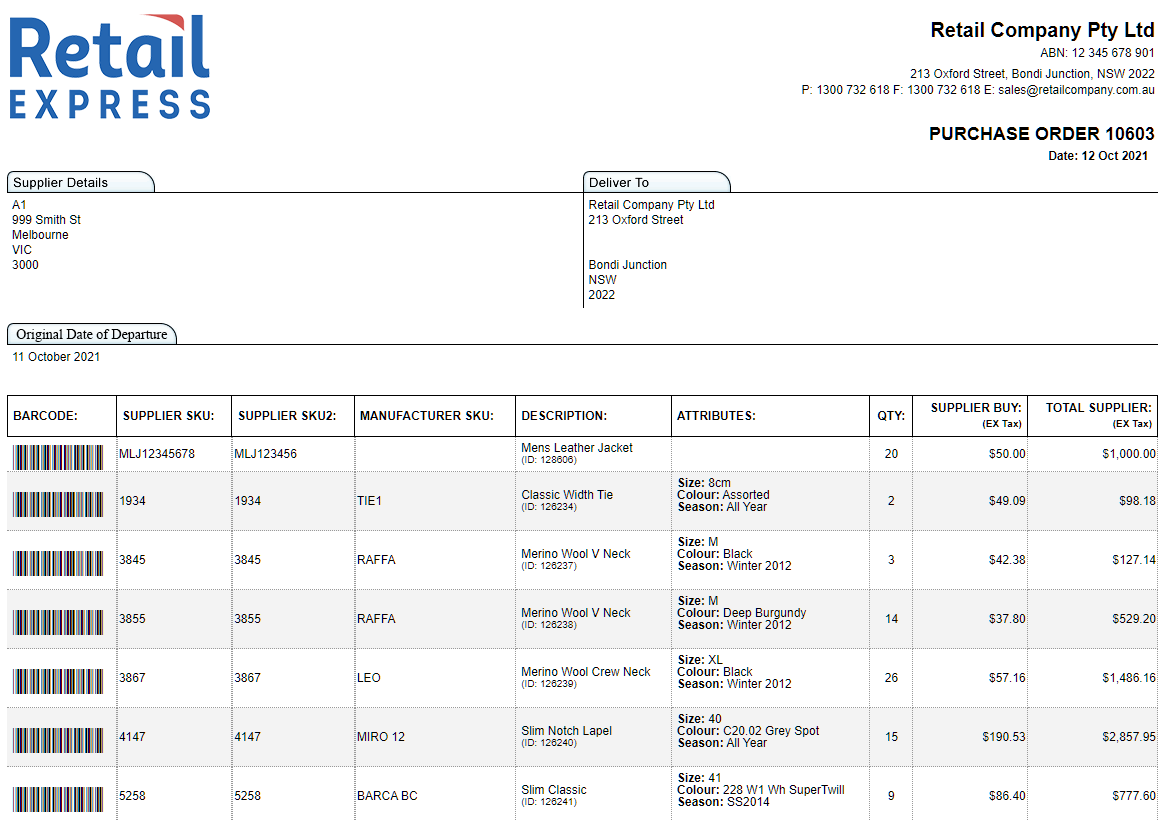
The information displayed is as follows:
- Barcode
- Supplier SKU/Supplier SKU2 (this can be toggled on/off per supplier)
- Manufacturer SKU
- Description (including Product ID)
- Attributes (Size, Colour, Brand)
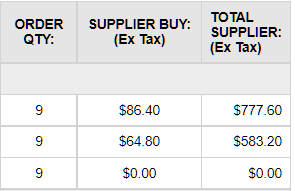
- Qty - the unit being ordered
- Supplier Buy (Ex Tax) - average supplier buy price for the product
- Total Supplier (Ex Tax) - the total from the Supplier Buy multiplied by the qty
Matrix Template with Packages Exploded
The Matrix Template groups products together based on whether they're:
- Grouped together using the same ManufacturerSKU
- A package (or a product within a package)
If the product fits neither of these scenarios it will still be displayed on the Purchase Order, but after all style products/packages.
The benefit of the Matrix Template is that it includes a lot more information in a much more compact space, much easier for a Supplier to easily see the products to be ordered.
The information displayed on the order is covered in more detail below
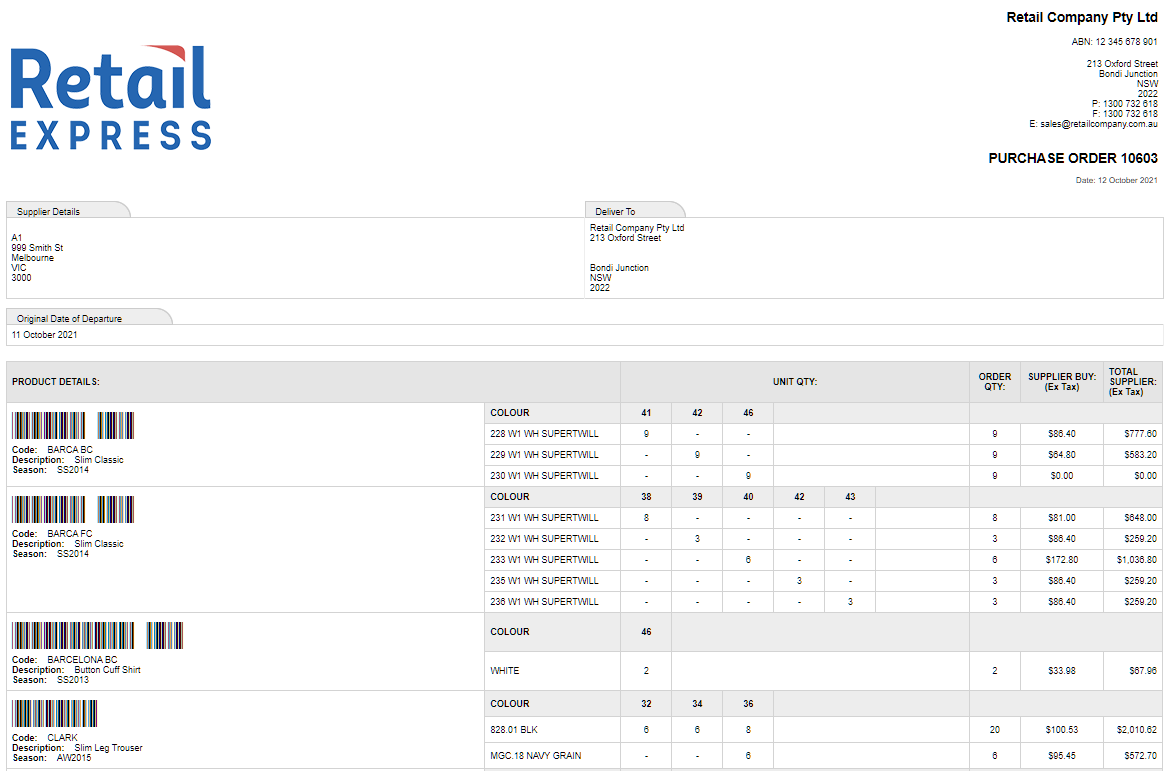
The details on the PO are as follows:
Product Details
Section | Details |
SKU Column
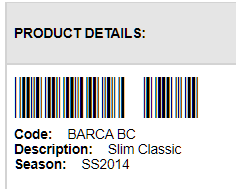
| Fields: - Barcode
- Manufacturer SKU
- Short Description
- Brand
* Displays the details as per the product with the lowest Product ID in the group |
Package
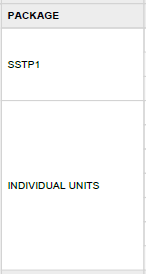
| If you have a Package on the order (not pictured above) the Package column will show the following information: - Package Supplier SKU - If there are products that form part of the package the Package's Supplier SKU will be displayed in the column e.g. SSTP1
- Individual Units - Products not part of a package (even if grouped in a style using the Manufacturer SKU)
|
Attributes
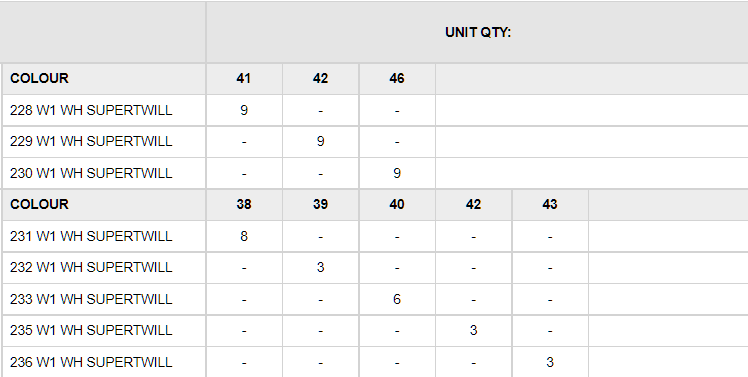
| Displays sizes and colours in a matrix grid where products are grouped using the Manufacturer SKU (even if part of a Package). - Colours - row per colour (sorted alphanumerically)
- Sizes - column per size (sorted by List Order then alphanumerically)
|
Unit Quantities
Section | Details |
Matrix

| - Displays a matrix grid for products with size/colour combinations (attributes may vary between styles e.g. one product may show S, M, L while another product may have 10, 12, 14)
- Quantity - the grid displays the quantity in each cell for each product matching the size/colour combinations
- PK Qty - The Package Quantity i.e. total quantity of size/colour within the package e.g. the package 4 products, 10 units of each product, for a total PK Qty of 40. If this column shows a "-" the product/row is not part of a package. The PK Qty is displayed in two areas - under the colours (to provide a total for each colour) and after the sizes (to provide a total for each size).
- Units - The total number of Units to be ordered based on the PK Qty and the Order Quantity for the Package e.g. an order is placed for a Package with a PK Qty of 40, the Units value would be 400.
|
Totals
Section | Details |
Order Qty | The Order Quantity - Packages: The total number of packages ordered (not the individual units)
- Individual units: The total number of products ordered per colour
|
Supplier Buy (ex Tax) | The Supplier Buy Price - Packages: Supplier buy price for the package
- Individual units: Average supplier buy for all units of that colour
|
Total Supplier (ex Tax) | The total value for the supplier: - Packages: Order Qty x Supplier Buy e.g. 10 packages ordered at $50 each, $500 total
- Individual Units: Supplier Buy x Unit Quantity e.g. 200 black shirts ordered at $25 each, a total of $5000
|
Frequently Asked Questions
Specific Suppliers don't show when creating an Order
If your Suppliers don't show in the list when trying to create a Purchase Order it's likely that they have been configured to be "Admin Only". Users need to be specifically configured to enable access to "Admin Only" Suppliers.
To resolve the issue, you can do either of the following:
- Remove the Admin Only setting for the
- Enable the user for access to Admin Only Suppliers
Barcode doesn't appear when printing a PO
If the barcode is not displaying when printing a Purchase Order, the required font will not be installed on the computer. You will need to install the Retail Express drivers and font to resolve the issue.