You can connect Retail Express to MYOB Cloud accounting for Australian retail businesses, enabling automated financial data synchronization supporting BAS preparation, profit and loss reporting, and compliance requirements. This helps optimize your retail accounting by eliminating manual data entry between systems, improving financial accuracy, and ensuring your accounting records stay current with retail operations.
Setting up MYOB Cloud integration involves establishing API connectivity between Retail Express and your MYOB account, configuring chart of accounts mappings, and setting synchronization preferences. When you implement MYOB Cloud integration successfully, you can expect streamlined daily accounting through automated transaction posting, improved accuracy from eliminating manual entry errors, time savings for accounting staff, better financial visibility through timely updates, and maintained compliance with Australian tax and reporting requirements.
Retail Express integrates with MYOB AccountRight 2019 edition, each morning synchronising data to create invoices, journals and more.
This article refers to the cloud integration method where the Company File has been stored online - click here for information on the Manual Data Export option.
Follow the steps below to set up the integration.
Step 1 - Prepare the MYOB AccountRight Data file
Due to a limitation with the MYOB AccountRight API, you will need to update a setting in MYOB to ensure that your accounting data reconciles, and the accounting movements relating to refunds appears in the correct GL account.
- Open MYOB AccountRight
- Navigate to Setup > Linked Accounts > Sales Accounts
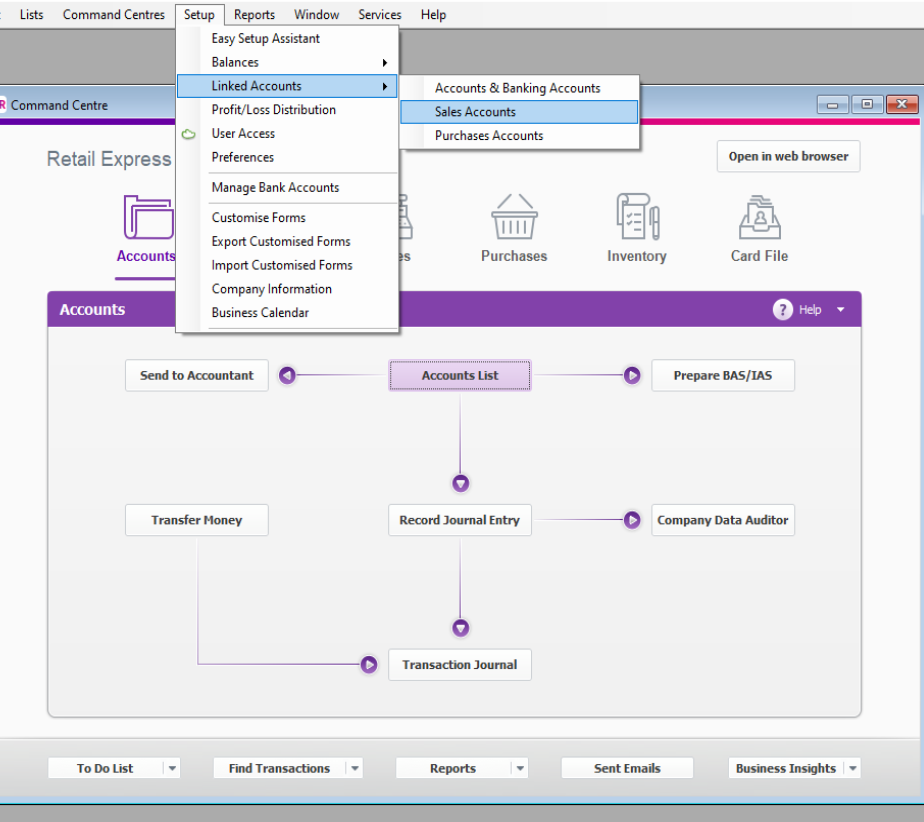
- Locate the setting I track deposits collected from Customers
- Select your linked Trade Debtors Account

- Click OK
Step 2 - Connect Retail Express to MYOB
To set up a new integration:
Ensure you have a MYOB account with an organisation setup. For assistance visit MYOB or contact your Accountant or Bookkeeper.
- Navigate to: Retail Express Back Office >Settings > Integrations > MYOB
- If this is your first integration, you will be directed to connect to MYOB immediately

- Click Connect to MYOB
- Select MYOB Data file
- You will be re-directed to the Retail Express setup page to complete the configuration.
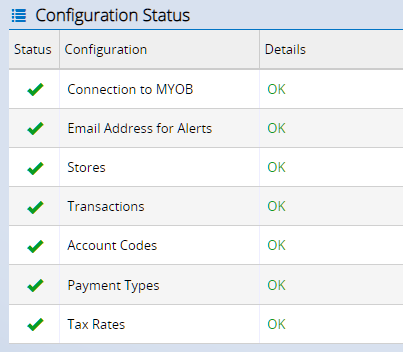
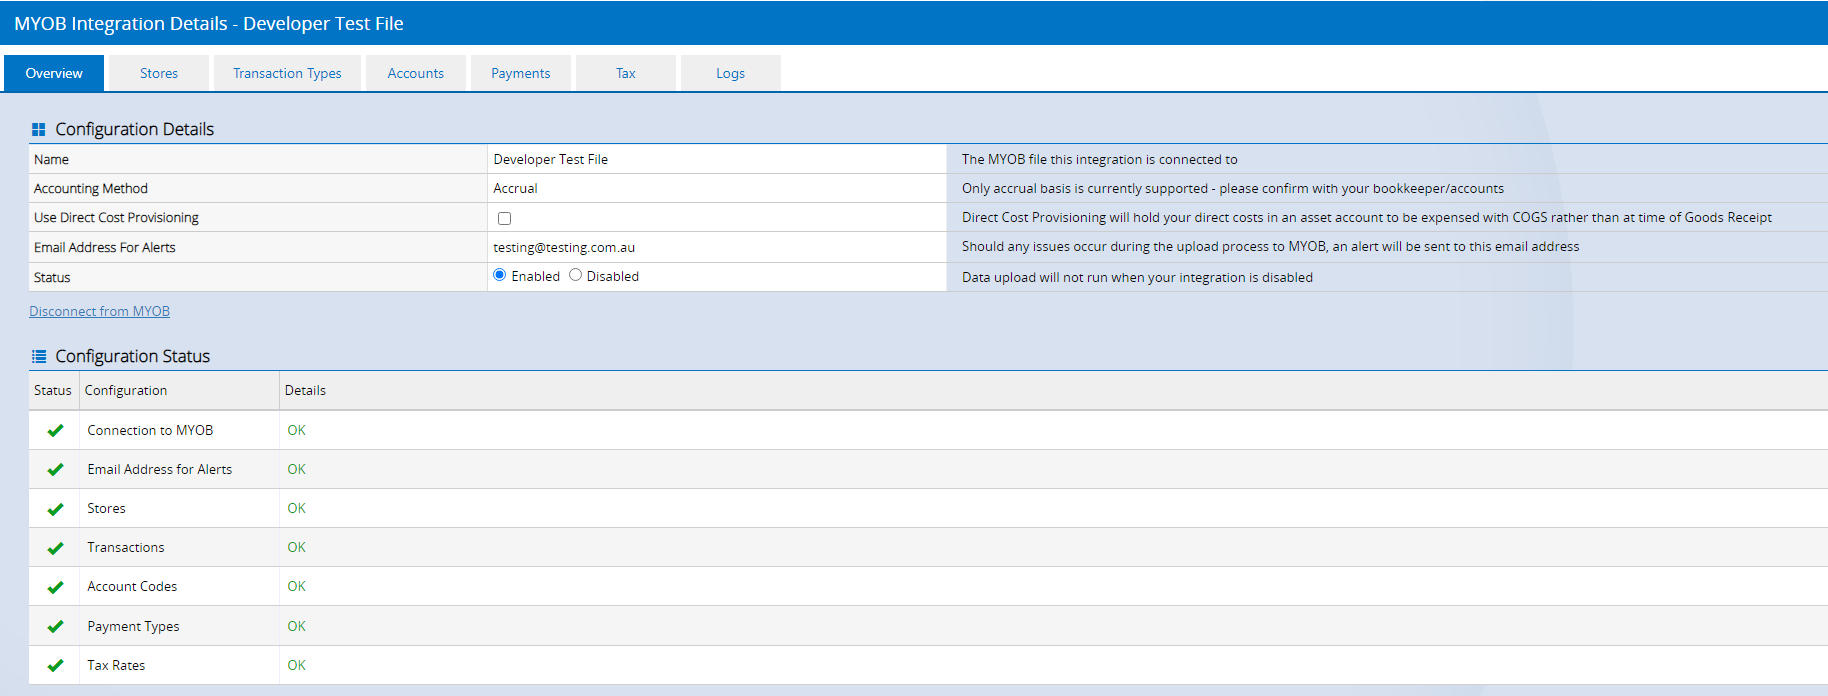
Step 3 - Configure the Integration Overview tab
The Overview tab contains two sections:
- Configuration Details
- Configuration Status - used for an indicator of any configuration issues, as each tab is populated the status will update to green OK.
Complete the fields as per below:
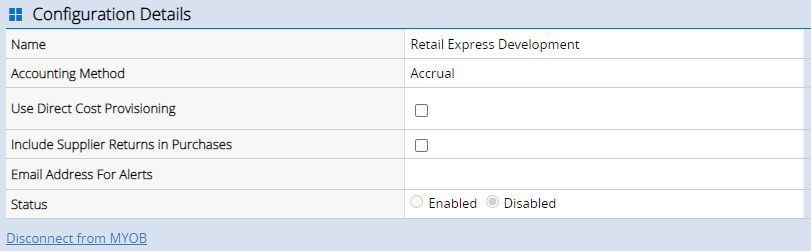

Field | Details |
Name | Your integration will be given the same name as your MYOB organisation to assist in identifying where your data will be uploaded |
Accounting Method | Only the Accrual method is supported - please confirm this suitability with your bookkeeper or accountant |
Use Direct Cost Provisioning | By default, Direct Costs (including duty, freight and any miscellaneous charges) are expensed on receipt, therefore all other cost transactions only relate to the Buy Price. If you choose to use Direct Cost Provisioning these direct costs will be provisioned for in an Asset account and then expensed along with the Buy Price as the Cost of Goods Sold. |
Include Supplier Returns in Purchases | Supplier Returns will send data to your accounting system when the Credit Note is processed (not when creating a Supplier Return). |
Email address for Alerts | The email address to be notified if there are any issues with uploading data. Once you've entered your email address the Configuration Status of Email Address for Alerts will update to green. |
Status | Indicates whether the integration is active or not. |
Step 4 - Stores
The Stores tab allows you to configure which Outlets in Retail Express you would like to upload to MYOB.
Each Store can only be uploaded in a single integration (you cannot create separate integrations to the same MYOB Company to use different account codes per store).
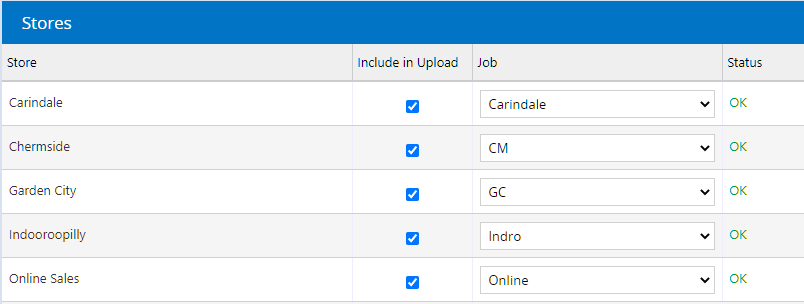
You can configure one MYOB integration per MYOB Company:
- Multiple Stores, One MYOB - If you have multiple stores that are all managed in one MYOB Company, you will need to create one MYOB Integration and select all of those stores in the Stores tab
- Multiple Stores, Multiple MYOB - If you have multiple stores that are each managed in a separate MYOB Company, you will need to configure one MYOB Integration per MYOB Company and choose the correct store for the company in the Stores tab
Fields to be configured:
Field | Details |
Store | The Outlet in Retail Express |
Include in Upload | Used to select any Stores to be integrated |
Job | Used to filter reports We recommend setting up a Job per store (optional) |
Jobs need to be created in MYOB before they're available via the drop-down. To add additional Jobs in MYOB:
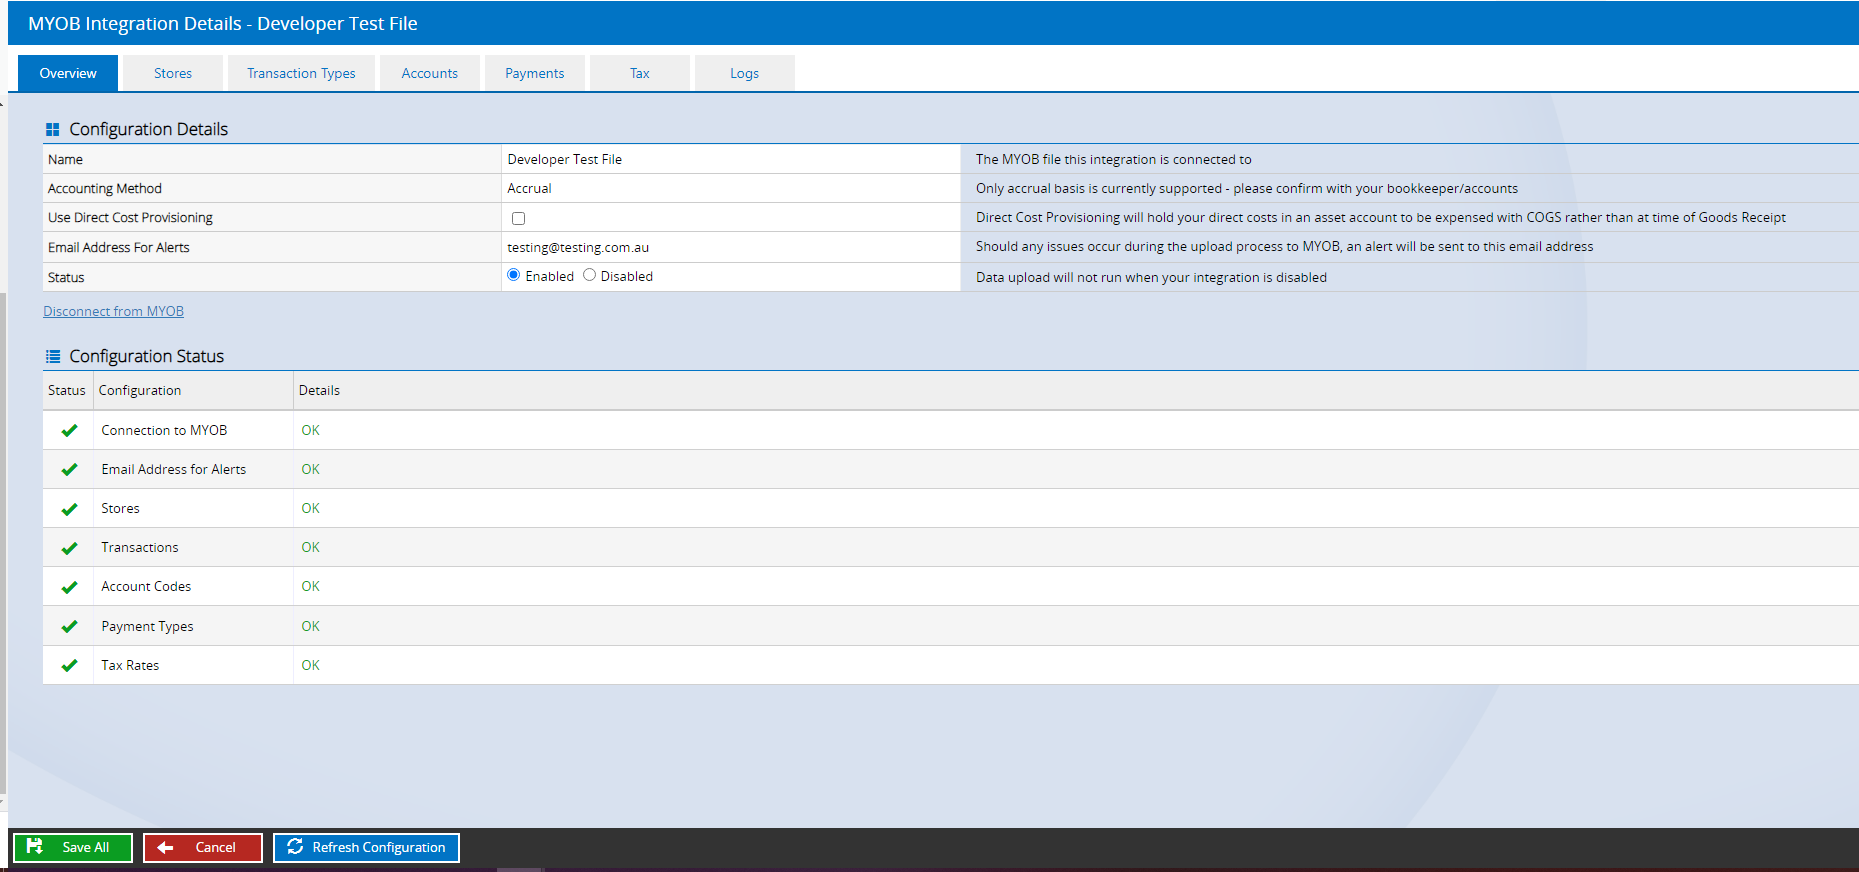
- Click Save All
- Open MYOB to set up up your Jobs
- When complete return to this screen and click Refresh Configuration to allow selection of appropriate Job
For more information about Jobs in MYOB refer to the MYOB Help Center.
Step 5 - Transaction Types
The Transaction Types allows you to select which Transactions will be uploaded to Xero.
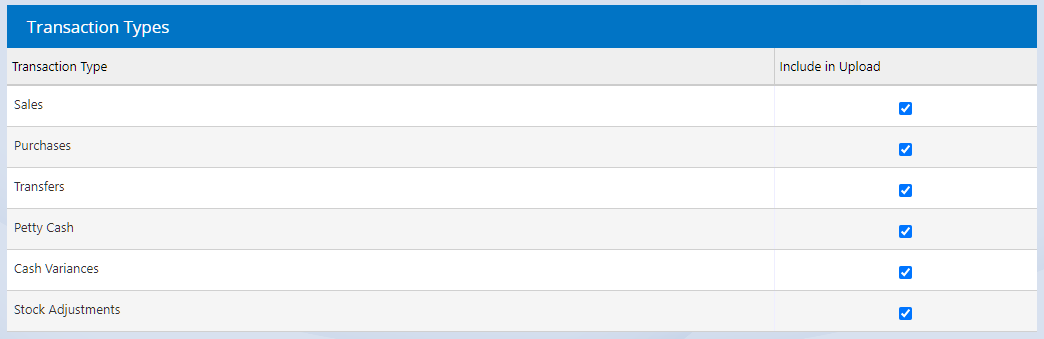
To exclude a transaction untick the box in the Include in Upload column.
Step 6 - Account mappings
The Accounts tab allows you to choose which General Ledger Accounts are used for different transaction types. These will initially be pre-populated with default accounts.
Creating new accounts specifically for your integration keeps your Retail Express data separate from other data in MYOB, making reconciliation easier.
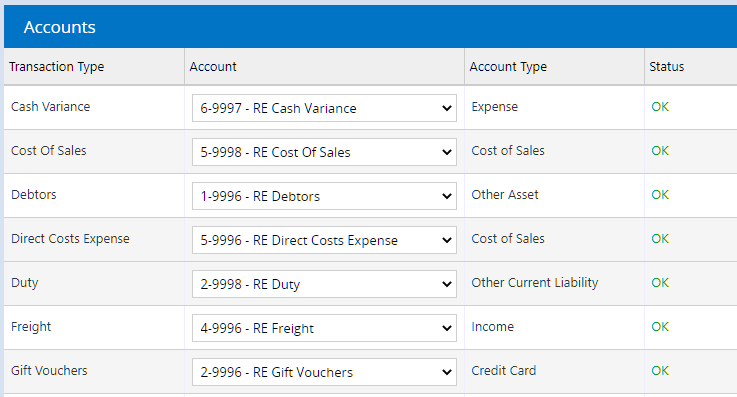
If you would like to create and use a pre-populated default Account, click Create This Account or click Create All Accounts to create them in bulk.
The Accounts may take a moment to create. If you see a processing icon, please wait until this has disappeared and the status changes to OK to ensure the account creates successfully in MYOB.

If you are using existing accounts in your MYOB organisation, these will be filtered by the Account Type required for the type of transaction and are the only account type valid for selection.
For more information:
- Chart of Accounts in MYOB - MYOB Help - Set up accounts
- Which transactions flow to which accounts - refer to the "Which transactions flow to each of my accounts" section in the Retail Express - Integrated Data article
Step 7 - Payment mappings
The Payments tab lets you configure which bank type accounts your Payments should integrate to.
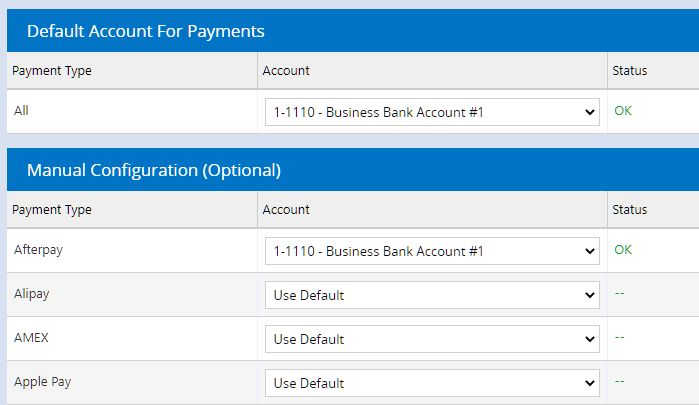
Field | Details |
Default Account for Payments | If you already created the default Payment Clearing account via the Accounts tab, the status will display as OK. You can select an Existing Bank Account or Clearing Account in MYOB if preferred. If using an existing Clearing Account it must be a "Bank" type account in MYOB |
Manual Configuration (Optional) | Select any specific Payment Types which should upload to an alternate account, including existing Bank Accounts and Clearing Accounts. |
Gift Voucher redemption will upload to your Gift Voucher account as set up on the Accounts tab.Direct Deposits will be uploaded as individual payments by default. Your other payment methods will be uploaded as a total value per payment method, per store, per day by default.To allow individual transactions to upload other payment methods please refer to Configuring Payment Types
Step 8 - Tax Rate mappings
The Tax tab allows you to configure which tax rate to use for each transaction.
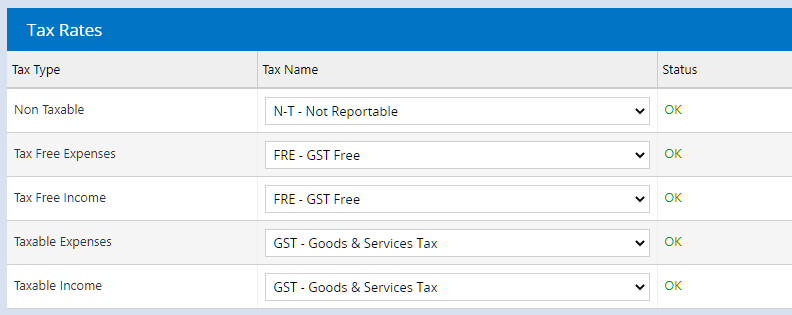
MYOB will already have recommended tax rates based on the type of transaction.
For more information on Tax Rates in MYOB, please see:MYOB Help - Setting up tax codes (Australia)
Step 9 - Enable the Integration
Once you've completed your configuration, return to the Overview tab to ensure the Configuration Status is green and OK for all settings.
You can now enable the integration.
If you're not ready to begin uploading data yet, leave the configuration disabled.
To enable the configuration:
- Click on the Overview tab
- In the Configuration Details section set the Status field to Enabled
- Click Save All
- This will prompt you to select the First Date for data to upload to MYOB (the selected date to begin your upload)

This date can be back-dated by 3 months from the start of the current month e.g. if you are setting up a new integration on the 5th of September you can backdate it to the 1st of June
- Click Continue to confirm the upload date and confirm the setup
- Your data will begin to upload to MYOB up to the current date within 30 minutes or so.