You can execute promotional pricing strategies efficiently through storewide discounts in Retail Express, which enable applying percentage-based price reductions across all outlets simultaneously for coordinated sales events. This promotional capability helps retail operators implement unified pricing strategies and drive sales across their retail network, with effective storewide discounts typically improving promotional consistency and customer engagement across Australian retail operations.
Storewide discount functionality in Retail Express enables retail operators to quickly activate promotional pricing across all locations, helping ensure consistent customer pricing and supporting coordinated marketing campaigns. This promotional pricing capability helps ensure your retail operations can respond quickly to competitive pressures, clear seasonal inventory, and execute unified promotional strategies supporting improved sales performance across your multi-store network.
This article details how to apply a storewide discount across all of your Stores / Outlets using the Mass Download / Mass Upload process.
Considerations when using this process:
- this process is only suitable if all of your Outlets use the Product Master pricing. products do NOT have Outlet specific pricing. For more detail on , please see:
- this process will apply a discount to all products downloaded - the selected discount will apply to any products not already discounted, AND it will also apply a further discount any already discounted pricing.
- ensure to delete any Outlet/Store specific worksheets prior to Upload to avoid inventory quantities being overwritten
Step 1 - Perform a Mass Download
Perform a Mass Download for all product types, (or alternately just the product types you want to apply discount to). For assistance with Mass Download, please see:Edit Products via Mass Download
Step 2 - Edit the Mass Download file
2.1 - Open the Excel file
Open the Excel File generated by the Mass Download > click Enable Editing > ensure you are in the Product Master worksheet.

2.2 - Delete unrequired worksheets
Delete all other worksheets. The worksheets named as your Outlets / Stores contain live stock quantities which will potentially be overwritten if you do not delete them at this point.
Important - DELETE ALL WORKSHEETS EXCEPT FOR Product Master BEFORE CONTINUING
2.3 - Copy existing discount prices
Prior to applying the formula supplied below, copy all the prices for the products that already have a value in the DiscountPrice column. Paste these prices into either the WebPrice or RRP column - whichever is not currently being used.
2.4 - Apply the discount formula
Navigate to the DiscountPrice (column R) > in the first cell (R11) enter the below formula > press Enter.
Discount Formula = P11*0.#insert discount here#
Where ## is the fraction of the current price to be applied.
Example: for a discount of 30%, the calculation used would be '100% - 30% = 70%'. In this case the ## would be 0.70. Using the above formula, this will reduce the POS Price by 30% and input that new value into the cell.

The first DiscountPrice cell is now populated with the correct discounted figure.
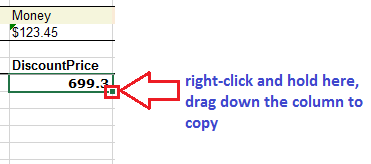
Drag the formula down the entire DiscountPrice column for all Products. To do this: left-click and hold the bottom right-hand corner of the cell, drag down to the bottom of your product list and let go of the button once you are there
2.5 - Update products that already had a discount price
Enable Sorting and Filtering (per red arrow below)
Navigate to the column into which you previously pasted existing discount pricing - either WebPrice or RRP column. Click the Sort box (per purple arrow below), untick to NOT display Blanks (per green arrow).
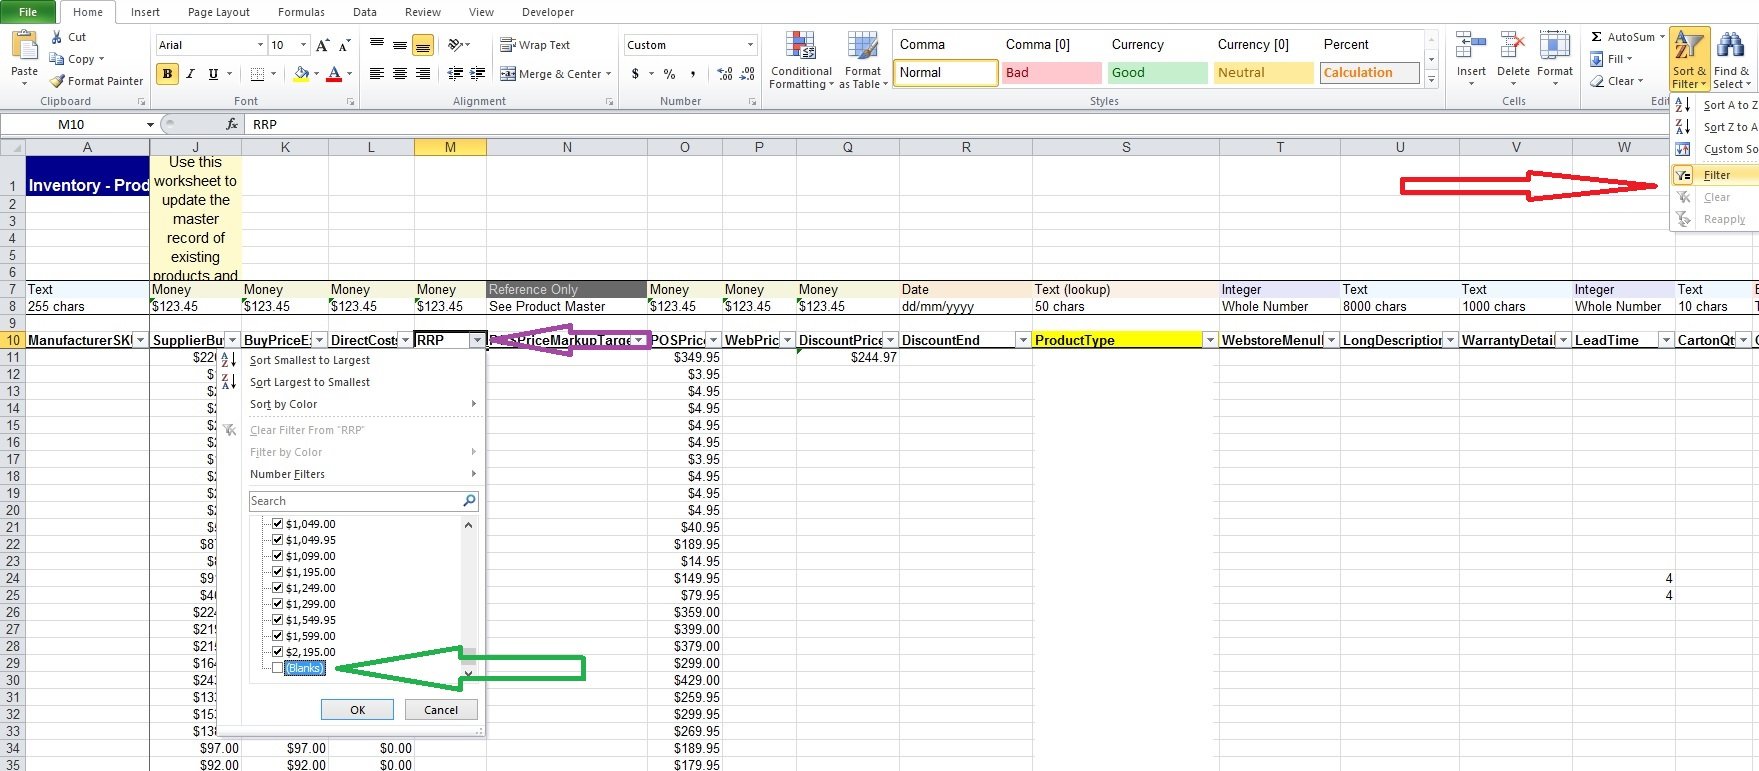
Your display will now only include products that had discounts prior to this Mass Download.
Now enter a formula in the DiscountPrice column to say =### * 0.70 (Were ### is the first Cell of the Column where you pasted the original discount pricing)
Again, right-click and copy this down for all products listed.
2.6 - Enter a Discount End date
Navigate to column DiscountEnd (cell S11) > enter the required end date in the format of dd/mm/yyyy.
The discount date is inclusive. Only once the current date has moved past the Discount Date will discount pricing end.
Discount pricing is applied automatically and immediately at the time of performing the Mass Upload into Retail Express so no start date is required.
Step 3 - Save the Perform a Mass Upload
Save this file and perform a Mass upload. For assistance with Mass Upload, please see:Edit Products via Mass Download / Upload
Once the Mass Upload is complete, your pricing has been applied and is live.