You can customize invoices, receipts, purchase orders, and other printed documents by uploading your company logo to Retail Express, creating professional-branded documentation for customer transactions and supplier communications. Properly configured logo display helps reinforce your retail brand identity on all customer-facing and business documents, improving professional presentation and brand recognition.
Setting up your company logo correctly ensures consistent branding across all printed materials generated from your retail operations, from customer receipts to supplier purchase orders.
The Logo Upload function is used to maintain the logo that appears at the top of Receipts, Tax Invoices, Quotes and Purchase Orders. Logos can be global for all Outlets, or configured for specific Outlets and Warehouses only.
Logo Requirements:
File Format | .gif |
Image size | No larger than 200 x 200 pixels |
Uploading a new logo
Follow the instructions below to upload a logo to your Retail Express system.
You may wish to use different Receipt and Invoice logos. For example, a black and white (or plain text) logo may be used for POS receipts, with a coloured/more detailed logo for invoices. You will be able to select individual logos during the upload process.
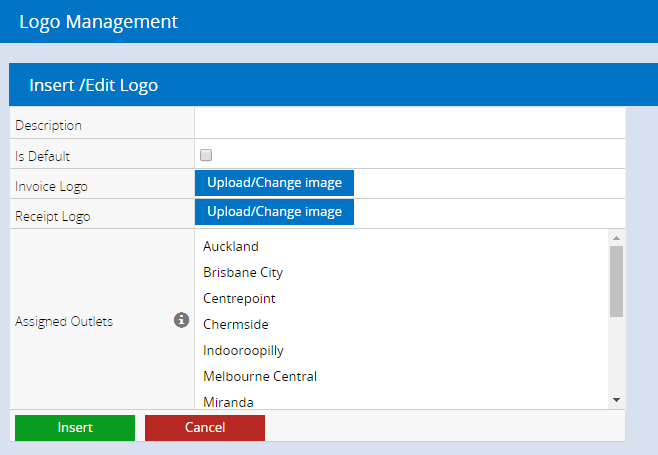
- Navigate to Settings > Logo Upload.
- Click Upload/Change Image on the form logo to be modified
- Browse to the file location and click Open
- Click either the Upload as Invoice Logo or Upload as Receipt Logo option depending on your preference
- An Upload Successful message will be displayed
- Click Close
- If you have uploaded an Invoice Logo and wish to use the same one for the receipts, click Copy Invoice Logo
- Complete the remaining fields as per below
- Click Insert
If the new logo isn't displayed you may need to clear your browser cache
Field | Definition |
Description | An internal description for the logo e.g. Outlet logo |
Is Default | Tick to set the logo as the default logo where no other logo has been specified as the default |
Invoice Logo | The logo selected to appear on invoices |
Receipt Logo | The logo selected to appear on receipts. Use the Darkness and Scale/Resize sliders to modify the Receipt logo for your Receipt printer. Different receipt printers/thermal printers will print in different qualities, so some test prints may be required when adjusting these settings. |
Assigned Outlets | The Outlets that will display this logo on their transactions e.g. Invoice. To select multiple outlets hold the Ctrl button and click on the required outlet. To deselect an outlet, hold Ctrl and click on the outlet. |