You can ensure transaction data synchronization across your Retail Express system by properly uploading sales from your POS to the back office, helping maintain accurate inventory levels and sales reporting across all locations. This capability enables proper data flow between point-of-sale terminals and your central retail management system, which helps ensure real-time visibility into sales performance and stock levels.
Setting up reliable sale upload processes enables your retail operations to maintain data integrity across your multi-store environment, helping optimize inventory accuracy and financial reporting. This helps retail businesses make informed decisions based on current sales data while ensuring all transactions are properly recorded in your centralized system.
You can upload sales directly into Retail Express using the Order Upload feature, which is useful when you need enter historical sales (when first migrating across to using Retail Express), or upload large volume Wholesale Orders.
In this article:
Sales Order Upload is an advanced feature with specific upload requirements and should only be performed by experienced users. Support for this feature is not covered by your support agreement. If you require technical assistance or training, please note this is a chargeable service.
Overview
Before uploading new sales, it's essential you keep in mind the following behaviour/restrictions:
- Only one sale can be created at a time (quotes cannot be created following this process)
- The template must remain in its exact format otherwise the formulas used within this template will fail to populate the fields required
- Maximum of 2000 unique products per upload
- Sales cannot be deleted (you can void them if required)
- Sales and Payments will be assigned to the Back Office register (you will need to edit the sale to assign it to any other registers)
- Creates a sale only - editing Products, Customers or Fulfilment/Source locations will need to be done after the sale has been created
- Product prices will not update to match Customer Price Groups (if the customer is associated with a Price Group/Loyalty Group) - you will need to edit the sale in POS to apply updated pricing
Uploading Sales
To upload a sale you will need to do the following:
- Download the template
- Edit the template to add your sales information
- Import the edited template into Retail Express
- Review the created Sales Order
Click on the headings below to view detailed information
To download the Sales Order Upload template:
- Navigate to Settings > Order Upload
- Click Download Order Upload Template in Step 1

- Open in Excel
- Click Enable Editing

The Order Upload Template is organised into multiple sheets, designed to guide you through the Order creation process. Mandatory fields are highlighted with red headers.
You should start at Step 1 - Sale Details & Products.

Start at sheet: Step 1 - Sales Detail & Products
Information entered into the template must be in the same format as it appears in Retail Express, including upper/lower case. (e.g., the Outlet entered must match exactly the Outlet name used in Retail Express)

Enter the Customer No. - the Customer Number is in the format AA-123456, and is automatically assigned to the customer upon creation.
Enter the Outlet - the Outlet is the store that the sale will be created against. It is also the automatic Fulfilment and Source location assigned to the Sale upon creation.
If Fulfilment and Source locations need to be edited, this can be done after creation of the Sales Order.
Date - the date will default to today, edit if required.
Freight (non-mandatory) - enter the total Freight value to apply to the sale.
Sale Person ID - the User ID that you wish to be recorded against the sale.
Comments (optional) - any comment you wish to populate in the Public Comments of the Invoice.

ProductID or Supplier SKU - Scan or type to add products to the Order. As you enter SKU information here, the remaining mandatory fields will populate with text of REQUIRED FIELD as a reminder.
Sales Qty - enter the sales quantity, in whole numbers
Fulfill Qty - If you wish the products to be Fulfilled upon creation of the Sale, enter values into this field. if you do NOT wish Products to be Fulfilled, enter a zero (0).
If Fulfill Qty is left blank, Products will automatically be Fulfilled.
Sell Price - enter the sell price (inc GST)
The price entered into this field will be the price applied at POS and will not be adjusted for any Price Group the customer is associated with, however this can be overwritten at POS after the sale is created.
Fulfilment Method - select the Fulfilment method.
Use the drop-down menu available for this field if unsure of the available options.
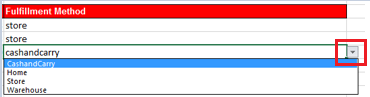
Fulfilment Method follow the normal rules at POS and Cash and Carry sales are automatically Fulfilled. For more information on Fulfilment at POS, please see: Fulfilment Methods at POS.
Go to sheet Step 2 OPTIONAL - Sales Payments
Enter Payment/s associated with this sale (if required). Any Payments entered here will populate immediately into the Income Report upon upload the Sales Order.
Payment Type - select a Payment Type from the drop-down menu
Amount - enter the payment value.
Date - enter the payment date
Go to sheet Step 3 DONT EDIT OrderUpload

The sales details entered in the previous sheets are displayed here.
Important Notes:
:
- Do NOT edit this sheet, it is for the purposes of saving the Upload file only. Should you need to make changes to product or prices, return to: Step 1 - Sales Detail & Products or, Step 2 OPTIONAL - Sales Payments sheet.
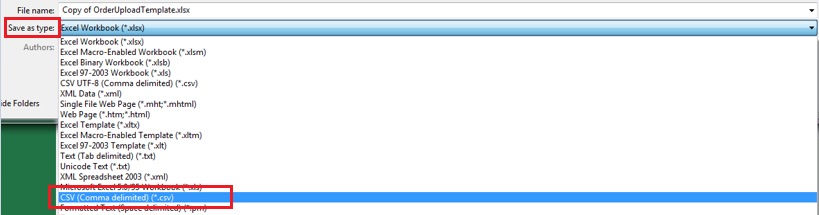
- The file MUST be saved from Sheet 3, and must be saved as .csv format. Saving while on any other tab/sheet or as another file type will result in errors and an unsuccessful Order Upload file.
Save the Order Upload file
Ensure you are on Sheet Step 3 DON'T EDIT - OrderUpload > navigate to File > Save as > browse to the location you wish to save to > select >> Save as Type>> of CSV (comma delimited) (*.csv) > click Save.
If you receive the below message, click OK

The Sales Order Upload has been created and saved to your selected location. The file will be in .csv format and entitled Copy of OrderUploadTemplate.csv.
Import the Edited Template into Retail Express
Return to: Settings > Order Upload > at Step 2, click Browse > browse to the location of your saved Order Upload > click to select the Copy of OrderUploadTemplate.csv file > click Upload.
You will receive a File Upload Successful notification, per below:

Common Errors
Should you receive any kind of error, the details will be displayed in the bottom half of the screen. Return to the saved Order Upload template, make the required changes and import again.
If no errors are displayed
If you receive no error, go to Step 3 > click Import.
You will receive a File Upload Successful notification, per below:

Unsure if your Order Upload completed successfully?
To reduce the likelihood of creation of duplicates, ensure to check the Sales Report prior to attempting the Order Upload again. Navigate to: Reports > Sales Reports > Sales Report.
You can now view the Sales Order via the Sales Report or at POS. You are also able to view any Payments entered via the Income Report.
To view the Sales Report >> Navigate to: Reports > Sales Reports > Sales Report > enter the required date and Outlet filters > click Search.

To view the Sale at POS
Navigate to POS > click Lookup > enter your Login details > enter the customer name OR click Today to search by date.

Click Open, to view or edit the sale details.
To view the Income Report
Navigate to: Reports > Finance Reports > Income Report.

If you're expected payment is not appearing in the Income Report, ensure you have the Payment Type enabled. Navigate to: Settings > Payment Types > ensure the Payment Type is ticked to enable.
The sale can now be completed per your normal process.