You can configure inventory buffers for your Shopify integration in Retail Express to prevent overselling by maintaining safety stock levels for online sales. This feature helps reduce customer service issues by reserving a portion of inventory for in-store sales while still making significant quantities available online, supporting balanced omnichannel inventory allocation across retail channels.
Setting up inventory buffers involves defining buffer quantities per product or location and establishing synchronization rules for available stock calculations. When properly configured, inventory buffers typically lead to reduced overselling incidents, better balance between online and in-store inventory availability, and improved customer satisfaction through more reliable stock information.
Inventory Buffers allows you to control the number of products available to sell on your Shopify store, so you can set some stock aside to keep on hand e.g. floor stock.
When calculating the Available quantity online, Shopify will factor in the buffer and reduce the quantity of products accordingly.
About Inventory Buffers:
Calculating Stock Available to Sell
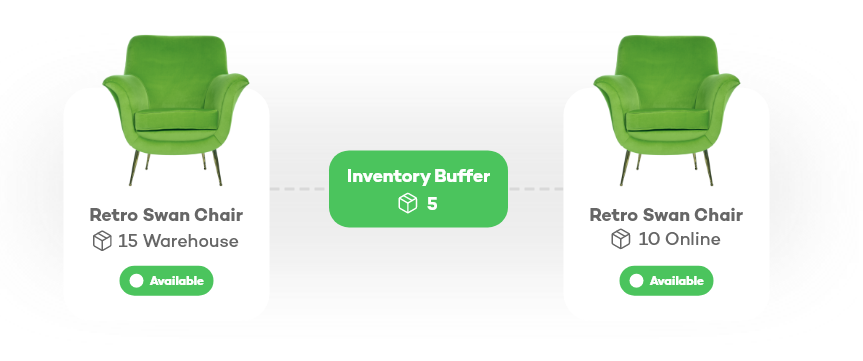
The stock available to sell online is calculated by adding all the Available Stock from your Inventory Locations, then subtracting the Inventory Buffer levels. For example, a product with a quantity of 15 Available and an Inventory Buffer of 5 would have 10 available to sell online.
Calculation method: Available to sell = Available minus Inventory Buffer
Available Qty | 15 |
Inventory Buffer | 5 |
Available to sell online | 10 |
Out of Stock Products:
If you have an Inventory Buffer and your products reach a zero level quantity, the buffer will cause the product to appear as a negative online. This is only visible from the admin page, the product will be displayed as "Out of Stock" to customers.
For example, if you have an Inventory Buffer of 5, and your product reaches 0 available in Retail Express, the quantity will be displayed as -5 in Shopify.
Configuring Inventory Buffers
The Default Inventory Buffer is automatically set to zero (0) so all available stock can be sold online. You can customise this if required. Any product with a Product Type not assigned to a Custom Inventory Buffer will use the Default Inventory Buffer.
Editing the Default Inventory Buffer will trigger a resynchronisation of all products and will take some time. We recommend doing this after hours.
- Navigate to Settings > Integration > Shopify
- Click the Pencil icon to edit your Shopify store
- Click the Inventory Buffers tab
- To create a new Custom Buffer enter a Name

- Enter the Buffer quantity
- Select the Product Types to apply the Buffer to
Select multiple Product Types by clicking holding the Ctrl button and mouse clicking (or press Shift + Click to select a range)
- Click the right arrow to move the selected Product Types to the right box
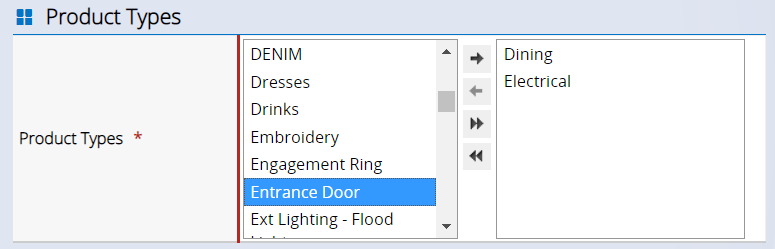
- Click the double rightarrow to add all Product Types
- Click Create
- A reminder will be displayed that all products with the selected Product Types will be synchronised
- Click Continue
To edit the Default Inventory Buffer:
- The Default Buffer will appear in the Inventory Buffers tab at the bottom of the page

- Click the Pencil icon to edit the value
- Change the value in the Inventory Buffer Settings table at the top
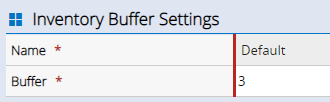
- Click Update
- A warning will be displayed to remind you that synchronisation will be triggered for all products, click Continue
Reminder: Synchronising all products may take some time - we recommend doing this out of peak trading hours.
- The updated Default Inventory Buffer level will be displayed at the bottom
Frequently Asked Questions
Can I configure buffers for specific products only?
No, currently you can only configure custom buffers per Product Type.
What happens if my Custom Buffer is lower than my Default Buffer?
The Custom Buffer will always take priority. For example, you might want to apply a buffer to most of your products except for one category. Configure the Default Buffer eg. 2, and create a Custom Buffer of 0 for the Category that should not have a buffer applied.
How can I use the same buffer for most of my products (but not all)?
Easy - configure the Default Buffer eg. 2, and create a Custom Buffer of 0 for the Category that should not have a buffer applied.