You can manage custom embroidery orders and third-party services efficiently through specialized workflows in Retail Express, which support tracking products sent for external processing while maintaining accurate inventory and customer order visibility. This service order capability helps retail operators coordinate value-added services and maintain customer communication, particularly valuable for Australian retail operations offering customization or external service integration with product sales.
The third-party work management functionality in Retail Express enables retail operators to track products through external processing stages, manage customer expectations for extended delivery times, and maintain accurate inventory allocation throughout the service period. This workflow helps ensure your retail operations can efficiently coordinate custom services while maintaining clear visibility over order status and supporting timely customer delivery of customized products.
This process is designed for handling embroidery/screen printing or any 3rd party work that has to be done to products before being collected by your customers. This approach is common across workwear stores, furniture stores and any situation where you require additional or 3rd party work to be done to the goods before collection. Examples including managing T-Shirts to be embroidered, flat packed pieces of furniture to be built, through to complete customisation and certification of a custom-built boat trailer.
The 3 step process utilises the Delivery Zones feature in Retail Express to indicate ?which step of the embroidery is the item at? before collection and you can report on this to see what item's are off-site at any time. In this example we will use the embroidery scenario, but it can be adaptor to various applications.
Step 1: Setup "Delivery zones" in your system for each stage of embroidery the item will go through in preparing it for collection. For example, one called "1. TO BE EMBROIDERED" the other "2. AT EMBROIDERER" and one more "3. READY FOR COLLECTION". These can be setup in Settings > Fulfilment Setup > Delivery Zones. You can have as few, or as many zones as you wish, each being a different step in the process, be sure to sign out of your POS and back in to see any new zone's you create.
Step 2: Assign the items to this zone at the point of sale.
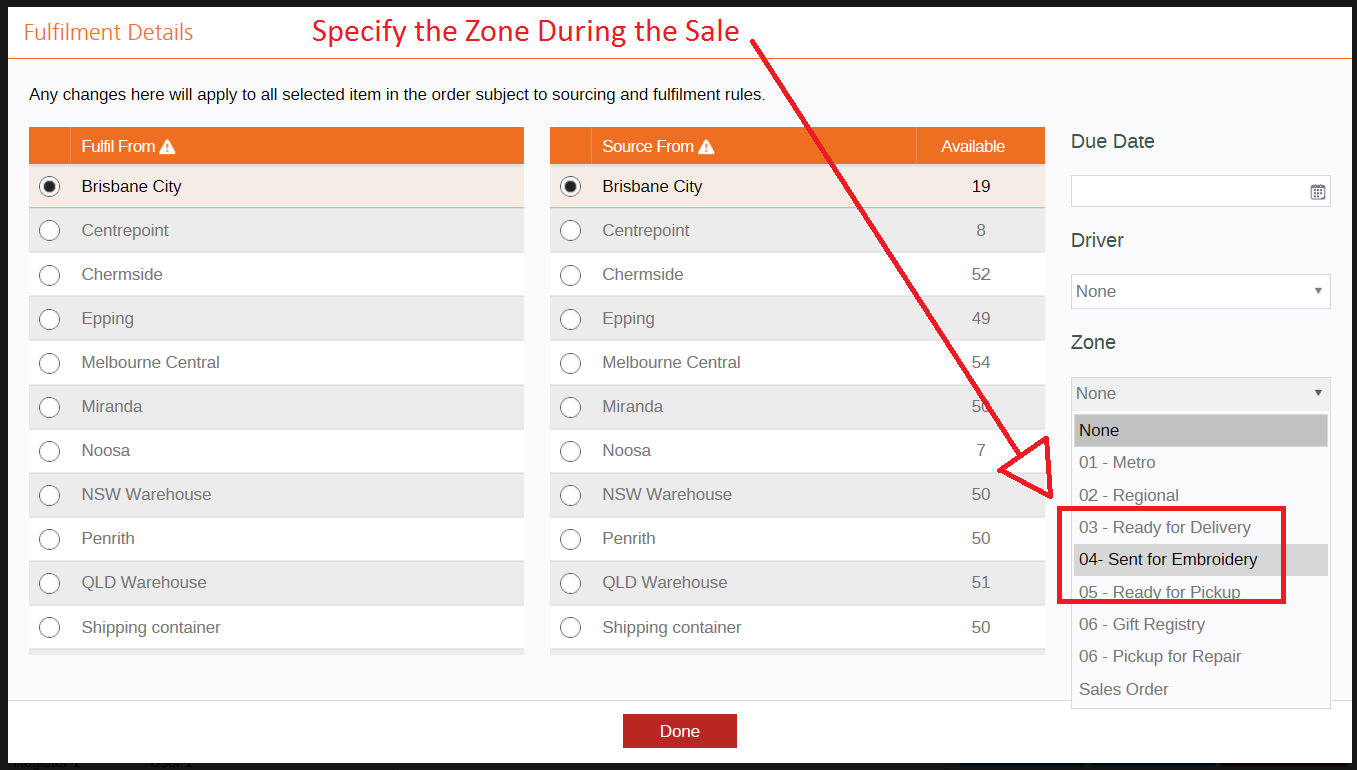
When making the sale to the customer in the first instance, for any items to be embroidered/worked on you need to first mark them as a layby/store pickup fulfilment method, as they are not being given to the customer right away. This next, most important step is to visit the orange fulfilment tab in the POS and allocate a zone to the product, so select zone "1. TO BE EMBROIDERED". This is done by double clicking on the product/s to be embroidered and the zone will show up on the right, you can also bulk apply all items to a single zone. Add the customer?s details and take any payments as you normally would to then finalise the sale.
Step 3: Once allocated to a particular zone in the POS you then use the fulfilment report in back office to see "all items marked as this zone" that were sold in a given date rate. Let?s say you send goods to the embroidery firm once a week, you would run this for sales in the past week and select just ?1. TO BE EMBROIDERED? as the zone, in this example that?s all items to go to embroiderer.
From the results shown you then get all the item together, send them to the embroiderer and change the zone for each of these to be ?2. AT EMBROIDERER? to specify they're now with the embroidery company. This is done without fulfilling the items, simply adjust the zone field for each item and submit the changes (Don?t enter anything in the Dispatch column!).
Once they come back and are ready to pickup, find them in the report by selecting ?2. AT EMBROIDERER? zone and using the same process you change the zone for each over to "Ready for collection" and you can call customers directly from this list to advise the goods are ready, they come in and pay and you fulfil from the report or from the POS as normal from there.
For detailed information on delivery zones and the fulfilment report please also see:
Delivery Zones
Dispatching items from Fulfilment Report