You can manage Shopify inventory levels through Retail Express to maintain accurate stock visibility for your online customers across all integrated locations. This capability helps prevent overselling and improves customer satisfaction by ensuring real-time inventory synchronization, supporting accurate stock availability information and better inventory planning across your omnichannel retail operations.
Setting up inventory level management involves configuring inventory locations, setting buffer quantities, and establishing synchronization frequencies. When properly configured, inventory management typically leads to reduced stockouts, fewer overselling incidents, and better customer confidence through accurate online stock availability information.
Within Retail Express you can select which Outlets are used to calculate the stock available to sell online. The available stock from these Outlets are combined to determine the total available stock for Shopify.
Once the Shopify integration has been enabled, Retail Express becomes the "point of truth". All updates to inventory levels are performed in Retail Express and synchronised to Shopify automatically (no manual updates to Shopify are necessary).
Selecting Inventory Outlets
The "Inventory Locations" setting defines which Outlets are used to calculate the total inventory level available to sell online.
To manage the Inventory Locations:
- Navigate to Settings > Integrations > Shopify
- Locate Inventory locations and Sourcing Priority fields
- Outlets assigned to Shopify are listed on the right. Outlets not assigned are listed on the left.
- To add a new Outlet click and highlight the Outlet on the left and click the right arrow
- To remove an Outlet click and highlight an Outlet on the right and click the Left Arrow
- Use the double arrows to add/remove all Outlets
- Click Save

Synchronising inventory updates
Inventory levels will naturally fluctuate as products are sold both in-store and online. Changes to the Available stock quantity will automatically trigger a synchronisation from Retail Express to Shopify.
Manual adjustments to stock levels should be processed in Retail Express only. Any updates to the stock levels in Shopify will not be synchronised to Retail Express. The next time the product synchronises the stock levels will be overwritten to match the quantity in Retail Express.
Important Note: Editing the Inventory levels within Shopify is not supported.
Retail Express-triggered updates:
Stock updates in Retail Express are automatically sent to Shopify for products that have been published online. For example, during day-to-day business the stock levels for products will be updated continuously as sales are made in-store.
Once a sale is processed it will go through the following process:
- A change in the stock level is made to increase/reduce the Available stock
- Retail Express adjusts the "Available" quantity for that product
- The change in inventory triggers a task to be added to the synchronisation queue
- The product is synchronised, and the web store updated with the new stock level
Event Driven Synchronisation - How to trigger a synchronisation.
Shopify-triggered updates:
Shopify can also trigger updates to the stock levels in Retail Express via incoming sales:
- A sale is made online
- The order is sent to Retail Express
- Retail Express reduces the "Available" quantity for that product
- The change in inventory triggers a task to be added to the synchronisation queue
- The product is synchronised, and the web store updated with the new stock level
Selling out of stock products
On occasion you may wish to sell products regardless of stock levels, for example pre-orders or stock you can obtain from the supplier quickly.
Using the "Prevent Disabling" feature within Retail Express you can sell a product online, even when the quantity is zero or in the negatives. Prevent Disabling can be enabled either individually or for multiple products at a time.
To control this feature for individual products:
- Log into Retail Express
- Open the Edit Product window e.g. enter the Product PLU code into the search bar in the top right-hand corner of Back Office
- Scroll to the Advanced Options section
- Tick the Prevent Disabling check box
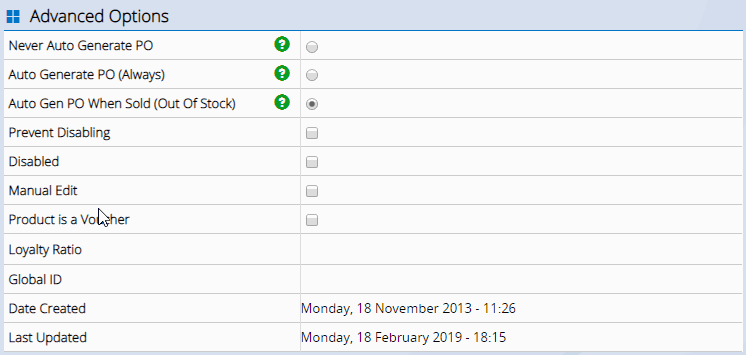
- Click Save Changes
To enable the option for multiple products:
- Log into Retail Express
- Navigate to Inventory > Product Search & Management
- Use the Filters to search for products as required
- Click Search
- From the Apply Product Edit Setting select the Prevent Disabling option
- From the Apply To option select All Search Results
You can also select to apply this setting to Core Products only
- Click Apply

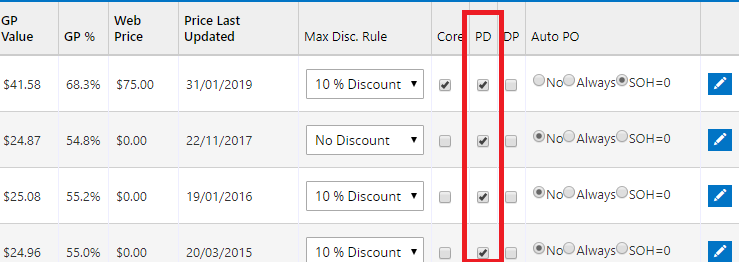
Once the changes have been applied the page will refresh. Note the "PD" column for the products is now ticked - this is the Prevent Disabling column.
Hover over the column heading for an explanation of the column
Multiple Outlets and automatic Stock Transfers
With the Retail Express and Shopify integration you can elect whether you would like the stock for web orders to be fulfilled from a central location (the Sales and Pricing Outlet) or from a range of outlets (depending on the customer's location and any matching Fulfilment Locations).
You can select between the two by enabling or disabling the Fulfilment Groups setting within the Shopify Integration configuration area.
Refer to the Shopify - Order Fulfilment Locations article for more information about Fulfilment Locations.
If you elect to use a central location, Retail Express will automatically create stock transfers where inventory has been sourced from another Outlet and needs to be transferred back to the Sales and Pricing Outlet before it's dispatched to the customer.
To explain the stock transfers, in the following scenario there are 3 outlets listed in priority order:
Outlet A - 0
Outlet B - 2
Outlet C - 3
Total: 5 Available
Two example orders below would cause the following Transfers to be created:
Order | Result |
Order quantity = 2 | - Outlet A increases the Allocated stock by 2 units
- Stock Transfer created from Outlet B to Outlet A for 2 units
- Outlet A would have -2 Available units
- Outlet B would have 0 Available units
Once the Transfer has been received Outlet A would be updated to have 0 Available (the stock will remain in Allocated until the order has been Fulfilled). |
Order quantity = 5 | - Outlet A increases the Allocated stock by 5 units
- Stock Transfer from Outlet B to Outlet A for 2 units
- Stock Transfer from Outlet C to Outlet A for 3 units
- Outlet A would have -5 Available units
- Outlet B would have 0 Available units
- Outlet C would have 0 Available units
Once the Transfers have been received Outlet A would be updated to have 0 Available (the stock will remain in Allocated until the order has been Fulfilled). |
All transfers should be processed prior to completing the sale and dispatching any products to the customer. Refer to the article Stock Transfer Essentials for more information on processing Stock Transfers.