You can migrate account customer balances into Retail Express during system implementation, helping your retail operations maintain accurate records of customer credit accounts and payment histories. This capability ensures all outstanding customer account balances are properly recorded, which helps preserve financial accuracy and customer relationships during the transition to Retail Express.
Setting up opening balance entry for account customers enables your retail operations to start with accurate financial records, helping optimize accounts receivable management from day one. This helps retail businesses maintain proper customer account tracking by ensuring all pre-existing balances are captured correctly in the new system.
Account Customers can place orders immediately with payments made at a later date. You can specify a Credit Limit and Payment Terms within Retail Express, as well as pause their ability to place orders (Stop Credit).
If you were using a former system to manage your Account Customers, you can enter an Opening Balance for your customer prior to going live with Retail Express. This will allow you to continue to manage your customers through a single system moving forward.
Once the balances have been entered the credit terms will be calculated from the current date.
In order to create an opening balance for your customers you will need to create the following items:
- Supplier e.g. Miscellaneous
- Non-inventory Product Type e.g. Miscellaneous.
- Product e.g. Balance Forward
- POS transaction for each customer using the Balance Brought Forward product.
Each of these steps are covered below in more detail.
Prerequisites
Before you can begin this process you will need:
- Access to Retail Express
- Your Products already loaded into Retail Express (this is completed as part of the implementation process)
- The Customers already loaded into Retail Express (this is an option part of the implementation process, if you choose to import them yourself note that using the Customer Mass Upload process you can bulk enter Credit Terms, Credit Limits and Stop Credit status)
- A list of Outstanding Balances by Customer
Entering Opening Balances
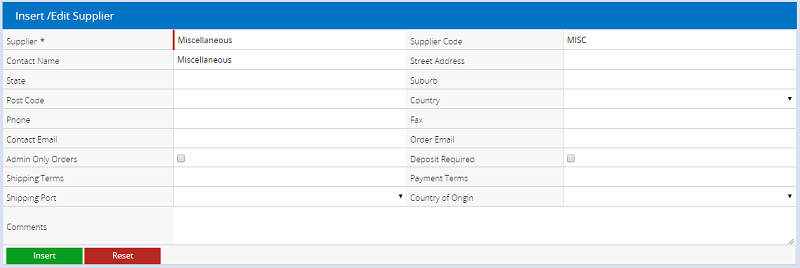
Create a Miscellaneous Supplier
In a later step you will be creating a specialised product for entering the opening balances. To avoid this product interfering with any of your other Supplier reports, the Supplier for this product should be kept separate from your main suppliers. By creating a new "Miscellaneous" Supplier you can assign the product to this generic one.
If you already have a generic supplier you can skip this step.
To create a new Supplier:
- Log into Retail Express
- Navigate to Settings > Suppliers
- Enter a name for the supplier in the Supplier field
- Enter a Supplier Code (this is used internally as a quick reference to the supplier)
- Enter any other fields as required
- Click Insert
For detailed information on creating suppliers refer to the Settings - Suppliers article
Create a non-inventoried Product Type
Creating a separate non-inventoried Product Type allows you to keep the Product Type and associated products separate in your product and inventory reporting.
If you already have a Product Type used to exclude products from reporting you can skip this step.
To create a new Product Type:
- Navigate to Settings > Product Types
- Enter a name for the Product Type in the Product Type field
- Click Insert
For more information on creating Product Types refer to the Settings - Product Types article.

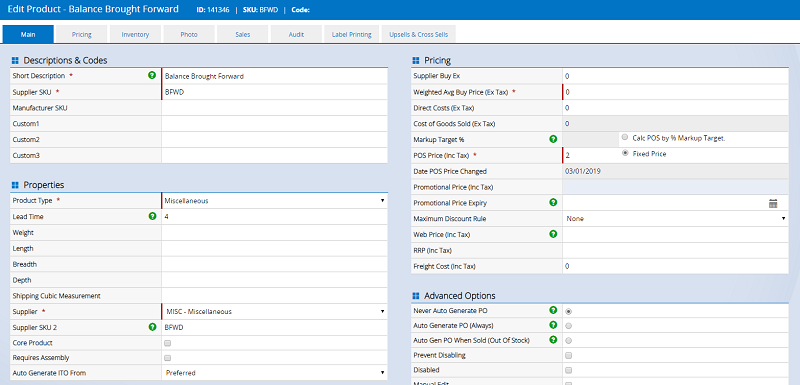
Create a "Balance Brought Forward" Product
The "Balance Brought Forward" product is used to create a sale at POS with the value of the balance for the Account Customer. Creating this as a separate product with the Product Type and Supplier created in the previous steps ensures your reporting and inventory remain accurate.
Once all Opening Balances have been entered the product can be disabled so that it doesn't appear in searches or reports.
To create a product:
- Navigate to Inventory > Create a Product
- Enter the information below against your product
- Enter any other information as required
- Click Save Changes
- Click the Pricing tab
- Leave checked or uncheck the check box in the Tax column, depending on whether you will be reporting GST on the payment (you will be unable to see this information until you have saved the product)
- Click Save Changes
Field | Details |
Short Description | Balance Brought Forward |
Supplier SKU | BFWD |
Product Type | The Product Type created earlier in this article e.g. Miscellaneous |
Supplier | The Supplier created earlier in this article e.g. Miscellaneous |
Weighted Avg Buy Price (Ex Tax) | 0 |
POS Price | 2 (this will be adjusted when creating sales) |
Create a sale with opening balances for each customer
For each customer you will be able to purchase the Balance Brought Forward product in a sale to add an outstanding amount equivalent to the balance of their account. This will then display on their Account Statements, and any further payments or purchases are created through Retail Express.
To create a sale:
- Log into POS
- Enter a User ID to create a new sale
- Add the Balance Brought Forward product to the sale (you can enter BFWD, the Supplier SKU, into the PLU Scan field to quickly add the product)
- Click into the Price field and enter the Outstanding Balance for the customer
- Click the Customer tab
- Use the fields to add the customer to the sale
- Click on the Outlet & Register name at the bottom to display the Sales Order Information window
- Change the Invoice Date to be the date of the last sale in the old system (if required)
- Click Save Changes to return to the sale
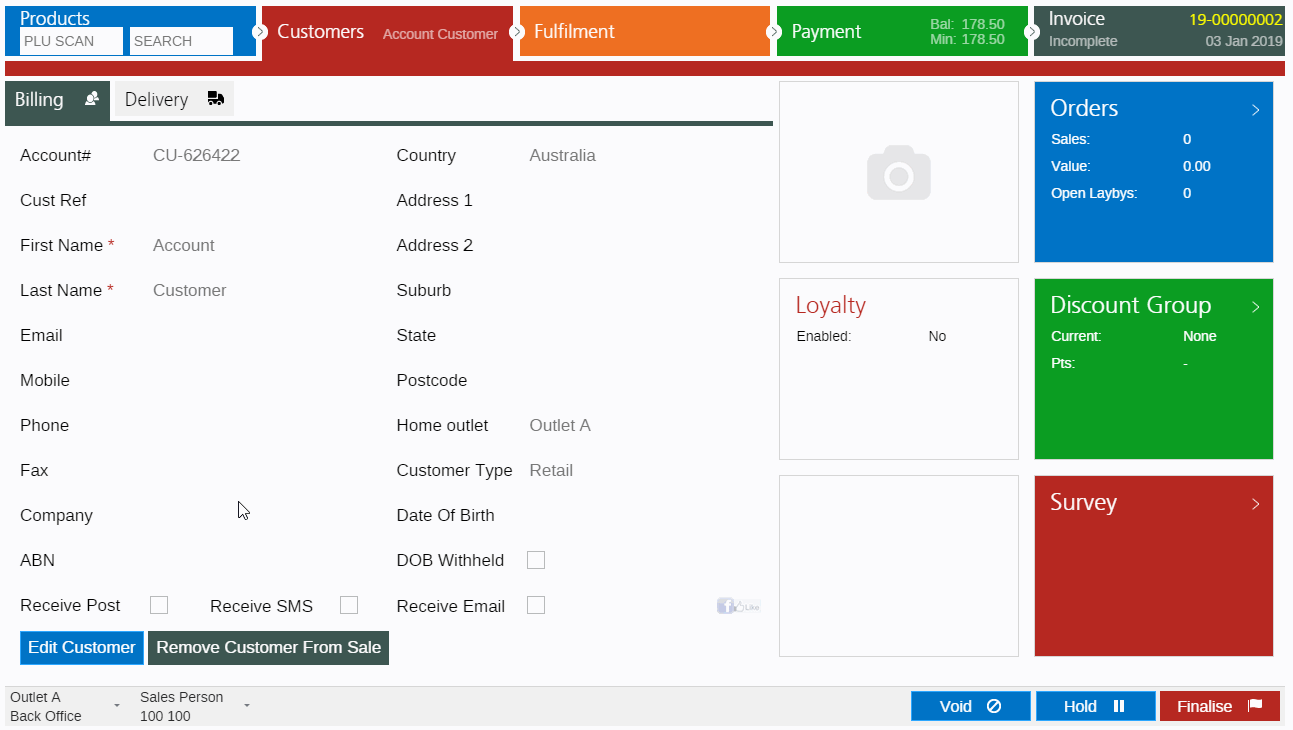
- Click Finalise to save and close the sale
If you try to finalise the sale and it requests payment or a minimum deposit you will need to confirm your customer has been created as an Account Customer.