Need a step-by-step setup guide?
This article provides an overview of how to connect Shopify to Retail Express.
For a more guided walkthrough, we also offer a free self-enrolment course that steps you through the Shopify Connector setup process in more detail.
Click here to enrol in the Shopify Connector Guide
You can connect your Shopify store to Retail Express to establish bidirectional data synchronization for products, customers, and orders across your retail channels. This connection helps enable seamless omnichannel operations by automatically sharing data between systems, supporting unified inventory management and consistent customer experience across all touchpoints.
Connecting Shopify involves installing the Retail Express app, configuring API permissions, and establishing initial synchronization settings. When properly connected, this integration typically leads to streamlined operations through automated data flow, improved accuracy across channels, and better visibility into your complete retail business performance.
The integration between Retail Express and Shopify is done in several phases. The first is to connect the two systems, however the data synchronisation remains disabled until you're ready to proceed. If connecting to an existing Shopify store you'll then be able to map your products. Once you're ready for the data to begin synchronising (and essentially "Go Live") you'll be able to enable the integration.
This article explains the process to initially connect Retail Express and Shopify.
Pre-requisites:
- The Shopify Connector License must be activated by Retail Express (contact the Sales Department for more information)
- A Shopify "Store Owner" user access level is required
Shopify - Shopify Prerequisites for Retail Express IntegrationShopify - Retail Express Prerequisites for Shopify Integration
Connecting Retail Express and Shopify
To connect Retail Express with Shopify, follow the steps below:
If using multiple Shopify stores these steps will need to be repeated for each store.
- Open Retail Express, and navigate to Settings > Integrations > Shopify
- In a separate browser, log into the Shopify Admin using a Store Owner account
- If you already have a store connected and you're setting up an additional store, you will need to click Connect to Shopify in the bottom left-hand corner (if this button is grey you will need to contact our Support Team to get your additional license activated).
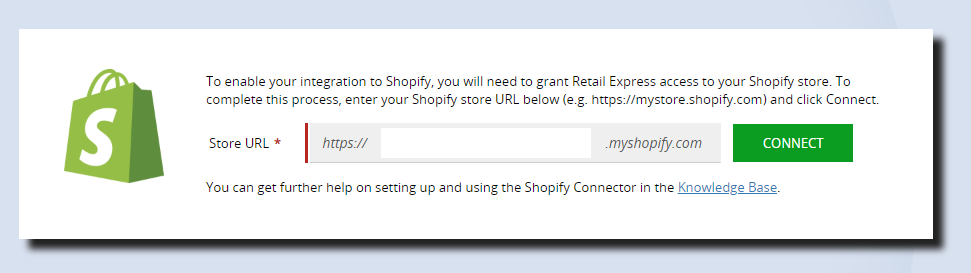
- Enter the URL for the Shopify store e.g. for a Store URL of https://example.myshopify.com enter "example" in the field
- Click Connect
- If step 1 was missed and you're weren't logged into Shopify already, a prompt will appear to log in. After logging in, press Back on the browser to return to Retail Express and press Connect again.
- A window will appear displaying the connection functionality and request confirmation of the integration.
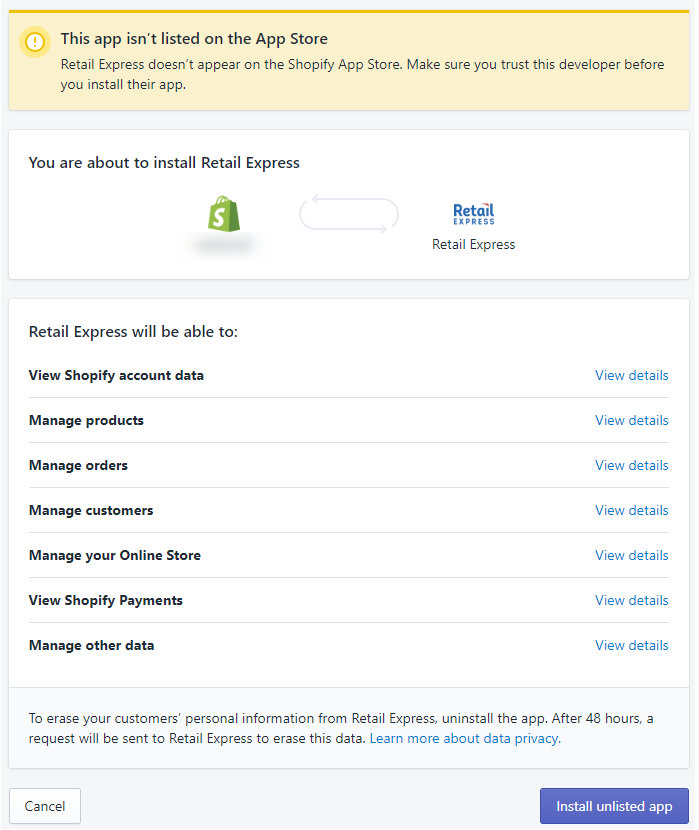
- Click Install unlisted app - this will authorise Retail Express to begin talking to the Shopify store (the Retail Express app is an unlisted app as it's not globally available on the Shopify App Store)
- The Shopify site will redirect back to Retail Express
- A message will be displayed confirming you have connected the two systems, with a warning about existing products in Shopify (for more information refer to the Shopify - Mapping Existing Shopify Products article):
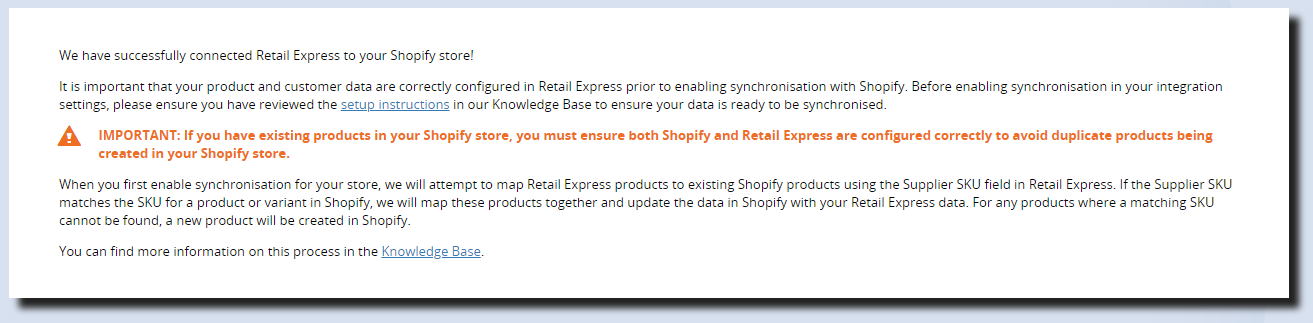
- Read the message and press Continue (green button in the bottom left-hand corner of the window)
- The Sales and Pricing Outlet is required to be a fully licensed Retail Express Outlet (not an Unmanned Warehouse) so that sales can be managed through POS if required.
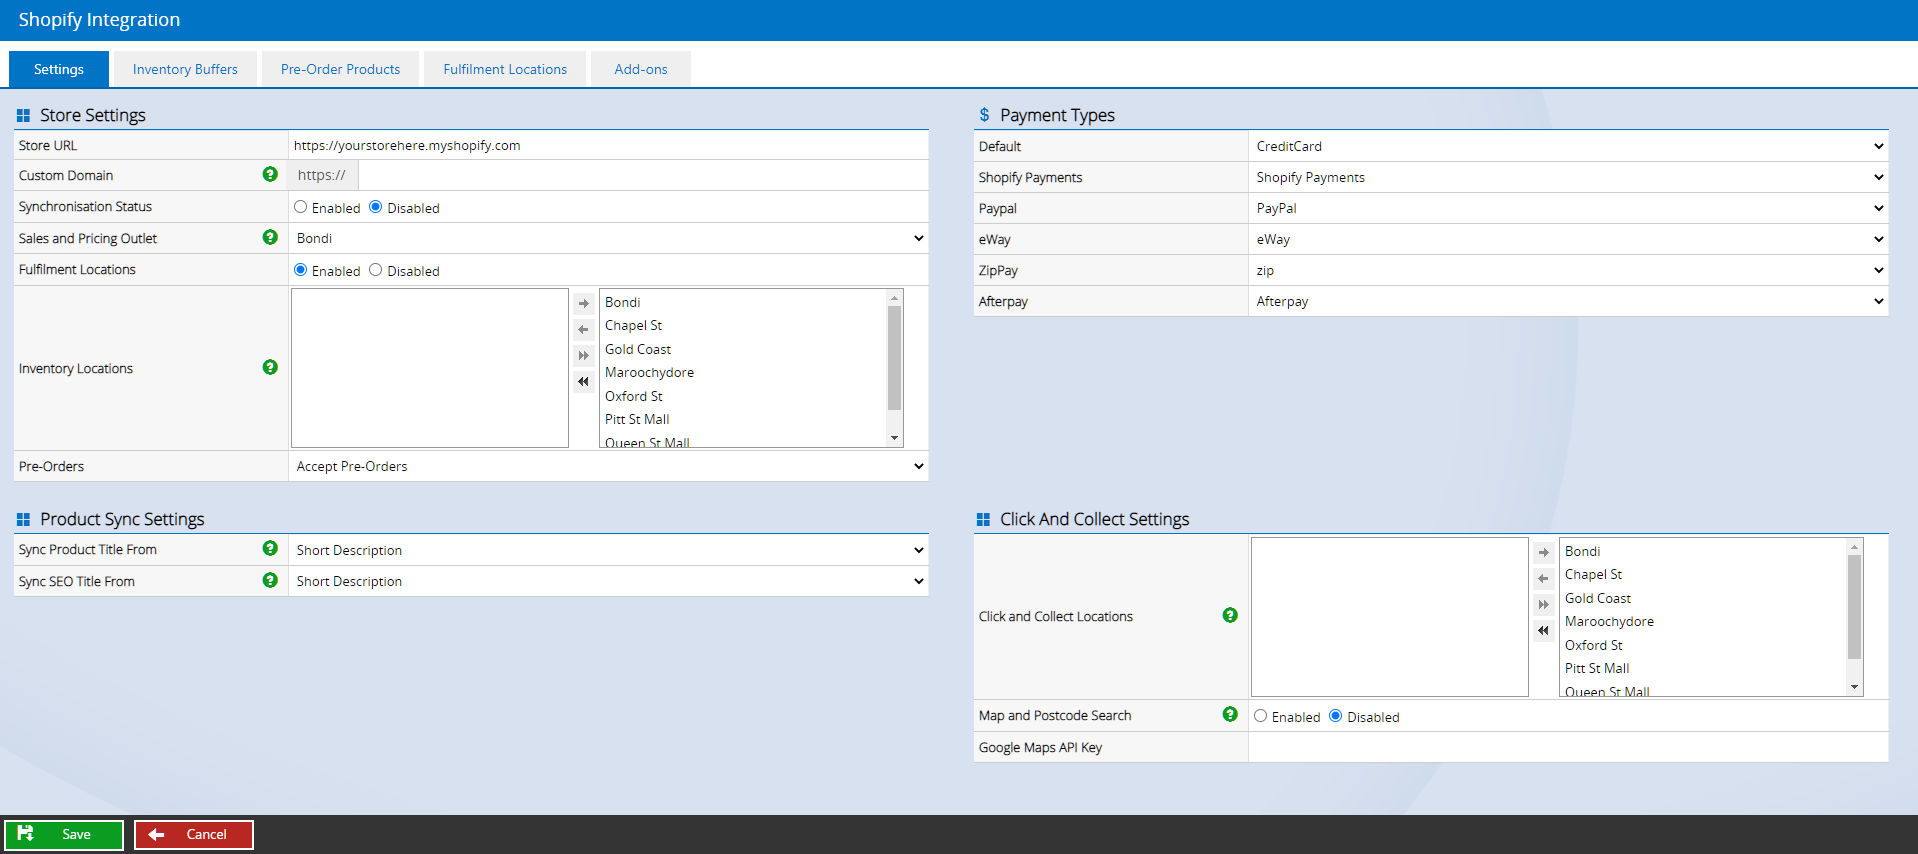
- Refer to the Fulfilment Locations article for detailed information on controlling where Inventory is sourced and fulfilled from
- Follow the Click and Collect if allowing customers to nominate a pickup location
- Click Save to save the configuration settings
At this point the integration remains as Disabled until you have prepared your product data for the integration and confirmed you are ready to synchronise (see the next section).
If you have existing products on Shopify do not enable the synchronisation until you have verified your products are configured and mapped correctly (otherwise you may encounter data issues later).
Next Steps
You will need to configure your Products and Customers prior to enabling your integration, including mapping any existing Shopify products. The configuration can be done either:
- Individually - by editing specific products or customers
- Bulk update - using the Product or Customer Mass Download/Upload functionality
Refer to the following guides on how to prepare the data:
- Shopify - Mapping Existing Shopify Products
- Product synchronisation
- Customer synchronisation
Once you have confirmed your data has been configured correctly, proceed with the Shopify - Enable the Integration article.
Settings fields
Field | Definition |
Store URL | Updated automatically with the web store URL as entered in the previous step |
Custom Domain | Used for Click and Collect if the URL for your web store is a custom site, and not the standard companyname.shopify.com format. e.g. https://mycustomwebsite.com. This field is optional but recommended. Enter the URL without the https:// |
Sales and Pricing Outlet | Select the appropriate Outlet from the drop-down list. This Outlet will be used for: - Receiving incoming sales
- Product Pricing
- Inventory fulfilment
|
Fulfilment Locations | Enabling this feature will allow you to create and maintain Fulfilment Groups for Shopify. Fulfilment Groups are compared to an incoming order and the customer's address to determine the most appropriate Outlet to Source and Dispatch stock from. Refer to the Shopify - Order Fulfilment Locations article for more information. |
Inventory Locations and Sourcing Priority | These Outlets will be combined to form the total available product quantity available for sale online. Click to select and highlight an Outlet > click the Right arrow to assign it to the online store. Alternatively, use the double arrows to assign all outlets. Use the up/down arrows to order the Outlets based on preferred source priority order. The Inventory Locations are global for all products published to Shopify i.e. it's not possible to turn off Outlets for some products and not others. Sales processed in-store at these outlets will also adjust the quantity and synchronise to the web store - a separate outlet would be required to maintain exclusive online quantities. |
Pre-Orders | Used to control whether you would like to enable the ability to sell products before you have them in stock. Refer to the Understanding Pre-Orders article for information on getting started with Pre-Orders. |
Payment Types | When payments are received against an order in Shopify the Retail Express system will allocate a payment against the sale within POS. You can choose the Payment Type the payment will be allocated against for easier reconciliation and reporting. Some of the most common payment methods can be mapped specifically to Payment Types in Retail Express as required. Select from the drop-down menu to map the two together. Enter a Default Payment Type to be used if no other payment method has been specified e.g. Online. All Shopify payments will be assigned to the Back Office register of your Primary Sales & Pricing Outlet (selected above). only Enabled Payment Types appear in this window. To enable other Payment Types, navigate to Settings > Payment Types. Enable the option, then return to the Shopify Settings to select it as required. |
Sync Product Title From | Used to configure which Product field in Retail Express will be used to form the Product Title on Shopify. You may want to give your products descriptive names in Retail Express, like "Check Shirt Red Small", but on Shopify you'd prefer the product to be called "Check Shirt Long Sleeve". To achieve this you can use a Custom field within Retail Express to populate the product name instead of the Short Description. Any edits to the product name in Shopify will be overwritten by the data in Retail Express during the synchronisation. |
Sync SEO Title From | Select which field in Retail Express will be used to synchronise the SEO Title from. You may wish to keep this the same as the Product Title, in which case you can select the same field selected on the "Sync Product Title From" field. If you prefer to edit your SEO titles directly within Shopify (or if you're working with an SEO agency) select "Do Not Sync". Any existing products on Shopify will not have their SEO Titles updated. All newly created products during the synchronisation will automatically have an SEO Title set based on the Product Name (the default Shopify behaviour) but will be ignored for all subsequent synchronisations. This gives you the ability to edit and refine the SEO Title once the initial synchronisation has taken place. |
Frequently Asked Questions
Find answers to the most common questions below
Unable to install the application
If you're unable to install the application, it's likely that the User Account you're using doesn't have the correct permissions. You must log in with a user account level of "Store Owner" to install the Retail Express application.
How do I connect my additional Shopify stores?
When you navigate to Settings > Integrations > Shopify your existing connections will be displayed. Click the Connect to Shopify button in the bottom left-hand corner to add additional stores.
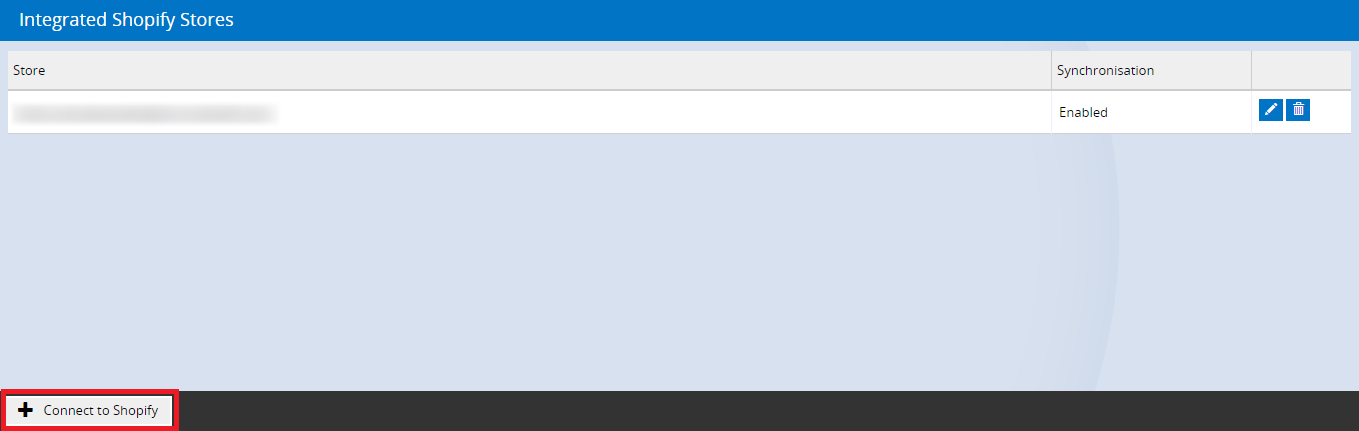
If this button is grey you will need to contact our Support Team to get your additional license activated
What happens if I delete the integration and reconnect it?
If you delete the integration, when you next reconnect the store you will need to work through the Data Mapping process to match your products. As part of this, you will need to update Retail Express to configure which products should be published to the Shopify store. The most efficient way to do this will be through the Mass Download/Upload process.