You can process and fulfill online orders directly within Retail Express, streamlining your omnichannel operations and improving order fulfillment efficiency across your retail network. This capability helps optimize retail operations by providing centralized tools to manage web orders, track shipments, and update customer notifications while maintaining accurate inventory levels across all locations.
Setting up online order processing involves using the Fulfilment Report or POS system to manage incoming web orders efficiently. When properly configured, this workflow typically leads to faster order processing, improved accuracy in shipment tracking, and better customer communication, helping ensure your omnichannel retail operations deliver consistent customer experiences.
Retail Express is used to complete sales from your web store, including fulfilling products i.e. marking them as processed and shipped. During the next synchronisation with your web store, the shipment information will be updated, and if enabled, the customer will receive a shipment notification.
Fulfilment Methods Overview
There are two methods for processing your web sales within Retail Express, see below for detailed information on each method.
- The Fulfilment Report (ideal for processing large numbers of sales at one time)
- Using POS (ideal for individual processing without leaving POS)
Using the Fulfilment Report
Using the Fulfilment Report is the recommended and most efficient method for processing your web sales. The Fulfilment Report method allows you to:
- Easily locate all outstanding orders to be Fulfilled and view if payment has been received
- Dispatch multiple products AND sales orders through a single page
- Filter by your requirements, including: date range, fulfilment location, delivery method/s
Tip: You can Map your Delivery Drivers in Retail Express to match your online Shipping Methods so that you can filter by specific delivery selections; this can be useful if you have offered a 'priority shipping' option and need to process these sales quickly
- Access Picking Lists, print labels and invoices directly from the report
- Clearly view Customer Comments associated with the Order
- Quickly open and edit the sale at POS via the 'E' edit button i.e: if you need to add a payment to the invoice
Click here for detailed step-by-step instructions.
Using POS
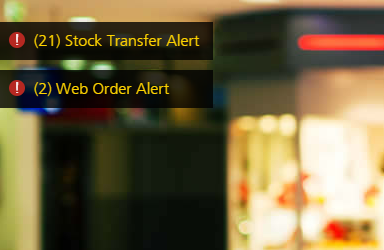
Using POS is a more simple method for processing your sales on an individual sale-by-sale basis. POS Alerts provide a handy "Web Order Alert" notification of the count of Web Orders to be processed, and links you to the "Search Sales Orders, Invoices & Quotes" window to efficiently open each Invoice.
📋 Note: This alert will display any orders assigned to the Outlet to be actioned i.e. requires payment or has products to be fulfilled/dispatched. Clicking the alert will take you to the POS Lookup window, where it will display Open Web Orders for the last 6 months by default (you may need to adjust the date to view older sales that still require action).
This method is typically recommended when fulfilling orders one-by-one, rather than in bulk. When you have a large number of sales to process it's best to use the Fulfilment Report method, and use the POS Alert as a notification guide only.
Fulfilling/dispatching Sales
Follow the steps below to process your sales within Retail Express.
📋 Note: If an Internal Transfer has been created for this sale (where stock has been Sourced from another Outlet/Store) this needs to be managed as part of a separate process to ensure your stock levels are correct.
Using the Fulfilment Report
The Fulfilment Report is designed to allow you to view all incoming sales, and process them accordingly.
Related: For detailed information on using the Fulfilment Report, please see: Fulfil Products from the Fulfilment Report
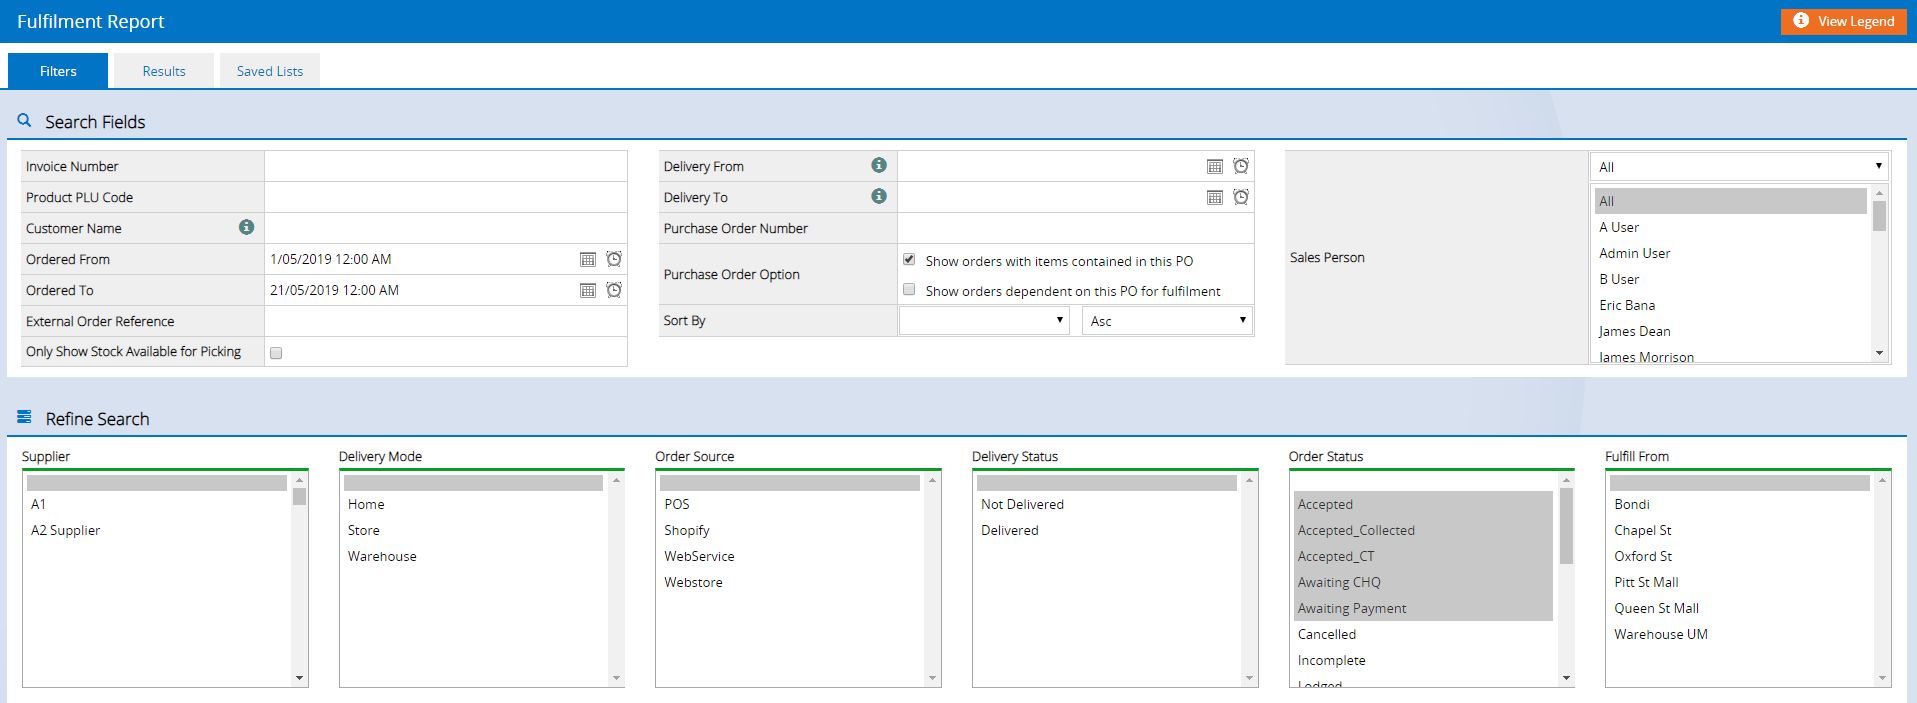
To use the Fulfilment Report:
- Navigate to Inventory Fulfilment Report
Tip: You can also access the report via Quick Links > Fulfilment Report
- Set the Ordered From and Ordered To to view orders within a specific date range
- Set the Order Source to Shopify, or Web Service (if using the eCommerce API)
- Set the Delivery Status to Not Delivered
- To filter ONLY for invoices that have been paid, set the Order Status to Processed
Tip: View the related article Why is my online sale showing as awaiting payment in Retail Express?
- Set the Fulfil From to filter by specific Fulfilment Outlet/s
- The Delivery Driver can be filtered if you have set your delivery methods on your web store to be mapped to the Delivery Driver in Retail Express.
- Apply any other filters required to further refine your search
Click Search

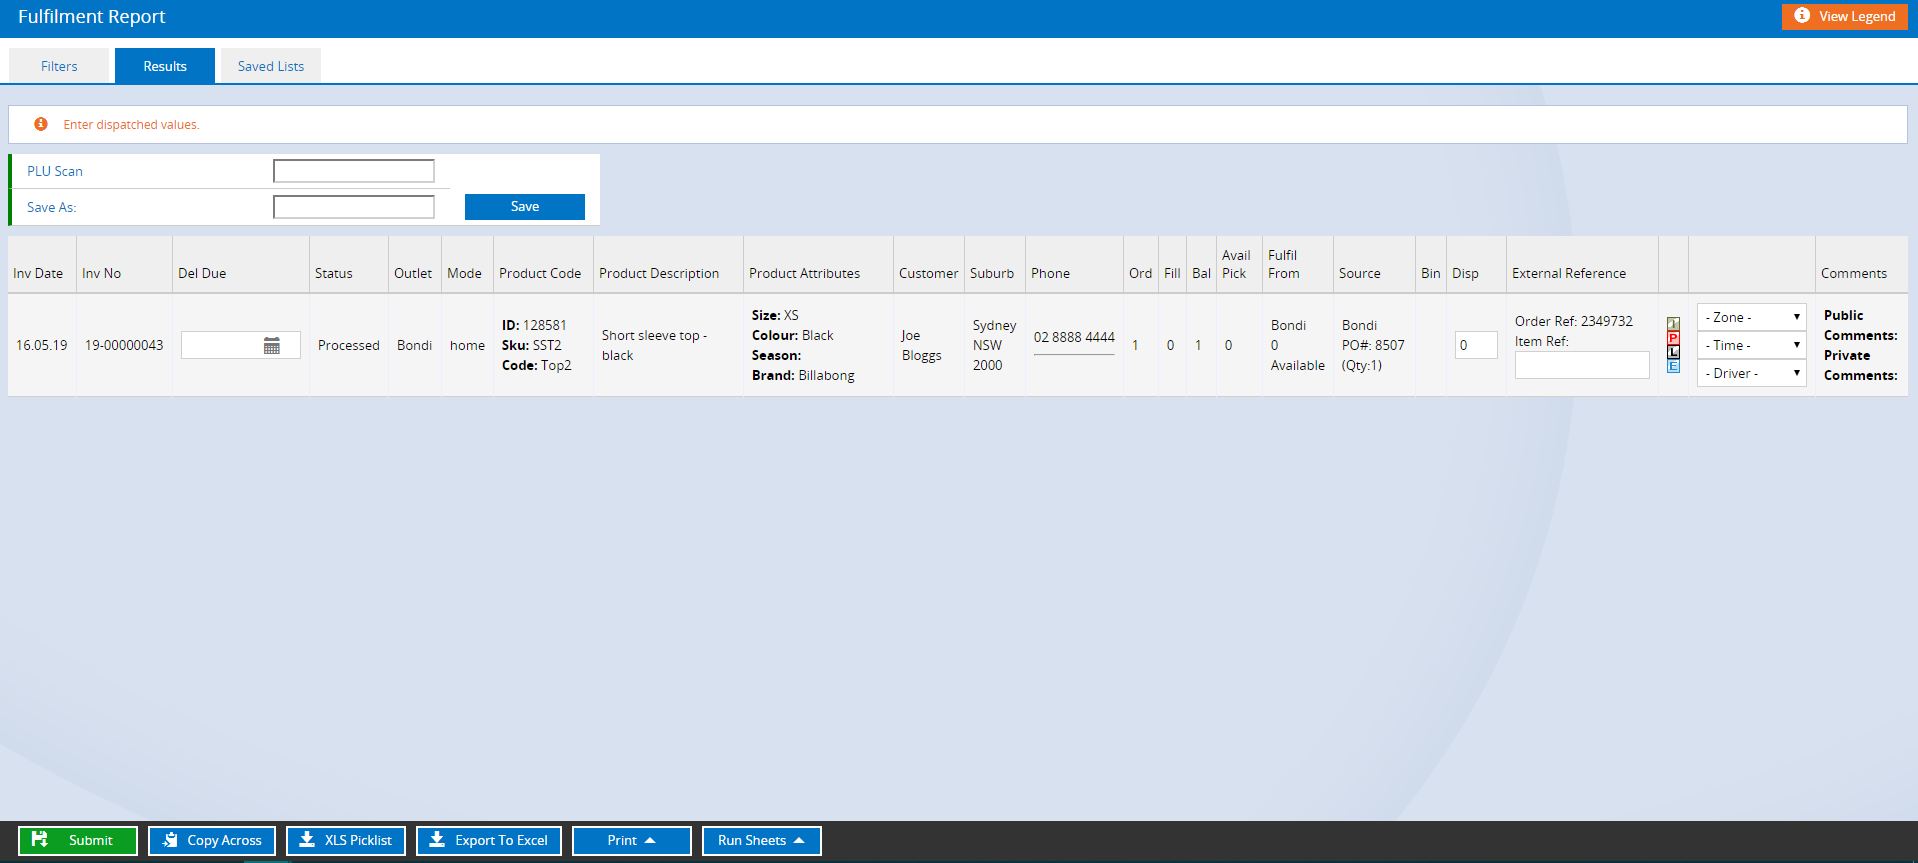
Each individual product for each order is displayed, including any Customer Comments as detailed in the Public Comments field.
- Check if there is a Transfer associated with the Order (details in the Source column). If so, this will need to be actioned prior to dispatching the Order.
- Click XLS Picklist to generate a Pick List (in Excel format) to provide to your staff to "Pick" the products for dispatch.
- If you utilise Delivery Drivers, there are number of Runsheets that print various information - you will need to review and print the Runsheet most suitable for your business needs.
- Click Print > Invoices to include invoices with your delivery
- Click Print > Labels to Print packing labels from your A4 Printer
Enter the Disp quantity for each product you wish to dispatch. This can be done in one of three different ways:
- Manually enter the Disp Quantity against each Product that you wish to dispatch
- Use PLU Scan to scan Products using a barcode scanner (or manually type the barcode). Each time you scan a barcode it will increase the Disp column by 1 for the first result in the list.
- Use Copy Across to populate the Disp column of ALL results with the full Ordered quantity.
Once you have made changes, select either:
- Submit - which will fulfil the Products immediately and apply all of the changes, or
- Save - enter a name into the Save As field and Save. This will save the results as a Saved List but won't submit the Fulfilments.
Using POS
The POS Home Screen displays an alert when there is a web sale assigned to that Outlet to be actioned i.e. requires payment or has products to be fulfilled/dispatched.

Click the Web Orders Today alert to open Search Sales Orders, Invoices & Quotes and process your Orders.
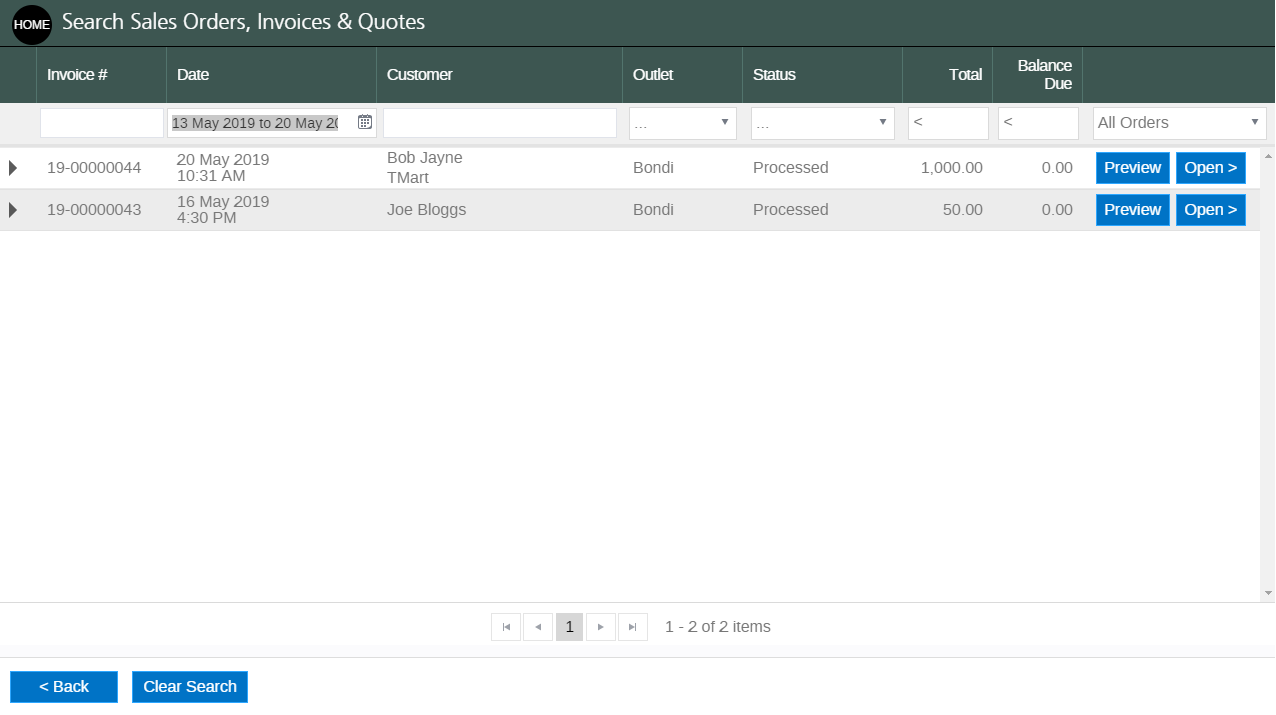
Apply any filters to help focus your results:
- To filter for today's orders only, click the calendar icon in the Date column > click Today
- To view the invoice for an order, click Preview
- To dispatch an Order, click Open > and click the Fulfilment tab and Fulfil the Order as normal (for more information see: How do I best use the Fulfilment tab in a POS sale?)
- To update the payment details, click Open>, click the Payment tab and enter the payment as required
- To email an update to the customer use the Email section on the Invoice tab
Tip: Ensure your POS Email Template has been updated to include the External Order Reference so your web store invoice number is displayed on the email to the customer
- Click Update to save and apply any changes
Frequently Asked Questions
Order was unable to be synchronised
If the order is unable to be synchronised to Retail Express at the time of placing the sale it will need to be manually entered in Retail Express using POS. e.g. if the Synchronisation Manager has been configured with incorrect user details, and a connection cannot be established with Retail Express.
Products are missing from the order in Retail Express
If a product is missing from the order in Retail Express, this could be due to the following reasons:
SKU code matches Product ID
If a product is synchronised and has a SKU code that matches the product ID, the synchronisation tool is unable to work as intended.
For example, if a sale is placed no product will be added to the sale. The order will not match the order online, although the full total of the sale will be transferred. This will result in the order in Retail Express appearing as overpaid.
To resolve the issue:
- Update the SupplierSKU/ManufacturerSKU of the product so that it doesn't match the product ID
- Resynchronise the product (note: you may need to remove the incorrect product from the web store)
- Adjust any transactions as required that are missing the products (edit the sale in POS and add the product)
The missing product doesn't have "Export to Web" ticked
If a product doesn't have "Export to Web" enabled it means the web store and Retail Express are not communicating about that product, including when orders are placed.
Follow the steps to enable the product for web store integration so the two systems can communicate, and if necessary, the steps for disabling and removing products from the web store.
Orders are created as "Awaiting Payment"
If the order is created in Retail Express as "awaiting payment" it's likely that the payment method hasn't been mapped to a Retail Express payment type. The web store is unable to tell Retail Express which payment method to use, and therefore no payment is allocated.
What POS Register is used for web store sales?
Web store sales are always put against the "Back Office" register for the outlet nominated as the Primary Sales Outlet.