Find related articles and FAQs at the bottom of this page
This article details how to create a Stock Transfer in Back Office using a purpose built Excel spreadsheet to populate your products and quantities. You can transfer stock from one Store/Outlet to a single Store, or choose to transfer stock to multiple different Stores at the same time.
Ensure you download a new copy of the template each time you use it to avoid any data integrity issues.
The Transfer Template is prepared based on the options selected from the Create Transfer screen.
To create a new Transfer Template:
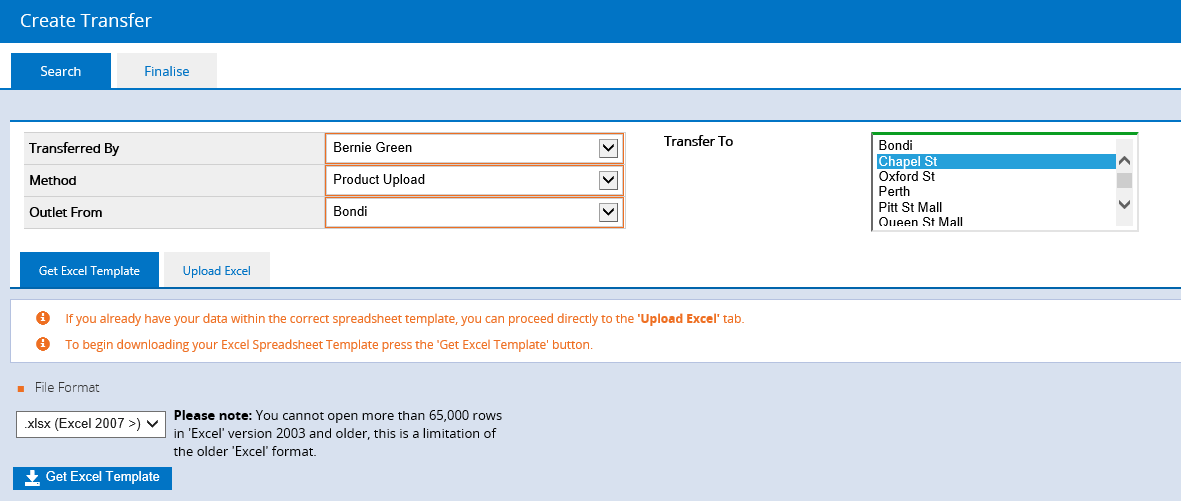
- Navigate to Inventory >Transfer Management > Create
- Make a select from the fields as required (see below for detailed information)
- Click Get Excel Template
- Open the spreadsheet that downloads
- Click Enable Editing
Transferred By | User creating the transfer |
Method | Method used to create a transfer (for this process select Product Upload) If you're looking for information on using Product Search Method, see: How to Create a Transfer via the Search Method. |
Outlet From | The Store/Outlet stock is to be transferred from |
Transfer To | The Store/Outlet stock is to be transferred to You can select a single location or multiple/all locations |
Notes | Enter internal notes or details to be populated onto the transfer/s |
Within the Transfer Template begin entering the Product ID or Supplier SKU and quantities of the products for transfer.
If you selected multiple Transfer To Outlets when downloading the template, ensure to also enter the ToWarehouseName for each Product.
The ToWarehouseName on the template must match exactly with your Outlet name. You can check your Outlet names via: Settings > Locations / Outlets > Outlets.
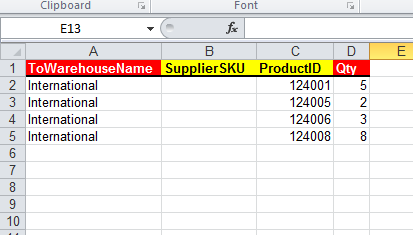
Save the file once complete, taking note of the saved location.
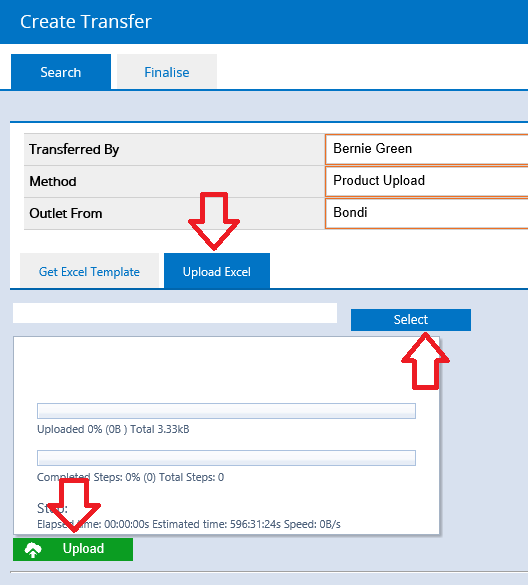
Return to the Create Transfer screen to upload the Transfer template.
- N
- Click the Upload Excel tab
- Click Select
- Browse to the location of the saved Transfer Template
- Click Upload
- If the Upload was successful a message will be displayed
- If there were errors they will be detailed at the bottom of the screen; correct the errors and repeat the steps above to try again
Viewing created Transfers
The Transfer Report will show any created Transfers, allowing you to confirm any data that has been uploaded.
If you upload the Transfer file again it will duplicate the transfer.
To run the Transfer Report:
- Navigate to Inventory > Transfer Management > Transfer Report
- Select the Outlet From and To filters leaving other filters at the default
- Click Search
- Any created transfers for your selected Outlets created that day will be displayed (you can click the Transfer number to open and review the products within).
Transfers created via Upload will have a Transfer status of In Progress
In Progress Transfer are created with the Stock at the stage of Allocated.
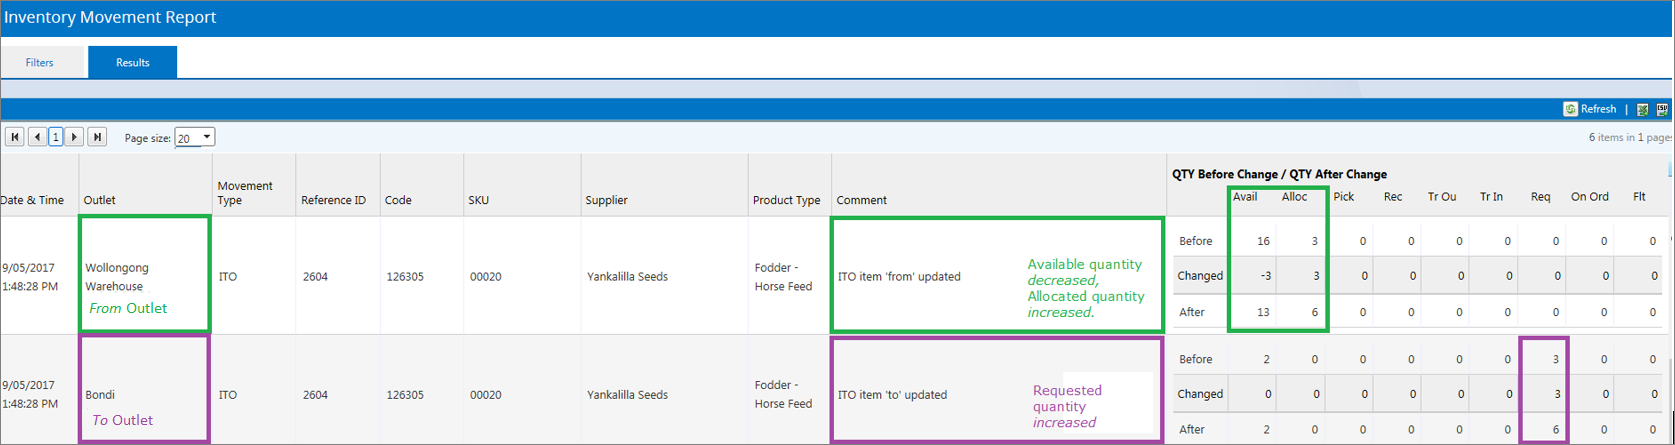
An In Progress status for your Transfer results in the below stock movement occurring (example image contained below is an extract from the Inventory Movement Log):
- - the From Outlet has the Available stock decreased and the Allocated stock increased
- - the To Outlet has the Requested stock increased
FAQs
Process Transfers in Bulk
To manage your Transfers in bulk:
- Navigate to: Inventory > Transfer Management > Bulk Edit
- Enter filters to review and action your selected Transfers
- Click Search
- All associated Transfer products are displayed.
For detailed information on managing Transfers en-masse refer to the Mass Edit Transfers article