You can synchronize customer data between Retail Express and Shopify to maintain unified customer records across online and in-store channels. This integration helps improve customer experience by ensuring consistent information, enabling seamless omnichannel interactions, and providing a complete view of customer purchase history regardless of shopping channel.
Setting up customer synchronization involves configuring bidirectional data exchange, mapping customer fields, and establishing synchronization triggers. When properly configured, customer sync typically leads to better customer service through complete purchase history visibility, improved targeting for promotional activities, and reduced data entry through automated customer record management.
Customers are constantly synchronised between Shopify and Retail Express using the email address as the unique reference. As events occur the data will be synchronised and updated e.g. when the customer creates an account online or makes a purchase online. If the Shopify integration has not yet been enabled, customers will be synchronised at the point of enabling the integration.
The email address is used as the identifier between both systems, so it's important to ensure you have reviewed the data prior to synchronising your customers.
Removing an email address from a customer account will stop the synchronisation between both systems.
New customer accounts are sent from Shopify and created in Retail Express, even when an order has not been placed. This can be done through either of the following actions online:
- When a customer creates an account
- When signing up for newsletter subscriptions (non-customer accounts)
Before you Begin
To get started with your customer synchronisation you need to complete the following steps:
- Restrict duplicate email addresses (to prevent duplicate accounts)
- Import existing customers into Retail Express before enabling the synchronisation so the account can be mapped to your existing Shopify customer account
- Enable your integration
Each of these steps are covered in more detail below
You will be unable to synchronise your customer accounts until duplicates in the system have been removed. Refer to the Restricting Duplicate Customer Emails article for more information.
Synchronising Customers
When a customer is published to Shopify it creates a customer record as an inactive account.
Customers will not be notified when an account has been created for them on Shopify
When the customer creates an account online an email will be triggered requesting they activate their account. Alternatively, customers can be prompted to activate their account by staff members sending an Account Invitation from the Shopify Admin (see the Shopify Help Centre for more information).
Customers can be synchronised from Retail Express to Shopify through the following methods:
- Individually - by editing customer records
- En-masse - using Customer Mass Download/Upload
- Automatically - as customers are created via POS (if default publish is enabled, covered further below)
Publishing individual customer accounts
To update/publish a customer account that already exists within Retail Express:
- Within Retail Express, navigate to: Customers > Customers
- Search for the required customer
- Click Search
- Click the corresponding Customer No. to open the customer record
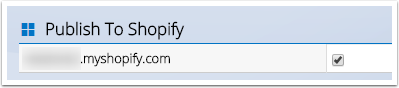
- Locate Publish To Shopify
- Tick the Shopify Store
- Click Save Changes
The customer will be queued to synchronise to the Shopify store.
Publishing multiple customer accounts
To update/publish multiple customer accounts that already exist within Retail Express:
- Within Retail Express, navigate to Customers > Customer Management > Customers Mass Download
- Click Start New Download if required
- Filter the customers
- Click Download to generate the Download file
- Once processed click Download CSV
- A CSV file will be downloaded containing customer information in Retail Express; this file can be opened in Microsoft Excel for editing
- Locate the column "Publish To:url" (where URL is the address for your Shopify store)
- To publish the customer to Shopify change the column to read TRUE
- Save the spreadsheet to your computer
- Return to Customers > Customer Management > Customer Mass Upload
- Follow the instructions in the Customer Mass Upload article to upload the changes
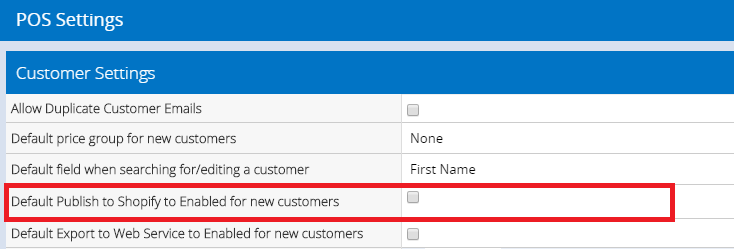
Enable Auto-Publish
Customers can be configured to automatically publish to Shopify as they're created within Retail Express.
To configure customers to auto publish:
- Log into Retail Express
- Navigate to Settings > POS Settings > Customer Settings
- Locate the field Default Publish to Shopify to Enabled for new Customers field (there will be a tickbox and the URL of the Shopify store)
- Tick the tickbox
- Click Save Changes
 (Note: your Shopify URL will appear in this field)
Related Articles
E-commerce Integration:
Customer Management: