You can install receipt printers with integrated EFTPOS terminals for Retail Express POS, enabling streamlined customer checkout with automated receipt printing and payment processing. This helps optimize your retail operations by providing professional customer receipts, supporting Australian EFTPOS integration, and creating efficient payment workflows reducing transaction time.
The Retail Express Hardware Utility is designed to allow the communication of Retail Express to communicate via your local network connection to hardware such as a Docket Receipt Printer and Integrated EFTPOS Terminals.
Re-Running the Hardware Utility
Note: If you have previously installed the utility and are looking to re-run it (which also updates it to the latest version) please see below. It is vital that you log out of POS (not just close the browser) once you have complete this process, then log back in.
Once the utility is complete, ensure you log out of POS from the POS home page, then log back in from the blue "Register Login" screen. If you did not log out of POS prior to re-running, log out of POS now and then back in.
Full Installation Process - Including Pre-Requisites and Advanced Details
Supported Receipt Printer Connection Scenarios
This guide has been written for the installation of the Retail Express Hardware Utility using the following supported connection scenarios:
- Direct connection to the Windows PC via USB connection - using the windows printer configured with the Manufacturer's Drivers
- Direct connection to the Windows PC via LPT / COM connection - talking directly to the port without manufacture drivers installed (note: you will need to know the "Baud Rate" of the printer during configuration)
- Manufacturer installed Windows Printer - configured to talk to a Docket Printer running on the local network via Ethernet or Wireless (typically if Windows can talk to the printer the Retail Express system should be able to).
Note: Supported POS Terminal configurations.
Installing Hardware
Prerequisites
The Hardware Utility will attempt to install any missing prerequisites during the initial install. Should this fail for any reason, you may like to install the following pre-requisite manually and re-attempt.
- Windows 7 or newer
- .Net Framework 4.6.1 or higher (for more information see the FAQs below)
- Microsoft Visual C++ 2005 (Installs Runtime libraries)
- Microsoft POS for .Net v 1.12 (Do not install v 1.1.4)
Microsoft Software requirements: the following software is required to be installed on the computer prior to running the Hardware Utility. For assistance on downloading and installing this software, you will need to contact your Systems Administrator/a Computer technician.
- Windows 7 32 /64 bit
- Windows 8 32 /64 bit
- Windows 8.1 32 /64 bit
- Windows 10
Accepted operating systems: The Retail Express Hardware Utility currently requires a Windows-based operating system and supports (note Windows 8.1 RT is not supported):
- Have the ability to install the Hardware Utility and allow it to make the required registry entries.
- To communicate via specific ports on the PC so any anti-virus software in use will have to be configured to allow this communication.
Administrative Privileges: Administrative privileges are needed to:
- Windows XP and Symantec Endpoint Protection (Cloud-based): if running Windows XP and using Symantec Endpoint Protection (cloud-based) this program will need to be uninstalled to be able to successfully install printers (disabling is not enough).
- McAfee antivirus/internet security - this program has also caused conflicts in the past and may need to be disabled during installation and relevant rules added to ignore the Retail Express software.
- Windows Updates: Please ensure the system is up to date in terms of Windows Updates and that the internet connection is stable before proceeding to install.
Note: Cash draws rely upon the receipt printer to "kick" the drawer open, so after configuring the receipt printer, the drawer should function/kick correctly.
Before you begin
Ensure that you have completed the following configuration or have the information available:
Video
https://player.vimeo.com/video/177170286
Installation
To install the Hardware Utility:
- Ensure you have applied all Windows Updates
- Open Retail Express
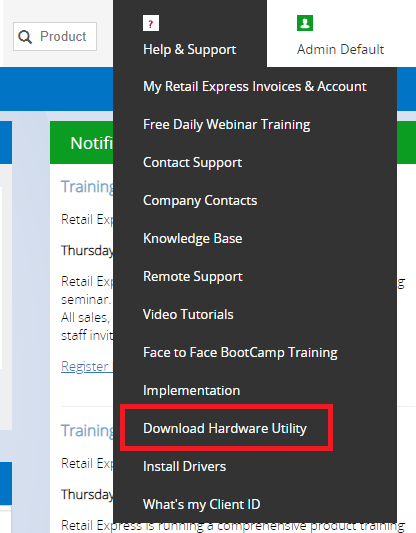
- Navigate to Help & Support > Download Hardware Utility
- Click OK to the pop-up message
- Click Open on the Download prompt
- Click Install
- A security warning will appear, click Yes
- The program will begin to run automatically; follow the instructions as per below.
Using the Hardware Utility Tool
To use the Hardware Utility Guide:
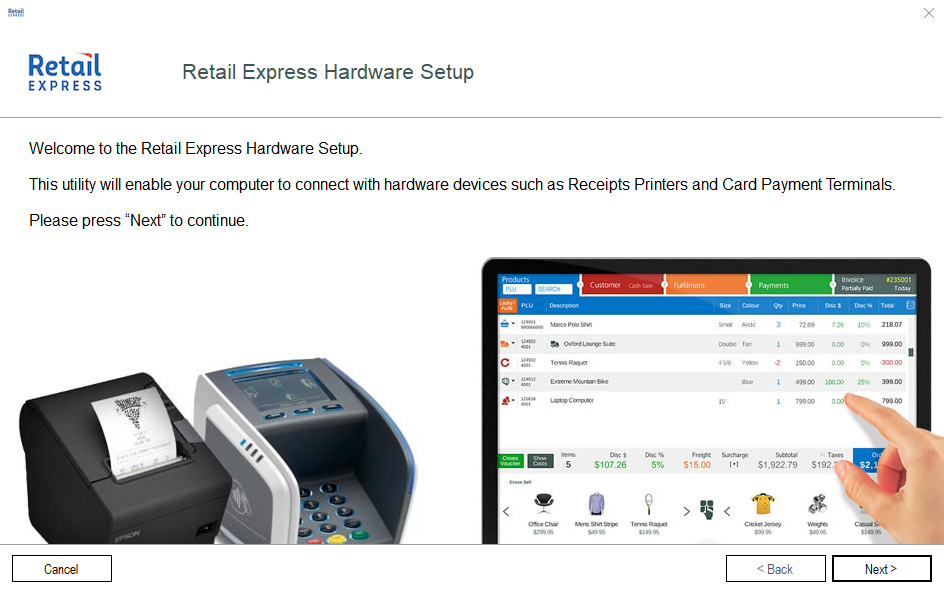
- The Welcome Page will be displayed, click Next
- If the tool was previously installed a warning will be displayed to confirm the hardware will be temporarily unavailable. Tick the confirmation box and click Next
- The Hardware Utility will install any prerequisite programs required, follow the prompts as required.
- Enter the Client ID, Username and Password (as obtained during the "Before you begin" section previously; note these fields are case sensitive) and click Next

- Select an Outlet from the dropdown list; this is the list of outlets associated with the user account entered in the previous step. If the required outlet doesn't appear, you will need to get your Admin to assign access to that user account (note that Retail Express will not be able to provide admin credentials due to security reasons). Click Next.
- Enter a Hardware Friendly Name. This is a name used for internal purposes, and will be used to identify the computer later. Click Next.
- The tool will now display which Network Adapter on the computer has an active network connection along with the IP address. If there are 2 network adapters both with an active internet connection, select the primary one and disable the other (if you're unsure how to do this please contact your Systems Administrator).

- If required, click Advanced Settings to change the ports, otherwise leave this as default, and click Next
- Plug in the Receipt Printer as per the image and click Next
- The Utility Tool will search for connected Printers. Once complete the Printer Port window will be displayed.

- Auto Detect and Test Print - the tool will automatically cycle through all COM / LPT ports and Windows printers trying to send a test print.
- Choose Printer Port (advanced) - the Utility Tool will display a list of printers and ports; select a printer straight away to test.

Select an option:
- Nothing Printed Try Next Port: depending on your previous selection, either the list of printers will be displayed to select from, or it will automatically cycle to the next printer
- Something Printed to the Wrong Printer: depending on your previous selection, either the list of printers will be displayed to select from, or it will automatically cycle to the next printer
- Garbled Text Printed to the Right Printer: the connection is correct, but the Baud Rate will need to be configured (you will be prompted for this in the next step). Click the Clear Text button to proceed.
- Clear Text Printed to the Correct Printer: if the test worked successfully click this button to continue onto the next step of the Hardware Utility Tool

On the Print Confirmation screen select an option to confirm the test print:
- The Baud Rate selection screen may appear if the printer is connected by Serial or Parallel port. Select the Baud Rate from the drop-down screen, noting that selecting the incorrect rate can result in garbled text on the receipt. The default baud rate is 9600.
- The Integrated EFTPOS (Card Payment Terminal) screen will be displayed. To finish the Hardware Utility and skip the Integrated Payments select None and click Next.
- Continue onto the Registers section below to complete the installation.
To install an integrated Payment System (Tyro, PC EFTPOS) skip to the next section; you will need to return to step 16 once you reach the "Register" section of the installation.
- ColumnDefinitionRegisterThe name of the register as configured within Retail ExpressAttached to another computerThe register already has been assigned to another computer in a previous Hardware Utility installation. This can still be selected to update it to the current computer if required.Attached ToThe name of the alternate computer the register is attached toSelectUsed to tick which registers will be attached to the current computer and printer

- Leaving the hardware utility running, Open Retail Express
- Navigate to Settings > POS Settings > Hardware Services
- Click the Local Hardware Override tab at the top
- Locate the name of the Register and tick the Force Local button
- Click Save Changes
- Return to the Hardware Utility tool and tick the same register

One register used on multiple computers
In this scenario, there may be two (or more) computers instore all logged into one register e.g. Brisbane Outlet, Register 1.Scenario configuration:In order for the hardware to function correctly, Retail Express is required to be configured to force a Local Hardware Override:
Adding additional computers communicating with existing hardware
This scenario is typical for peak periods, where you need to add additional computers or tablets temporarily to assist with processing your customers. (e.g. Christmas, major shopping seasons). For example, your outlet may typically have two computers, but you may wish to add additional computers/tablets configured to use the existing Receipt Printer/Integrated EFTPOS terminal (rather than their own dedicated hardware).The Hardware Utility will need to be run on the new computer (to install the appropriate certificates). Once complete the new computers/tablets can sign into the appropriate registers to begin using the hardware as required.Prerequisite: ensure any new registers have been configured within Retail Express (otherwise you will need to cancel the installation, create the registers and re-run the Hardware Utility installation). To create a new register, navigate to Settings > POS Settings > Registers.Scenario Configuration:Tick the new registers as required (ensuring the existing setup remains selected) and continue with the installation.
Different registers for each computer
In this scenario, each of the computers has their own respective register e.g. Computer 1 signs into Brisbane Outlet - Register 1, computer 2 signs into Brisbane Outlet - Register 2.Scenario Configuration:Tick the register the current computer will be associated with and continue with the installation (the Hardware Utility will need to be run on each computer).
- The Hardware Configuration will be saved, note this can take a few minutes. Once complete the Retail Express Hardware Setup Finished window will be displayed.
- Press Finish to close the window.
If you use Chrome, you must enable local network access for POS so it can talk to your hardware. Follow this guide:
Enabling Local Network Access in Google Chrome for Retail Express POS - Maropost Community
Integrated EFTPOS - Tyro
New Installation:
If the Tyro software wasn't installed previously, it will attempt to automatically download and install the software. In that case, follow the below article to complete the configuration (note: new terminals may require a phone call to Tyro to activate the terminal prior to installation).
Installed previously:
Typically Tyro would have installed and configured the terminals already; the Retail Express Hardware Utility will just check to confirm the setup and require verification. Follow the steps below to complete the process.
- From the Integrated EFTPOS (Card Payment Terminal) screen, select Tyro from the dropdown and click Next.
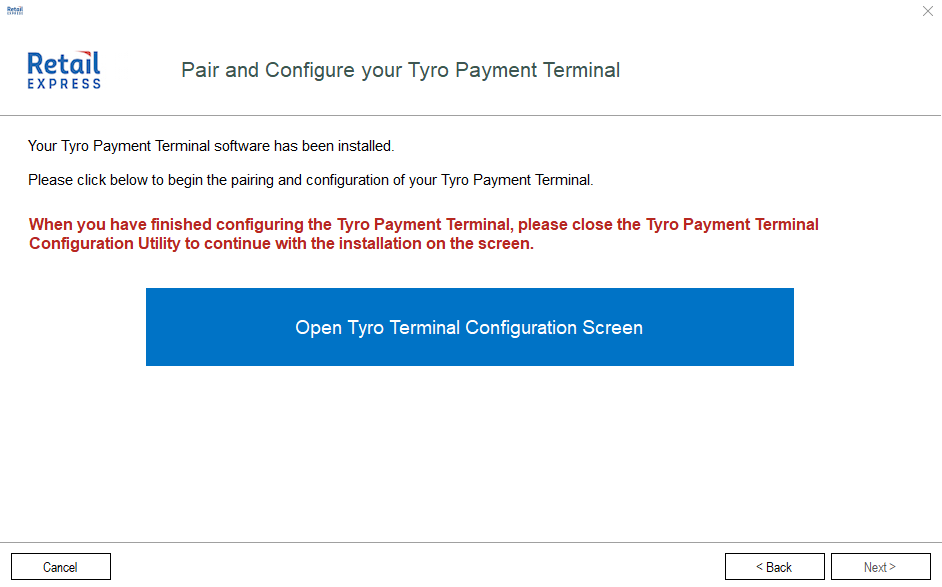
- The Hardware Utility will check to confirm the installation, then display the Pair and Configure your Tyro Payment Terminal screen. Click the blue Open Tyro Terminal Configuration Screen button.
- In the Printing Location box select whether the receipts should print on the Tyro terminal or a local printer (if there is a printer attached directly to this computer).
- Click the Verify Key button
- Once completed click OK
- Return back to the Hardware Utility and press Next
- Follow the instructions from step 16 in the previous Using the Hardware Utility Tool section.
Rerunning the Hardware Installation
The Hardware Utility tool can be re-run at any time, either by following the prompts above to run the file from Retail Express or by clicking the shortcut icon on the desktop and selecting "Launch Configuration Wizard" (the shortcut on the desktop was created during the initial installation).

When the Hardware Utility opens, click the Launch Configuration Wizard button at the bottom of the screen.
Reinstall the Hardware Utility
In some situations, the Hardware Utility may become corrupted by a power outage or incorrect shutdown. If this occurs a complete re-install of the application may be required.
- Click on the Utility.exe download link in the "Available Downloads" section at the bottom of this page (Note: this is not the same as the Hardware Utility tool)
- If a warning appears about the file click Run or Keep (the prompt will depend on the browser)
- Click Allow or Yes to run the application to run if prompted by Windows
- Some versions of Windows may display a message Windows Protected your PC. If this appears click More Info > Run anyway.
- Select Re-Install and click OK
- Follow and allow the onscreen prompts to complete
Note: When re-installing, the Hardware Utility will download again and ask to run > run the setup.exe to begin the installation wizard.
Uninstall the Hardware Utility
- Click on the Utility.exe download link in the "Available Downloads" section at the bottom of this page (Note: this is not the same as the Hardware Utility tool)
- If a warning appears about the file click Run or Keep (the prompt will depend on the browser)
- Click Allow or Yes to run the application to run if prompted by Windows
- Some versions of Windows may display a message Windows Protected your PC. If this appears click More Info > Run anyway.
- Select Uninstall the Hardware Utility
- Click OK
- Follow and allow the onscreen prompts to complete.
Note: In rare circumstances, this process may not complete a full uninstall. If this occurs we recommend navigating to Control Panel > Programs > Retail Express Hardware Utility > Uninstall to finish the uninstallation.
Frequently Asked Questions
Some of the most common Frequently Asked Questions are displayed below, however for comprehensive troubleshooting information please refer to the below article:
Note: Receipt Printer and Integrated EFTPOS - Troubleshooting.
How to manually restart the Hardware Service
If you're experiencing problems with the hardware, one of the first troubleshooting steps to take is to confirm the Hardware Service is running. If the Service has been stopped, you may experience the following:
- Receipts are not printing
- The Integrated EFTPOS is not functioning
Reasons the service may have stopped
The most common causes for the service to not run are:
- The computer was slow to start, and the processes are still starting up
- Antivirus software has blocked the service
Restarting the service
- Log out of POS (note: closing the browser window will not log out of POS, you will need to follow the steps in the linked article)
- Open the Retail Express Hardware Utility either by clicking on the icon on the desktop or by selecting the program in the "Start" menu
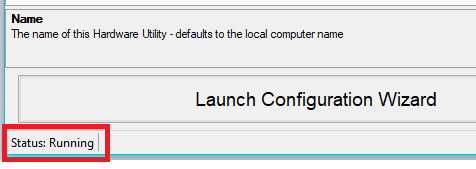
- If a prompt appears for the User Access Control click "Yes" - Check the status in the bottom left-hand corner of the window:
- If the service is Stopped click Service > Start from the menu.
- If the service is Running click Service > Restart from the menu.
- Log into POS and retry a sale to confirm if the issue has been resolved.
Hardware Utility doesn't automatically start when the computer starts
If the Hardware Utility doesn't automatically start when the computer starts, to immediately resolve the issue you will need to manually restart the service. Instructions on this process can be found in a previous section of this article.
To resolve the issue ongoing you will need to investigate and identify the cause for the service not running. The most common causes for the service to not run are:
- The computer was slow to start, and the processes are still starting up
- The service has been changed to be a manual service
- Antivirus software has blocked the service
In these cases you should:
- Reboot and wait - At a suitable time (i.e. when the hardware is not required, typically outside of trading hours) restart the computer and wait a substantial period of time to see if the service begins running. You should wait longer than necessary to see if there's just a delay.
You can check the service status by opening the Hardware Utility tool and checking the status in the bottom left-hand corner
- Check your antivirus - the instructions for this will vary depending on the antivirus program used. You should check the blocked programs and services to see if the Hardware Utility is listed under the Blocked items.
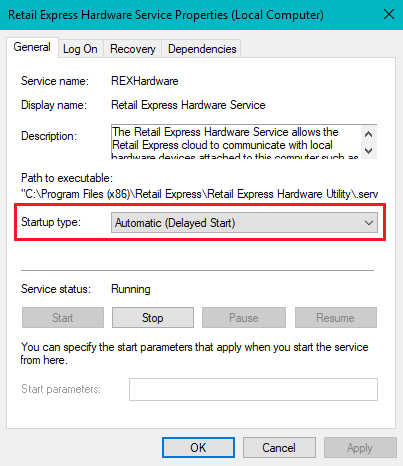
- Confirm the service has not been configured to be a manual service - in some cases the service may have been configured to be a manual service. This indicates to the computer that the service should only be run when prompted and not automatically when the computer starts. To check this setting please consult your version of Windows below
Windows 10
To check the service configuration:
- Click the Windows icon
- Type Services
- Select the Services desktop app
- Locate the Retail Express Hardware Service
- Ensure Automatic or Automatic (Delayed Start) has been selected
- Click OK to save the changes and close the window
Microsoft .NET update
Clients using the Retail Express Hardware Utility need to ensure they have updated the pre-requisite software, Microsoft .NET, which is installed on the computer as part of the Utility.
The Hardware Utility requires a minimum of Microsoft .NET 4.6.1 or later.
You may have already received this version update as part of the standard Windows Updates, so you may not encounter this issue. If you try to install/update from the link below, the PC will advise if you already have the required (or later) version installed - in which case no further action is required.
Downloading Microsoft .NET
Before you begin:
- If you have previously installed the Hardware Utility it may continue to run in the background. You will need to install .NET before the next time you open it (i.e. to troubleshoot, install or reinstall hardware).
- Windows XP is not supported (Retail Express has also not supported Windows XP since August 2016 - refer to the article Supported Operating Systems)
- Administrator access is required to install the software. If the account is not an administrator, you will need to log in with an appropriate account (contact your Network Administrator or local computer technician to organise access).
To download and install the latest version of Microsoft .NET 4.6.1:
- Navigate to the Microsoft Download Page
- Select your Language from the drop-down box
- Click the Download button
- Follow the prompts to install the latest update
- Once installed, follow the instructions above to continue the installation of the Retail Express Hardware Utility.
How to check the Hardware Utility Configuration
The Hardware Utility tool has the ability to display a Configuration text document, useful for diagnosing various problems. For example, to see if a printer is Windows-based, Serial etc.
To open the Configuration text document:
- Open the Retail Express Hardware Service using the icon on the desktop or Start menu
- Click File > Show Config
- The configuration text document will be displayed.
Unable to see all the buttons in the Utility
The most common cause for this is a font size change in Windows. If the Windows font size has been changed from the default size you may experience problems using the Hardware Utility.
To resolve the issue:
- Close the hardware utility
- Minimise all programs until you are viewing the Windows Desktop
- Right-click on the desktop and click on Display Settings
- Locate the Scale and Layout section
- Under the setting Change the size of text, apps and other items select 100