You can import outstanding voucher and credit note balances into Retail Express during implementation, helping your retail operations honor existing store credit commitments to customers. This capability ensures all active vouchers are properly recorded in the new system, which helps maintain customer trust and accurate financial tracking during system transitions.
Setting up historical voucher data entry enables your retail operations to implement new systems without disrupting customer store credit, helping optimize customer service continuity. This helps retail businesses maintain financial obligations and customer relationships by ensuring all outstanding credits are accessible and redeemable in Retail Express.
Vouchers and Credit Notes from existing systems can be entered into Retail Express prior to going live, making it more efficient for your staff to update the sale in the future.
To enter existing Vouchers and Credit Notes, you will need to create a sale in POS using either of the following methods:
- An individual sale for each voucher/credit note with a customer attached to the order
- A single sale with a purchase of multiple vouchers (this is only recommended when the customer name is not required) as either Cash & Carry (no customer) or a generic customer account
You can edit the voucher/credit note code at the time of entering the item into Retail Express, so you can retain the original code from the previous system. This will make it easier to find and redeem the voucher/credit note in POS when presented by the customer.
As part of this process you will be required to Pay for the voucher/s to finalise the sale. It's recommended to use the "None" payment type as per the Prerequisites below.
Prerequisites
- A list of outstanding Vouchers and Credit Notes from your existing system
- Your Customers uploaded into the Retail Express database (alternatively these can be created in POS as you create each sale)
- An enabled Payment Type for the payments to be allocated against
Using the "None" Payment Type will allow you to finalise the transaction without taking a physical payment, and allow you to separate the payment on the Income Report.
Entering Existing Vouchers and Credit Notes
Check Voucher Expiry Date settings
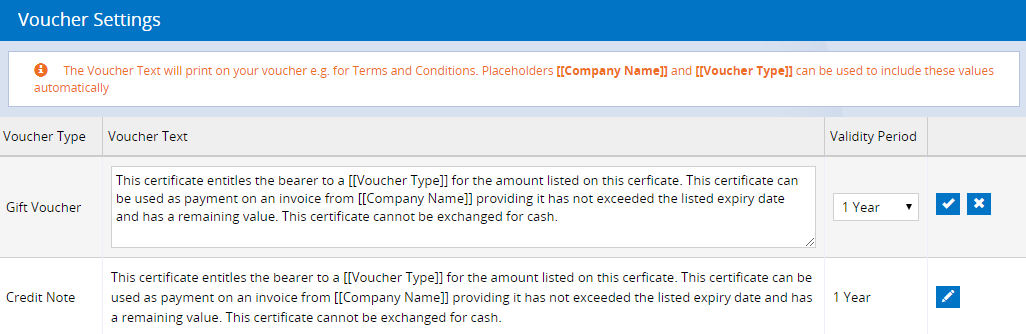
Before creating any vouchers it's essential that you check your configured Voucher Validity Period. This will need to be in alignment with your previous system to avoid any vouchers prematurely expiring and unable to be redeemed in POS.
To configure the Voucher settings:
- Log into the Retail Express Back Office
- Navigate to Settings > POS Settings > Voucher Settings
- Click the blue Pencil icon to edit the appropriate voucher type
- Select a Voucher Validity Period from the drop down
- Click the tick icon
- Click Save Changes
Refer to the POS Settings - Voucher Settings article for more detailed information.
 Click to view full size
Once a voucher has passed the validity date it will be cancelled, and cannot be reactivated.
You can edit the Validity Period at any time without affecting the Expiry Date for existing vouchers i.e. you could set it to Forever while creating existing vouchers, then change the setting for 1 Year for all new vouchers moving forward.
Create existing vouchers
When creating the vouchers, you have two options:
- Create one sale per voucher (with a customer for each sale)
- Create one sale with all vouchers (processed as a cash sale or using a "generic" customer)
The method you choose depends on your business requirements and the need to be able to locate a voucher by a customer name. If that's not necessary, you can create all vouchers on a single sale, saving you time.
To create your vouchers:
- Log into Retail Express
- Open POS
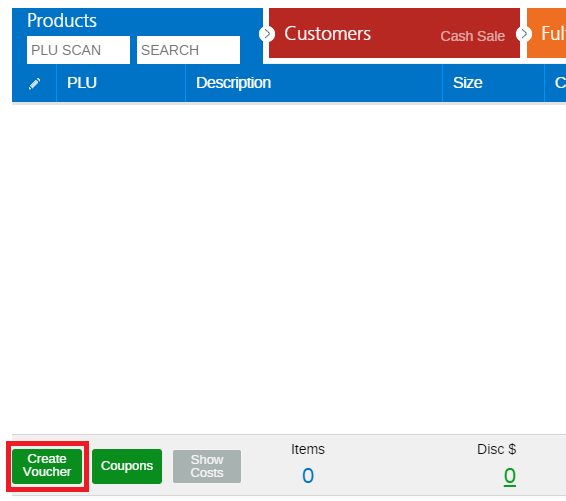
- Create a New Sale
- Click the green Create Voucher button
- Enter the voucher code from the previous system into the Voucher Code field (alternatively you can leave this as the unique code auto-generated by Retail Express)
- Enter the value of the voucher into the Voucher Value $ field (if the voucher has been partly redeemed enter the remaining balance)
- Click the Gift Voucher icon as the Voucher Type
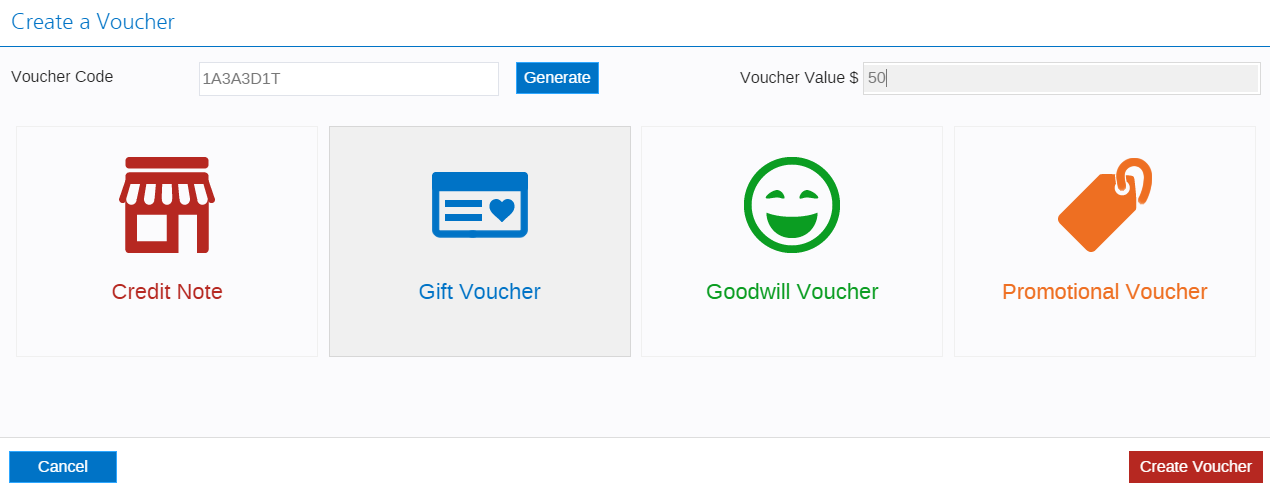
- Click Create Voucher
- If you are adding multiple vouchers to the same sale, click the Create Voucher button and repeat the steps again for the remaining vouchers
- Click the Customer tab
- Use the fields to add a customer to the sale (if using multiple vouchers on a single sale you can skip this step)
- Click the Payment tab
- Select the appropriate payment type
The Payment Type "None" will allow you to finalise the transaction without taking a physical payment, and allow you to separate the payment on the Income Report.
- Enter the Payment Value so the Balance of the sale is $0
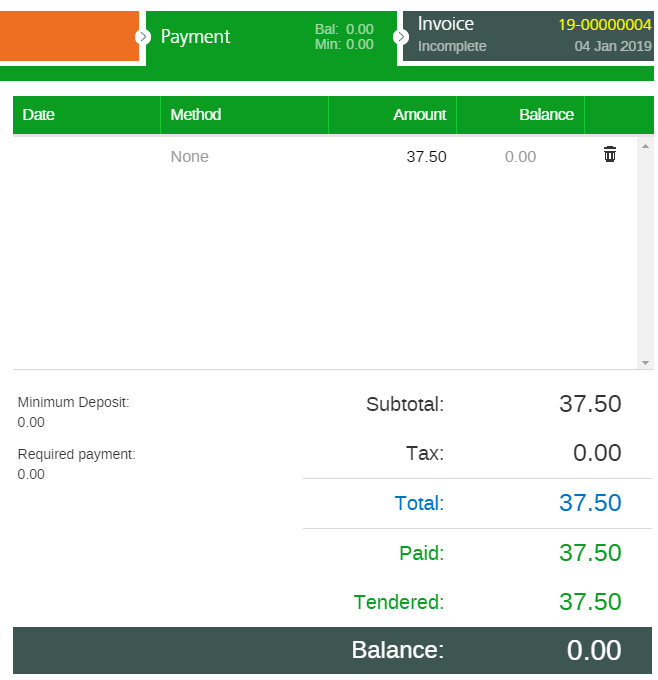
- Click Finalise
Create Credit Notes
Credit notes follow the same process as the Gift Vouchers above with the following exceptions:
- When selecting the Voucher Type ensure you select Credit Note

- You will need to add a Customer to the sale to assign the Credit Note to that particular customer (if the customer has multiple Credit Notes you can use a single sale to add multiple Credit Notes)
Use the Voucher instructions above to enter your Credit Notes accordingly.
Finalisation (end of day)
As a result of entering historical transactions your system will have recorded payments to be reconciled through the POS End of Day/Cash up process.
Once all historical transactions (including any existing Lay-bys) have been entered you should process the following:
If the End of Day/Cash Up is not completed all historical payments will appear in the first End of Day processed in Retail Express. This may make it difficult to reconcile.