You can configure gift voucher and credit note functionality in Retail Express to provide flexible customer service options that help drive repeat business and improve customer loyalty. This capability enables your retail operators to issue store credit efficiently, which helps turn product returns into future sales opportunities while maintaining proper financial tracking.
Setting up proper gift voucher workflows enables your retail operations to offer customers convenient purchasing options for gifts while providing store credit solutions for returns and exchanges. This helps optimize retail customer service by giving operators tools to handle various transaction scenarios while maintaining accurate financial records across all store locations.
Vouchers are created within POS, creating an available balance stored against a unique code. This code is then used as a form of currency when redeemed in the future. If using the Retail Express Shopify Connector (with the Gift Voucher add-on enabled) any vouchers created will be synchronised with your online store, giving the customer the ability to redeem their voucher either in-store or online.
You can bulk create vouchers for your customers with just a few clicks using the Customer Activity Report e.g. awarding your VIP customers a voucher in their birthday month.
Vouchers can be used in the following manner:
- the credit can later be redeemed partially or in full
- the credit can be redeemed from any Store
- the credit can be redeemed to any person of your choice
- all Vouchers will automatically expire within the specified time period
Reminder: As of 1st November 2019 all Gift Vouchers are required to have a minimum expiry of 3 years, unless it meets the requirements for an exception to the rule. For information see the ACCC website and the POS Settings - Voucher Settings article for information on configuring the automatic expiration date.
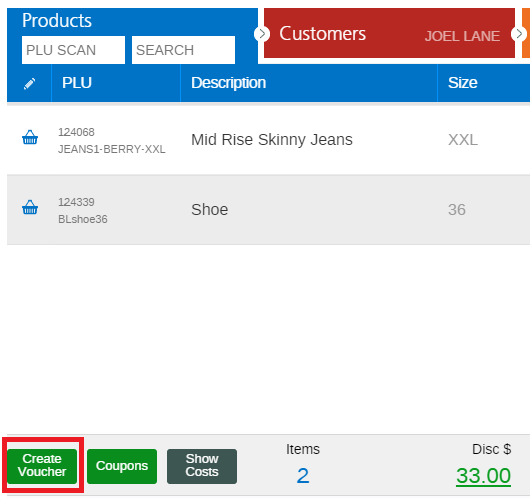
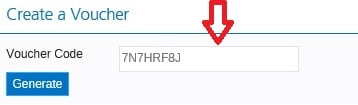
Create a Voucher
- Within POS, to create a new Gift Voucher or Store Credit, click Create Voucher
- The Voucher Code is auto created, however if you have your own you can override this code with your own if required.
- Enter the Voucher Value
- Select the Voucher Type
We recommend using Gift Vouchers, unless the customer is an Account Customer (Credit Note will be selected by default for Account Customers). Credit Notes will be displayed on the Account Payments Report.
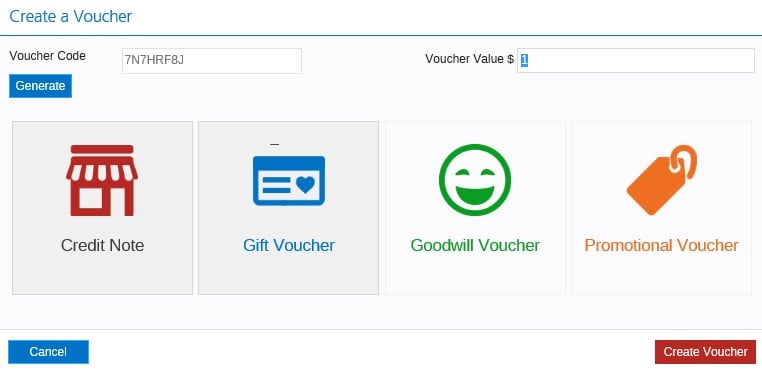
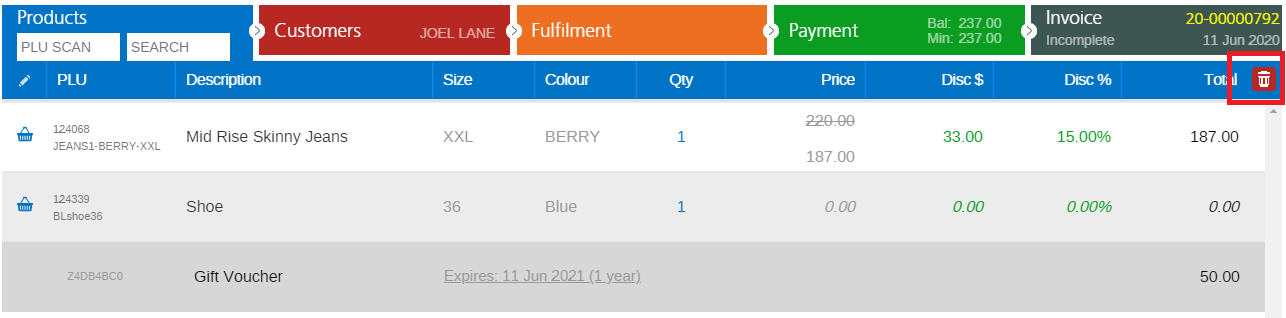
- Click Create Voucher. The voucher now appears at the bottom of the Products within the sales order.
- You cannot edit a voucher, however you can delete a voucher and create a new one if required.
- To delete a Voucher (prior to completion of the sale) click on the voucher to highlight it
- Click the Trash Can icon.
- Continue the sales transaction as normal
If creating a "Goodwill" voucher (i.e. the customer is not paying for the voucher) you can use the Payment Type of "None" to process the order; see the FAQs below for more information.
- Click the Invoice tab
- Click Print Vouchers
- You will be able to select your Receipt Printer or A4 printer
Frequently Asked Questions
Can I assign a pre-printed voucher code when I create a voucher?
Yes, simply override the auto created voucher code and type (or scan) the pre-printed voucher code into the Voucher Code field > then continue the transaction as normal.

Where can I report on or view created vouchers?
When a Voucher or Credit is created, it will appear in your sales transaction and form part of the Order Total Value. In the Back Office area it will appear in your Voucher Reports (Reports > Finance Reports).
How to load a value onto a plastic store gift card
Some gift card suppliers have their cards accepted via EFTPOS terminals. For more information about this availability we recommend you contact your EFTPOS terminal provider. However, we have detailed steps below for processing this style of card at POS.
Using this process, these gift cards will NOT be created or tracked as a voucher in Retail Express. They will be used similarly to an EFTPOS debit card.
Create a miscellaneous or non-inventory product, such as "Gift Card". This product will always end up with no sale, cost, nor stock.
To Top Up a Gift Card:
- Create a new sale for the customer.
- Enter the Gift Card 'product'
- Edit the amount to match the voucher value
- Take payment and finalise the sale as normal
- Perform a Refund on the original sales > ensure to return as saleable stock
- At the Payments tab, use your integrated EFT payment type to send the refund value to the EFT terminal.
- Swipe or insert the Gift Card and follow the on-screen EFT prompts to load up the gift card (rather than returning the value to a customers EFTPOS card)
To Redeem a Gift Card
- Take payment via EFTPOS terminal
- Select EFTPOS as payment method.
Can I re-instate or reactivate an expired voucher?
No, once a voucher passes it's validity date it is closed and cannot be reactivated for use.
There are a number of options available, depending on how you wish to serve the customer:
How do I comply with the 3 year voucher validity period?
Navigate to Back Office > Settings > POS Settings > Voucher Settings. You will be able to select a Voucher Validity Period of 3 years.
For more detail see:Voucher Settings and Expiry.
How do I create a voucher to 'give' to someone without receiving any money?
When creating a voucher you will still need to enter a payment, even though you may not be actually receiving money.
You can use the Payment Type of "None" to continue to process the order and create the voucher. This Payment Type is used as a way to balance the POS transaction (i.e. reduce the balance owing to $0) and keep a record of the amount given away.
To use the Payment Type of None:
- From the left side tender options, choose either None or Donation as the tender type
- Enter the full amount of the voucher being created
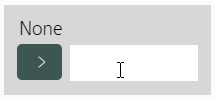
- The balance outstanding will be displayed as $0
- Continue to process the sale as normal
Later, when you are reconciling your income, either in the 'Income Report' or the 'End of Day Report' - you will see income in the 'None' or Donation' section.
If you are unable to see the "None" Payment Type you may need to enable it. Refer to the Settings - Payment Types article for information on enabling/disabling Payment Types.