You can process supplier invoices against purchase orders to reconcile received goods with payment obligations, helping ensure accurate accounts payable and inventory valuation. This improves your retail operations by linking invoices to specific POs, with properly configured invoice processing typically enabling better financial accuracy and streamlined accounting integration.
Understanding invoice processing involves recognizing PO-to-invoice matching, variance handling, and accounting integration impacts to help retail operators focus on the right financial reconciliation workflows, ensuring your retail strategy consistently drives better accounting accuracy and supplier payment management outcomes.
Each Purchase Order can be associated with one invoice, which will track all your inventory costs and synchronise to integrated Accounting programs.
Invoices can be reconciled when receiving the stock (to do it all in one step) or separately after all of the stock has been received, for example, if different staff are responsible for receiving and invoicing Purchase Orders.
Stock will be received at the cost at the time of receipt, and recalculated when the Invoice is entered.
Create an Invoice (Local)
The process below covers the steps to enter an invoice when handled separately from the Stock Receipt. However, if you're entering both the Stock Receipt and Invoice in one step, you can skip straight to step 4.
- Navigate to Inventory > PO Management > PO Manager
- Search for your Purchase Order using the search filters
- Click the Pencil icon to open the PO for editing
- Click the Stock Receipts & Invoices tab at the top

- A list of the Stock Receipts will be displayed
- Click the Pencil icon on the Stock Receipt to open for editing
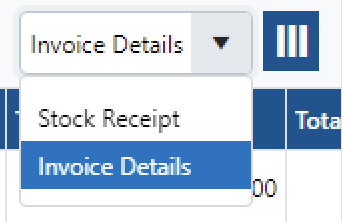
- If the stock has been Made Available already, the Invoice Details view will be selected by default.
To change your view, use the View dropdown field on the right, or use the Column menu to select which columns you would like to display.
- Scroll to the top to view the Invoice Details section
- Enter the Supplier Invoice Number
- Select a method to Distribute Costs By - any costs entered (Freight, Duty etc) will be spread across all received products accordingly. Click here for more information on understanding Cost Distribution and the impact on COGS
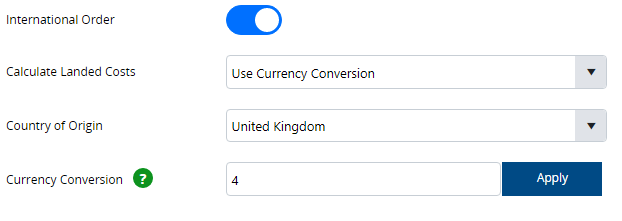
- If processing an International Order click the toggle to enable the International Order mode and refer to the International Order section below. If your Supplier is configured with a Country of Origin other than Australia the International Order will be toggled on automatically
- Enter any Notes
- Enter the Direct Costs i.e. Freight, Duty, and Other.
- Tick/untick Inc Tax for each cost as required
- Click Apply Costs - the costs will be applied to the products depending on the Distribute Costs method selected
- Scroll down to the Receipt Items table
- If the Invoice Details view is selected the Cost columns will be displayed - Buy Ex etc.
- Edit the Qty Invoiced if required e.g. if you had ordered 5 products, and received 3 but were invoiced 5, you will be able to keep track of when you have been short-shipped by the supplier
- Update the prices if needed
- Tick/untick Inc Tax column for products as required
You can bulk update the tax setting for multiple products by ticking the box in the first column and using the Edit Items button
- Enter a Discount on individual line items, or use the Apply Discount button to apply to a bulk discount for all lines
- Enter Notes against individual products if required
- Click Finalise
- Click Finalise Now
- Click Label Printing to print labels if required
Create an Invoice (International)
If you are entering an invoice for an International PO, you will need to update the settings to calculate the Landed Costs and Buy Ex price.
Calculate Landed Cost Options
To calculate the landed costs, you can choose from two options:
Manual | Manually enter the Buy Ex per line |
Currency Conversion | Select a Country of Origin and Currency Conversion. These fields will be automatically populated based on the Supplier settings and the Country Configuration. You can also enter a Currency Conversion rate directly into the window. Refer to Understanding Purchasing, Receiving and Invoicing for more information. |
Frequently Asked Questions
- Saving an invoice
- View who created the stock receipt or invoice