You can integrate PC-EFTPOS (Linkly) with Retail Express for Australian retailers, enabling integrated payment processing at POS supporting all major Australian card schemes and payment types. This helps optimize your retail operations by streamlining checkout processes, reducing transaction errors through integrated payment processing, and supporting Australian payment standards including contactless and mobile payments.
Find FAQs and related articles at the bottom of this page
Retail Express supports integrated EFTPOS services through the use of PC-EFTPOS terminals. For New Zealand customers, please refer to the NZ specific instructions here.
Update as of February 2020 - PC-EFTPOS has been renamed to Linkly but is still currently referred to as PC-EFTPOS within the Retail Express application.

Non-integrated mode
Please ensure you contact the terminal provider to determine how to process sales in Non-Integrated mode using the terminal's menu. This is required in the event the computer is offline, the integration has failed, or most commonly, to take payment over the phone for a transaction.
A non-integrated or "manual" transaction is often referred to as a MOTO Transaction and it is vital all staff understand how to process these on the terminal if needed.
Before you begin:
Ensure the latest version of PC-EFTPOS is installed on the PC where the terminal is located. Click on the link below to access the latest version, or contact PC-EFTPOS for further information.

PC-EFTPOS will be able to assist you to install and connect the terminal. This must be done before beginning the Hardware Utility (the utility takes the installed terminal and connects it to Retail Express).
Update as of February 2020 - PC-EFTPOS has been renamed to Linkly but is still currently referred to as PC-EFTPOS within the Retail Express application.
The PC with PC-EFTPOS must be paired and showing as connected within the PC-EFTPOS software. To check this:
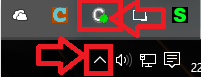
- The PC-EFTPOS software icon is typically found in the "Notification Area" in Windows, located in the bottom right-hand corner beside the clock.
- Click on the notification area arrow to expand the notification tray:

- Look for the PC EFTPOS icon (depending on your version of PC-EFTPOS, the logo will be displayed as:
A white "C" with a green dot:
or
a green "C":


If the PC EFTPOS Client GUI icon is showing any other colour instead of green, this means that the software is not paired and connected. Contact PC EFTPOS for more information and assistance
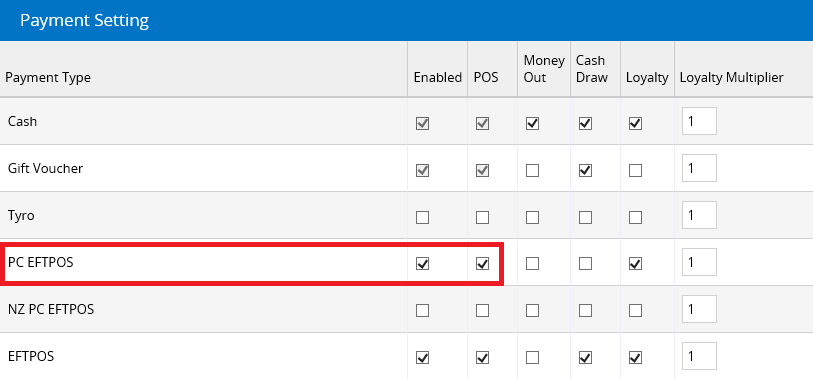
To prompt a PC EFTPOS payment in POS, the "PC EFTPOS" Payment Type will need to be selected. This Payment Type needs to be enabled prior to beginning the integration process so that it's available for the staff to select.
To enable the Payment Type:
- Navigate to Settings > Payment Types
- Tick the Enabled and POS tick boxes for "PC EFTPOS"
- If this payment method should award Loyalty Points ensure the Loyalty option is ticked
- Click Save Changes
What you will need:
- Retail Express Client ID (if installing the Hardware Utility for the first time) - this is located within Retail Express by navigating to Help & Support > What's my Client ID
- Retail Express User name and Password
- If installing to multiple computers but with only one PC EFTPOS terminal, the IP address of the PC where the PC EFTPOS terminal is connected. If you're not sure how to obtain this information please contact an IT Professional. Ask them about setting up a "Static IP" for that computer to avoid any issues in the future.
If you encounter any issues within the PC-EFTPOS software displaying any errors or not functioning you will need to contact PC-EFTPOS directly.
Connecting PC EFTPOS:
The integration uses the Retail Express Hardware Utility to connect and configure the PC EFTPOS Terminal.
If you have not yet installed this utility, click on the link for instructions on how to download and install the utility on the computer. During the installation process you will be able to select PC EFTPOS to connect to; follow the instructions below from that point onwards.
- Load the Retail Express Hardware Utility tool (related: How to Re-Run the Hardware Utility)
- Follow the prompts until you reach the step Connect and Configure a Card Payment Terminal (note: it will search for a Receipt Printer if not already stalled, you will be able to Skip this step after its initial search)
- Select PC-EFTPOS from the drop down
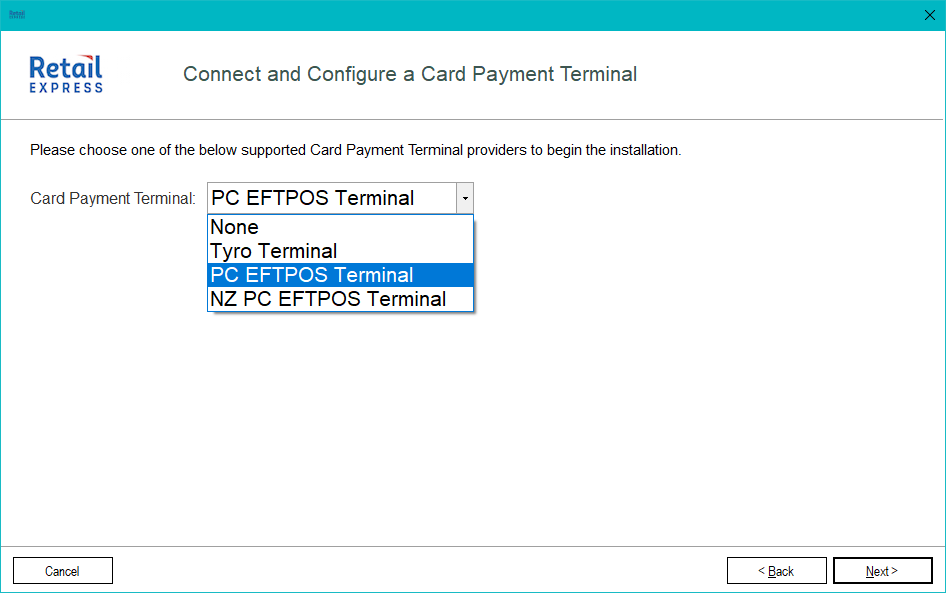
- Select whether the Pin Pad is connected to this machine:
If this is the computer where the PC EFTPOS terminal is connected to | Select "Yes" and skip to step 7 |
If this is not the computer where the PC EFTPOS terminal is connected | Select "No" and continue to the next step |
- Enter the IP Address of the PC where the terminal is connected
- Leave the Port Number as defaulted
- Click Next
- Click the blue Open PC EFTPOS Configuration Screen button to open the Configuration Wizard
- Follow the prompts to configure PC-EFTPOS (for more information open the PC-EFTPOS Installation Guide and skip to page 13)
This step specifically refers to the installation and configuration of the PC-EFTPOS terminal. If you have only just received your PC-EFTPOS terminal you will need to contact PC-EFTPOS directly for assistance with installing and configuring your terminal; once complete return to this article and continue from step 10 onwards.
- Once the configuration is complete the window will close and you will be returned to the Retail Express Hardware Utility
- Press Next
- Select a POS Register that this PC signs into for Retail Express POS
- Click Next
- Click Next
- Click Finish
To test the integration, log out of POS (note: closing the browser will not log out of POS). Log back in and try processing a sale.

Print outs for EFTPOS receipts can be configured to come from:
- The EFTPOS Printer; or
- Receipt Printer (this printer must be installed as a Windows Printer)
To configure the location:
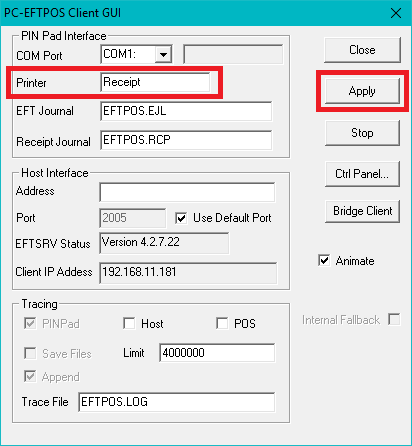
- Open the PC EFTPOS Client GUI. This is the software that was installed earlier (refer to the "Before you Begin" section).
- The PC-EFTPOS software icon is typically found in the "Notification Area" in Windows, located in the bottom right-hand corner beside the clock.
- Click on the notification area arrow to expand the notification tray:

- Look for the PC EFTPOS icon
- Double click on the icon to open the Client GUI
- To print receipts to the EFTPOS Printer remove the name from the Printer field
- To print receipts to the Receipt Printer enter the name of the printer as it appears in the Devices and Printers list in Windows
- Windows 10: click the Windows icon to open the menu, type "Printers" to open the "Printers and scanners" list
- Windows 7: click Start > Devices and Printers
- Press Apply
FAQs
If the PC EFTPOS Client GUI icon is showing a red light instead of green, this means that the software is not paired and connected. Contact PC-EFTPOS for more information and assistance.
The PC-EFTPOS software icon is typically found in the "Notification Area" in Windows, located in the bottom right-hand corner beside the clock.
- Click on the notification area arrow to expand the notification tray:

- Depending on your version of PC-EFTPOS, the logo will be displayed as:
A white "C" with a green dot:
or
a green "C":


During the installation using the Retail Express Hardware Utility you will be prompted to open and follow the PC EFTPOS Configuration Wizard. Detailed Instructions for this tool can be found within the PC-EFTPOS Installation Guide on page 13.