You can create customers in the back office for administrative customer setup outside of POS transactions, helping maintain customer records and prepare for upcoming business. This improves your retail operations by providing centralized customer creation, with properly configured back office customer setup typically enabling better pre-sale preparation and more accurate customer data management.
Understanding back office customer creation involves recognizing required fields, optional information capture, and integration with POS workflows to help retail operators focus on the right customer data management activities, ensuring your retail strategy consistently drives better customer service readiness and data accuracy outcomes.
The Customers feature in Back Office allows you to create and manage your customers easily, right from within Retail Express. In addition to that, using the search filters you can narrow your customer record search and export the results into Microsoft Excel.
Customers can also be created directly within POS, and managed en-masse using the Mass Download and Mass Upload feature.
Create a customer
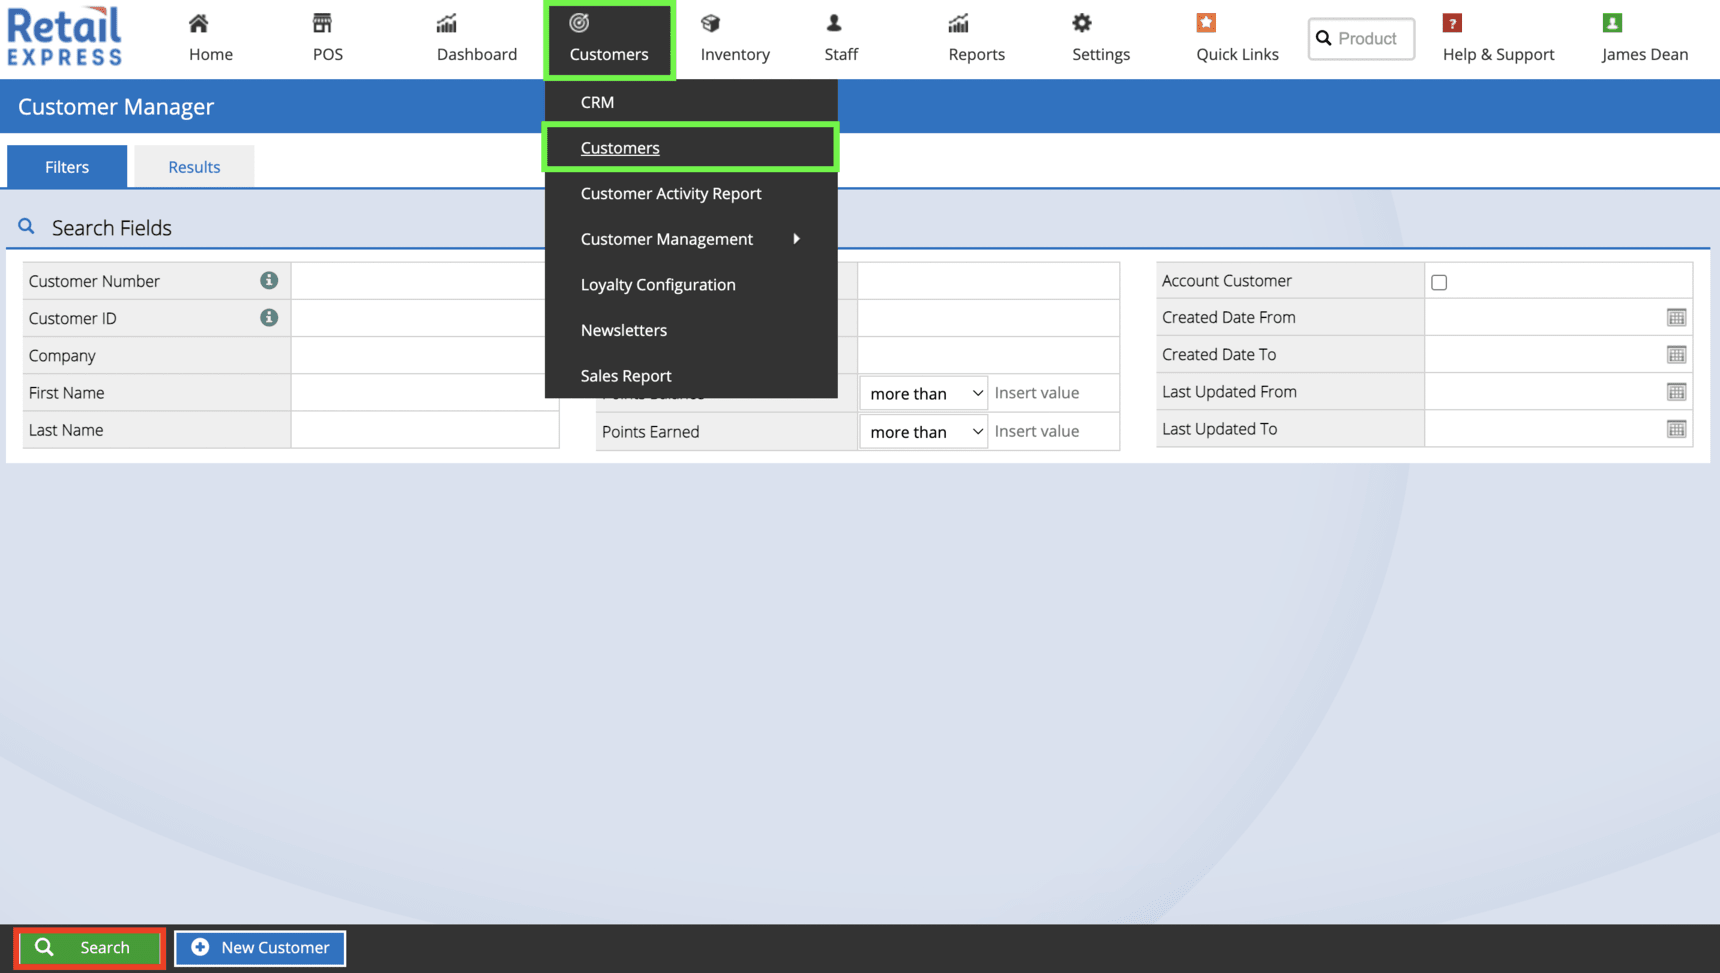
- Navigate to Customers > Customers (also available via Reports > Customer Reports > Customers or the "Customers" option from the Quick Links)
- Click New Customer at the bottom of the screen
- Update the information as required
📋
Note: Some special characters are not supported in the customer fields, click
here for a full list of supported characters and symbols.
Back to top
Customer Fields
When creating your customers the fields are as follows:
| Field | Details |
| Customer Number | A unique reference assigned to the customer by the system (for reference only) |
| Customer ID | A unique reference assigned to the customer by the system (for reference only) |
| Date Created | The date the customer was created in Retail Express; cannot be modified |
| First Name | The first name of the customer (mandatory field) |
| Last Name | The customer's last name |
| Company | The Company Name |
| ABN | Australian Business Number |
| Website | The website address for the customer/company |
| Email | The email address for the customer - can be used in conjunction with the Newsletter functionality and the Customer Mass Download for mail merges etc |
| Password | If Retail Express was previously connected with a web store this field created a password for customers when they were initially created. This is a legacy field that is no longer synchronised nor required to be entered for a customer. |
| Date of Birth | The Date of Birth for the customer (DOB) |
| Date of Birth Withheld | Used to track whether the customer has opted not to provide their date of birth (DOB) |
| Receive Email | If the customer has subscribed to email communications; can be controlled through eCommerce integrations and used in the Newsletter functionality for creating customer mailing lists. |
| Receive Post | If the customer has subscribed to postal/mail-out communications |
| Receive SMS | If the customer has subscribed to SMS Communications; included in the Customer Mass Download for reference (some SMS marketing technologies will allow you to import customer details). |
| Phone | The customer's phone number |
| Fax | The customer's fax number |
| Mobile | The customer's mobile number |
The billing address fields are typically where the invoices/receipts should be made out to for the customer. When adding a customer to POS this will be the address information displayed on the "Billing" tab
| Field | Details |
| Address Line 1 | The first line of the address. If there is a unit number, apartment or building level it will typically reflect this information, with Address Line 2 used for the street information. If not, it will be the standard street address including the number e.g. 3 Ocean St. |
| Address Line 2 | The second line of the address (optional) |
| Suburb | The town/suburb of the customer |
| State | The state, can be entered in full or as an abbreviation e.g. QLD |
| Country | The country for the customer |
| Post Code | The post/zip code for the customer |

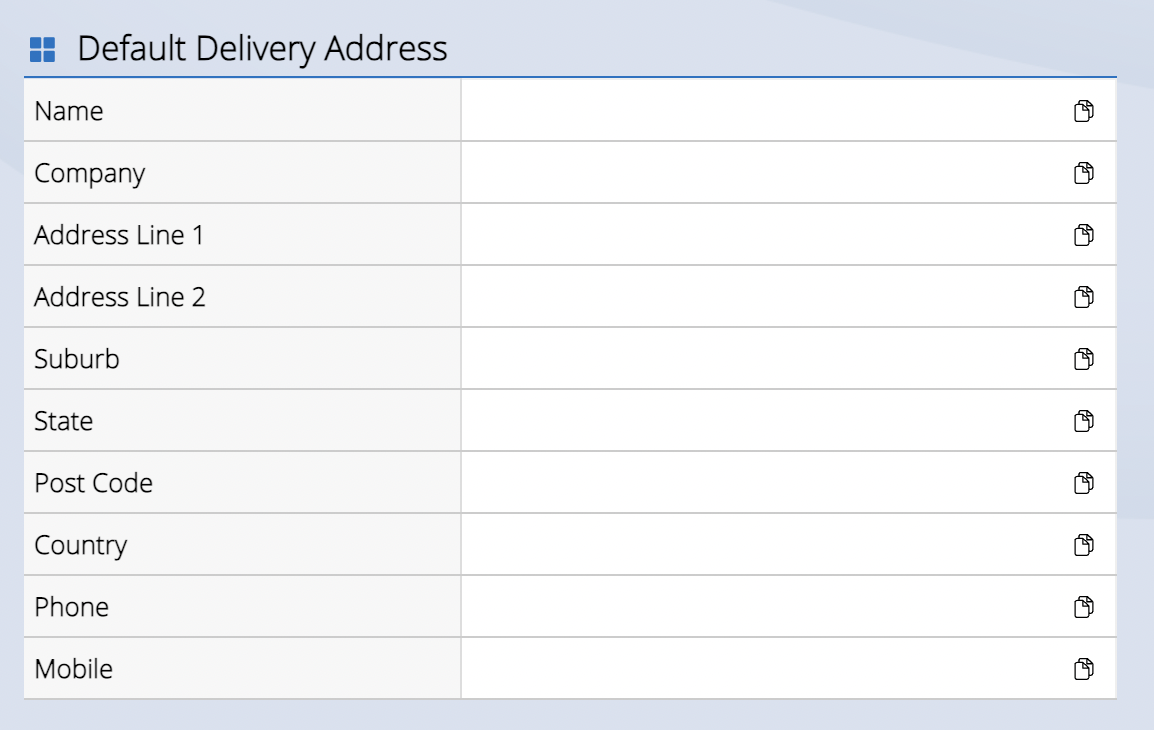
The Default Delivery address is used when dispatching products to the customer and will appear on the relevant delivery documentation e.g. shipping labels.
Tip: Additional delivery addresses can be entered by clicking the Additional Delivery Addresses button at the bottom of the Edit Customer window e.g. if the customer has different delivery addresses for work/home.
| Field | Details |
| Name | The name of the customer |
| Company | The Company for the customer |
| Address Line 1 | The first line of the address. If there is a unit number, apartment or building level it will typically reflect this information, with Address Line 2 used for the street information. If not, it will be the standard street address including the number e.g. 3 Ocean St. |
| Address Line 2 | The second line of the address (optional) |
| Suburb | The town/suburb of the customer |
| State | The state, can be entered in full or as an abbreviation e.g. QLD |
| Country | The country for the customer's delivery |
| Phone | The phone number for the customer whom the products are being delivered to. If delivering it to a workplace this will typically be the customer's direct line there or the workplace |
| Mobile | The customer's mobile |
| Field | Details |
| Custom Reference | A generic field that can be used to store information about the customer. This field is accessible from POS, so if using Loyalty it can be used to store a barcode of a customer loyalty card (which can be used to search for the customer by scanning the card in POS) |
| Customer Type |
Used to categorise the customer record, and available within POS and several reports in the Back Office e.g. Sales Report. The options available are:
- Employee
- Partner
- Referrer
- Retail (default)
- Wholesale
|
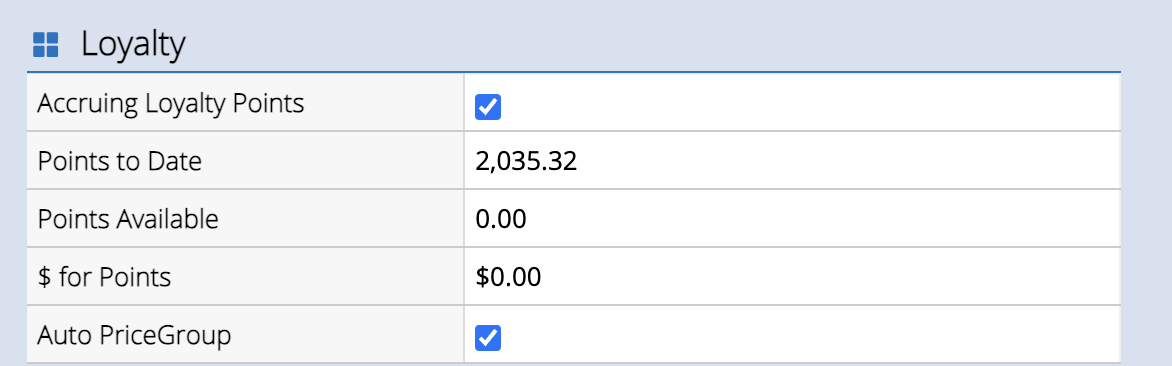
| Field | Details |
| Accruing Loyalty Points | The customer can be enabled/disabled for Loyalty Points as required e.g. Wholesale customers may not accrue points while Retail customers do |
| Points to Date | The total amount of points the customer has accrued over the lifetime of their account (including points redeemed) |
| Points Available | The number of points that are available (not including any points previously redeemed) |
| $ for Points | The calculated dollar value of the customer's available points (as configured in the global Loyalty Settings) |
| Auto PriceGroup | If the Loyalty system has been configured to enable automatic Price Groups (to receive discount benefits) based on a customer's points value, this can be enabled/disabled on a per-customer basis similar to the Accruing Loyalty Points setting. |

For more information on Account Customers refer to Customers - Setting up an Account Customer
| Field | Details |
| Payment Terms | The terms of which the customer is required to pay any outstanding invoices. Selecting a 60, 90 or 120 value will turn the customer into an Account Customer and they will not be required to pay a minimum deposit on sales (provided there is an available balance against their Credit Limit) |
| Stop Credit | Enabling this option will display a prompt within POS when the customer is about to place an order exceeding their credit limit (they will still be able to make a purchase on account). |
| Credit Limit | The amount available for the customer to purchase on account |
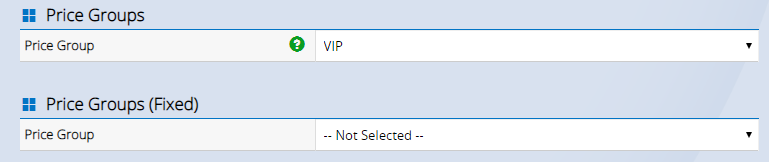
These fields display whether the customer has been assigned to a Price Group or a Price Groups (Fixed) group.
Tip: Click on the green tick to see the calculated discount levels for the Price Group (Price Groups (Fixed) are configured per product).

This setting is related to web store integrations using the eCommerce API e.g. Magento. Tick this option to synchronise the customer with the web store.

This section will only be displayed if you're using the Shopify integration and it has been enabled. The name of the Shopify web store will be displayed here. Tick to synchronise the customer with the web store.
- Navigate to Customers > Customers
- Click Search at the bottom of the screen
- To Update the information Click on the Pencil Icon
📋 Note: You can also click on the Customer Number to Edit the Details
Back to top
Tip: Want to store some notes and comments against your customers? Refer to the
Customers - Public/Private Comments article to find out how to add comments against specific invoices, or as an ongoing record.
Related Articles
Payment Processing:
Point Of Sale Operations:
Reporting Analytics:


