You can automate shipping workflows through Shippit integration with Retail Express, which synchronizes orders to Shippit's delivery management platform for streamlined carrier coordination and tracking. This shipping automation helps retail operators reduce manual dispatch processes and improve delivery efficiency, with effective Shippit integration typically improving shipping accuracy and reducing administrative overhead across Australian retail operations.
Shippit synchronization in Retail Express enables retail operators to automatically send fulfilled orders to Shippit for carrier allocation and tracking, helping ensure efficient delivery coordination and customer communication. This shipping integration helps ensure your retail operations can maintain professional delivery workflows while reducing manual data entry and supporting excellent customer delivery experiences.

The Shippit integration combines the strength of Retail Express' inventory management with Shippit's advanced shipping features, allowing businesses to streamline their shipping processes and reduce manual double handling.
The Shippit Integration is available for $19 per month. To request a Licence, please click here.
If you are not already a Shippit customer, please contact Shippit to set up an account
Using Retail Express, staff will be able to fulfil instore and online sales, sending the order automatically to Shippit. Switching to the Shippit portal, the staff member will then be able to print address labels and book the order for delivery.
The synchronisation is one-way, meaning that changes made to the order within Shippit will not apply to Retail Express e.g. editing product information, deleting products from the delivery etc.
Before you begin
Before you can get started with Shippit you'll need to:
- Purchase a Shippit Integration licence from Retail Express
- Configure the integration with Shippit as per the Settings - Configure Shippit Fulfilment Service article. 1
Order Synchronisation Overview
Sales marked for Delivery are sent to Shippit when they're fulfilled in Retail Express, as long as the customer address details have been populated, a mapped Freight Type has been chosen for the order, and the Shippit settings have been configured correctly (see the Faqs for more information).
Prior to being fulfilled, staff will be able to make modifications to the order (for example changing the Source or Fulfil location). Once the product has been fulfilled it can't be modified on the sale, and staff can use Shippit to print labels and book a courier.
Products can be fulfilled through both POS and the Fulfilment Report - both methods will send the order to Shippit.
For more detailed information on the Order Synchronisation process please refer to the Frequently Asked Questions. For a list of Features and Limitations please refer to the Settings - Configure Shippit Fulfilment Service article.
Back to top
Send a sale to Shippit - POS
Any unfulfilled sale can be sent to Shippit using POS - they don't need to be new sales created manually (e.g. incoming web store sales processed through POS).
The order will synchronise as long as the sale is not yet fulfilled, the customer address details have been populated, a mapped Freight Type has been chosen for the order, and the Shippit settings have been configured correctly (see the Faqs for more information).
For this example we'll create and fulfil the sale through POS, although sales can also be fulfilled in bulk through the Fulfilment Report and synchronised with Shippit (covered in the Fulfilment Report section below).
- Log into POS
- Create a new sale
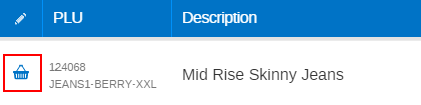
- Change the Fulfilment Method to Delivery for at least one product by clicking on the Shopping Basket icon
- Click the orange Freight link in the total bar
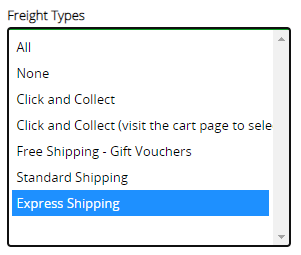
- Select a Freight Type
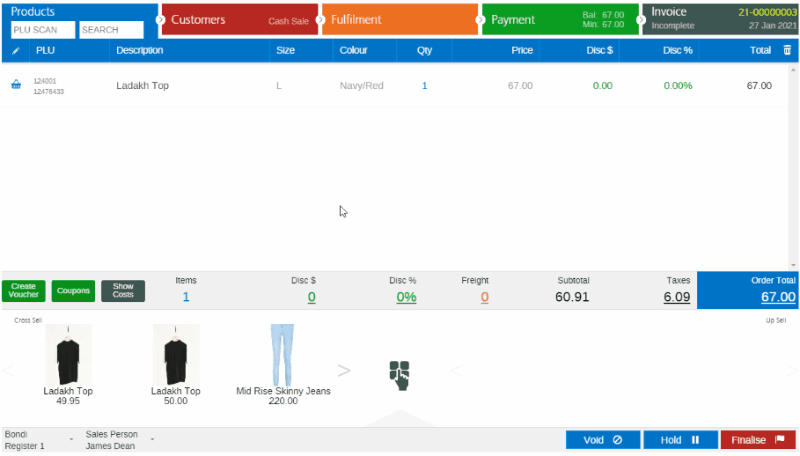
- Enter a Freight Amount if the customer is being charged a delivery fee
- Click Done
- Click the Customers tab
- Add a Customer to the sale
📋
Note: Ensure all the customer fields have been completed as per the
Order Criteria below
- Add a Payment
- Finalise the sale
At this point the sale has not synchronised to Shippit, and can be amended by staff if required. Sales are only synchronised at the point of fulfilment (covered in more detail below).
Back to top
Fulfil the sale
When products are fulfilled a Shipment Order will be sent to Shippit. Products can be fulfilled altogether, or individually as required (partial fulfilment). Products on a sale cannot be modified once they have been fulfilled - you will need to refund the product before re-adding it to the sale.
- Open the sale in POS
- Click the Fulfilment tab
- Click the Arrow in the header to fulfil the items

Tip: To use different freight types for individual products on the same sale, refer to the Frequently Asked Questions
- Finalise the order
- If you review the order in POS, the Fill column has been updated to show the product has been fulfilled

- A new Shipment Order will be sent to Shippit to the account as per the Fulfilment Outlet API Key in the Shippit settings

Tip: The Retail Invoice number displayed in Shippit will match either the Retail Express Order Number or the External Order Reference depending on your
Shippit Integration settings
Back to top
Send a sale to Shippit - Fulfilment Report
Sales from online stores can either be fulfilled individually through POS (using the process described above) or in bulk using the Fulfilment Report.
- Navigate to Inventory > Fulfilment Report
- Select a Freight Type to filter exclusively by specific Freight Types
📋 Note: Freight Types that have been deleted/disabled from the system are still associated with historical sales, and available to filter by.
- Select an Order Source if required e.g. Shopify
- Use the remaining filters to search for your products as required
- The Freight Type will be displayed in the Delivery Options column
- Fulfil the products by updating the value in the Disp column (either by scanning your products, typing in a quantity manually, or using the Copy Across button)
- Click Submit
- Click OK
The stock will be marked as fulfilled and synchronised with Shippit to create a Shipment order.
Back to top
View Tracking Information
You can use POS to check if an order has been sent to Shippit, as well view the Tracking Number and a link to viewing the Shipment on Shippit.
- Open the sale in POS
- Click the Fulfilment tab

- Double click on the Product
Tip: Press and hold for touch screens/tablet
- The Tracking Details will be displayed on the right-hand side
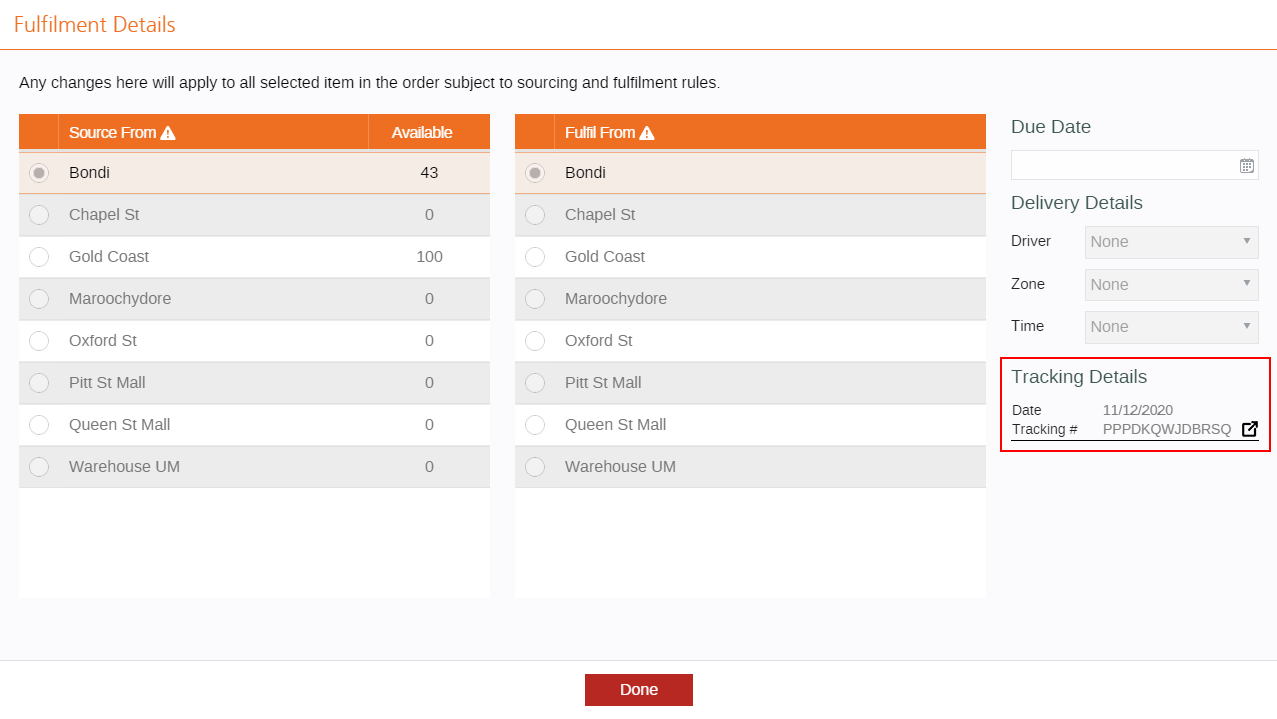
- Click the Link button to open the Shippit Order

- A more detailed view of the order will be displayed in Shippit

You will now be able to use Shippit to print labels, packing lists and book the shipment in for delivery.
Back to top
Frequently Asked Questions
Can I use different Freight Types on the same invoice?
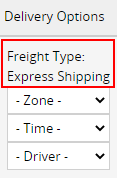
To use different Freight Types on the same invoice you will need to fulfil products individually. For example, if using Express delivery for some products, but Standard shipping for other products:
- Select the Freight Type "Express" on the Products tab
- Fulfil only the products being sent via Express Shipping
- Finalise the order
- Select the Freight Type "Standard" on the Products tab
- Fulfil only the products being sent via Standard Shipping
- Finalise the order
Each time the sale is finalised the Order will synchronise with Shippit to create a Shipment Order. In the example above, two separate Shipment orders will be created.
- If your order shows as Pending, it means Retail Express is trying to send your order to Shippit. Retail Express will try 5 times, and if it fails you will need to manually create the shipment within Shippit.
- If you're unable to see a Tracking Details section at all, please check the Order Criteria - either your settings are incomplete or the Order did not match the criteria required to synchronise with Shippit. You will need to create this shipment manually, and correct your settings for future synchronisations to occur.
Orders are synchronised with Shippit when they're fulfilled in Retail Express, and provided the following criteria is met:
| Setting | Configuration/Fields required |
| Shippit Integration | - Enabled |
| Product Fulfilment Method (one or more products) |  |
| Fulfilment Outlet for products on the sale | API Key added |
| Freight Type |
- Option other than "None" or "Do not send to Shippit"
- Mapped to a Shippit Delivery Service
|
| Customer Details |
- First Name
- Email Address
- Address line 1
- Surburb
- State (if in Australia)
- Country (for countries other than Australia)
- Post Code/Zip Code
|
By default the Retail Express Order Number will be sent to Shippit, although this can be configued to use the External Order Reference field.
The External Order reference is used by the Shopify Connector and some ecom/web store API integrations to display the web store's invoice number (API developers would need to custom build this in).
We recommend configuring your Shippit settings to use the External Order Reference field as the synchronised Order Reference number. Customers shopping online will see the same order number both on the web store and Shippit (if using Shippit tracking emails to customers). If an External Order Reference doesn't exist (e.g. an instore order) it will default back to using the Retail Express Invoice number.
Tip: If using Shopify or the eCommerce API, we strongly recommend configuring the Shippit settings in Retail Express to synchronise orders using the External Order Reference for the Order reference.
How many Shipment Orders are created in Shippit will depend on the Shippit settings in Retail Express, and the conditions of each sale.
Multiple Pickup Outlets
Used when products are fulfilled from multiple Outlets in Retail Express:
| Sale conditions | Shippit API Key configuration | Shipments created in Shippit |
|
All products fulfilled
|
Separate API key for each Outlet in Retail Express
|
Separate order for each Outlet
|
|
All products fulfilled
|
Same API key for multiple Outlet in Retail Express
|
Single order sent to Shippit account.
Pickup Location manually selected in Shippit
|
|
Partial Fulfilment - multiple Pickup Outlets
|
Separate API key for each Outlet
|
Shippit orders will be created each time products are fulfilled.
Separate order for each Outlet for each fulfilment
|
Single Pickup Outlet
Used when products are fulfilled from a single Outlet in Retail Express:
| Sale conditions | Shipments created in Shippit |
| All products fulfilled | Single order for all items |
| Partial fulfilment | New Shipment Order each time products are fulfilled |
The following data is synchronised when a sale is sent from Retail Express to Shippit:
Order Details:
- Freight Type (the Shippit Delivery Service/Courier Type)
- Delivery Address
- Delivery Post Code
- Delivery Suburb
- Delivery State (Australian orders)
- Delivery Country Code
- Receiver Phone Number (based on a priority of Delivery Mobile, Billing Mobile, Delivery Phone, Billing Phone, or if none found, blank)
- Invoice Number (External Order Reference or Retail Express Order Number, depending on configuration settings)
- Total Weight of all products
Product Attributes:
- Supplier SKU
- Short Description (Product Title)
- Price
- Quantity Ordered
- Quantity Fulfilled
Recipient details:
- Email address
- First Name
- Last Name
- Mobile Number (based on a priority of Delivery Mobile, Billing Mobile, or blank)
Want more information? View related articles:
Related Articles
Inventory Management: