Stripe provides online payment processing services for internet businesses. The Neto integration with Stripe lets you start accepting payments instantly. To learn more and view the pricing for Stripe, please visit the Stripe website.
Set up Stripe
To set up Stripe to take credit card payments on your webstore:
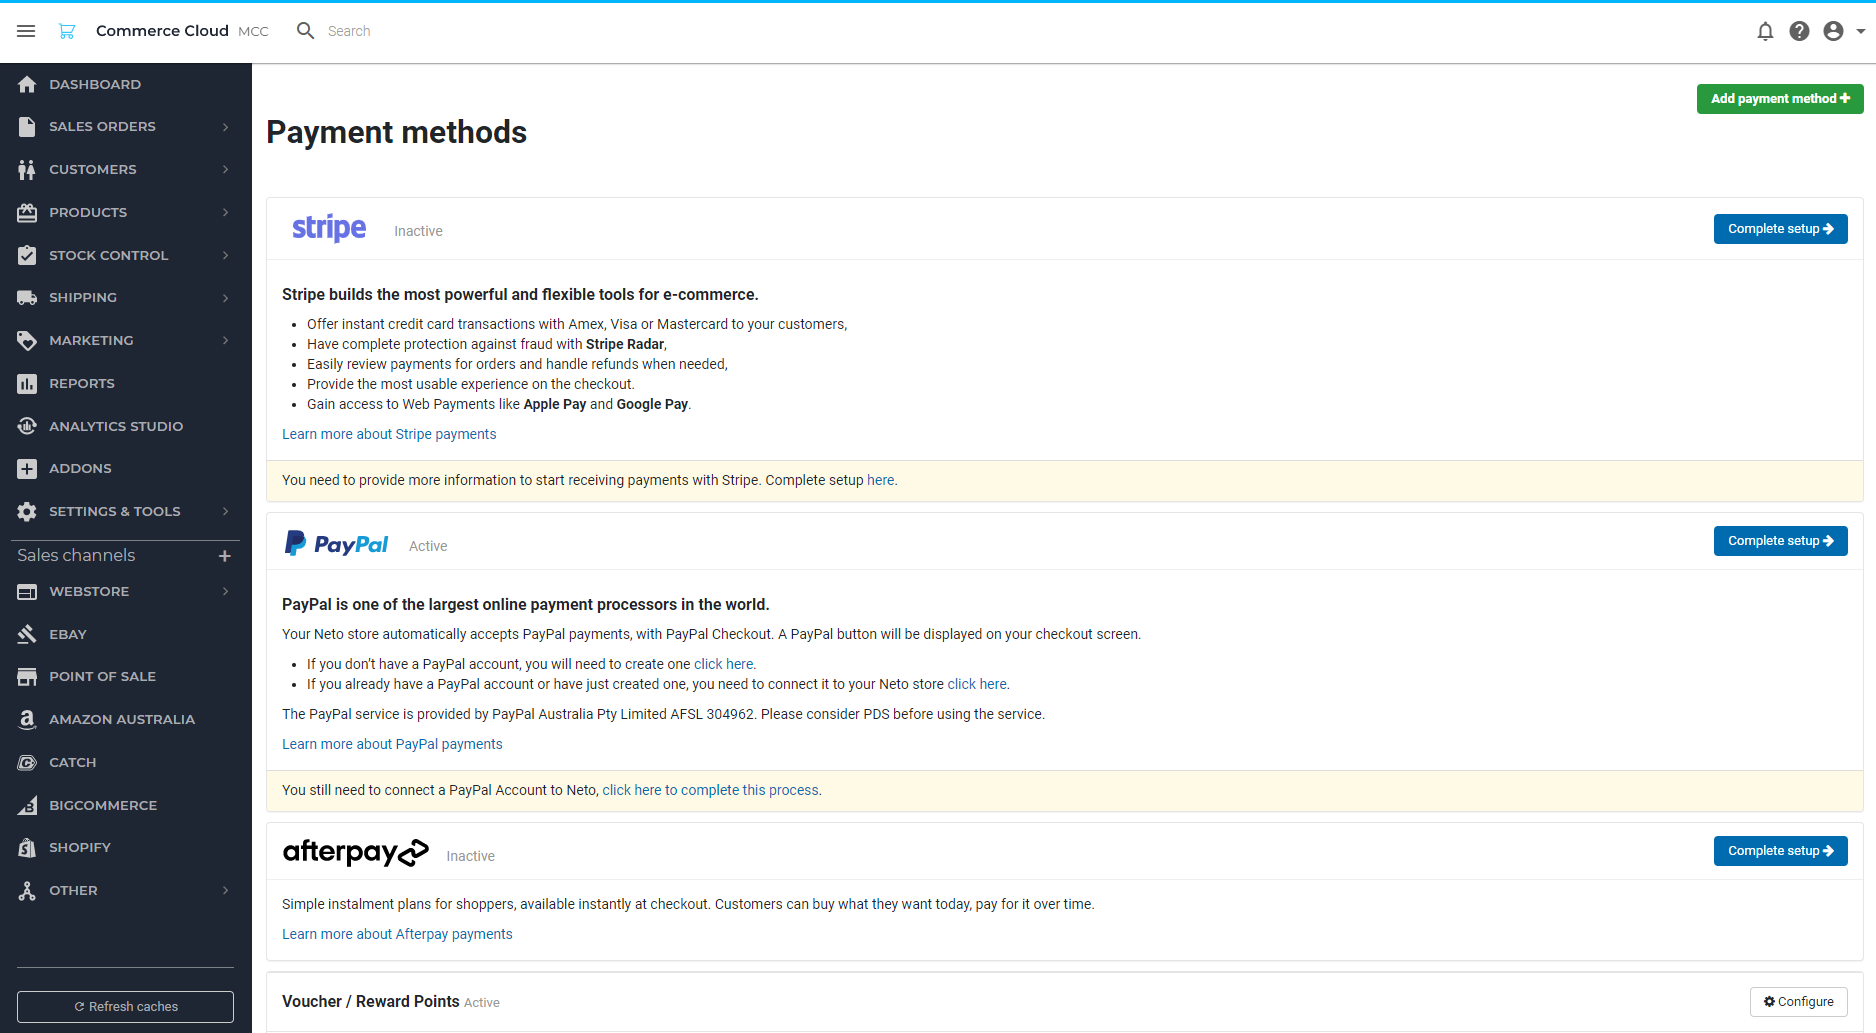
- In your Neto control panel, navigate to Settings & Tools > Payment Methods
- On the payment methods page, click the Complete Setup button for Stripe.
- If you have an existing Stripe account, click the Sign In link in the top right corner.
- Enter your Stripe credentials and authenticate the link to Neto. You'll be taken back to your Neto control panel.
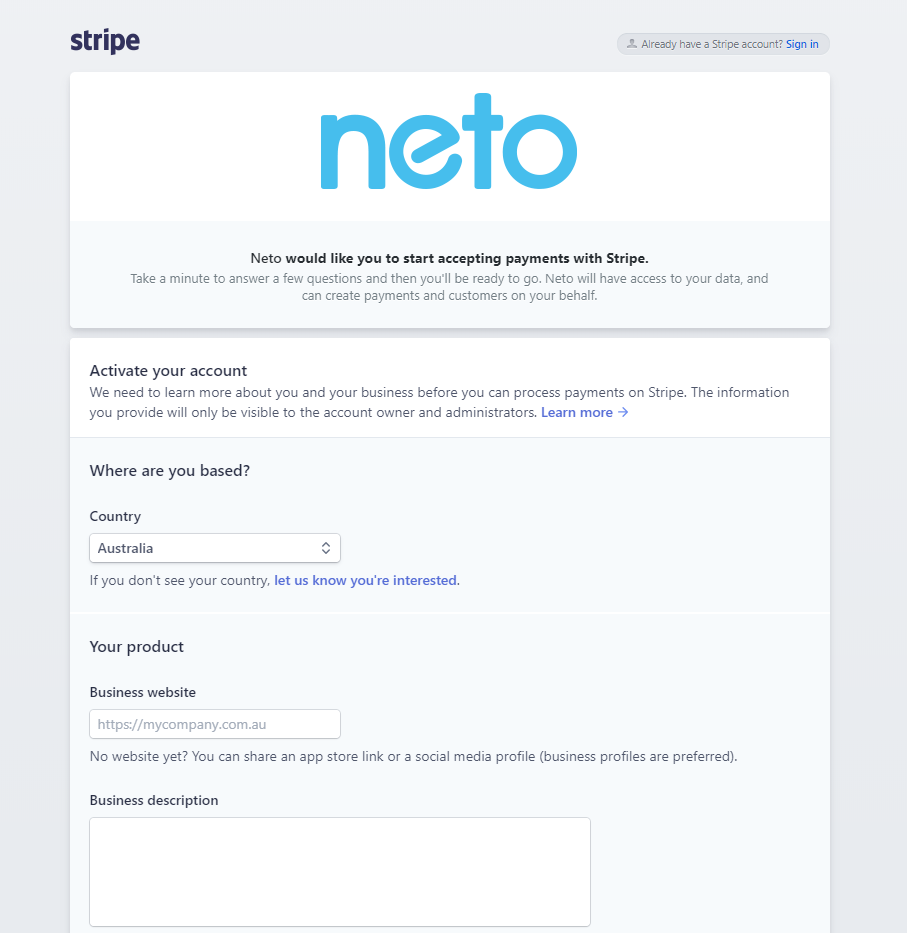
- If you don't have a Stripe account, enter your business details into the Stripe form.
- Click the Authorize access to this account button. You'll be taken back to your control panel.
Your Stripe account is now set up in Neto. Your website and control panel can now accept credit card payments.
Apple and Google Pay (Web payments)
In addition to credit cards, Stripe can also take payments through Apple and Google Pay. Customers must be using a compatible browser/device and have a card saved.
Important: Without these, the web payment buttons will not appear in checkout.
The exact requirements for web payments to appear are:
Safari (Apple Pay only):
- Safari on Mac running macOS Sierra or later.
- An iPhone (not an iPad) with a card in its Wallet paired to your Mac with Handoff, or a Mac with Touch ID.
Mobile Safari (Apple Pay only):
- Mobile Safari on iOS 10.1 or later.
- A card saved in Wallet, by going to Settings > Wallet & Apple Pay.
Chrome (Google Pay only):
- Chrome 61 or newer.
- A saved payment card.
Chrome Mobile for Android (Google Pay only):
- Chrome 61 or newer.
- An activated Google Pay card or a saved card (Settings > Payment methods).
- Access payment methods enabled (Settings > Privacy).
Microsoft Edge for Windows:
- Microsoft Edge 16.16299 or newer.
- A saved payment card.
To add web payments to your webstore:
- In your control panel, navigate to Settings & tools > Payment methods.
- In the Stripe section, click the Configure button.
- If Web payments appear here, you've already set up Apple and Google Pay. Click on Web Payments to make it active or edit the settings.
- On the new payment method page, select the checkbox that corresponds to Apple and Google Pay.
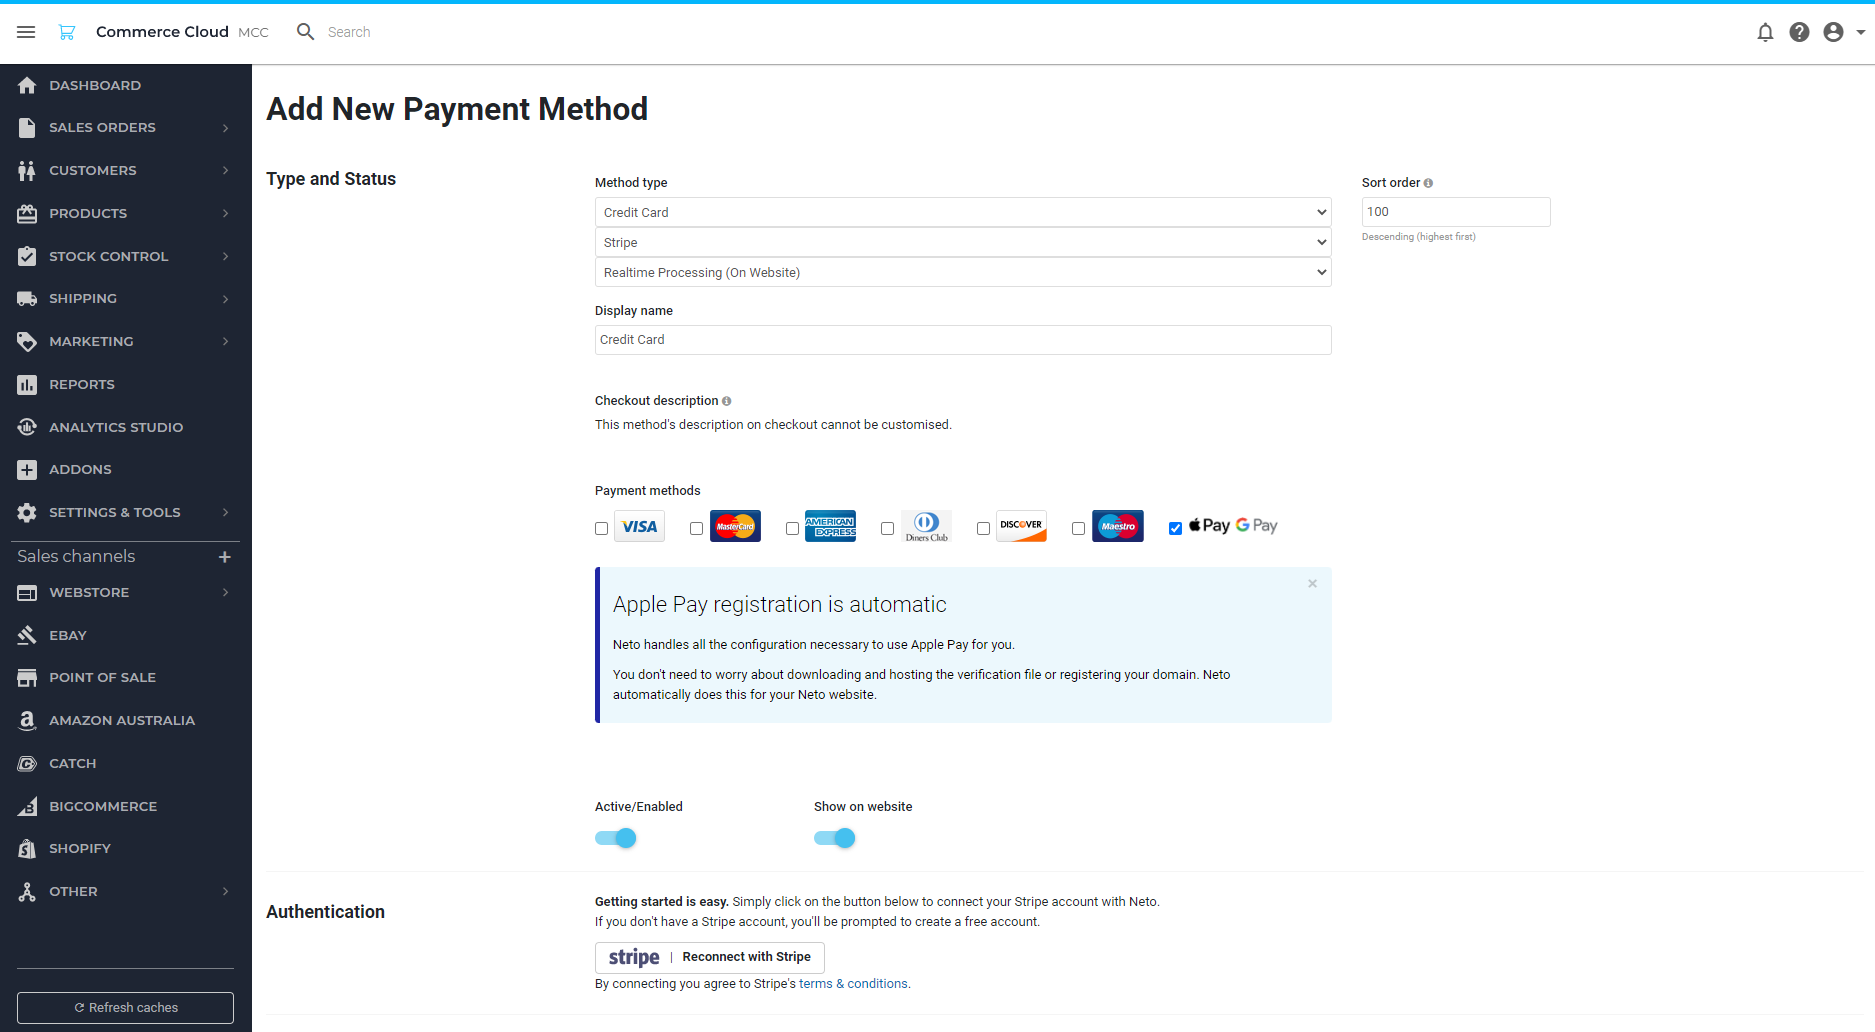
- Configure the settings as desired. All settings are described in a section below.
- Click the Complete button.
Web payments are now set up for customers to pay for their orders, the web payments Express buttons are shown at the top of the checkout page, see example below:

Warning: Do not change the name of the web payments method. Changing the name will remove the icons in the footer of your website.
To setup Apple/ Google Pay in the lower Stripe card section of the checkout, you must implement the settings from the Stripe side. This is then shown under the relevant card payment method that is setup via Stripe, like Visa or Mastercard, rather than on it's own payment method line.
Web Payment Website Tweaks
You can display web payment icons in the footer of your website with a website tweak. We also recommend amending the invoice template to display which specific method (Apple Pay or Google Pay) was used. The steps to make these tweaks can be found in our developer documentation.
The tweaks require knowledge of the Neto B@SE language and HTML. If you're not confident making these changes yourself, we recommend that you engage the services of a Neto partner.
Configure Settings
Once Stripe is set up, you can set up the available settings in Neto. To set up your Stripe payment gateway settings:
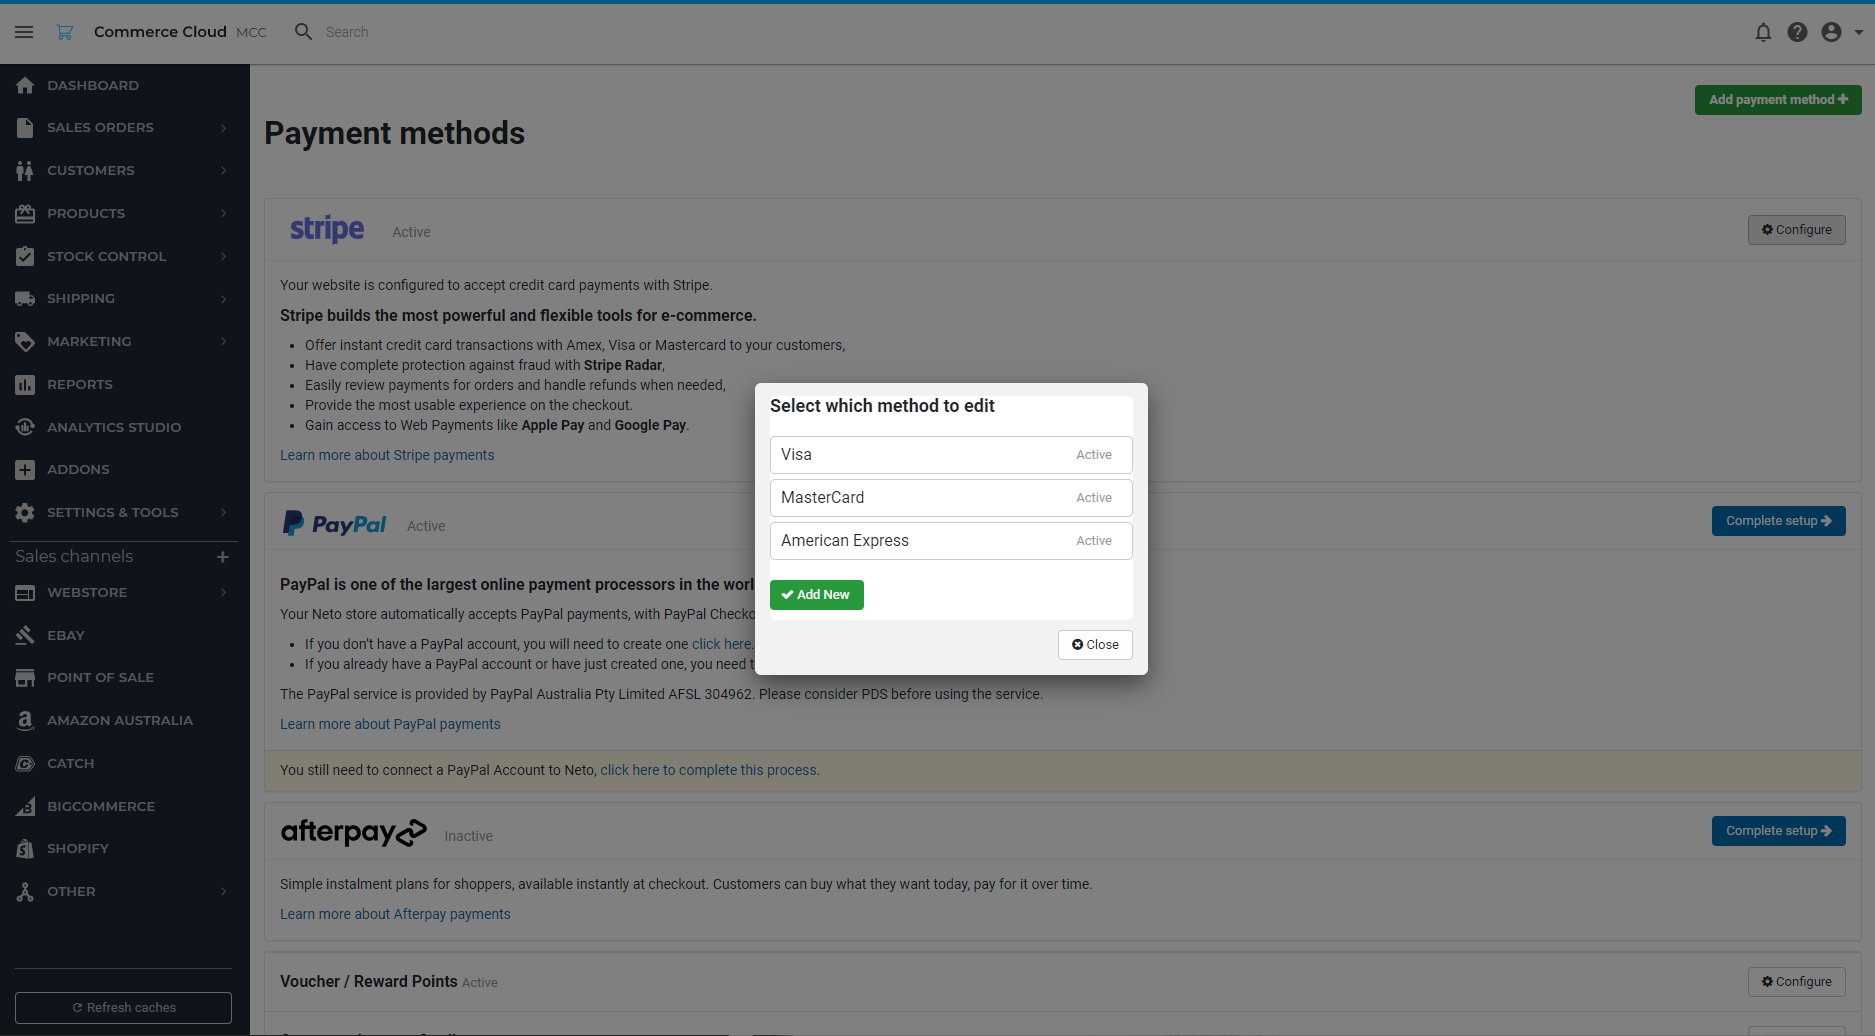
- In your Neto control panel, navigate to Settings & Tools > Payment Methods
- Click the Configure button that corresponds to the Stripe credit card gateway.
- Select the card type you wish to edit.
- Display Name: The name you and the customer see on your website and in sales orders.
Checkout description: Appears to customers when they select this payment option at checkout.
Stored Card description: Appears to customers when they select a stored card payment option at checkout.
Active/Enabled: Toggles this payment method off and on.
Show on website: Toggle the visibility for customers off and on.
Allow customers to save their cards for future purchases: When enabled, returning customers don’t need to re-enter their card details to check out. Can also be used to set up layby.
Include Stripe.js on every page of your site: When enabled, Stripe can detect behaviour that may indicate fraud as customers browse your website. This makes your Stripe transactions more secure.
Surcharge: Adds a percentage surcharge for transactions. Refer to the ACCC website for further information.
Min Spend: Payment will not display if the order amount is less than the min spend.
Max Spend: Payment will not display if the order amount is more than the max spend.
User Groups: This payment method is only visible to customers in the groups you have enabled.
eBay Payment Mapping: Only applies if you’re using the Neto eBay integration. See this article for more information.
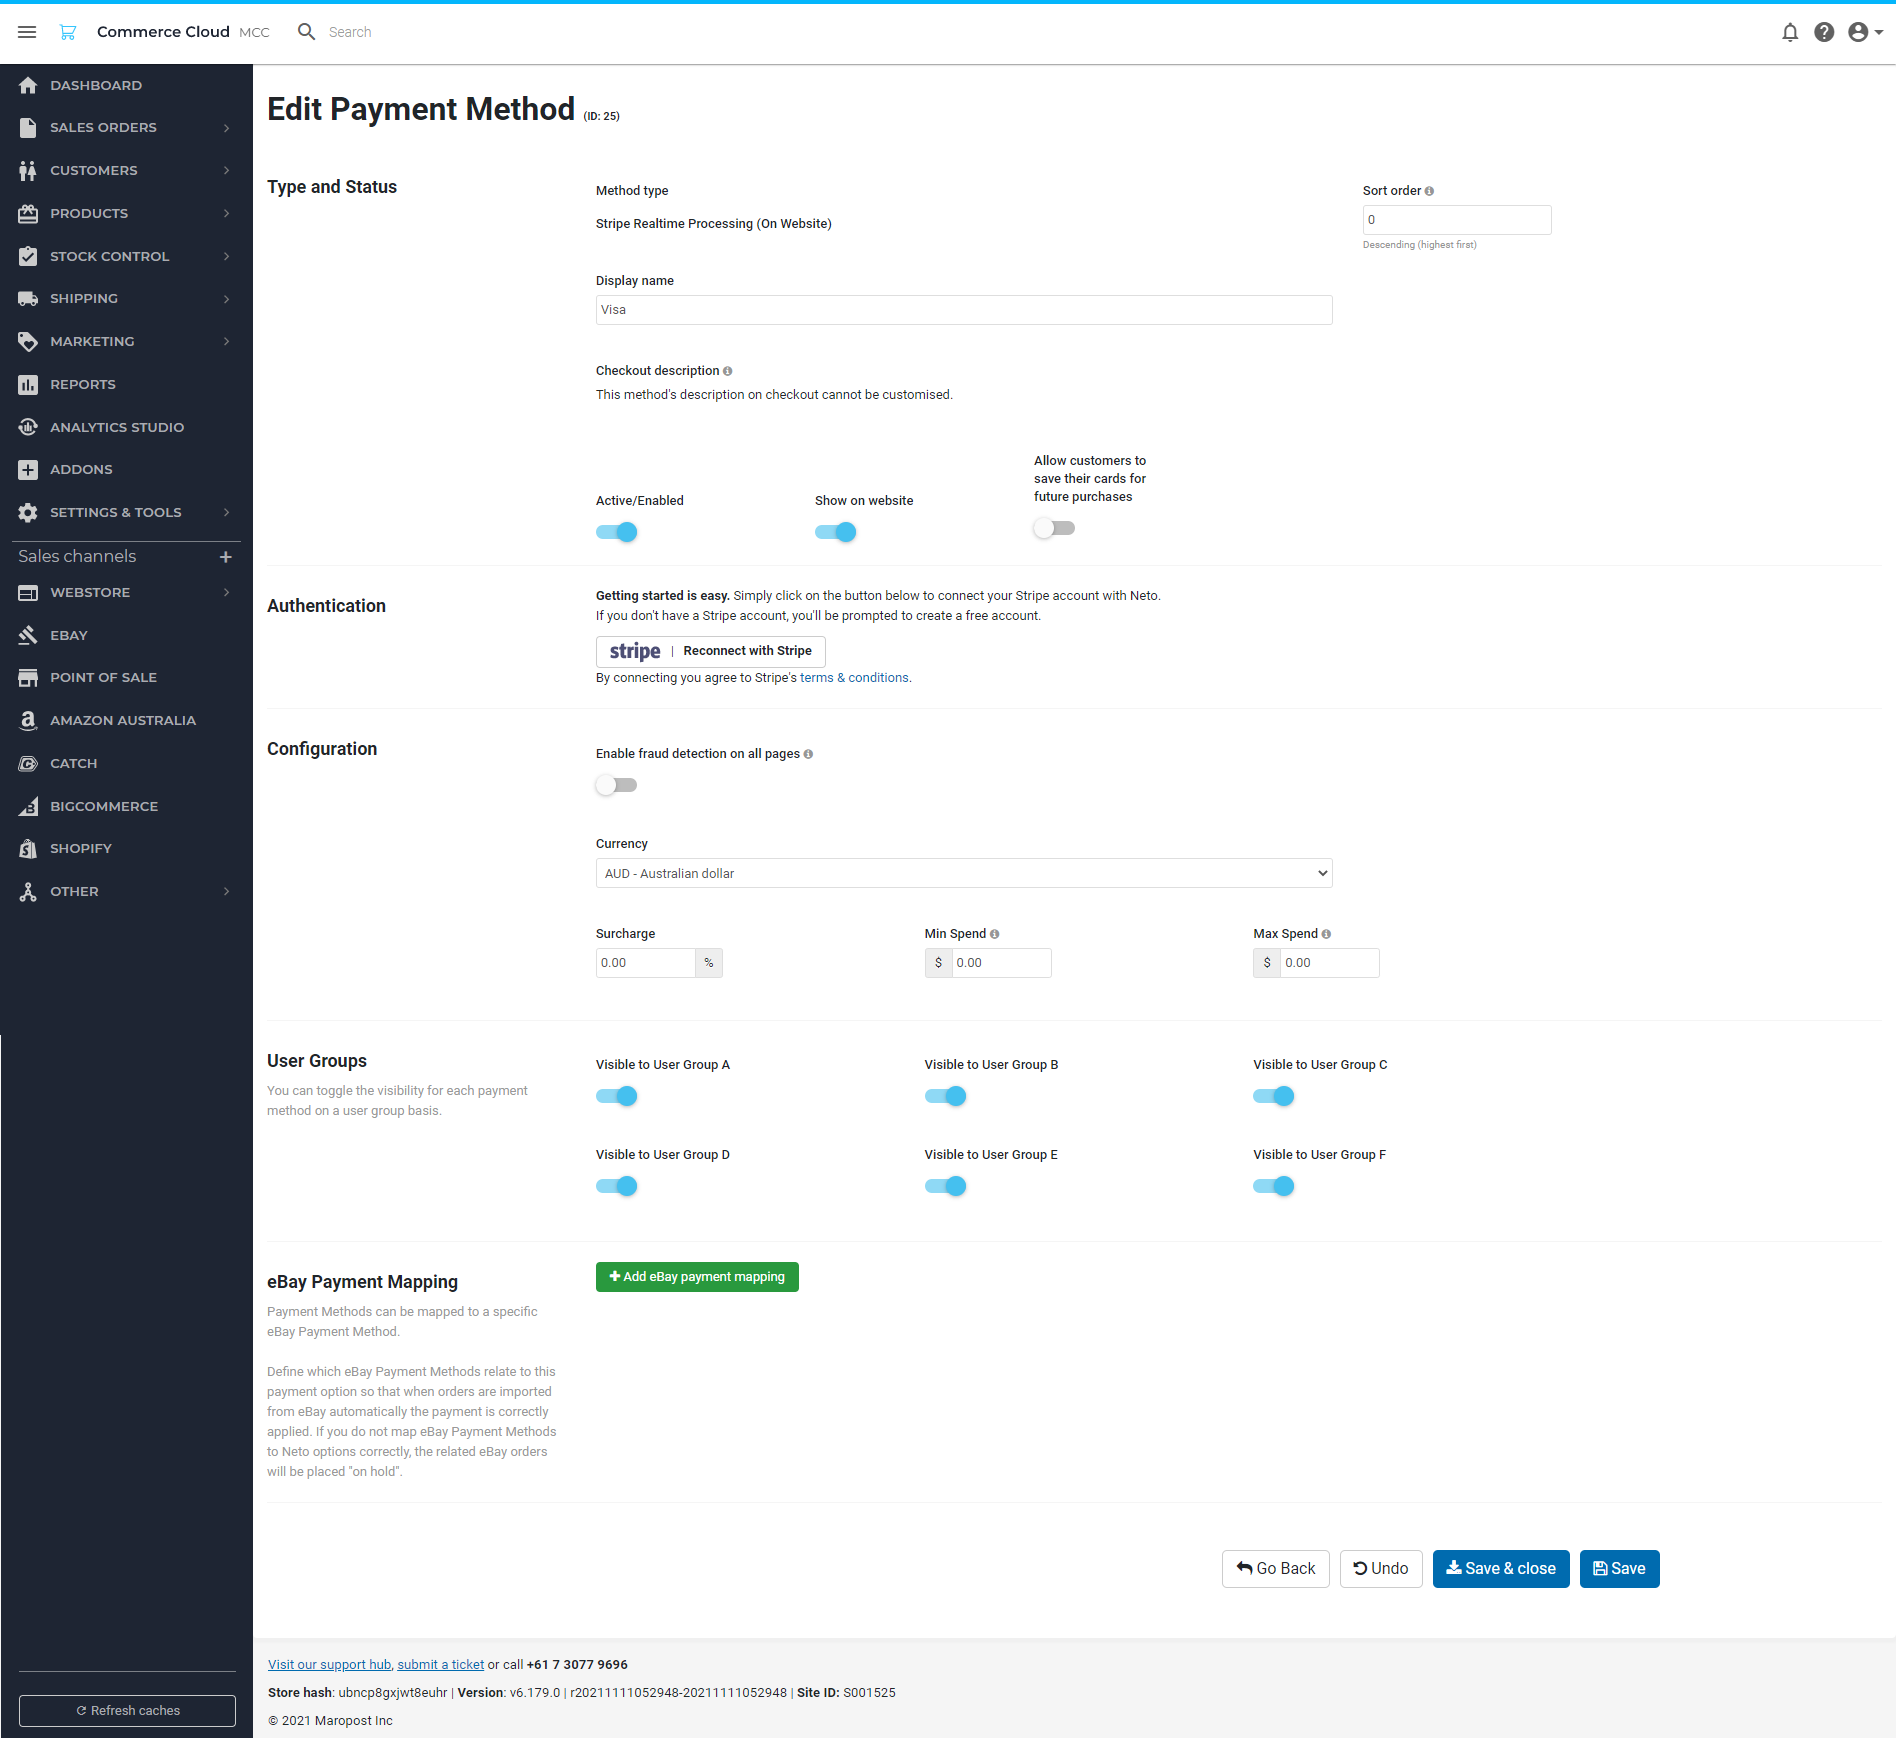
- Click the Save & close button when complete.
Repeat these steps for each credit card type as required.
Stripe 3D Secure 2 Card Authentication
Stripe uses 3D Secure as a way to safeguard against potentially fraudulent transactions. More customer information (such as shipping address) is securely transmitted to the card issuer to determine if the customer is the cardholder.
If the issuer is suspicious, the customer may need to perform additional identity verification to complete their purchase. When 3D Secure is used to authenticate a payment, the customer's bank/card issuer assumes liability for the payment.
Any disputes from a fraudulent transaction can be raised directly with your card issuer (other dispute reasons follow their normal process).
Workflow
- The customer selects a Stripe credit card method on your checkout page.
- The request is sent to the cardholder's bank/issuer for verification.
- The bank/issuer evaluates the information and decides if the transaction is legitimate.
- If the transaction is deemed legitimate, no further information is requested, and the transaction proceeds as normal.
- This usually involves showing the customer an authentication page on their bank's website, where they are prompted to enter a password associated with the card, or a verification code sent to their phone. Do note that additional verification is required on all transactions made by customers in the European Union due to their banking regulations.
- If the additional step is authenticated, the payment is processed successfully.
3D Secure Settings
You can change when the additional verification is triggered in your Stripe account based on Stripes hard coded rules.
If you have Stripe Radar for Fraud Teams, you can create custom rules with specific criteria. For example, you can request the additional verification steps for customers in specific countries.
We recommend that you review these settings to ensure they meet your needs. For more information, please refer to Stripe's documentation.
Stripe Fraud Protection
Stripe incorporates a fraud protection system called Radar. Radar uses machine learning to help identify fraudulent transactions and provide alerts. Neto displays these alerts in several different ways:
- Allowed: If the risk level is Normal, the sales order will be created in Neto as usual.
- Place in Review: The sales order will be created in Neto and placed on Hold with an internal note.
- Blocked: The sales order will not be created in Neto. Should these occur, you will need to view the payment in Stripe to either approve or refund the payment. You can learn more about Stripe Radar in this article.
Stripe Radar is included for all users. Stripe also offers more detailed information with Stripe Radar for Fraud Teams. This upgrade is available directly through Stripe. See this article for more information.
Refund or Approve a Stripe Payment
When Stripe detects that a transaction has a high or elevated risk, it needs to be reviewed for you to receive the funds. Direct links to the payment in Stripe are accessible from the sales order and payments pages.
Important: Refunds in Stripe don't update the status of the orders in Neto. If you cancel a payment in Stripe, you must also cancel the order in Neto manually.
Sales Orders Page
To find the payment and refund, or approve it from the sales order:
- In your Neto control panel, navigate to Sales orders > View orders
- Ensure the order is set to "View as Sales".
- At the bottom of the page, click the Payment & Refund History tab.
- This tab displays a list of payments. On the right-hand side is an edit icon. Click it, and choose View Payment in Stripe from the drop down menu.
- Stripe will open and display the payment for you to review.
Payments Page
The payments page lists all the payments you have received for your sales orders. To open a Stripe payment from the payments page:
- In your Neto control panel, navigate to Sales orders > View payments.
- Find the payment in the list by using the filters.
- Click the edit icon and choose View Payment in Stripe from the dropdown menu.
- Stripe will open and display the payment for you to review.
Payment Statuses
Warning: The "Payment Statuses" section does not apply to the Neto Core Checkout system. To learn more, click here.
Stripe provides information regarding payment status for every transaction for the ease of both the business and the customer’s understanding. These statuses provide valuable insights into the journey of a transaction, from initiation to completion or potential issues. Let’s take a look at the different payment statuses provided by Stripe.
Completed Transactions: This status indicates that the payment has been successfully processed, the funds have been transferred, and the transaction is considered finalised.
Failed Transactions: This status indicates that there was an issue during the payment process that prevented it from being completed successfully. This could be due to reasons such as insufficient funds, expired card details, or other payment gateway-related issues.
Incomplete Payments: These occur when a customer initiates the checkout process. Whenever such an event is encountered, Neto registers it as a payment intent in the system. This acts as a placeholder for the beginning of a payment transaction, which can be initiated from the user’s end. Please keep in mind that this status is not a reflection of a technical issue. Incomplete payments also don't authorise any card charges
This placeholder can have several outcomes:
- Cancelled: If the customer opts for a non-Stripe payment method during checkout.
- Failed: If the customer attempts to pay with Stripe but encounters issues like insufficient funds.
- Complete: If the payment is successfully processed.
- Incomplete: If the customer doesn't complete the checkout process, the payment is rendered incomplete for an indefinite period of time.
Expired Transactions: This status indicates that the buyer initiated the checkout process through one of the BNPL payment methods (via Stripe) but abandoned the payment without gracefully cancelling it (e.g., closed the browser window rather than clicking a cancel button). After a given period of time that varies depending on the payment method, the payment session with the BNPL provider expires, and the Stripe payment status will reflect this with the “Expired” status.
Uncaptured Transactions: These are unexpected and require attention. This status occurs between payment authorisation and capture and typically lasts only a few seconds. Any payment left uncaptured beyond this brief period indicates an issue, as it means an authorisation is placed on the customer's card, which expires after 7 days. In such cases, please contact our support team for assistance or to report the problem.
Setup Stripe BNPL configurations
Stripe's Buy Now, Pay Later (BNPL) feature allows customers to split their purchases into manageable instalments via flexible payment options through Afterpay, Klarna, and Affirm, enhancing affordability and convenience. In this section, we'll guide you through essential steps to get started with Stripe BNPL configurations.
Log in to your Maropost Control Panel and follow the steps to add new payment methods:
- In your control panel, navigate to Settings & tools > Payment methods.
- In the Stripe section, click the Configure button.
- A pop-up screen will appear. Click the Add New button.
- Select the checkboxes that correspond to the new payment methods (e.g., Afterpay) that you wish to add.
- Configure the settings as desired.
- Click the Complete button at the bottom of the page.
- Check whether the payment method configured shows up on the Checkout page. Make sure to place dummy orders to check whether the payment method is working.
Warning: Please ensure that you do not have both the native Afterpay and the Stripe Afterpay payment options enabled simultaneously.
Setup Stripe BNPL Widget (Optional)
Following the previous section, let's take a look at how you can install the Stripe BNPL widget for your webstore. Follow the steps as shown below-
- In the Addons store in the Control Panel, find the Stripe Pay Later Widgets addon and install it.
- Find your Stripe API "Publishable Key" on this page in your Stripe account.

- Additionally, once you have installed the widget, you can click Configure on the addon, and change the appearance of the widget by selecting one of the 3 available themes:
stripe
night
flat

- You can now see the widget on your webstore in the following pages:
Product Page
Cart Page
Warning: Please be aware that the widget's appearance and positioning may vary with customised webstore templates.
To know more about rates, Stripe's pricing is available here. Please contact Stripe directly to discuss pricing.