Neto by Maropost has a large number of predefined product fields available to use. These fields can be expanded using add-ons from the add-on store. Custom fields can also be created if a required field does not already exist.
This article describes how to create regular products. For other product types, refer to these additional articles:
Add Products Individually
To add products individually through your control panel:
- In your Neto control panel, navigate to Products > Add product.
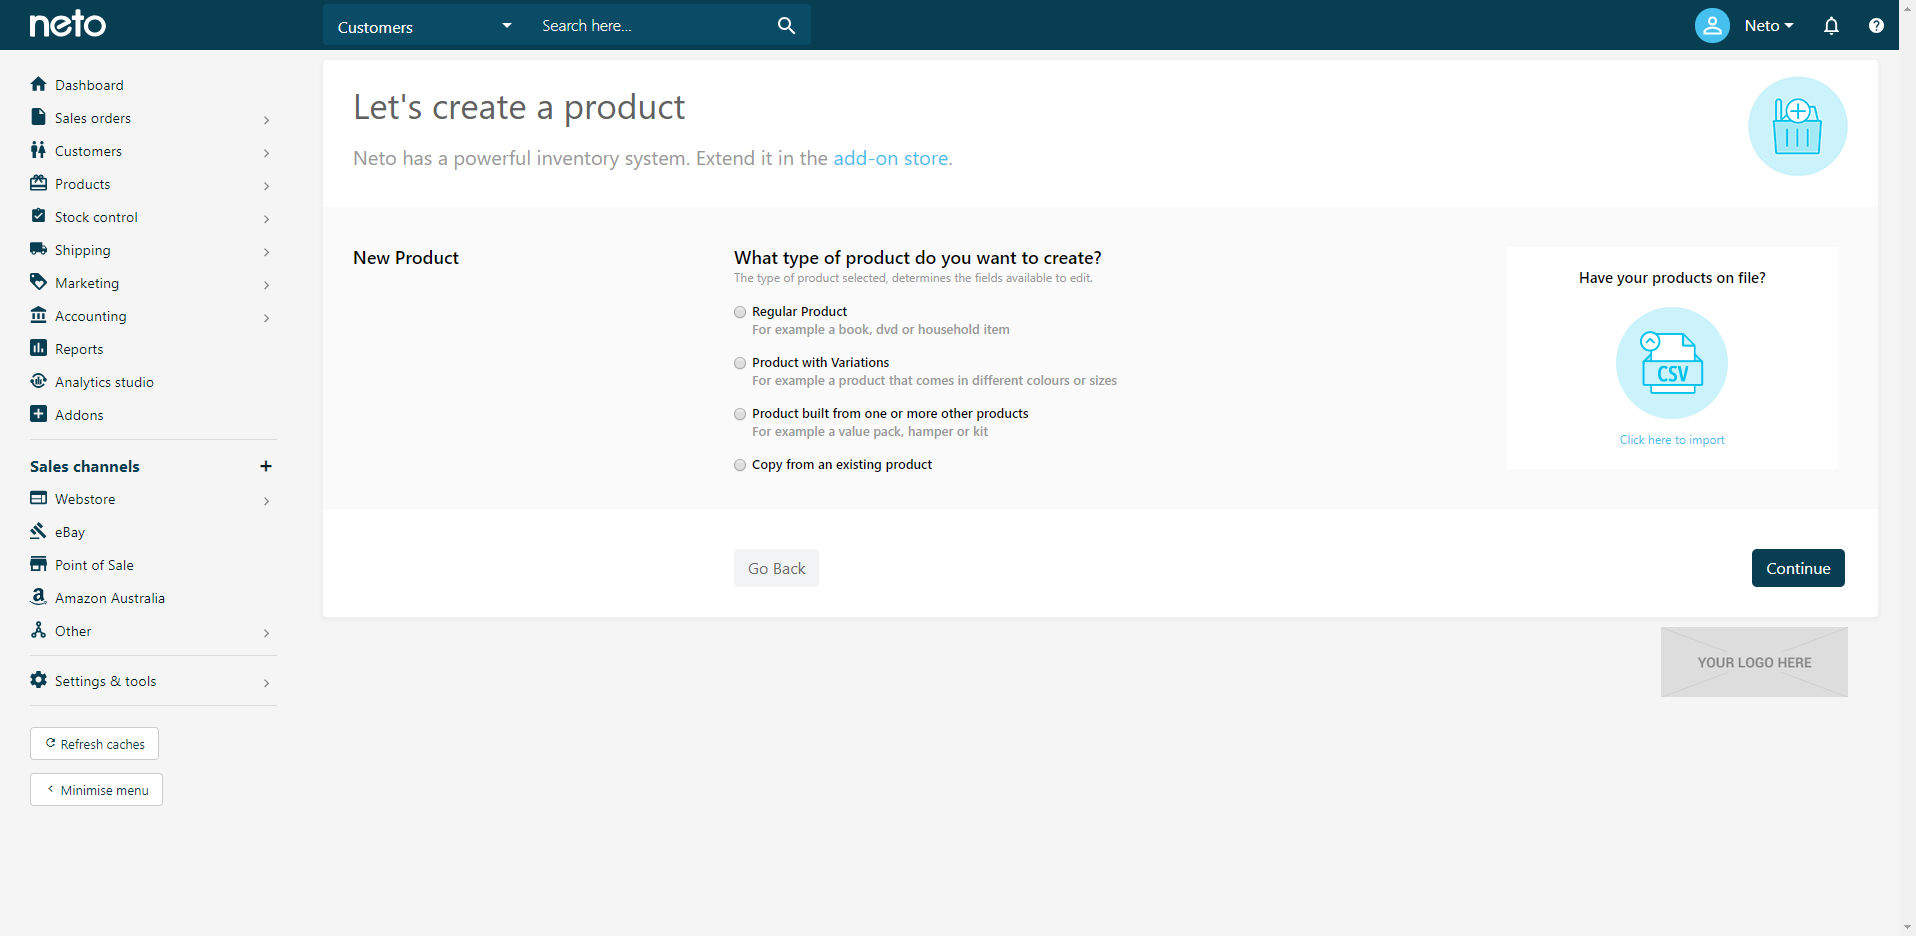
Different types of products can be created from the Let's create a product page by selecting the relevant radio button.
- Click the Regular Product radio button and additional fields will display beneath the list of product type radio buttons.
- Enter your product information into the fields provided.
- In the Images section, click the Choose File button to upload a product image. You can also drag and drop images directly from an open folder.
- Click the Continue button (at the bottom of the screen).
- The product page will display with more sections and fields. These depend on which addons you have installed, and your permission levels. To learn about all the fields please refer to our field definitions guide.
Add Products in Bulk
Products can be created in bulk using the data import wizard with a CSV file. Please refer to our Product Import Wizard article for instructions.
Brand
Neto treats brands much like product categories, with only a top level (no child or sub-categories). Brands can be added to products, and much like categories, they can be configured to display in different ways on your website.
By default, brands can be used as search filters, but you can include a brands page, brands menu, or highlight your featured brands.
Brands are also an important feature for your other sales channels. eBay, Amazon, and Neto POS all use the brand to group, highlight or enhance the way products are searched and displayed.
Add a Brand to a Product
Brands are created automatically when you add them to a product. They can be entered during product creation, or to products that already exist in Neto.
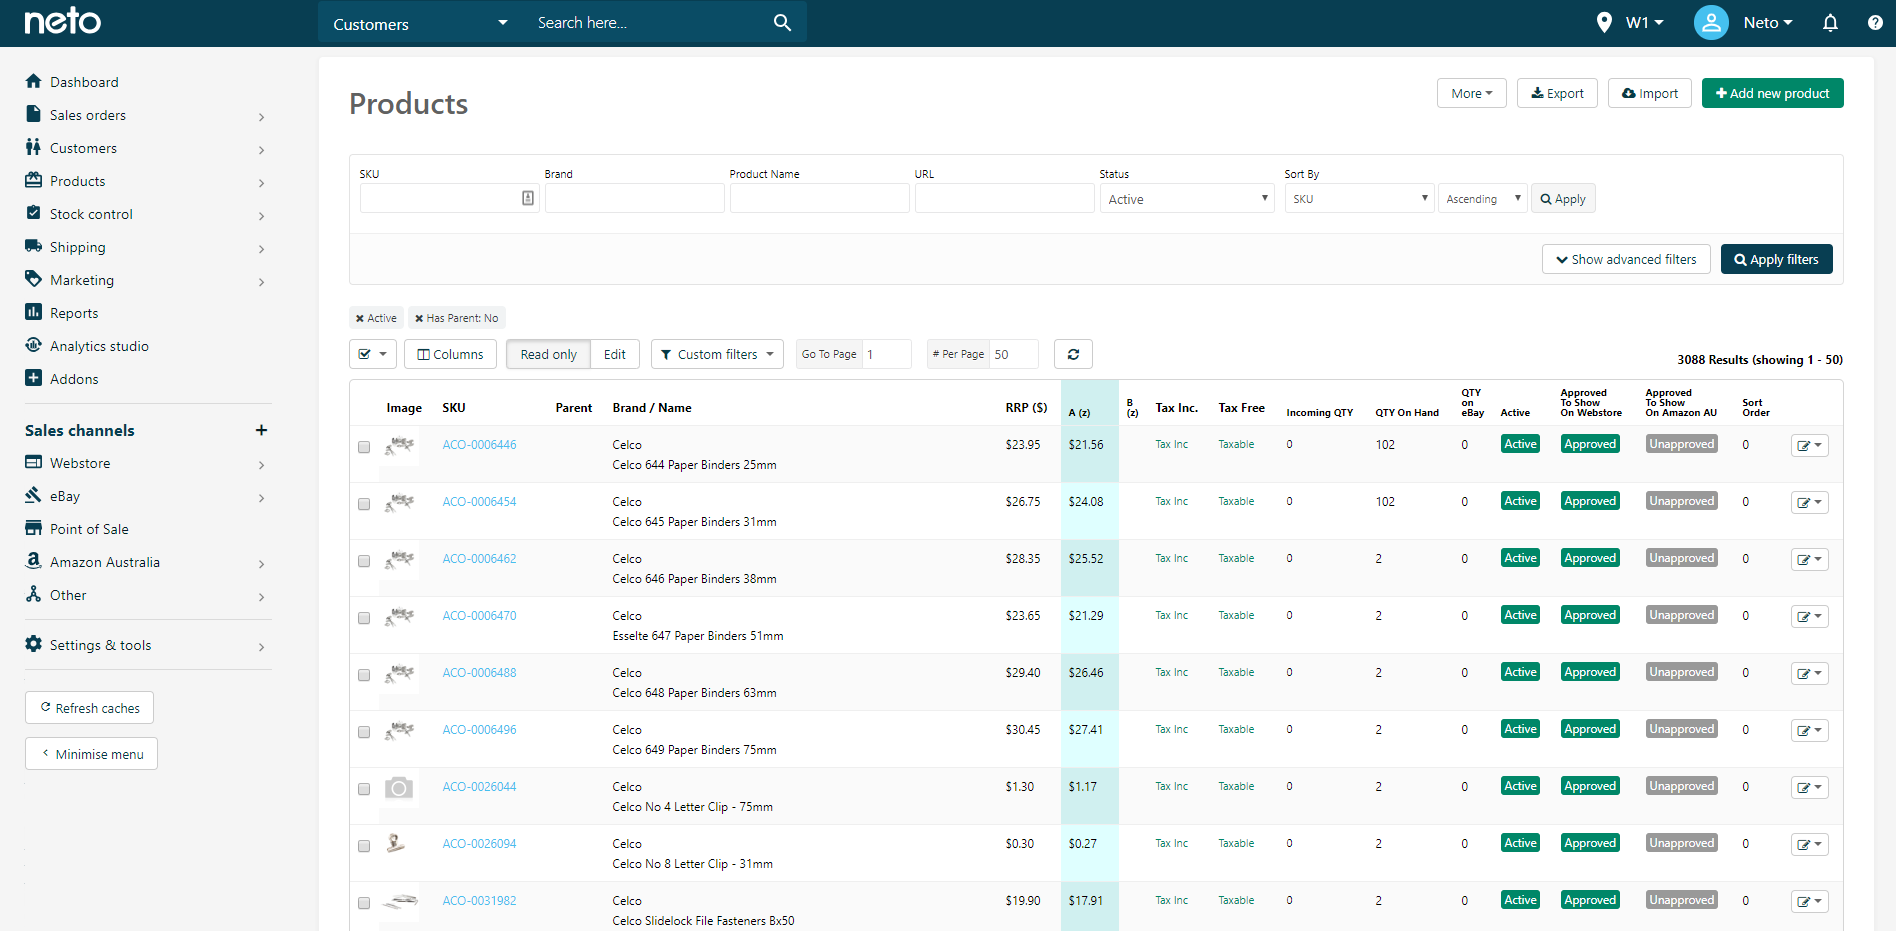
- In your Neto control panel navigate to Products > Active.
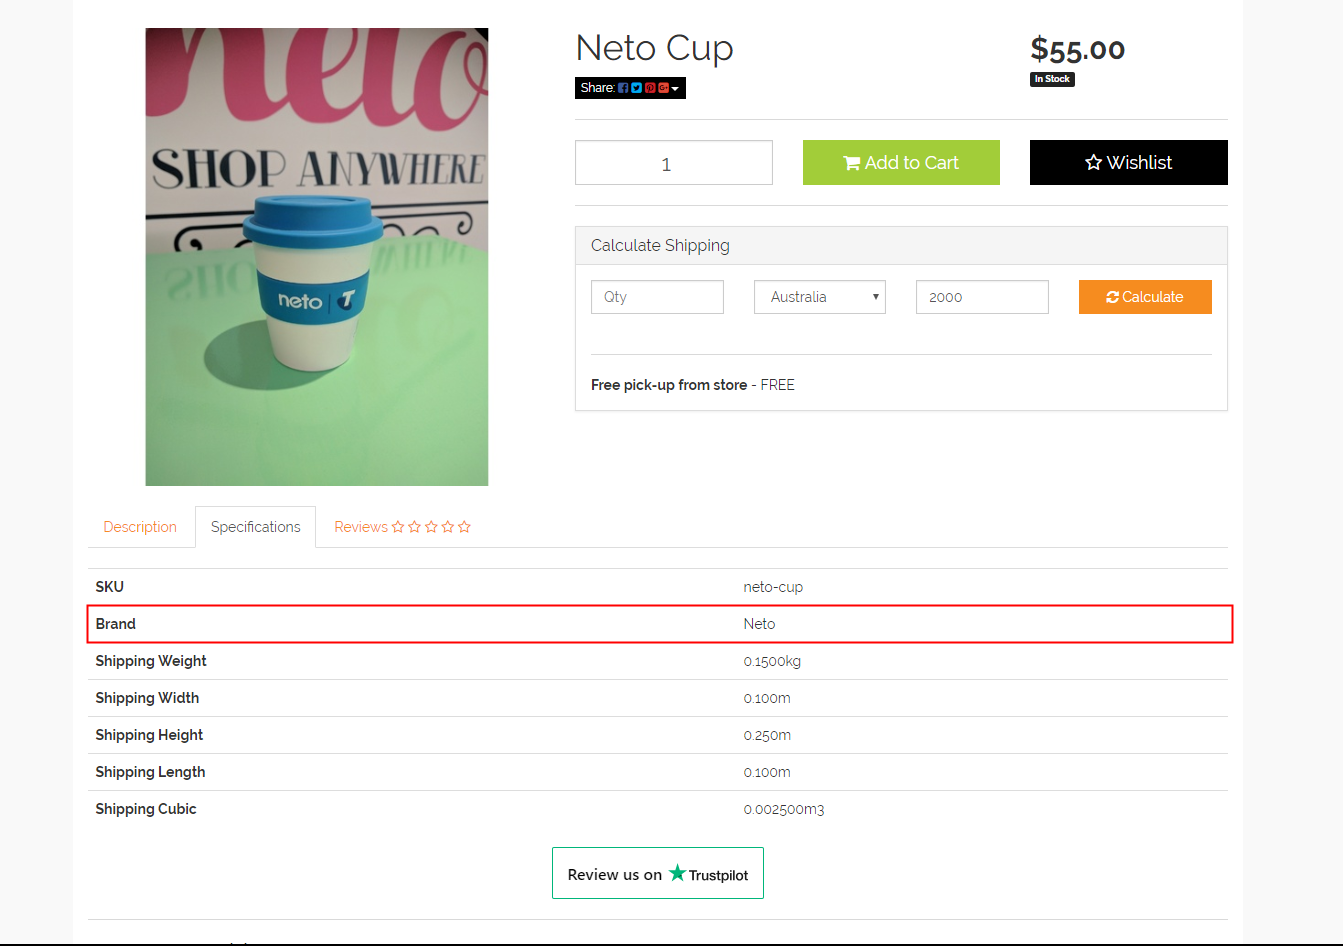
- Click the SKU of the product that you want to add the brand to. The product details page will appear, which allows you to edit the product fields.
- In the Naming & Visibility section, enter the Brand of your product, then click Save.
If the brand doesn't currently exist, it will be automatically created. More information on managing your brands can be found below.
Tip: Brands are also created when using the product or content import wizard.
Manage Brands
Like categories, brands can be customised with different content, visibility settings, and images.
- In your Neto control panel navigate to Products > Brands to see a full list of brands.
Brands can be made active/inactive or deleted on this page by selecting the checkboxes, and clicking the With Selected button.
- Click on a brand name to open the edit page.
- You can now enter more information about the selected brand, upload an image, change which user groups can see it, or make viewing the brand page require a login.
- When finished with your changes, click the Save button.
Clone Products
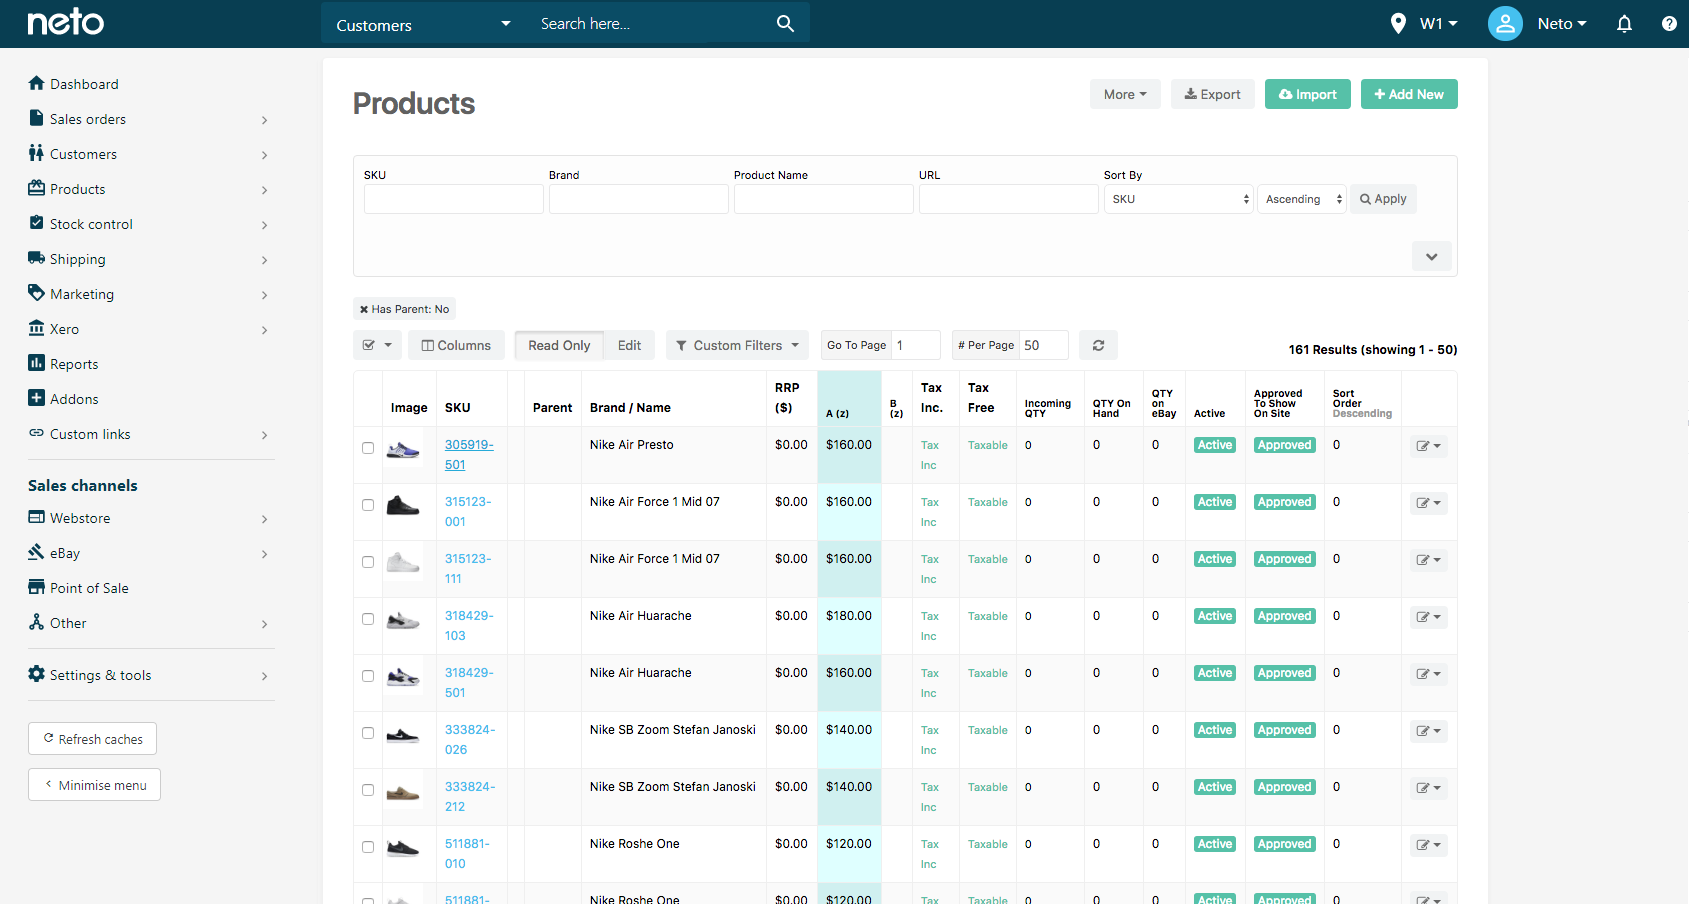
- In your Neto control panel navigate to Products > View Products.
- On the right-hand side of every product, there is an edit icon. Locate the product you wish to edit, click the icon, and select Copy Existing Product.
You can also clone a product by navigating to Products > Add a Product and selecting Copy from an existing product. You can then enter the SKU of the product you want to copy from.
- Enter the SKU of your new product, and choose if you want to copy stock. If you select yes, your Inventory Policy (track/do not track inventory) will be copied, but the stock level will not.
Click the Continue button.
- The product details will expand and you will have the opportunity to edit the product information, such as the name, images, price, description, and shipping info. Make any changes, and click the Continue button.
Your product will now be cloned, and you can continue editing the product as required.
Edit Products in Bulk
Editing products in bulk is best achieved using the Neto export and import wizards:
- Use the complex export wizard to create a CSV file with the SKU and any fields you want to change.
- Open your CSV file and change the fields. Be sure to save it as a CSV file (MS-DOS format on Mac).
- Use the complex import wizard to import the CSV file with the SKU and any fields you want to change.
Product Category
There are several ways to add product categories to your products. This article goes through the methods you can add product categories to products through the control panel.
- Add Product Categories to Individual Products
- Add Product Categories to Products in Bulk
- Add Product Categories to Products via Import
Add Product Categories to Individual Products
To add a product category to an individual product:
- In your Neto control panel navigate to Products > View Products.
- From the Products page, click on the relevant SKU link.
- Click on the Categorisation link within the Product menu.
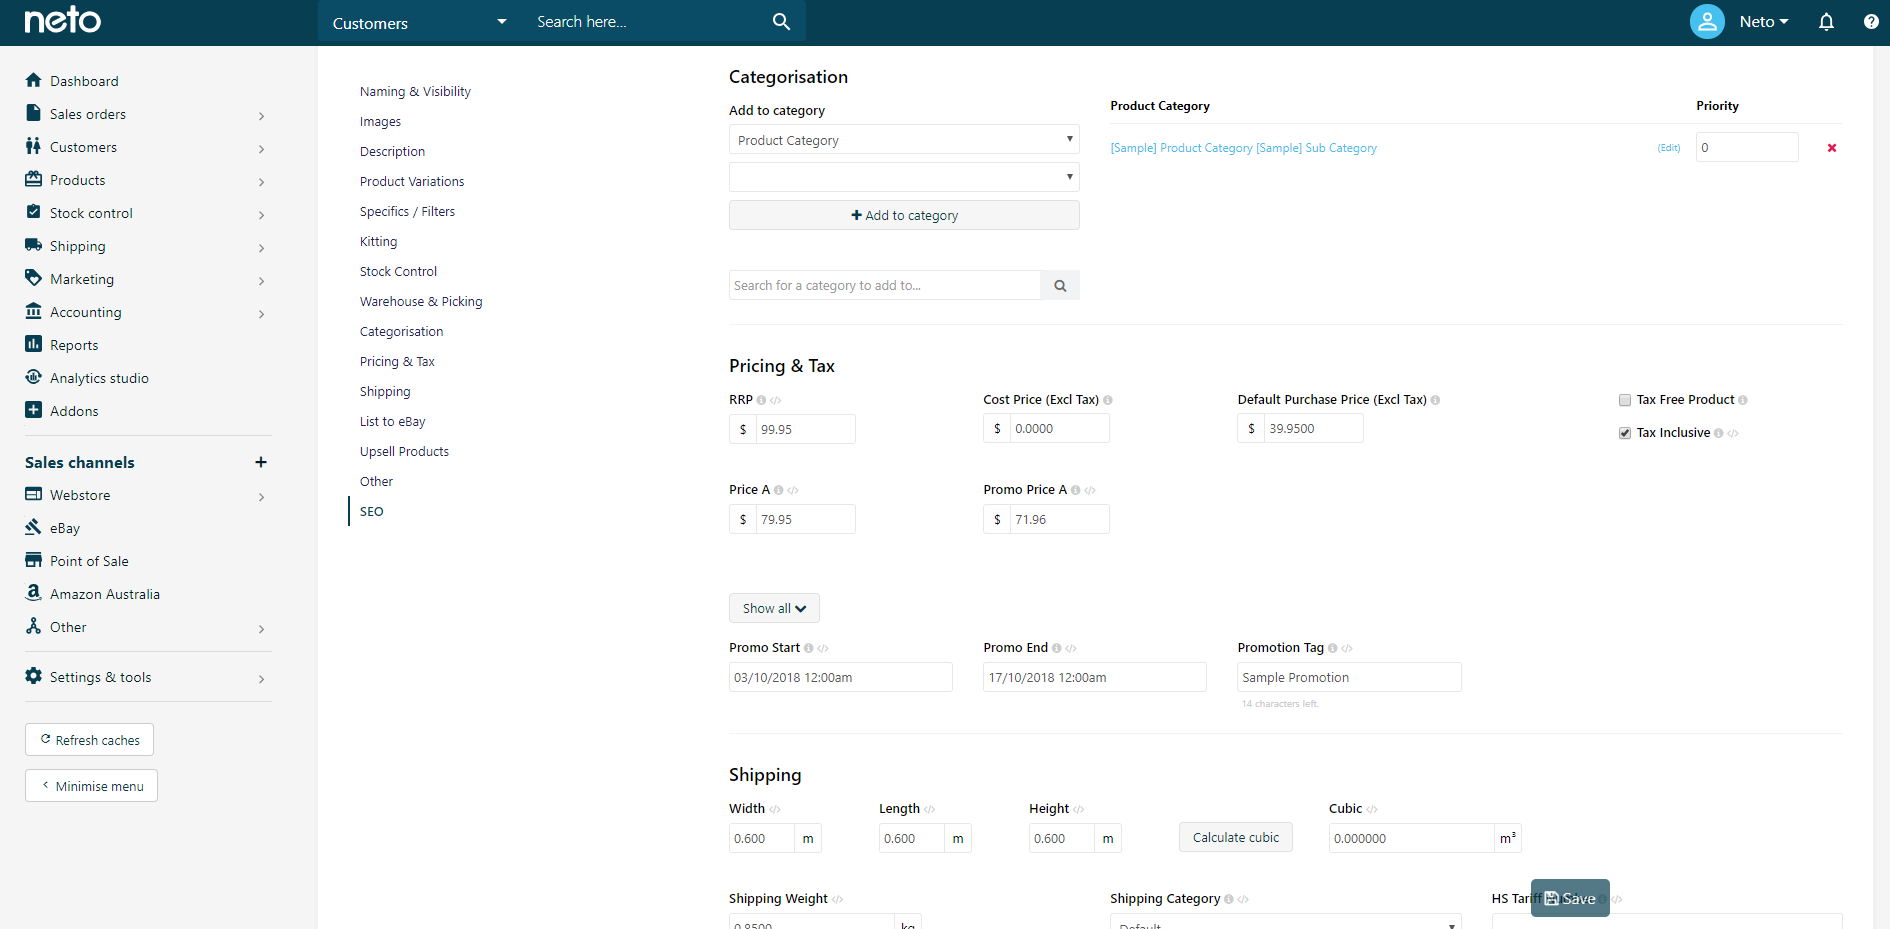
- Select the relevant category from the Add to category dropdown.
- Select an option from the blank dropdown.
- Click the Add to category button.
Please Note: Remember to click the Add to category button or the category will not save.
- Repeat steps 3 - 5 for adding more categories.
- Click the Save button.
Add Product Categories to Products in Bulk
Product categories can be added to multiple products at once on the products page:
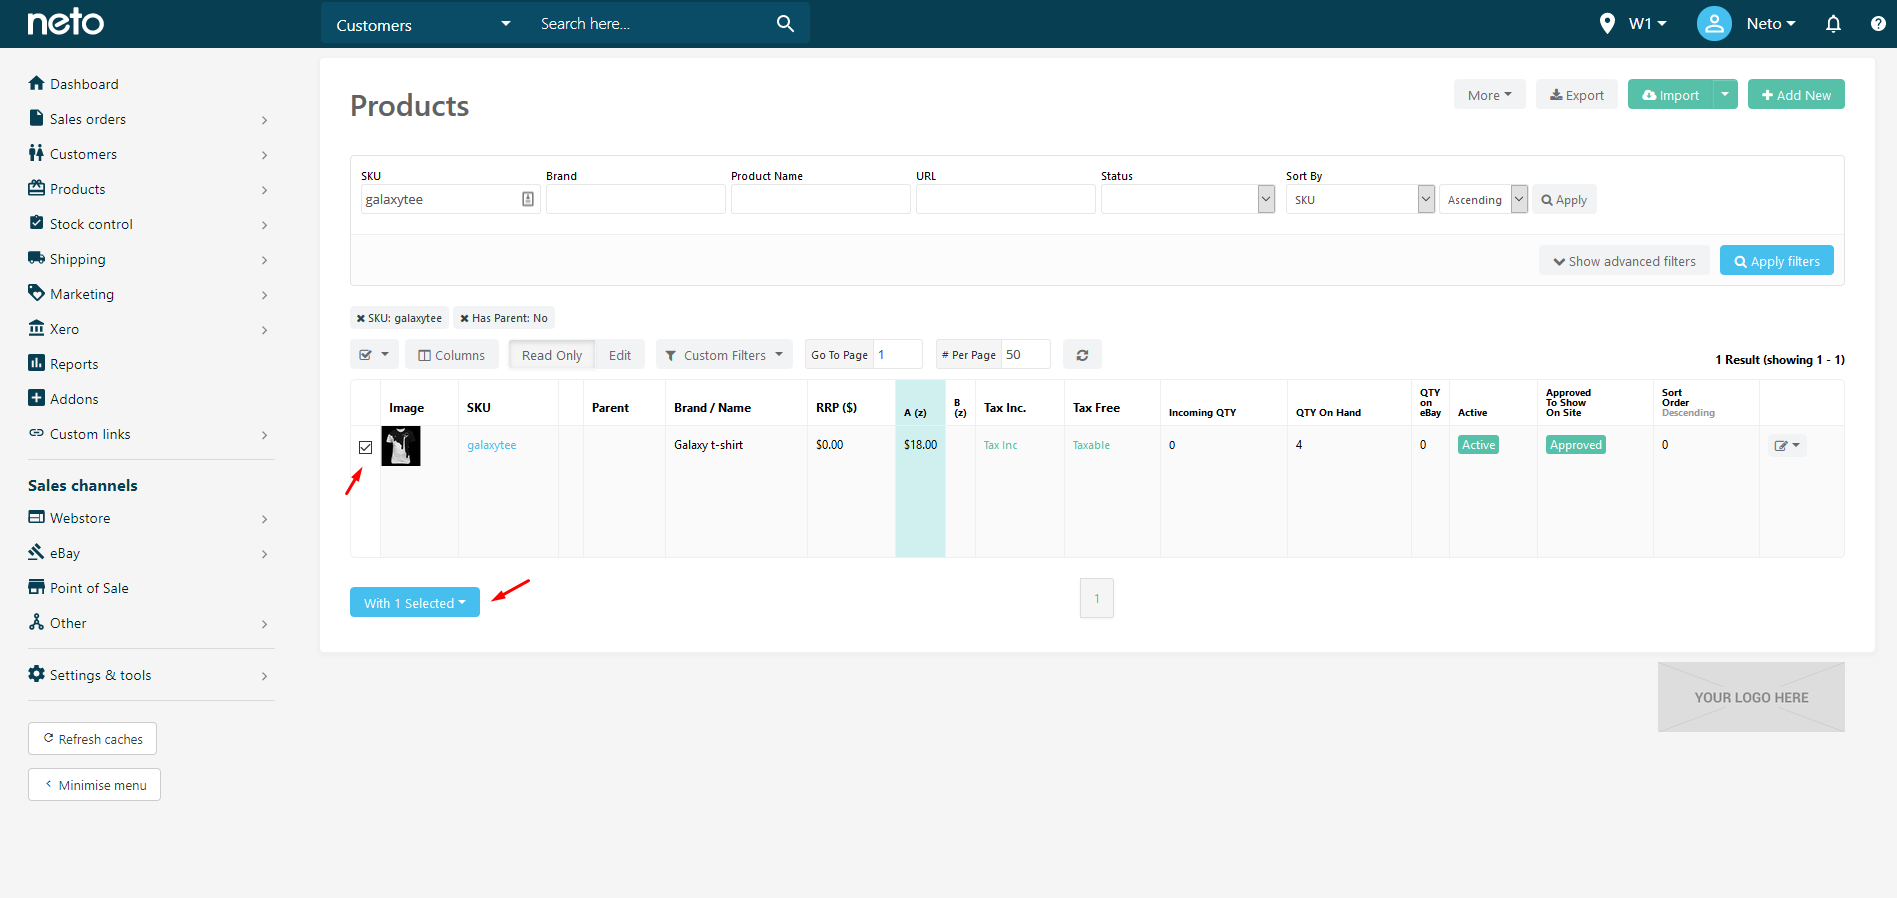
- From the Products page, select the relevant SKUs by selecting the check boxes.
- Scroll down to the bottom of the page, and click the With Selected button.
- Select Add/remove categories from the pop-up menu.
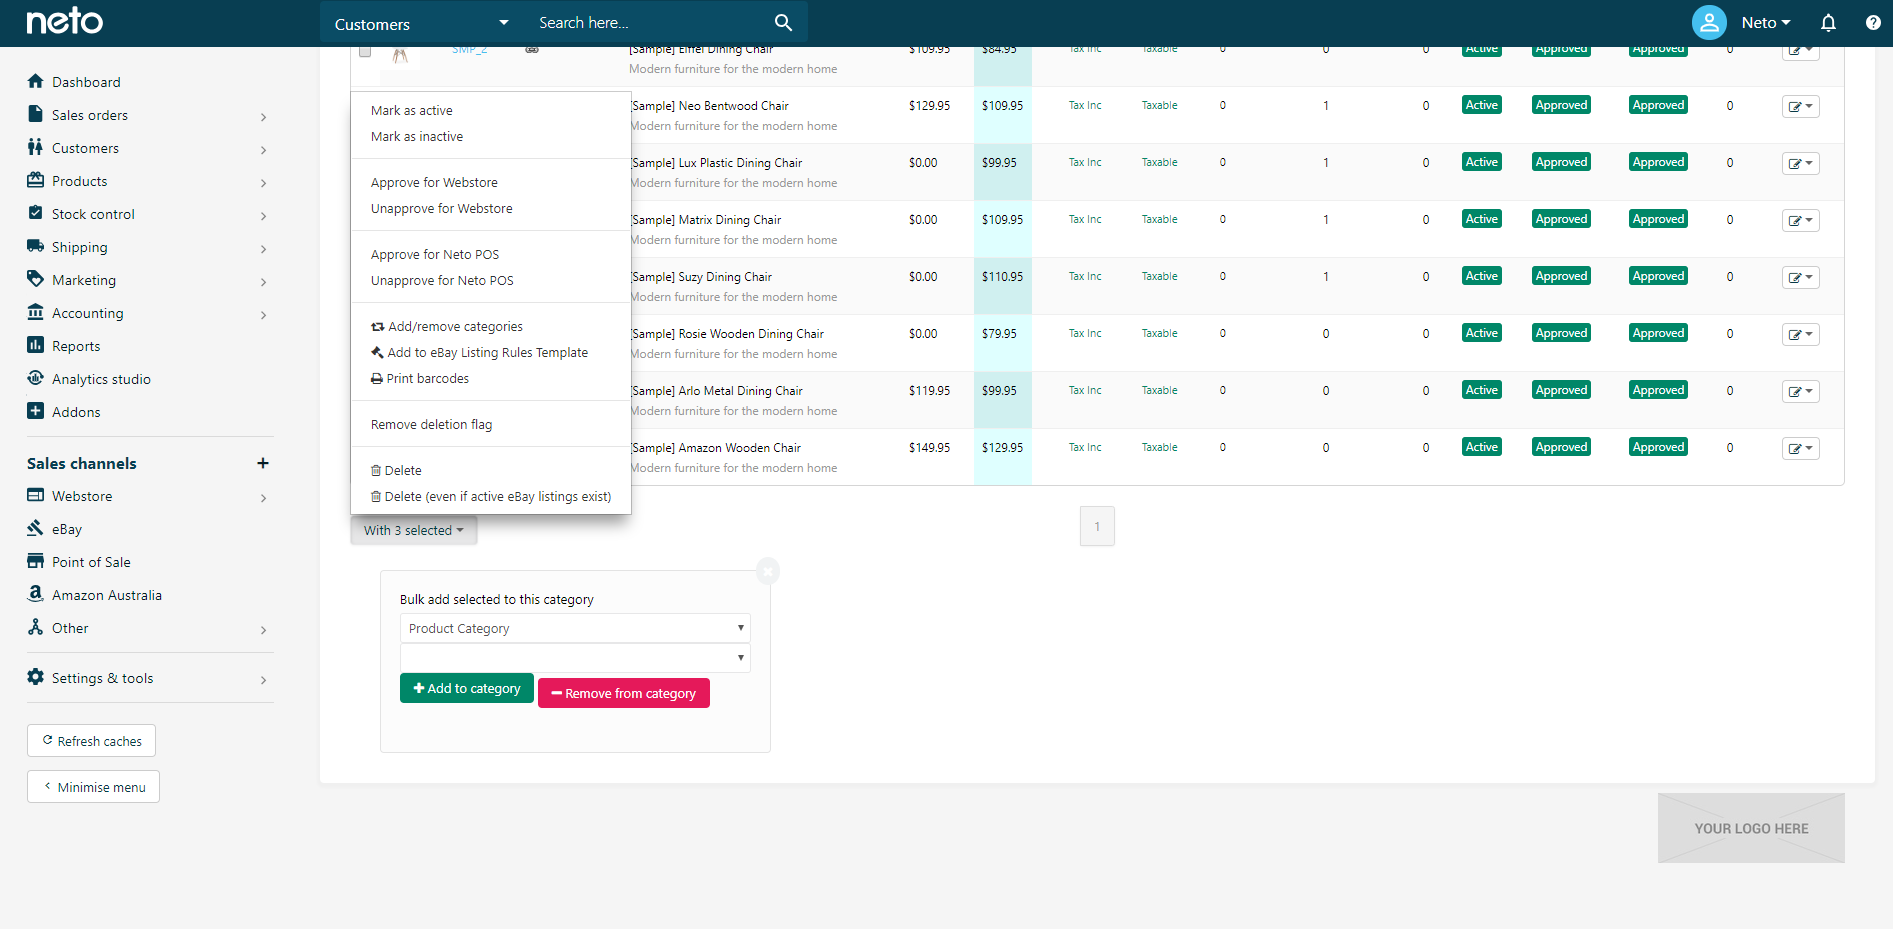
- Select the Product Category you wish to add or remove from the Product Category dropdown.
- Click the Add to category button.
Click the Remove from category button to remove the selected categories in bulk.
Add Product Categories to Products via Import
Instructions to import product categories can be found here.
Set Product Category Priority
When assigning product categories to a product, you can also select which category takes priority over the others.
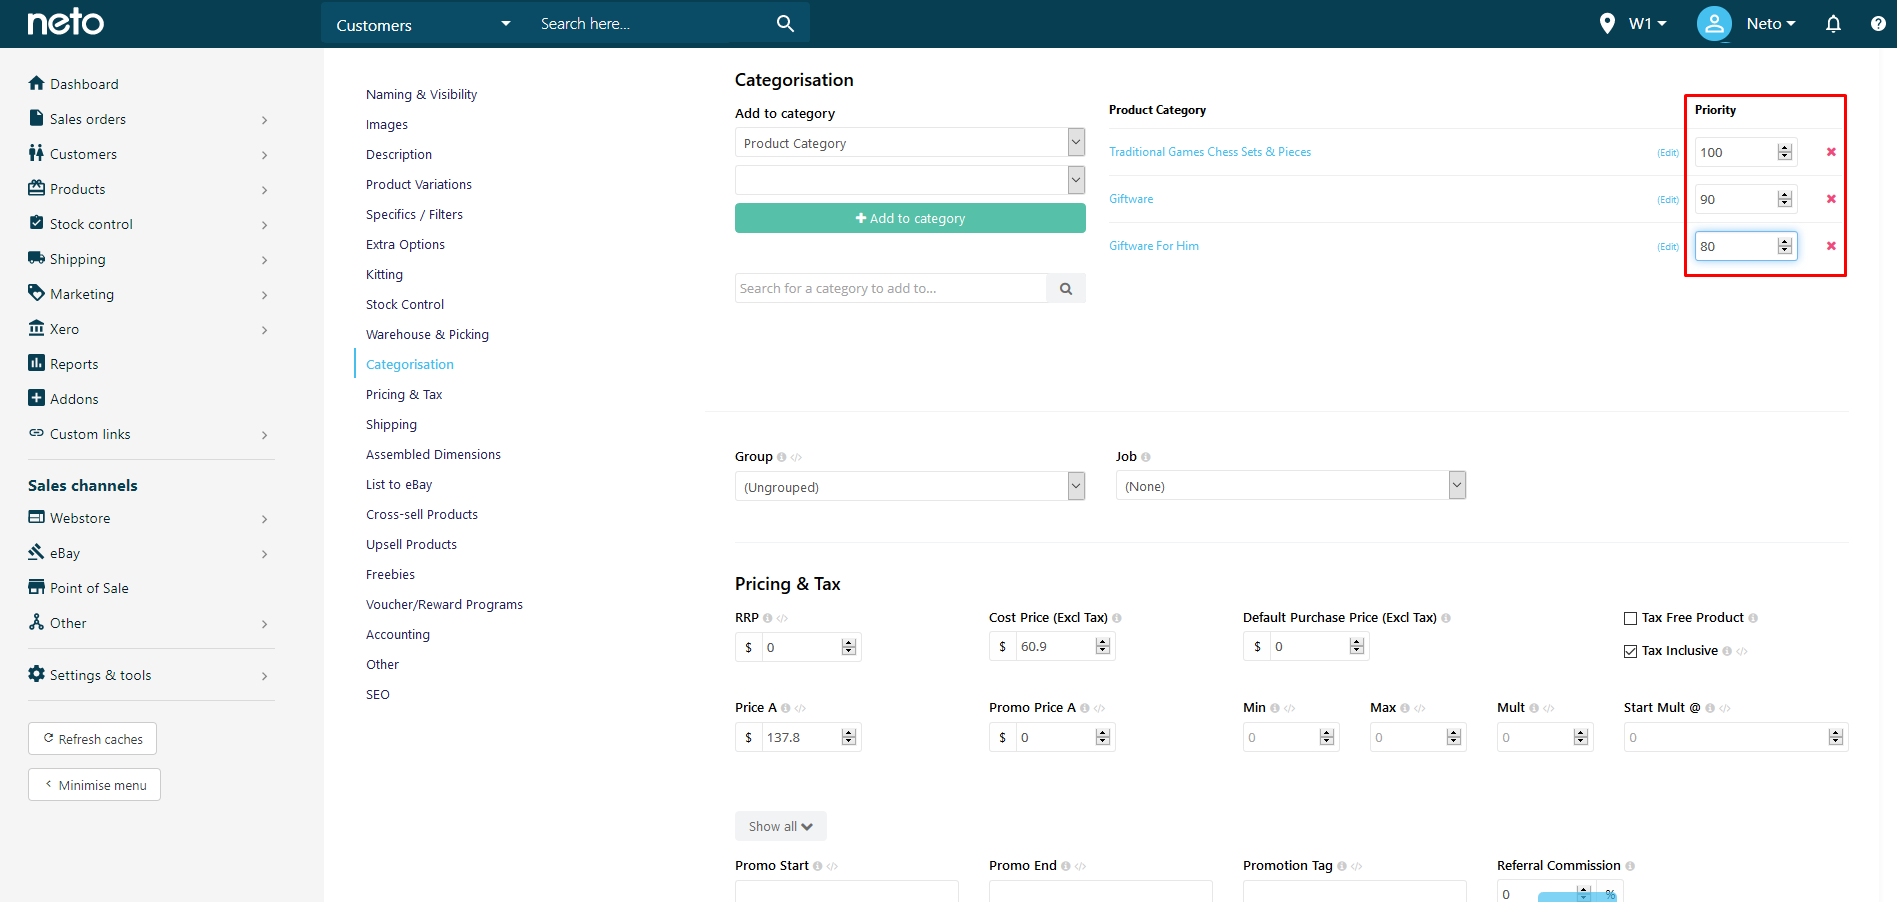
For example, this product has three product categories assigned to it:

There is a priority field on the right-hand side of each assigned category. The priority is used for both:
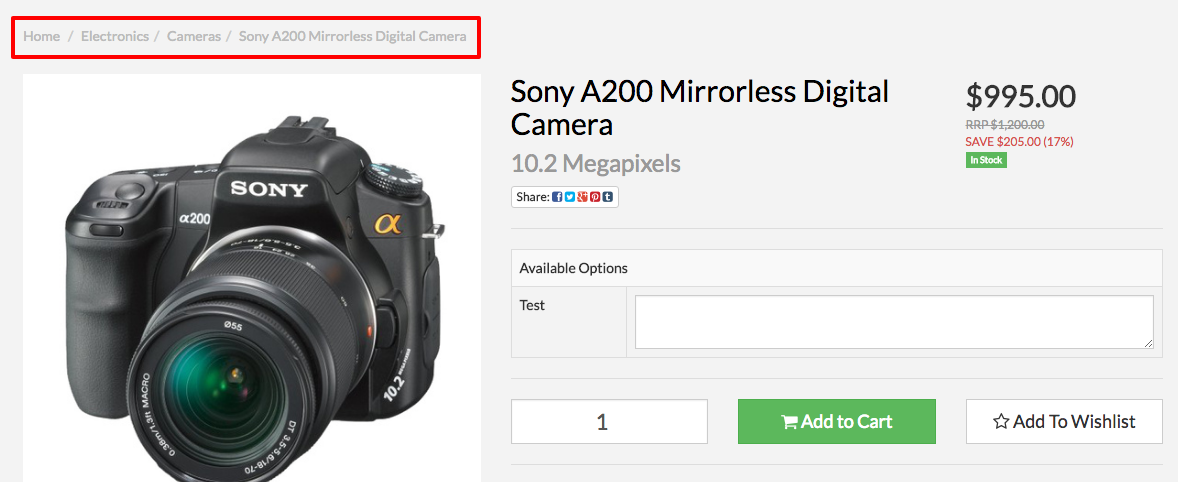
- The path to the product at the top of the product page (the breadcrumbs):
- The eBay/Catch/Amazon category Mapping also uses the priority to select the Neto category to map to a marketplace category (and eBay store category).
In both cases, the highest number takes priority. You can change the priority by entering a number in the priority field on the right-hand side of the assigned categories:
You don't need to enter a priority for each category. As long as the the category you want to be first has a number, the rest can remain blank. Once entered, save the changes to the product.
Set The Category Priority In Bulk
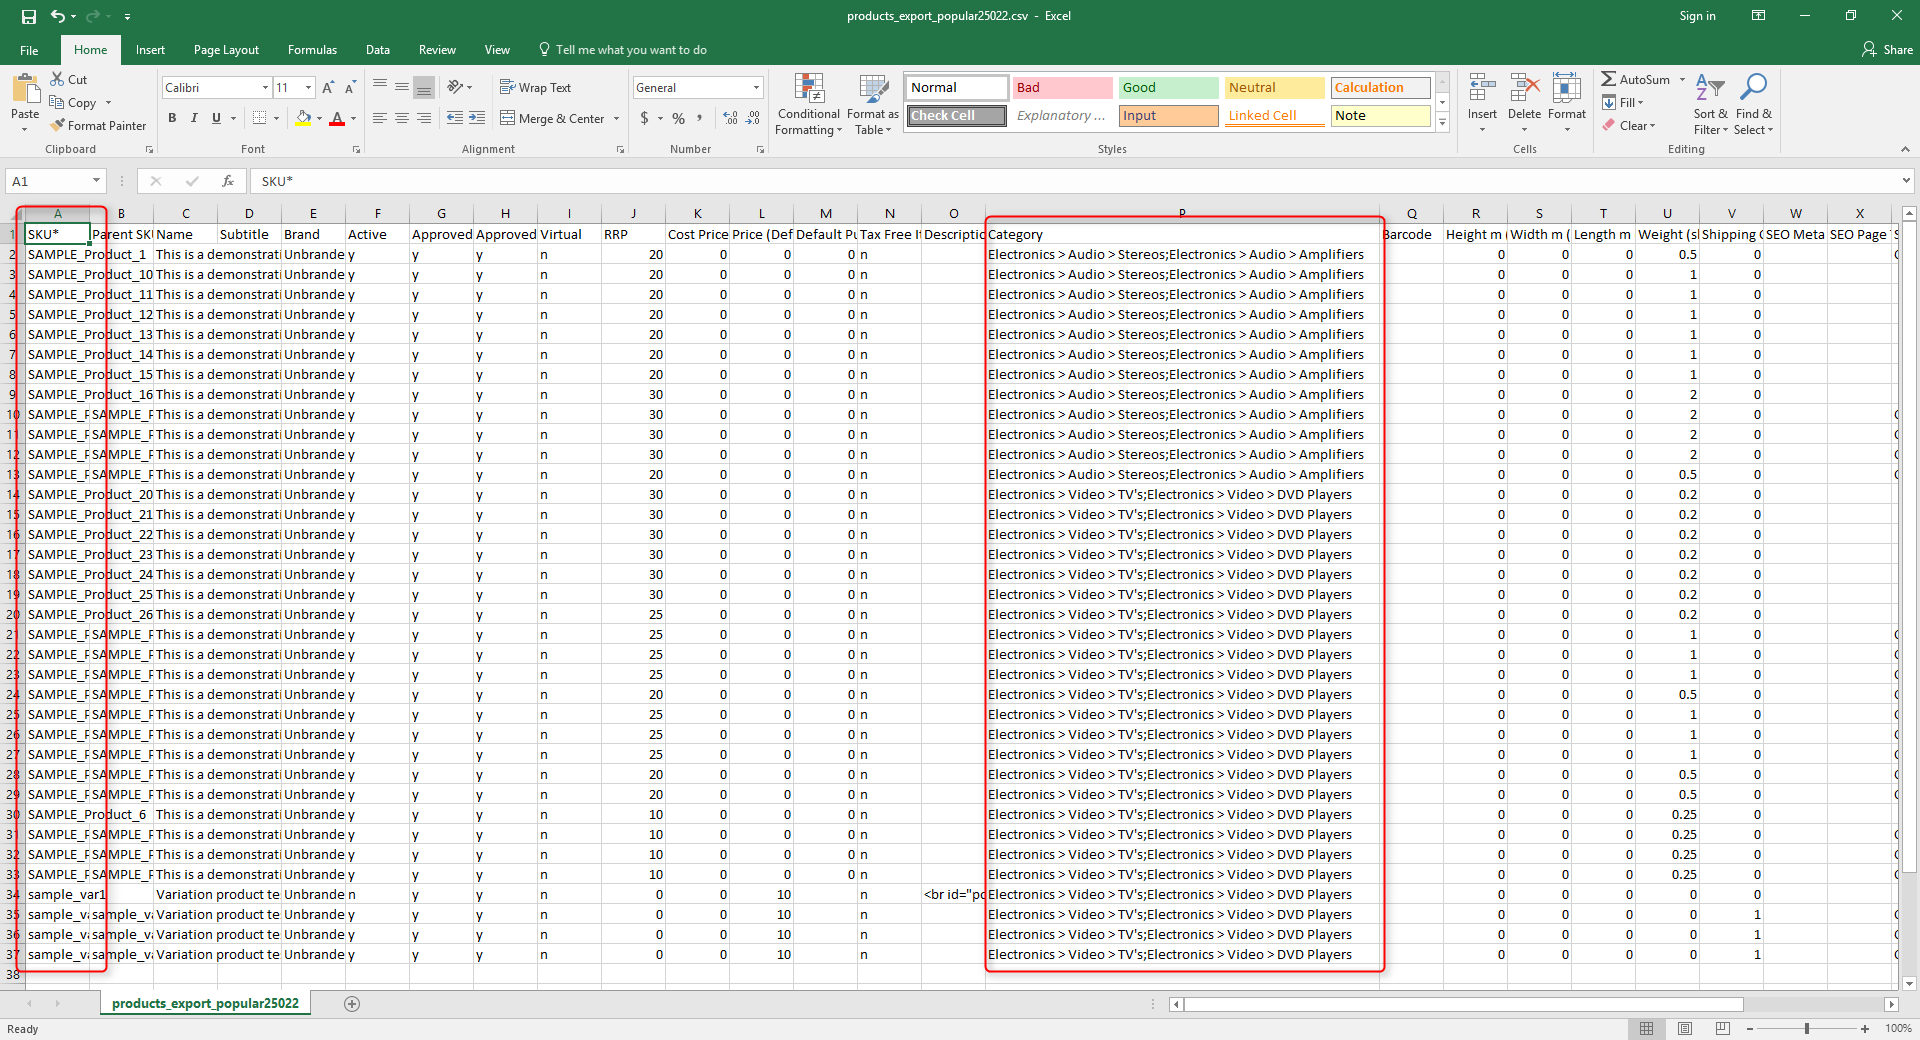
Product categories can be prioritised in bulk through the import wizard. To do this, first run a simple export to generate a CSV file with your products. The file will look similar to this, but the two columns we're concerned with are the SKU and Category.
To set the priority, you need to add two colons (::) and the priority number after each full category path.
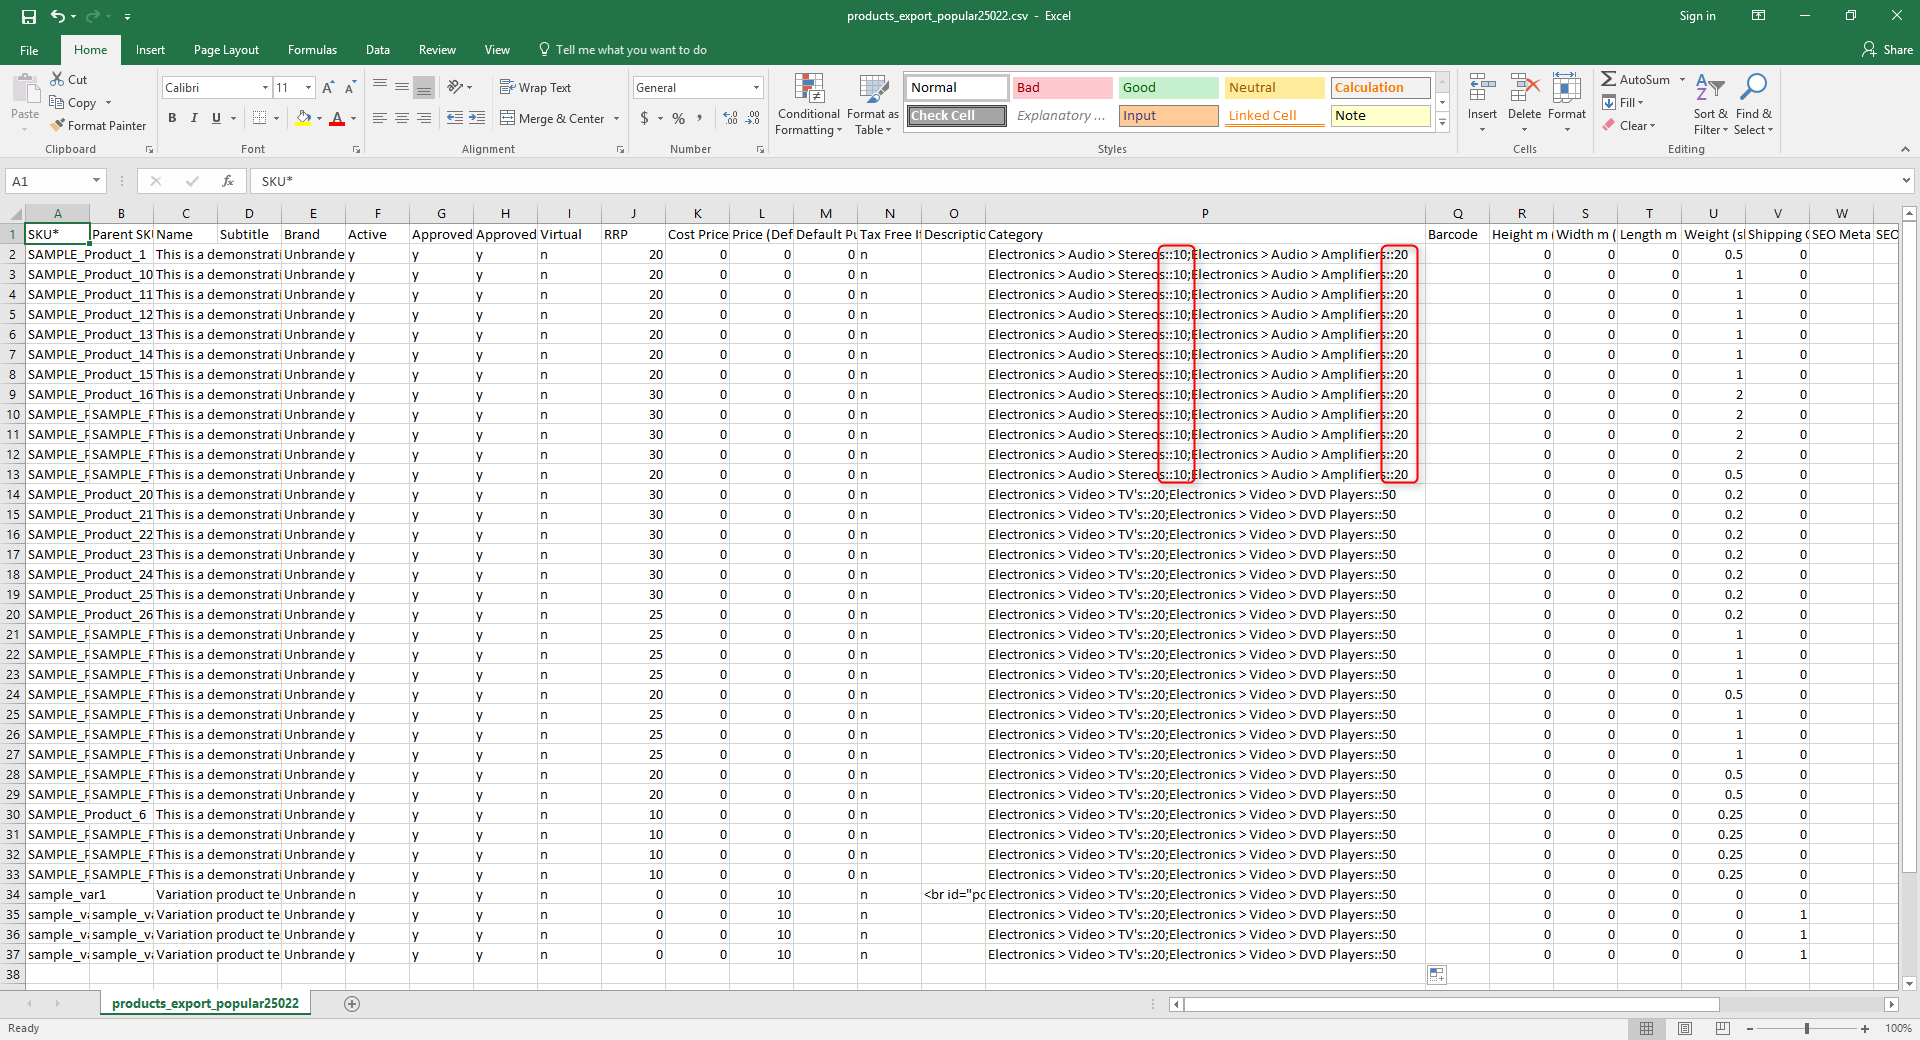
Once complete, Save your file as a CSV (comma separate values). You can now import the file using the import wizard.
In update options step, click the Show Advanced Update Options link. The settings you need to change are under Category Options:
- Set Category Update Options to Replace Existing Record.
- Set Category Compatibility Notes / Sort Order Format to Sort Order.
- Enter :: in the Category Compatibility Notes / Sort Order Separator field.

Pre-order Products
Pre-order products can be pre-purchased on your web store before they are available for purchase. Customers will be able to buy the product in advance before it is officially available, and will be notified that the product is due to be shipped at a future date. This differs from back order, where you're waiting for a restock to arrive from your supplier.
When pre-orders are turned on, orders will be added to the qty committed into a negative amount up to the same number as the pre-order qty. Eg. If you have pre-order qty of 50, the product will still be available until qty on hand is -50. Once the stock arrives, empty the pre-order field and populate the warehouse qty field.
Customers will receive a standard order at checkout and once the item has arrived at the warehouse, a standard dispatch notification will be sent out during the pick, pack and dispatch process.
To make products available for pre-order:
- In your Neto control panel navigate to Products > View Products.

- Click on the product you would like to make available for Pre-order.
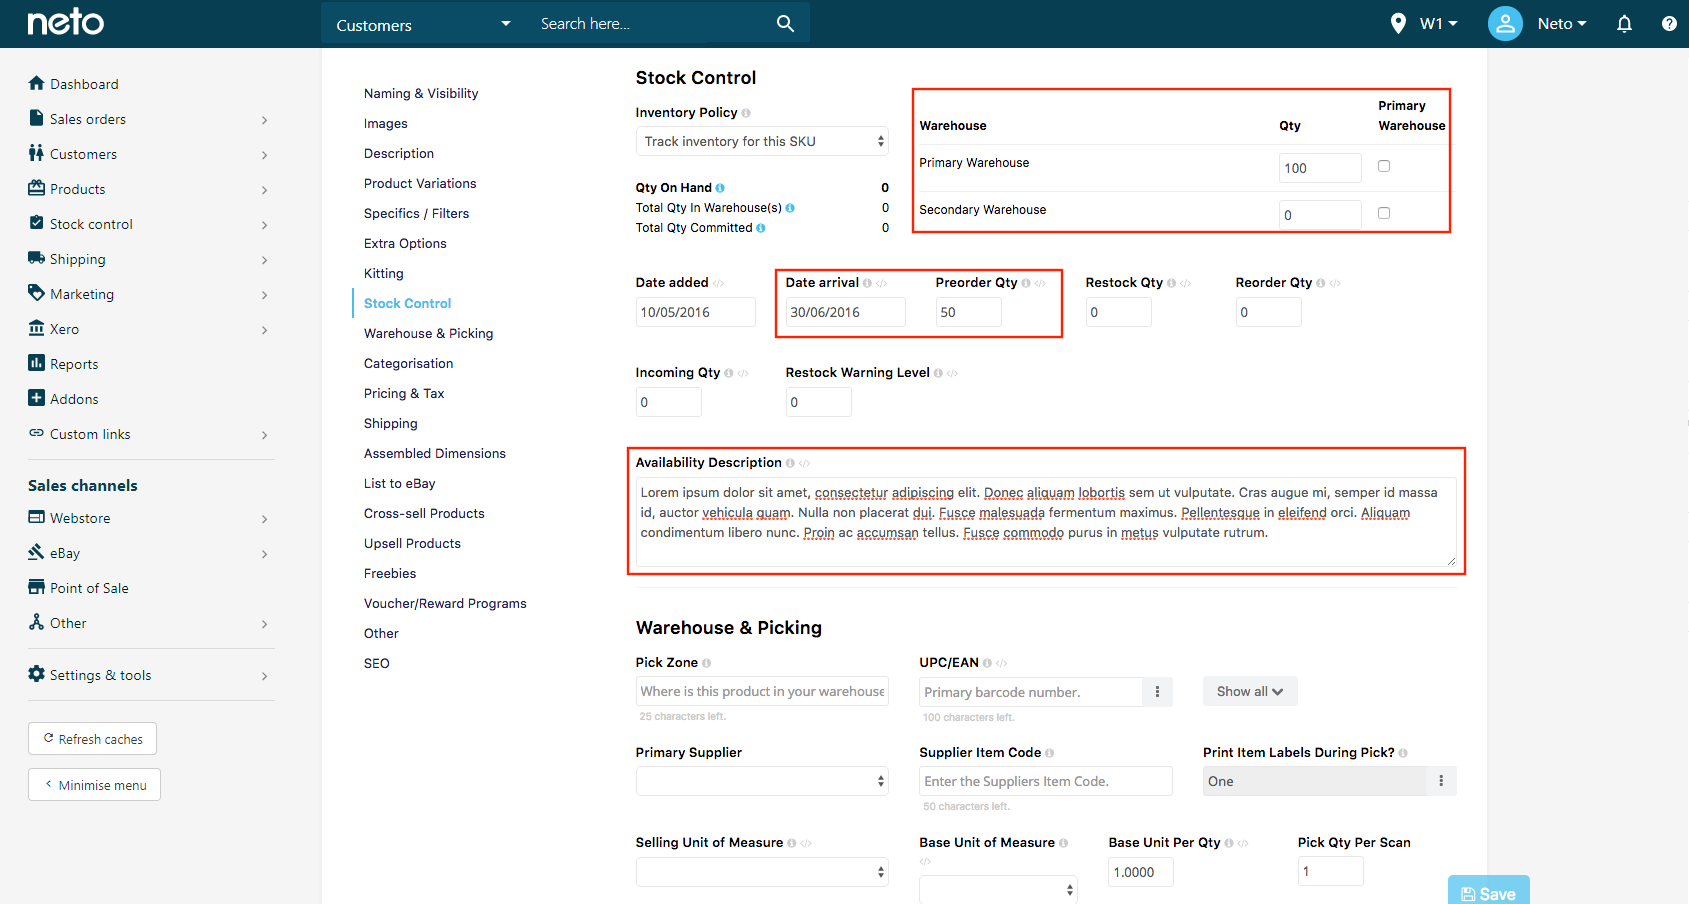
- Locate the Stock Control section and populate the fields:
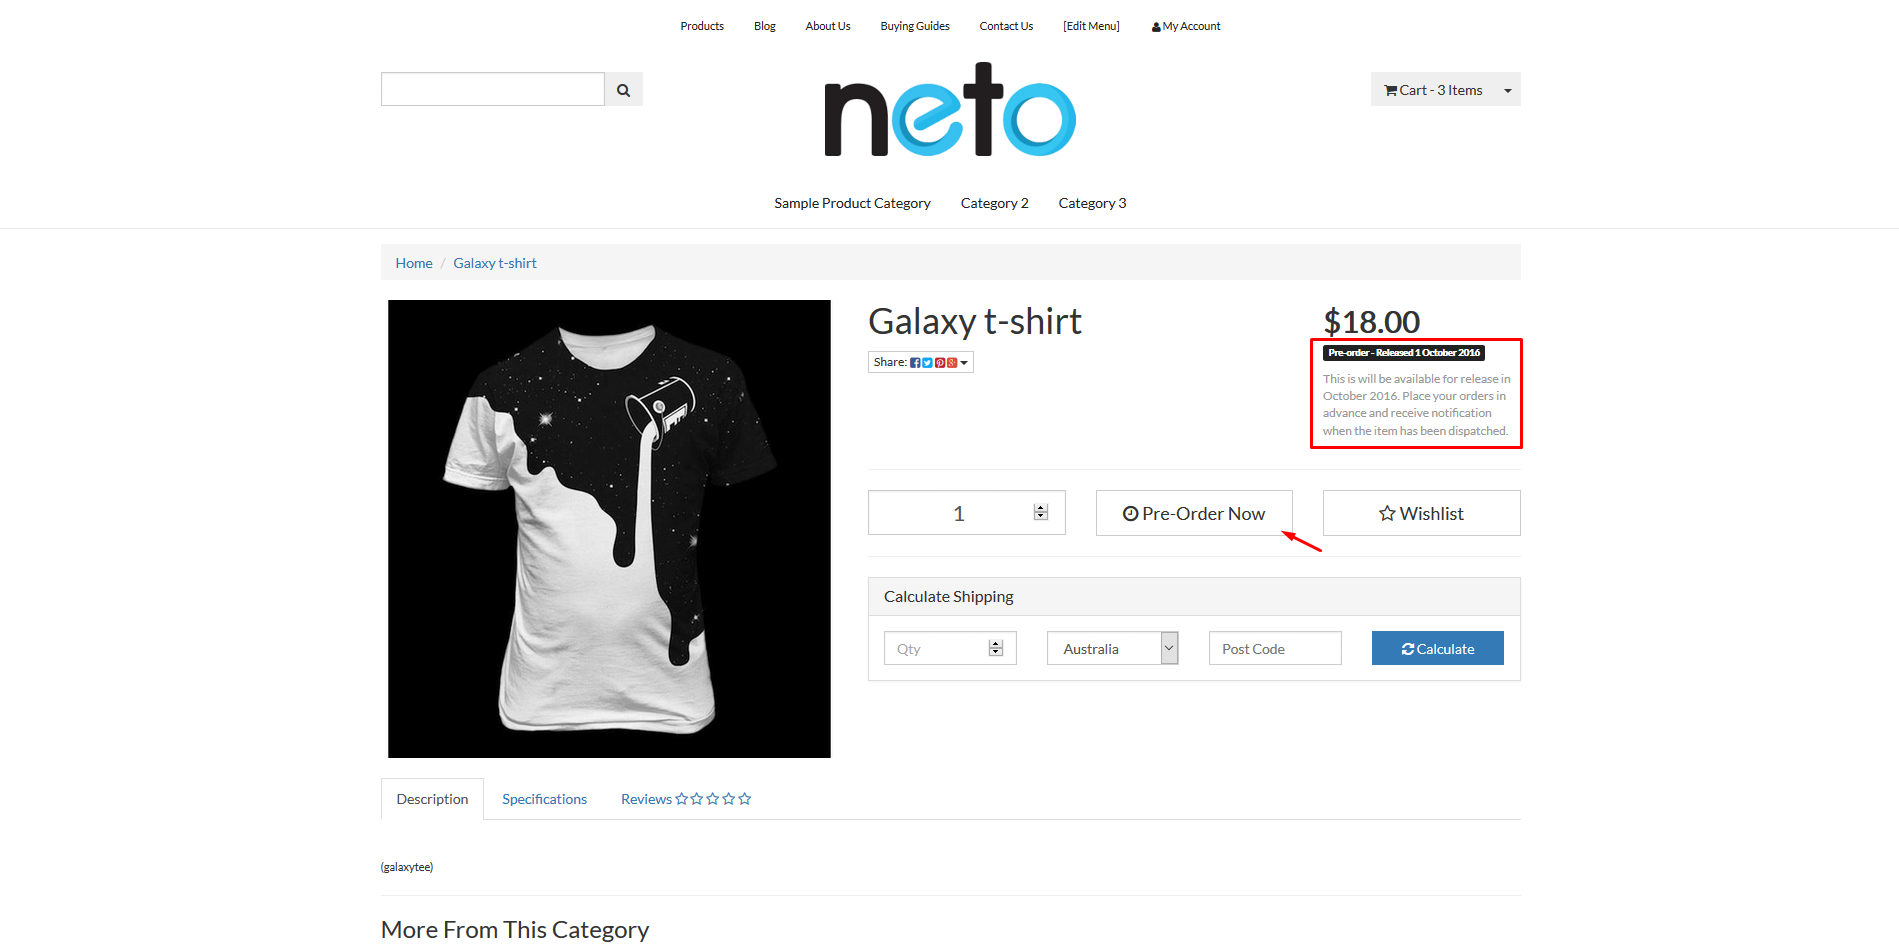
Please Note: The Pre-order Qty does not replace the warehouse quantity field. Warehouse Qty will still need to contain your current stock levels. You can specify a different amount currently available to the amount incoming.In the Availability description you can explain any terms and conditions attached to the pre-order.Here’s how the pre-order will look on the webstore:
- Enter a quantity in the warehouse field - this is a required field.
- Enter a future arrival date in the date of arrival field - this is a required field.
- Enter a pre-order quantity in the pre-order qty field - this is a required field. - This will determine the number of products that can be sold on pre-order to prevent overselling.
Locate the Stock Control section and populate the fields:
Please Note: The Pre-order Qty does not replace the warehouse quantity field. Warehouse Qty will still need to contain your current stock levels. You can specify a different amount currently available to the amount incoming.
In the Availability description you can explain any terms and conditions attached to the pre-order.
Here's how the pre-order will look on the webstore:
Delete Products
If you are using Neto Inventory you will NOT be able to delete products.
Deleting products is permanent and can lead to issues with orders, reporting as well as accounting and eBay integrations. It is advised that products are made Inactive where possible.
- In your Neto control panel navigate to Products > View Products.
- Search for the product(s) you wish to delete, scroll down the bottom and click the blue With Selected button and click the Delete button. The selected products and their images will be permanently deleted from your database.
When you delete a product it is removed from the database overnight. SKUs cannot be reused until the next morning.
Custom Product Fields
You can add up to 50 of your own custom products data fields. They can be used for product settings, to store additional customer data, or display more information on the product page.
Custom fields cannot be deleted once they are created.
You can add different types of custom fields depending on what you'll use them for:
- Date
- Text
- True / False Selectors
- Selection Boxes
To add a new custom product field:
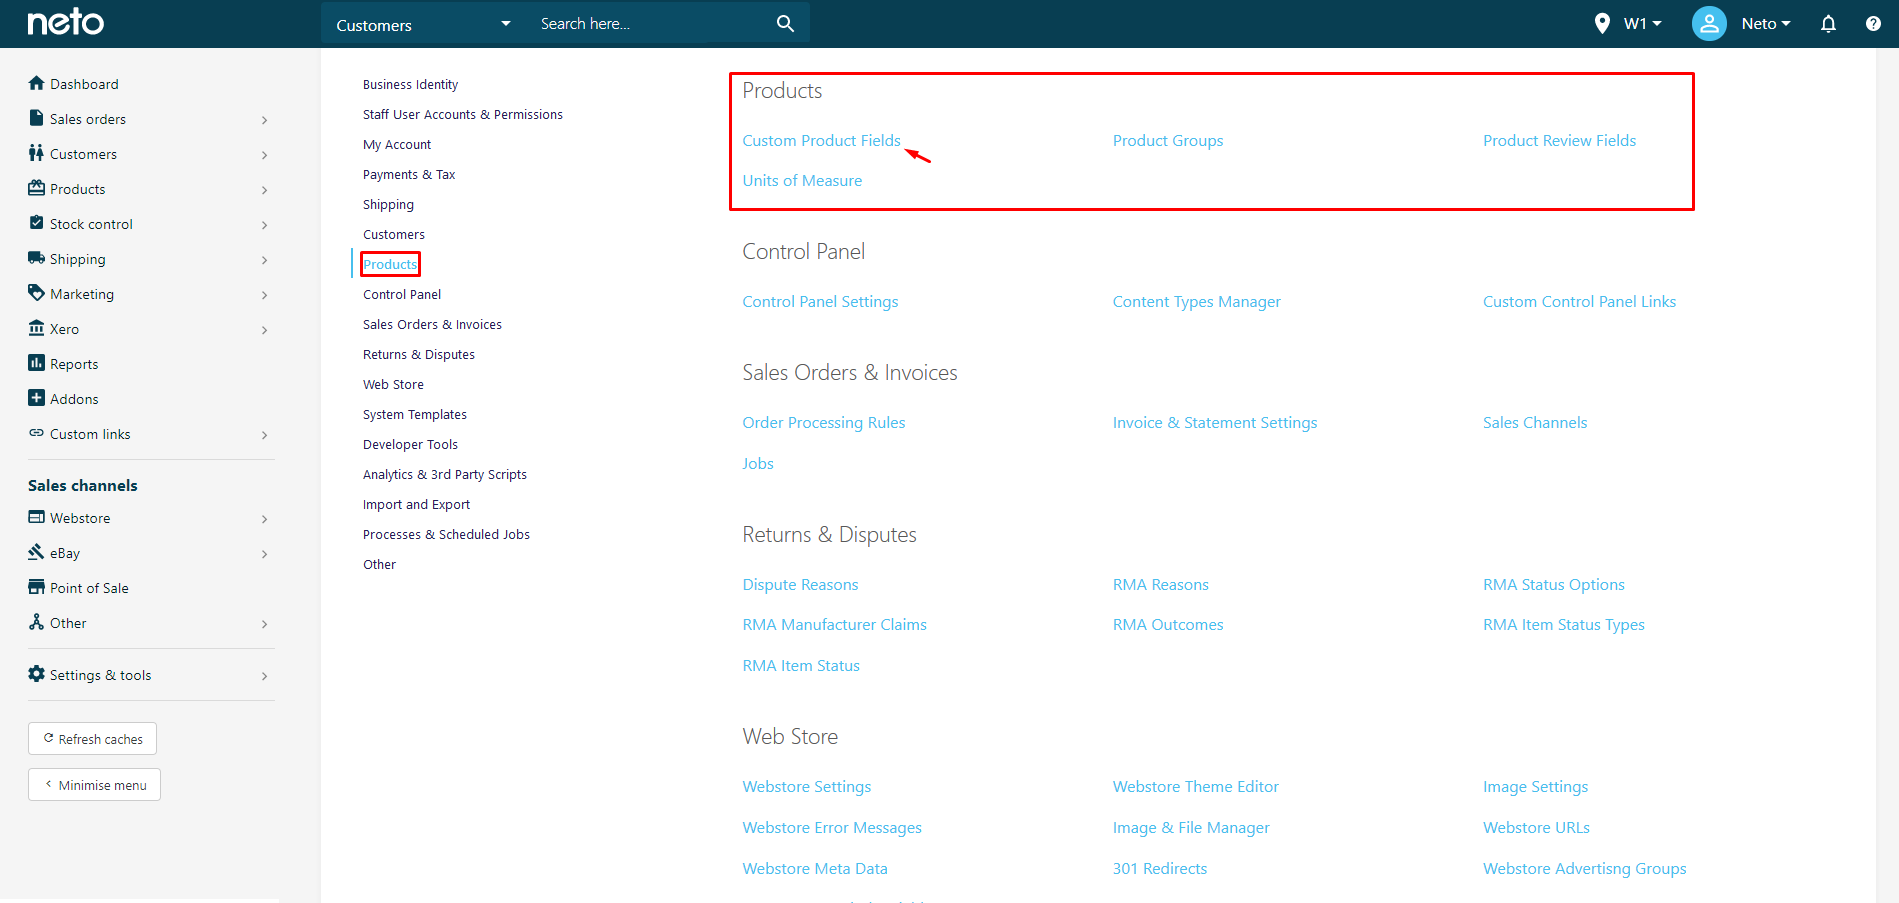
- In your Neto control panel navigate to Settings ;& Tools > All Settings & Tools.
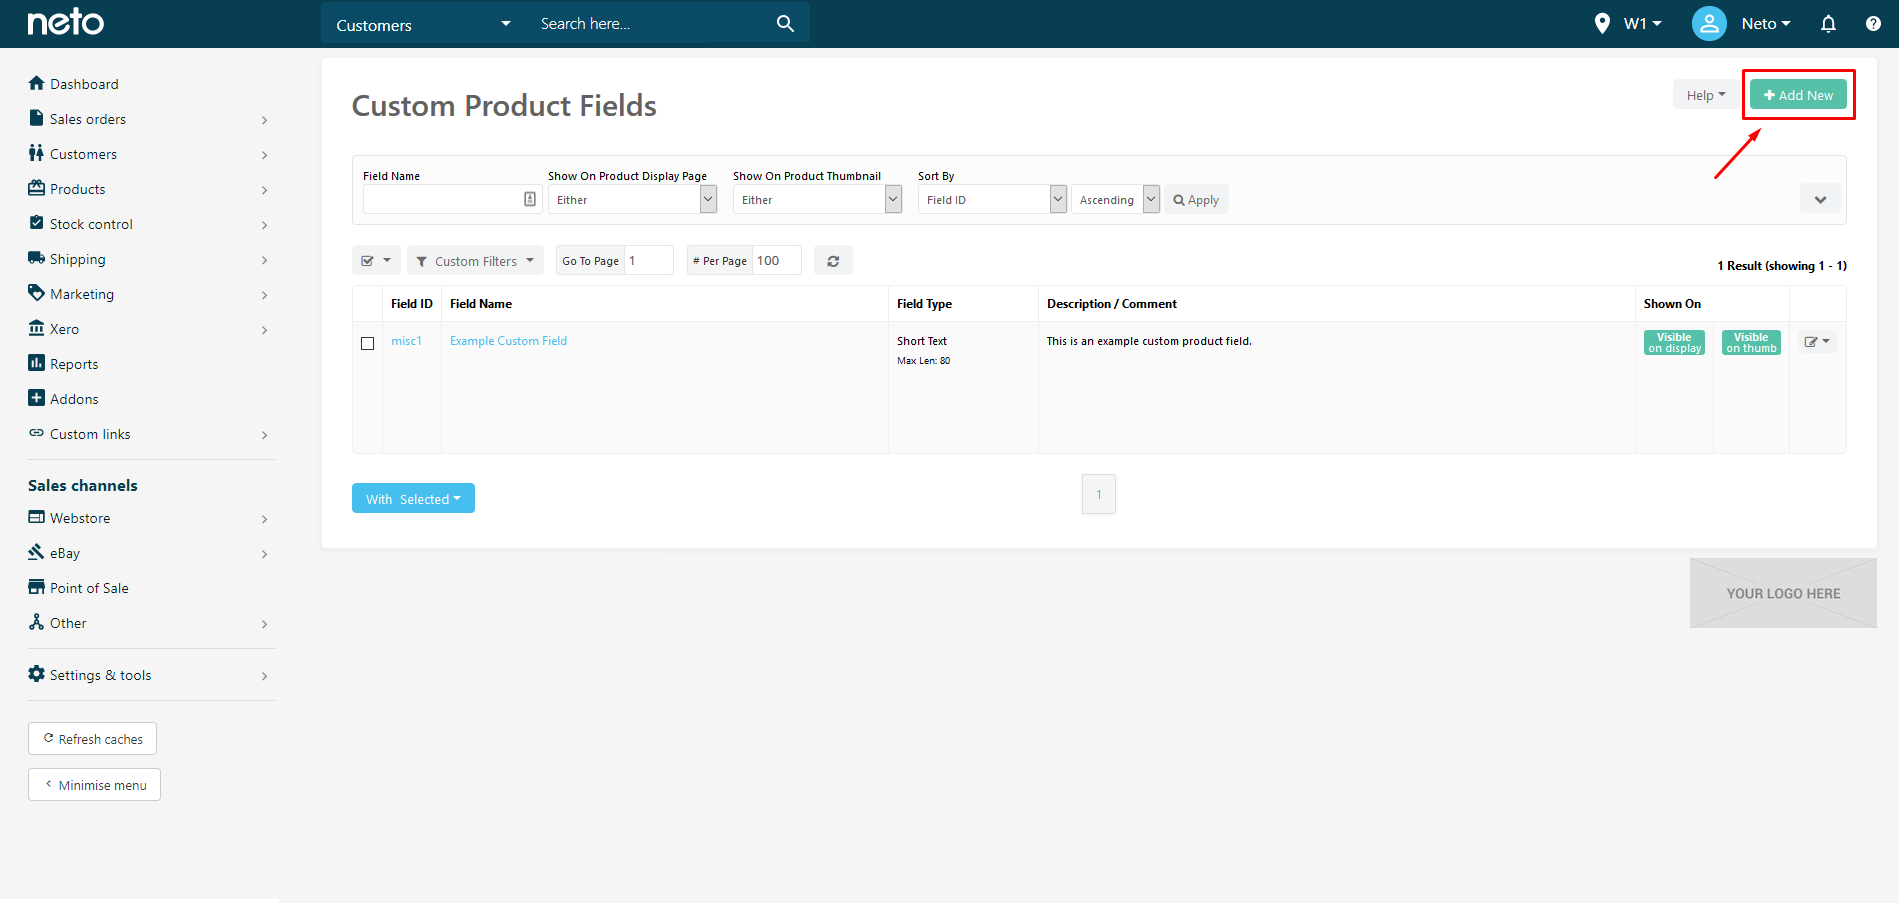
- Under the Products header click on Custom Product Fields.
- Click Add New.
- Select the Custom Field you want to use. For example, fields 11 - 13 are searchable from your webstore.
- Enter the Field Name.
- Select the Field Type:
- Short Text - for text with a character limit. Then enter the maximum number of characters in Maximum Length.
- Text - for longer text. You can even use the WYSIWYG Editor with this field.
- Date - for a date with a date picker.
- Integer Number - for whole numbers.
- Decimal Number - for numbers with decimal places like currency.
- True/False - a drop down menu with the values True and False.
- Selection Box - a drop down menu where you can customise the options. Enter the options in Selection Box Options. One option per line (recommended for Amazon/Catch shipping templates).
Select the Field Type:
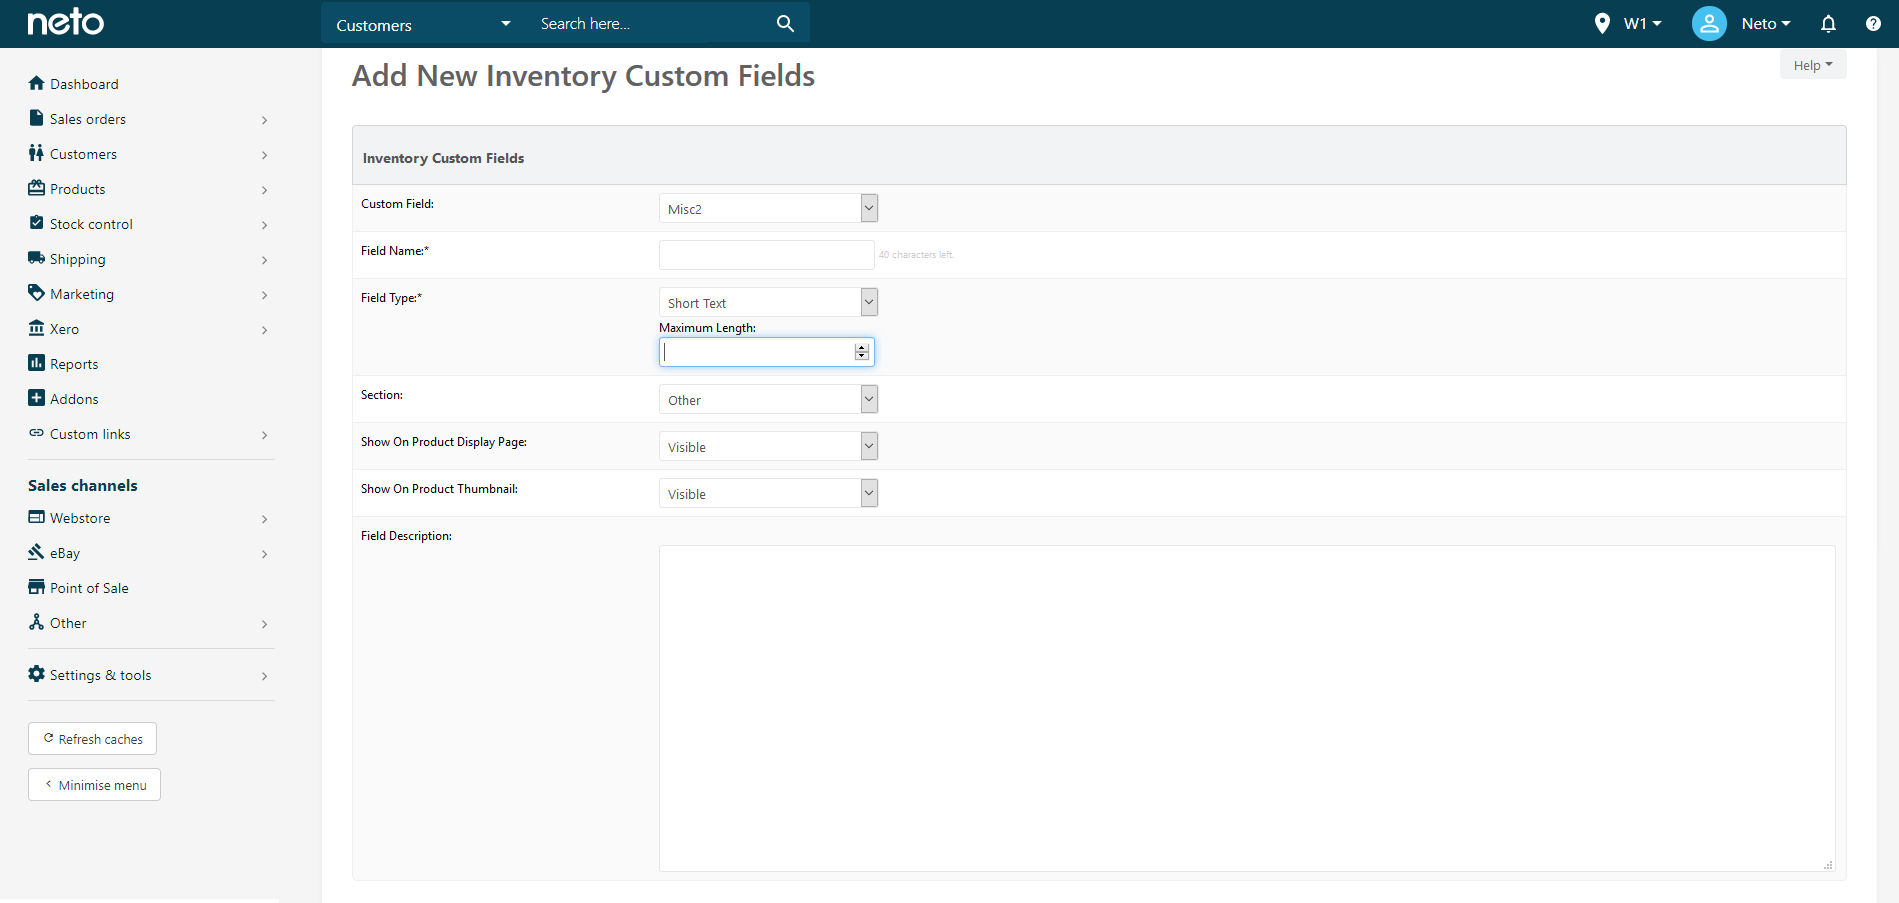
- Select the Section on the product page (in the control panel) where you want to display the field. It will appear at the bottom of that section.
- Show On Product Display Page controls if the displays on the product page. Your theme may need to be changed to support this option.
- Show On Product Thumbnail controls if the displays on the product category pages. Your theme may need to be changed to support this option.
- The Field Description is for internal information only. It will not display on your site.
- Click on Save.
Your custom field is now created and can be populated with data manually of via the product import wizard.
Display a Custom Field in your Webstore
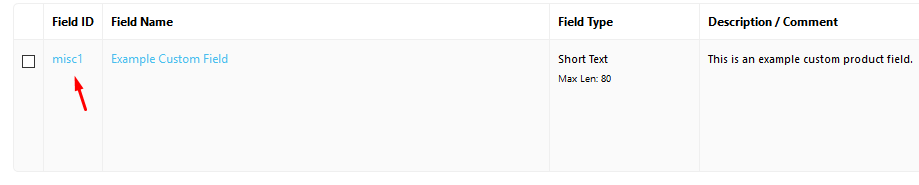
Most themes would require a design change to display a custom field. Use the tag [@misc1@] where misc1 is the Field ID. You will find the Field ID by going to:
- In your Neto control panel navigate to Settings & Tools > All settings & Tools
- Under the Products header click on Custom Product Fields and check the left-hand column.
Our approved partners can add custom product fields to your theme. Please complete the contact form for a quote.
Back In Stock Notifications
Back in stock notifications are managed by implementing the Wishlist feature, there is more information on how to implement this on our Wishlists Overview page.