Overview
Products can be imported into Neto by Maropost through either a simple (predefined) or complex (custom) file format. For either method, you will need to convert the order into a file type that can be imported by our system, either CSV (preferred) or XML.
The data in your file is processed according to which columns/fields you choose to match against (map) to Neto fields. Data that isn't changing should be excluded from the file by deleting the entire column, not just the values. Empty fields in a file can remove existing data if the column is still mapped to a Neto field.
Note: If you're using a Mac ensure your spreadsheet is saved in CSV (MS-DOS Format).
Tip: Neto partners can set this up for you. Request a data service job for a quote.
Simple Import
Simple imports use the Neto CSV template files to define the product data. Before importing your products, download one of the template files below to populate your data:
We recommend only using the simple import if you use one of the above templates. If your data has been downloaded from another system, use the complex import. To import products using the simple import:
- In your Neto control panel, navigate to Products > View products.
- Click the Import button at the top of the page.
- Click the Choose File button and upload the CSV file with your product data.
- Click the Upload file button.
- You'll see a preview of your file headers and the first row of data. Confirm that they match, and click the Start import button.
Your products will be imported into Neto. Allow 10 minutes for them to appear.
Complex Import
Complex imports allow you to upload customised data files from other systems and platforms. Not only can you use it to populate information, but it's also useful to make changes in bulk. To use the complex import, you will need to have your orders in a CSV file ready to upload:
- In your Neto control panel, navigate to Settings & tools > Import data.
- Select the Products radio button.
- Click the Perform complex import button and select Start Data Import Wizard.
- Click the Choose File button and upload your CSV file. Then click Continue to Next Step.
- If there is a column you don't want to import, you can select - ignore column - on that row to prevent it from being imported. You can also click on the red cross on the right to remove that column from being imported. If you have removed a column by mistake, click on the Add Extra Field button and select the name of the column from your file under Column Name. Then select the database field you want to map it to in the Database Field Name column.
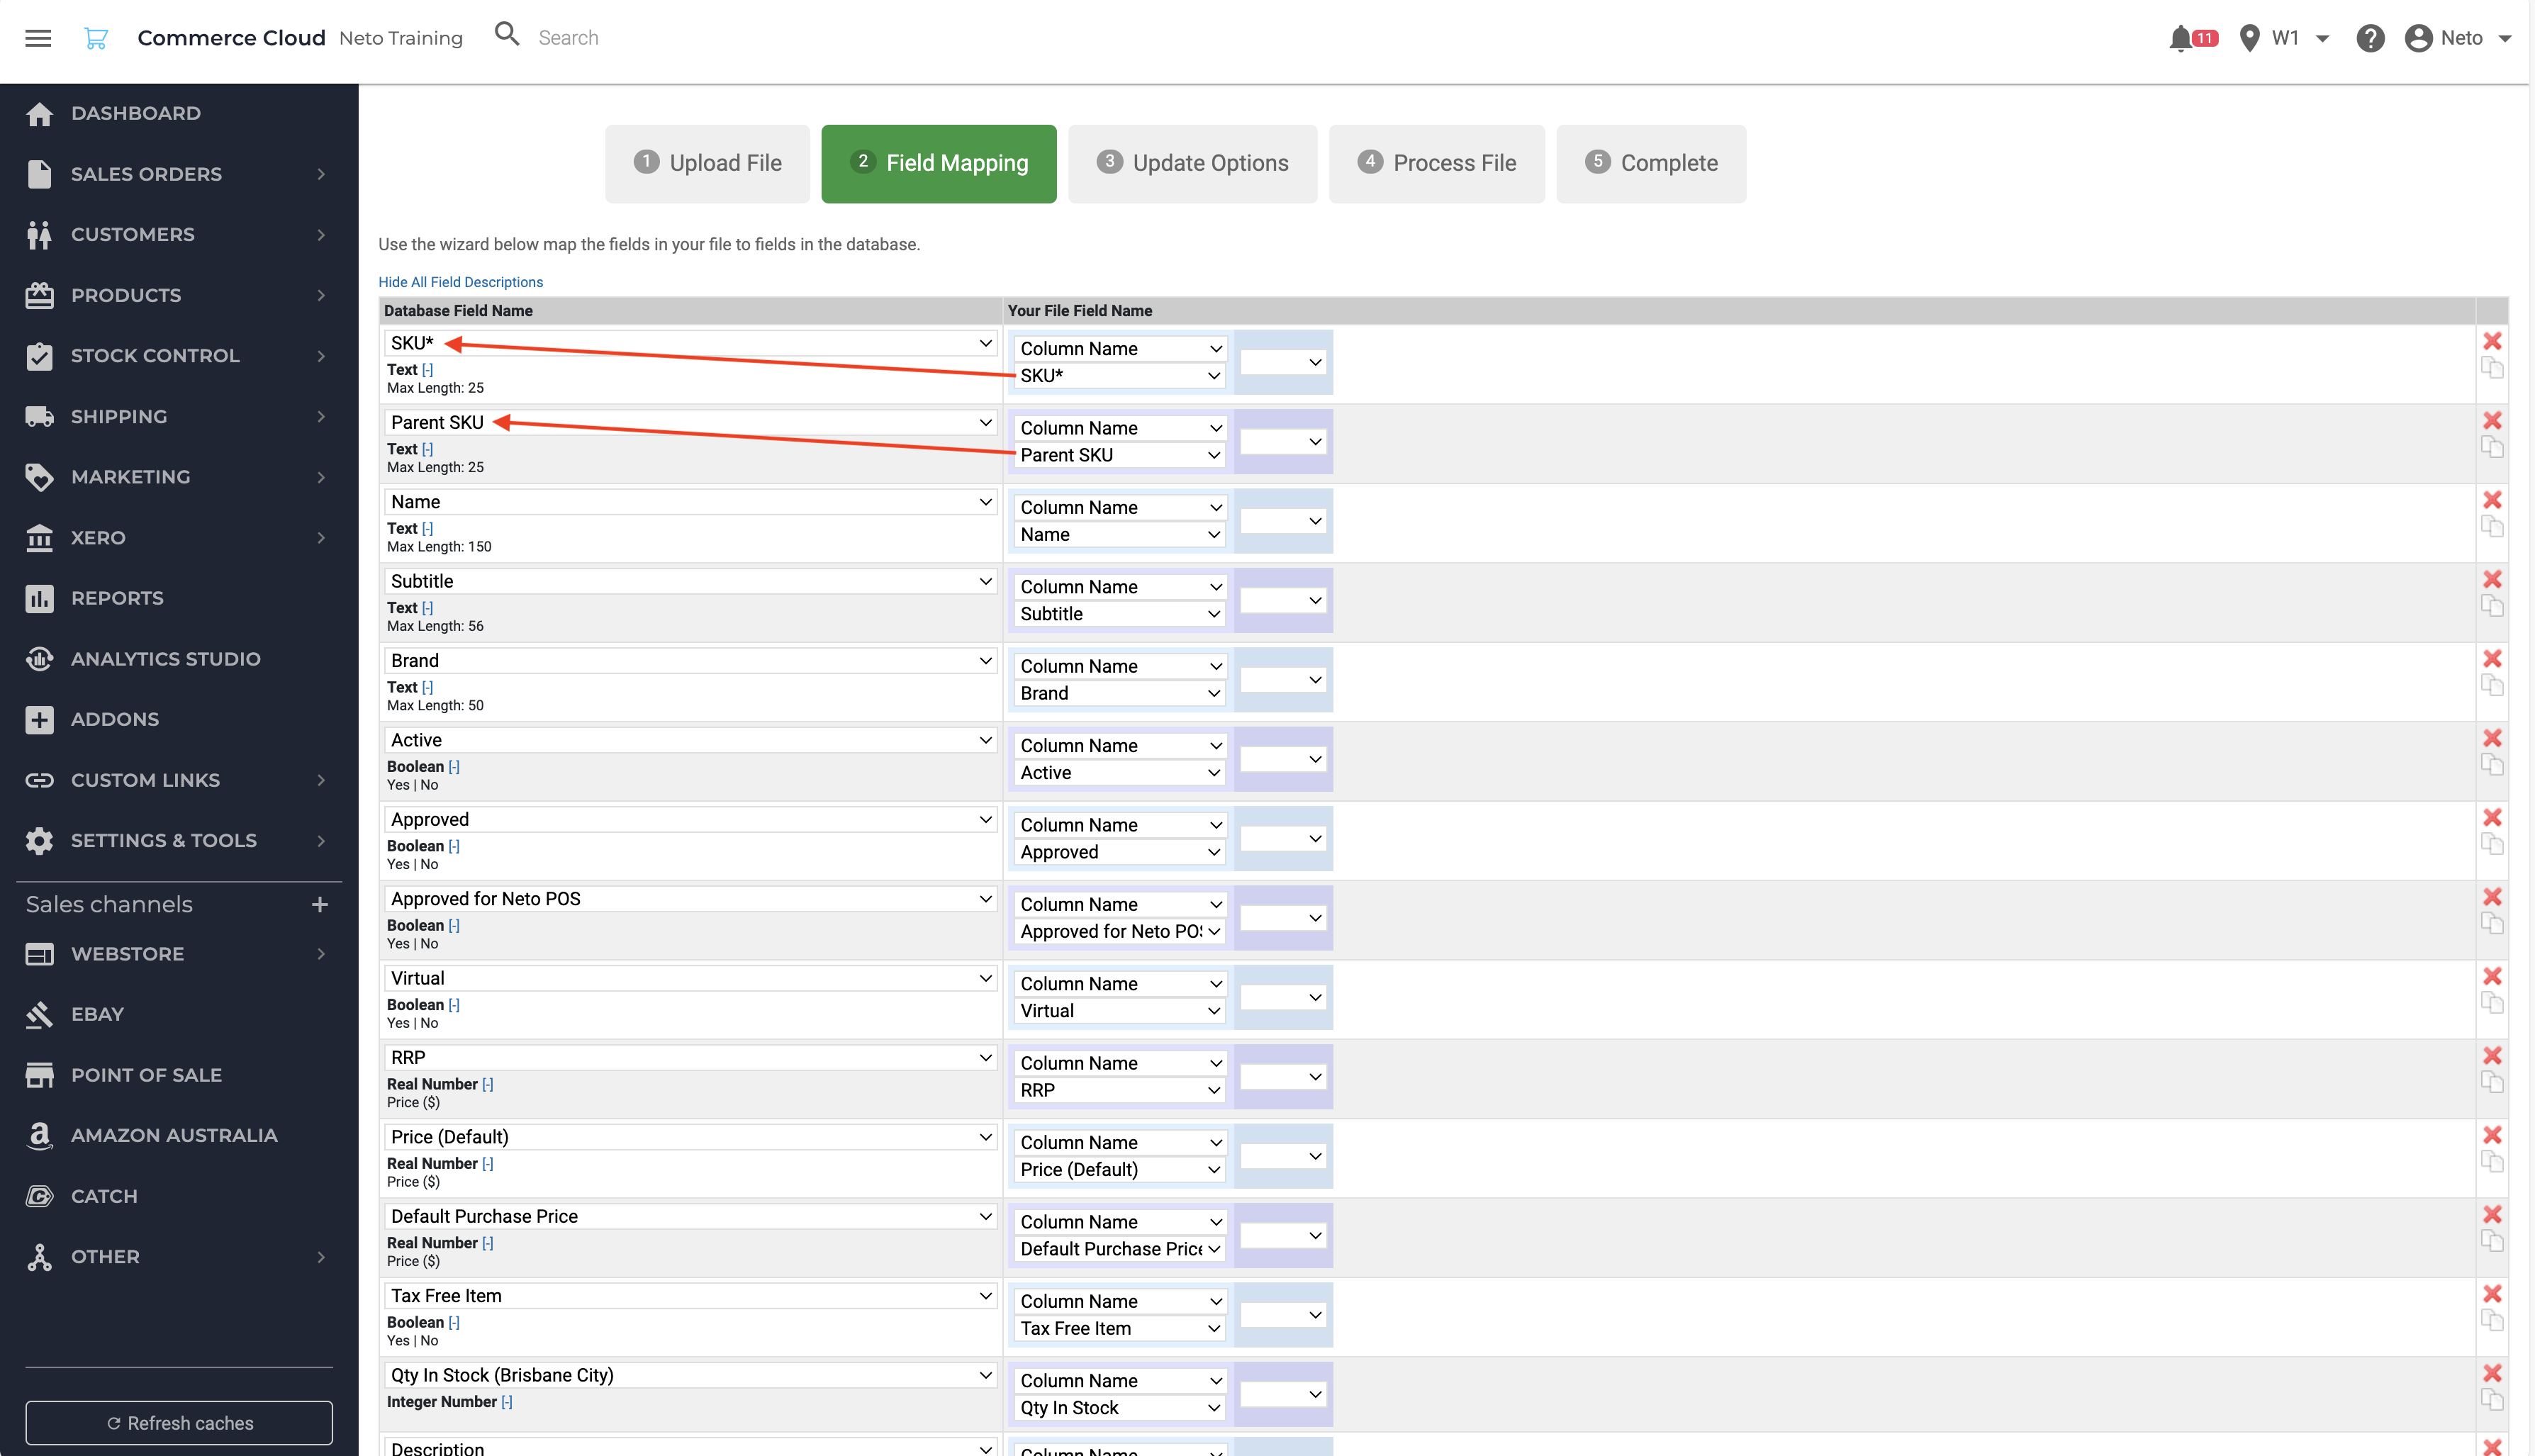
Categories, brands, and specifics that don't already exist can be created when importing products. When mapping is complete, click on the Continue to Next Step button.
- In most cases, you would select Add New / Update Existing Products.
- Add New / Update Existing Products - will create a new product if the SKU does not exist on your site. If it does, it will update that product.
- Add New Products Only - will create a new product if the SKU does not exist on your site. If the SKU already exists, the product will not be updated.
- Update Existing Products Only - new products will not be created. Only products with existing SKUs will be updated.
- Replace All Existing Products - this will delete any product on your site that is not in the import file (not recommended).
Click the Show Advanced Update Options link to display additional import settings. These settings can be useful if you need to replace fields, set units of measurement, or ignore incomplete data.Click on the Continue to Next Step button.
- You're now ready to import your sales order file. If you want to save your settings select the checkbox and enter a template name. Click the Process File Now button to complete the import wizard.
The import process will be queued to run and update the products.
Tip: Click on the export process ID to view a page with the status of your import. Click the Run Now button on this page to start the process immediately.
Product Images
When importing a file of products, you can enter the URL of product images. Neto will get the images from this specified location and attach them to the product. This is ideal if you're importing products and images from a 3rd party website or supplier.
Field Name | Field Type | Field Description | Field Restrictions | Notes |
|---|
Image URL (Main Image) | Text String | Main product image. Images will be re-sized as per your image re-size settings in admin > system setup > image settings. | URL (Supported Tags: USERNAME=Username, MD5PASSWORD=MD5 Encoded Password, SKU=SKU). Image will be downloaded from specified location. | Must be fully qualified URL to an image file hosted online. System will download image from here an insert into file system. Use the string DELETE to delete an image. |
Image Alt 01 URL | Text String | 1st alternate product image. Images will be re-sized as per your image re-size settings in admin > system setup > image settings. | URL (Supported Tags: USERNAME=Username, MD5PASSWORD=MD5 Encoded Password, SKU=SKU). Image will be downloaded from specified location. | Must be fully qualified URL to an image file hosted online. System will download image from here an insert into file system. Use the string DELETE to delete an image. |
Image Alt 02 URL | Text String | 2nd alternate product image. Images will be re-sized as per your image re-size settings in admin > system setup > image settings. | URL (Supported Tags: USERNAME=Username, MD5PASSWORD=MD5 Encoded Password, SKU=SKU). Image will be downloaded from specified location. | Must be fully qualified URL to an image file hosted online. System will download image from here an insert into file system. Use the string DELETE to delete an image. |
Image Alt 03 URL | Text String | 3rd alternate product image. Images will be re-sized as per your image re-size settings in admin > system setup > image settings. | URL (Supported Tags: USERNAME=Username, MD5PASSWORD=MD5 Encoded Password, SKU=SKU). Image will be downloaded from specified location. | Must be fully qualified URL to an image file hosted online. System will download image from here an insert into file system. Use the string DELETE to delete an image. |
... | ... | ... | ... | ... |
Image Alt 100 URL | Text String | 100th alternate product image. Images will be re-sized as per your image re-size settings in admin > system setup > image settings. | URL (Supported Tags: USERNAME=Username, MD5PASSWORD=MD5 Encoded Password, SKU=SKU). Image will be downloaded from specified location. | Must be fully qualified URL to an image file hosted online. System will download image from here an insert into file system. Use the string DELETE to delete an image. |
Tip: Allow some time for images to be processed. Neto servers process around 1,000 large images per hour on average.
Product Kits
Kits are bundles of products made up of one or more items. There are several terms specific to kits that you should familiarise yourself with in our guide to creating kits.
You will now need to enter the product SKU and the kitting columns into your CSV file. To give some context on how this should look, you can download our sample CSV to work from.
You can import kitted products in bulk using the import system using the following string:
[SKU]=[quantity]:[price_breakdown]:[min_qty]:[max_qty]:[assemble_group]
Example: abc_1=1:10:1:10:group1
Field | Description |
|---|
SKU | Product identifier. |
Quantity | The amount of the product that is included in the kit. |
Price Breakdown | Cost of this product SKU, per unit. |
Min Qty | The minimum quantity customers have to buy in this kit (editable kits only). |
Max Qty | The maximum quantity customers can buy in this kit (editable kits only). |
Assemble Group | Editable kit's can have limits applied to them in a group. For example, a protein shake can let you choose between 5 flavours, but you can only add a maximum of 10 across each flavour. |
Note: If the Quantity is entered as 0 the product will not be added to the kit, unless you specify it as an Editable Kit.
This will create one component of the kitted SKU. To add a second component, just add a comma (,) at the end of the string and repeat like this:
[SKU_1]=[SKU_1_quantity]:[SKU_1_price_breakdown]:[SKU_1_min_qty]:[SKU_1_max_qty]:[SKU_1_assemble_group],
[SKU_2]=[SKU_2_quantity]:[SKU_2_price_breakdown]:[SKU_2_min_qty]:[SKU_2_max_qty]:[SKU_2_assemble_group], ...
Example: abc_3=6:20:1:10:group1,abc_4=24:20:1:10:group1
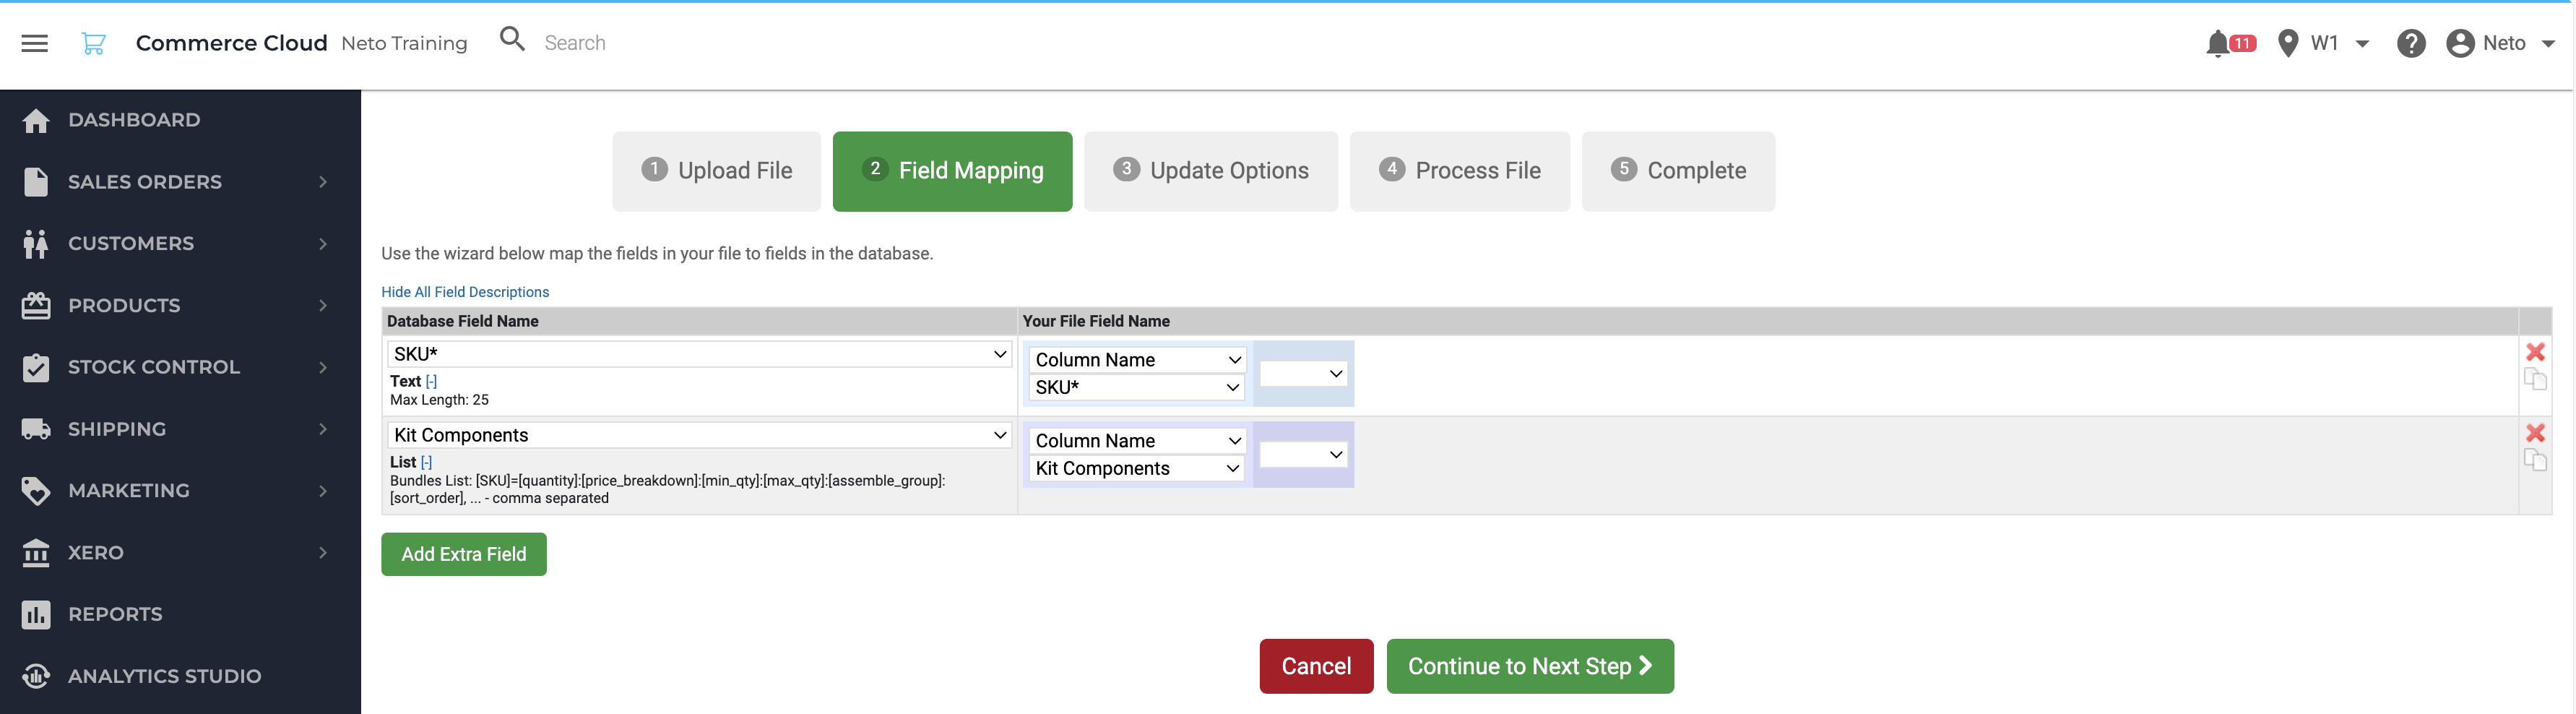
Once you've uploaded your file, continue to the next step. In field mapping, your kitted SKU and your kitted components will be mapped to field names from the CSV file. It should look something like this.
Further Examples:
Another way of importing two components 'abc_1' and 'abc_2' with default quantity of 1, price of $10, minimum quantity of 1, maximum quantity 10 in the group 'group1' would be as follows:
abc_1=1:10:1:10:group1,abc_2=1:10:1:10:group1
If you do not need as many details you could omit some of the values. So add the same components without a maximum quantity or group you could use this format:
abc_1=1:10:1::,abc_2=1:10:1::
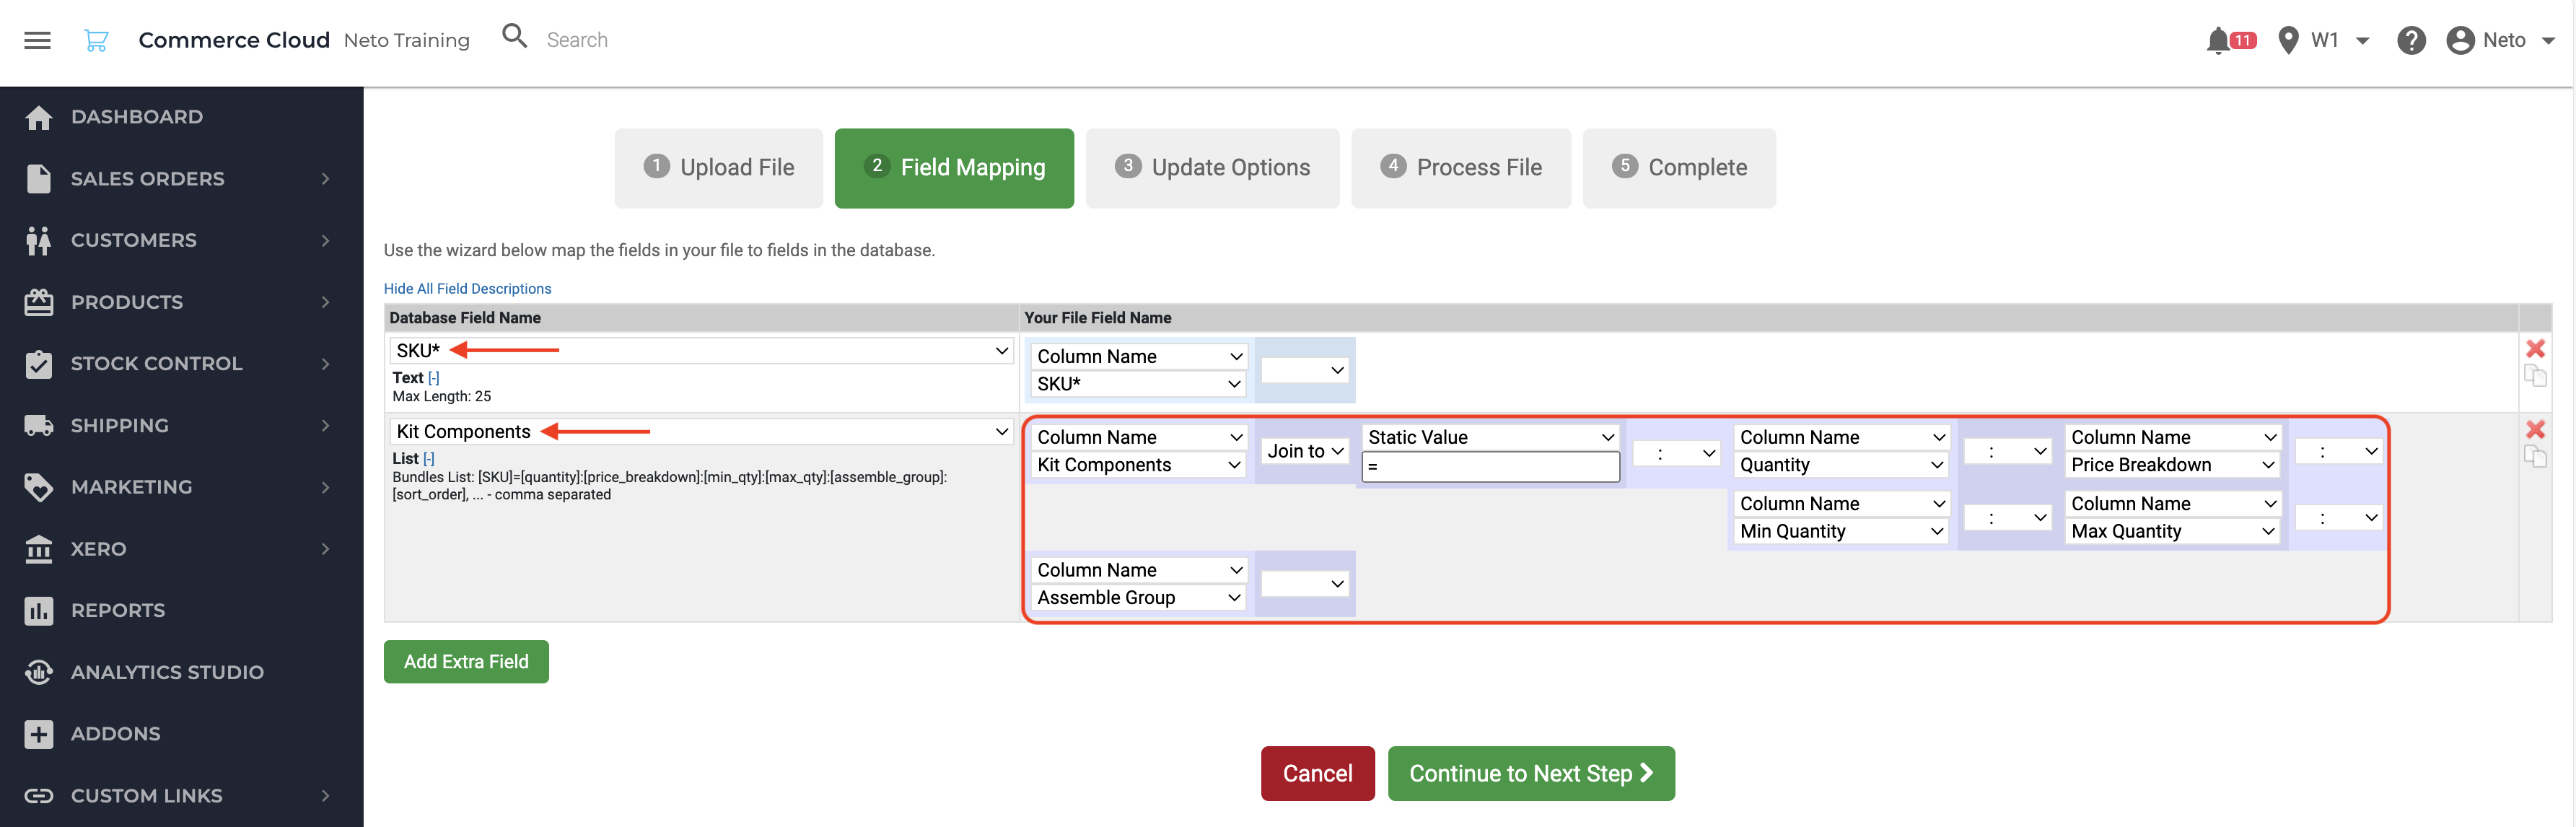
If the CSV has columns for each field
If you have each of the required fields in separate fields in your spreadsheet, you can combine them together into a string by joining the fields together in the field mapping section like in the example screenshot.
Product Categories
Product categories can be created and assigned to products in the product import wizard. There are a few ways to import product categories this way:
Neto Field | Field Type | Field Description | Example |
|---|
Category Full Path List (Product Category) | List | List of categories that the product is assigned to. Separate each category in a path with a ">" sign. A product can be assigned to multiple categories. | Computers > Accessories > Mice; IT Equipment > Laptop Accessories |
Category ID List (Product Category) | List | List of categories that the product is assigned to. Semicolon separated string. Use the system generated ID of the category as it appears in your control panel. | 10;34 |
Category Name List (Product Category) | List | List of categories that the product is assigned to. Semicolon separated string. Use the name of the category as it appears in your database. | Mice;Laptop Accessories |
After mapping your fields, move on to step 3, the Update Options. Click to show the advanced options, and in the Category Options section change Create New Category Options to yes.
Continue through the rest of the steps to complete the import process.
Item Specifics
Product specifics can be uploaded to Neto using the import wizard or an import template. You can use our example specifics import template to help you get started.
Specifics are imported as a semicolon-separated list format:
[Specific Type 1]:[Specific Value 1];[Specific Type 2]:[Specific Value 2];...
If your specific has multiple values from the same type, they need to be pipe (|) separated.
Example: one value for each specific:
Colour:Red;Size:Large
Example: adding multiple values to a specific:
DVD Region:1|2|4|;Colour:Black|Grey<br>

Note: Each price break needs to be separated by a comma.
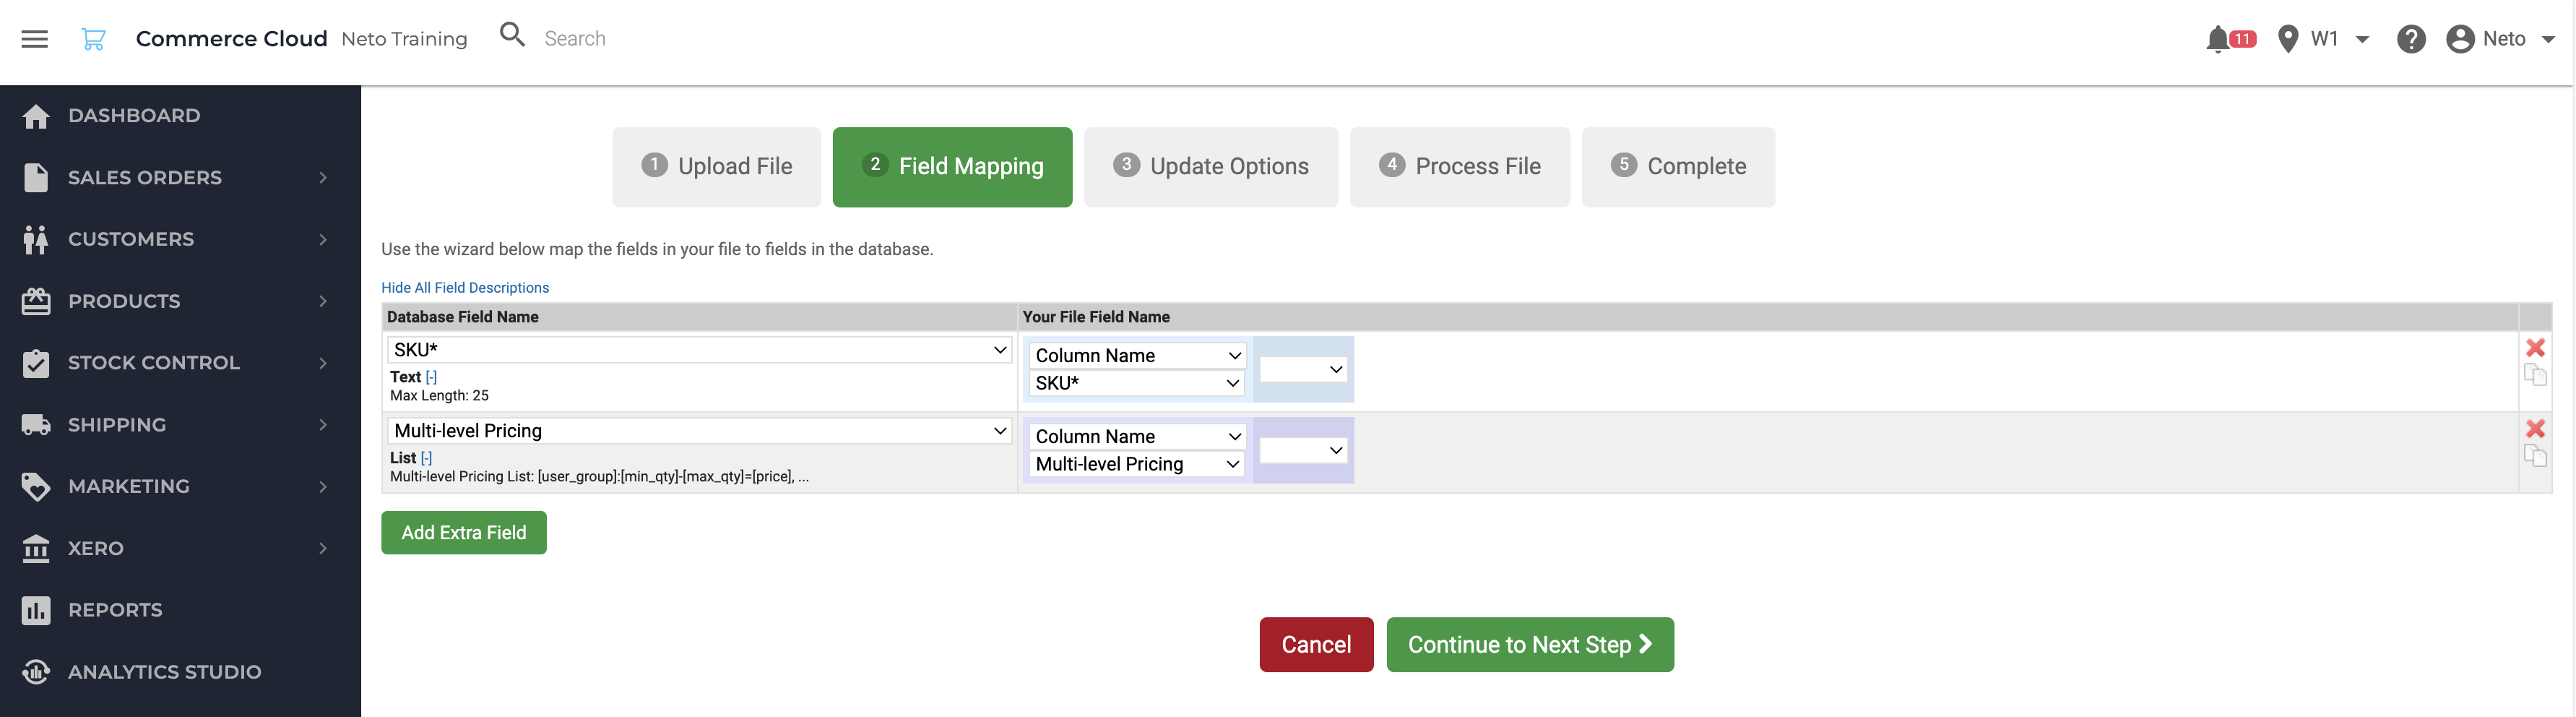
The information below represents an example of how the multi-level pricing can be set up.
SKU | Multi-level Pricing |
|---|
SKU_1 | A:21-50=20, B:10-20=20, B:21-50=17, B:51-100=15, |
SKU_2 | A:16-20=10, B:10-20=10, B:21-50=8, B:51-100=7, |
During the field mapping step, match the SKU and Multi-Level Pricing database fields to the appropriate fields in the CSV file. Once complete, Continue To Next Step.
Extra Options
Tip: This article requires Extra Options add-on to be installed from the Neto add-on store.
Extra options allow you to upsell products with additional features. This includes gift wrapping, warranty, or accessories suitable for your products.
Tip: Extra options are not typically used for size or colour options. Instead set up product variations.
Below is a sample import string for a list of extra options that you could add to your products via import.
**Gift Wrapping;* No Thanks;Standard Red Wrapping;Standard Blue Wrapping;Premium Red Wrapping=5.00;Premium Blue Wrapping=5.00^**Gift Message;*-TEXT_FIELD-;LENGTH=250
You can import this string to the Extra options field in the database to update products in bulk.
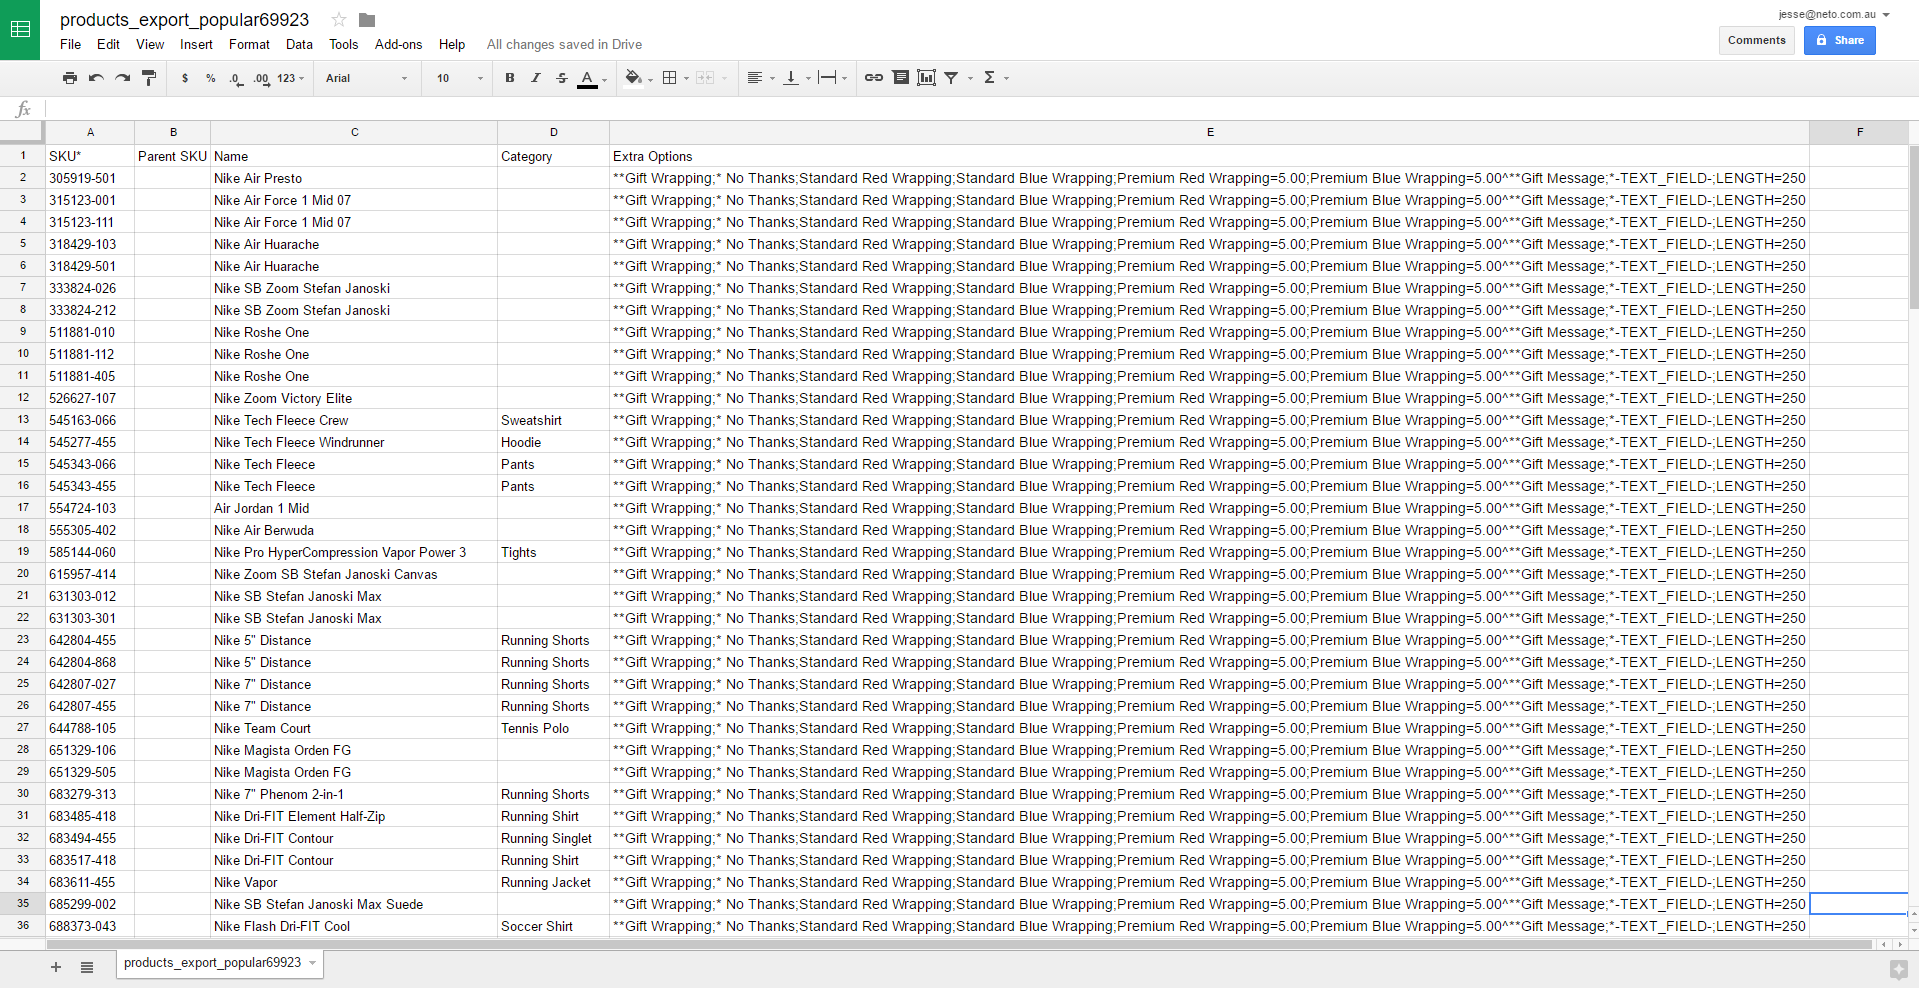
In the above example, each new option set is separated by ^** and the default option for each option set is prefixed with a single *.
Add to Inventory Levels
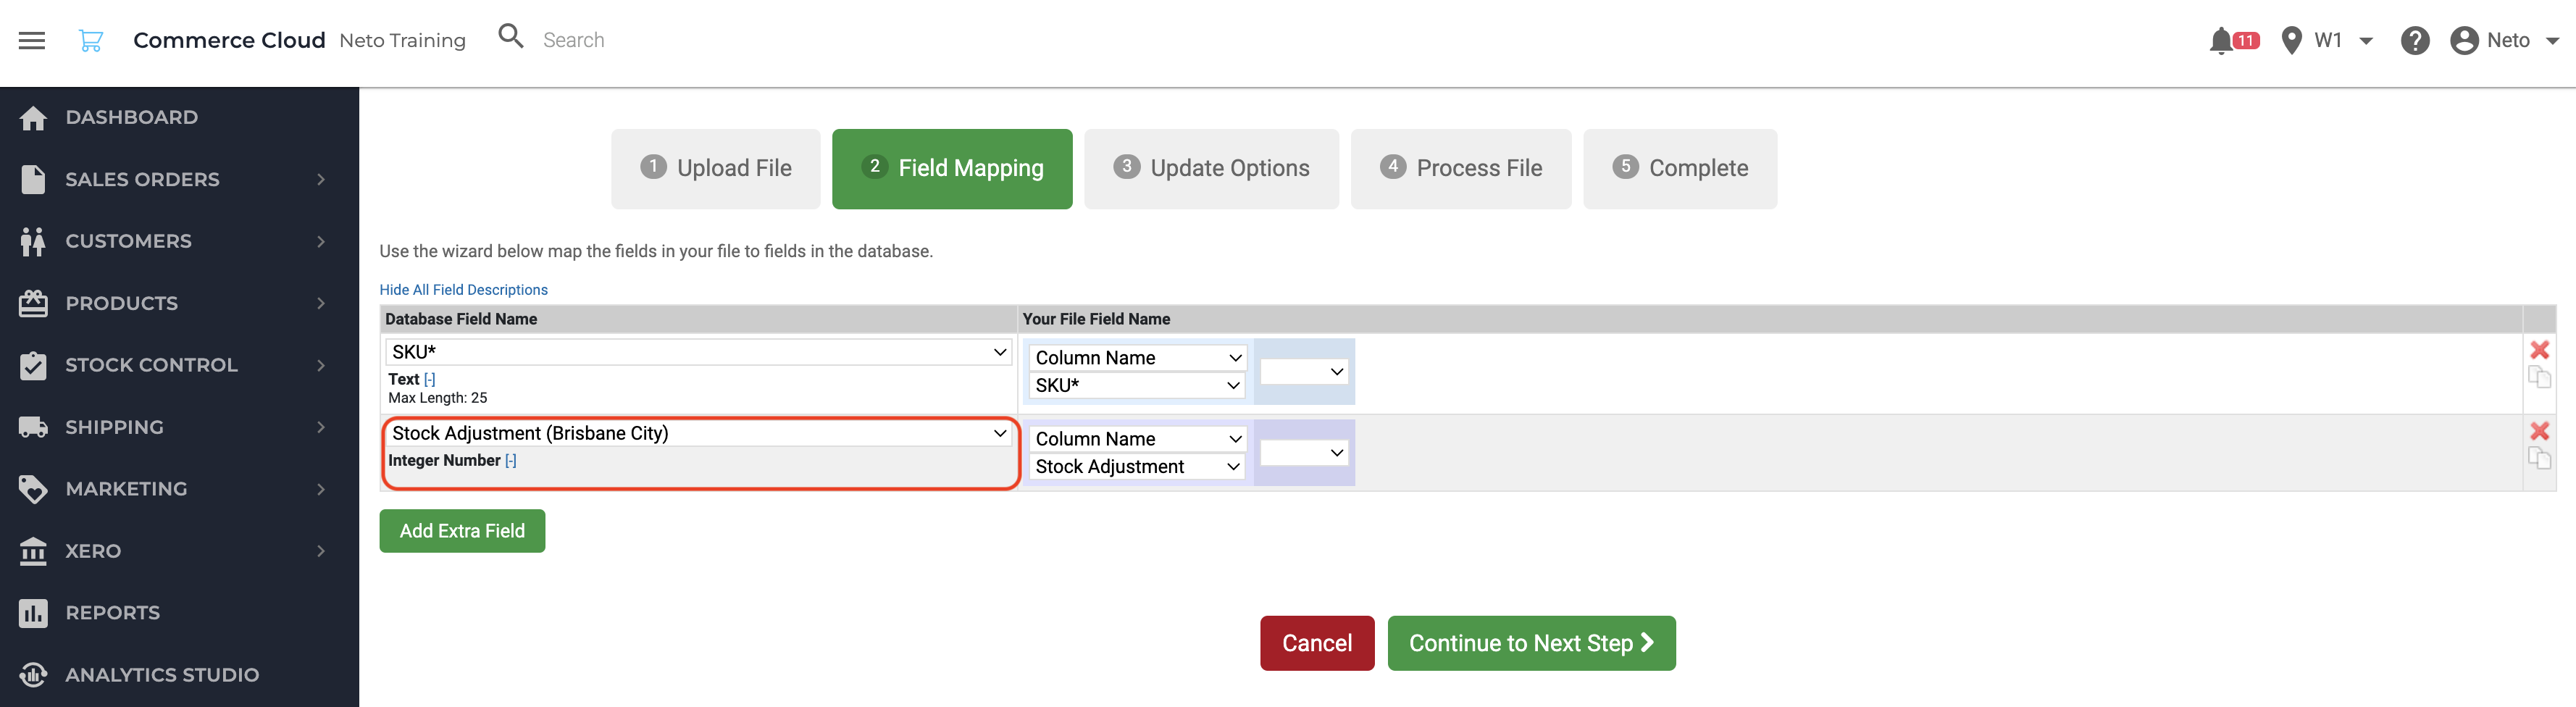
Rather than replace the stock levels of your products when importing, you can add incoming stock to the amount you already have. To do this, use the stock adjustment field in the import wizard.
In your field mapping, you want to select Stock adjustment and the warehouse you want it to affect, as per the screenshot below.