Like Maropost Commerce, BigCommerce has a product export function that can be used to populate your entire product list in Maropost Commerce. It's important to note that this process does not import all product information exactly as it was in BigCommerce, due to differences in how products are structured.
You will still need to perform some data entry tasks in the file you download from BigCommerce. This process creates a template to import your BigCommerce data, so any changes you make in the CSV file can be easily imported without needing to go through the wizard each time. These tasks are discussed further at the end of this article.
In this Article
Create a BigCommerce File
Create a CSV file of your products in BigCommerce so that they can be imported into Maropost Commerce:
In BigCommerce navigate to Advanced Settings > Export Templates.
Click the Create an Export Template button.
Name the template Maropost Commerce and deselect all export options except Enable Products Exporting.
In the advanced settings, change Sub Items to Expand sub items across the csv.
Save and generate the file.
Create the Import Template in Maropost Commerce
BigCommerce fields match up quite well with Maropost Commerce product fields, though you will need to make some edits. For that reason, start by creating an import template using the wizard:
Follow the steps in the import wizard to upload your file and map the fields to Maropost Commerce. The table below provides a good match between Maropost Commerce and BigCommerce fields.
Maropost Commerce | BigCommerce | Notes |
|---|
SKU | Product SKU | |
Name | Product Name | |
Weight (Shipping) | Weight | Weight in BigCommerce must be in kg |
Description | Description | |
Price (Default) | Price | Price can also be mapped to a specific price group. |
RRP | Retail Price | |
Promotion Price | Sale Price | Sale price can also be mapped to a specific promotion price group. |
Cost Price | Cost Price | Cost price can’t be imported if advanced inventory is installed. |
Qty In Stock (Default) | Stock Level | Stock level can also be mapped to a specific warehouse. |
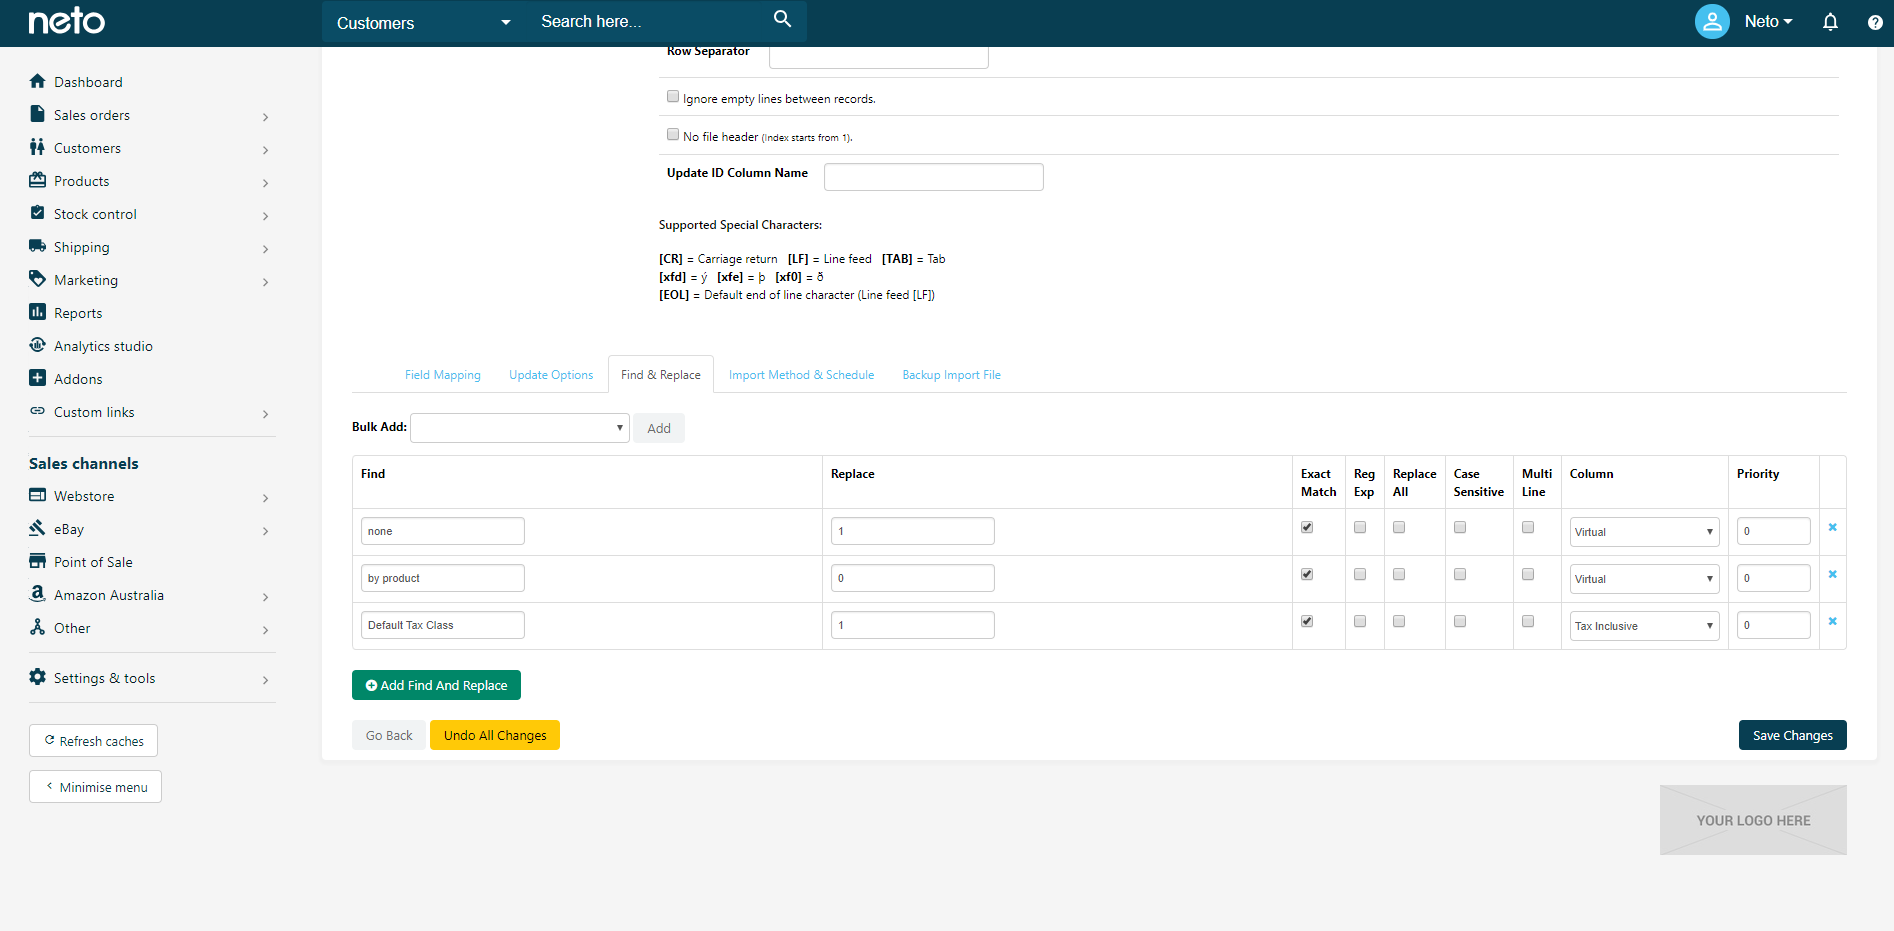
Virtual | Track Inventory | Requires two find and replace entries on the virtual field.
Find none replace with 1.
Find by product replace with 0. |
Sort Order 1 | Sort Order | |
Active | Product Visible | |
Approved | Allow Purchases | Will set as approved for all sales channels. |
Width m (Shipping) | Width | Add / Static Value 100 to convert centimeters to meters. |
Height m (Shipping) | Height | Add / Static Value 100 to convert centimeters to meters. |
Length m (shipping) | Depth | Add / Static Value 100 to convert centimeters to meters. |
Brand | Brand | |
Warranty | Warranty | |
Pick Zone | Bin Picking Number | |
UPC/EAN | Product UPC/EAN | Can also be mapped to UPC/EAN1, UPCEAN2 etc |
Tax Inclusive | Product Tax Class | Requires a find and replace entry on the tax inclusive field. If your products in BigCommerce have tax included in the price.
Find Default Tax Class replace with 1
Otherwise
Find Default Tax Class replace with 0.
May require more entries if you use multiple tax classes. |
Search Keywords | Search Keywords | |
SEO Page Title | Page Title | |
SEO Meta Keywords | Meta Keywords | |
SEO Meta Description | Meta Description | |
Product URL | Product URL | |
Image URL (Main Image) | Product Image URL | |
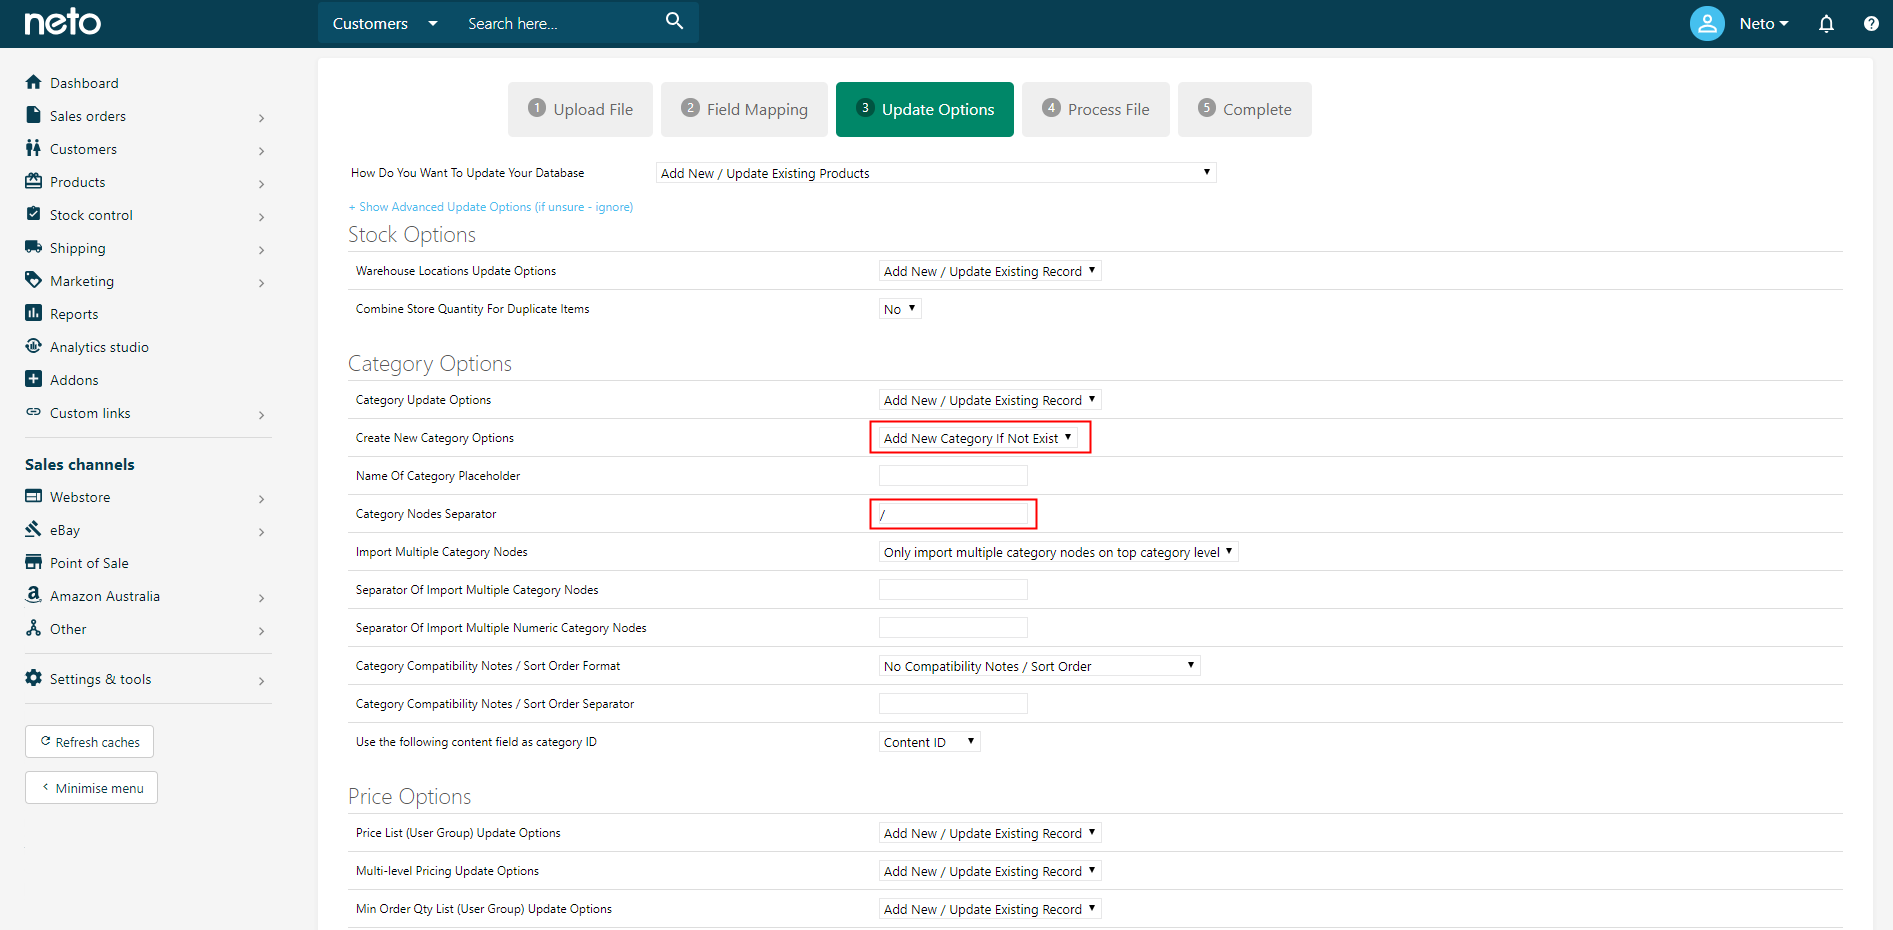
Category Full Path List (Product Category) | Category Path | Category Nodes Separator needs to be set as / in the update options of the template. |
Date Added | Date Added | |
In the Update Options step, expand the advanced settings. Change the settings mentioned in the table above so that it matches the image below.
At the Process File step, ensure you save the settings as a template, then process the file.
Your file will import however not all products will be created correctly. These issues are easily fixed with some manipulation of the template.
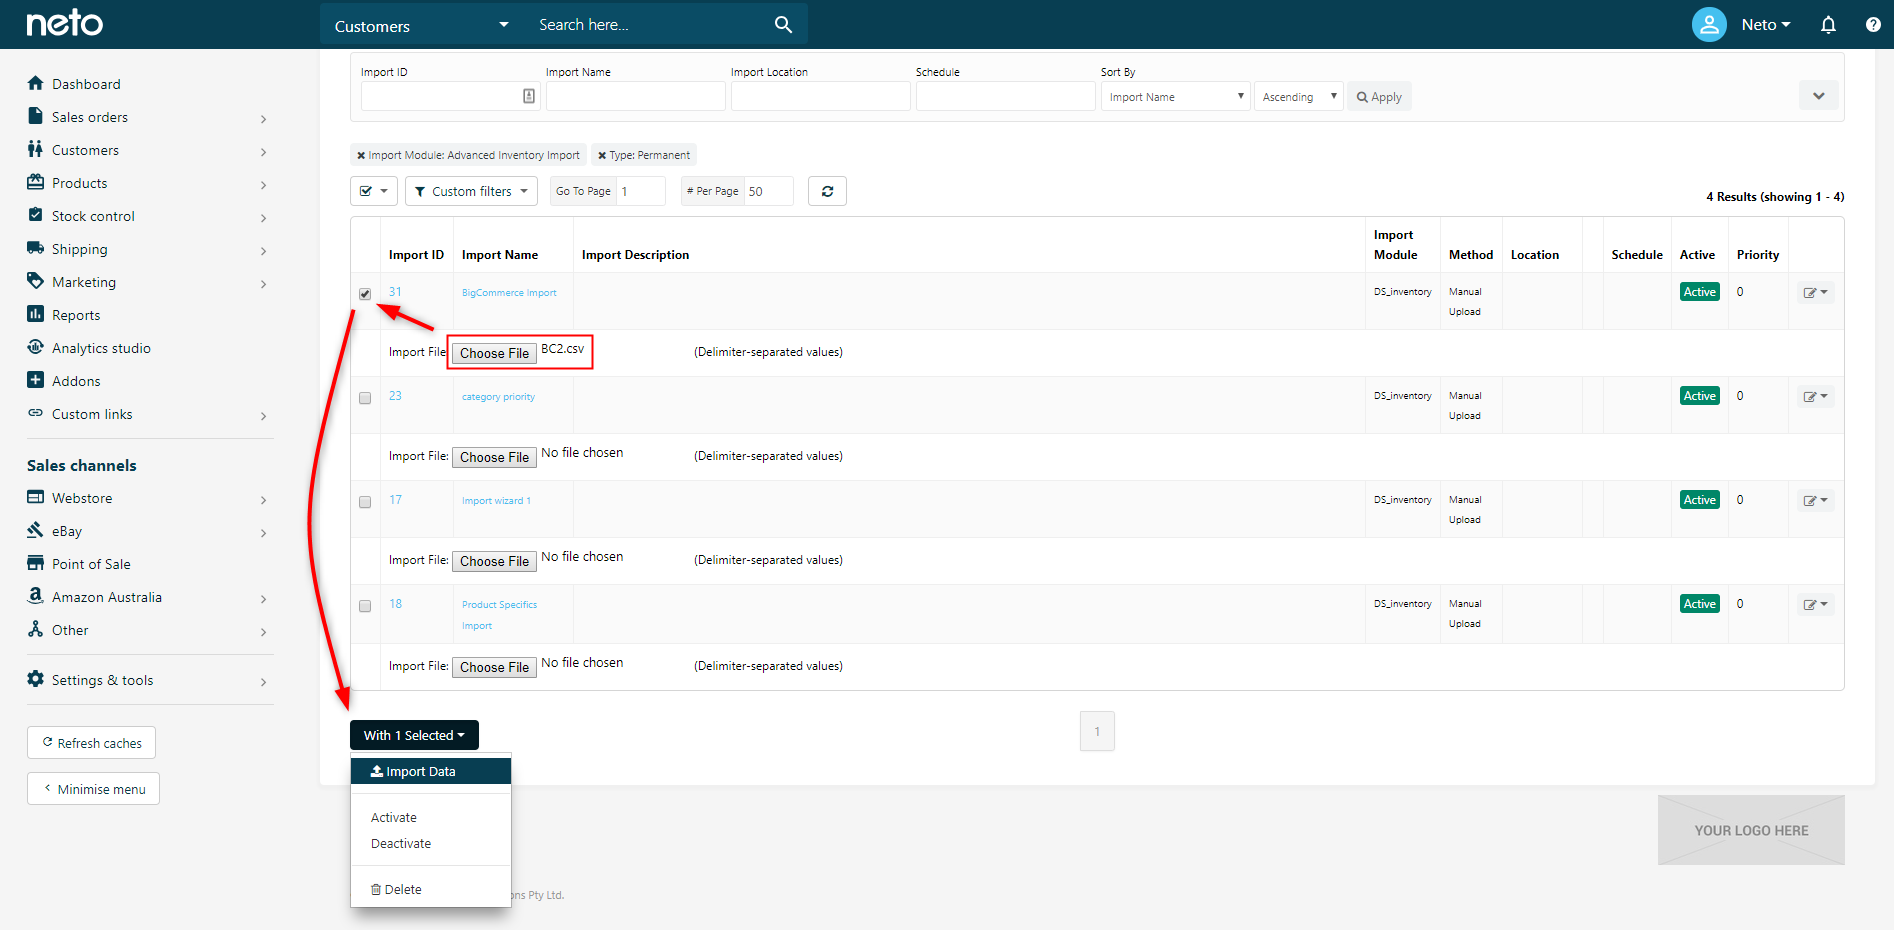
Navigate to Settings & Tools > Import Data.
Click Complex Import and choose Use Existing Custom Import Templates.
Find your BigCommerce template and click on it to edit the settings.
Click on the Find & Replace tab and add the three find and replace entries mentioned in the above table, so that it matches the image below.
Save the template. You can now click Go Back to upload your file again. If you have products with variations, we recommend the below steps to add your variation specifics.

Variation Specifics
BigCommerce outputs variation specifics into the product name field of each variation, in a format that isn't readable by Maropost Commerce. This data can be manipulated quite easily using excel (or a similar spreadsheet program) so that it can be imported into the Item Specifics field.
These steps involve manipulating the product name field in bulk by adding special characters. If your product names contain commas, colons, or equals signs, perform these steps after your initial import.
Open the csv file exported from BigCommerce.
Select the Product Name column, so every row in this column is selected.
Run a find and replace (Ctrl + H) to format the item specifics for variation products.
Find | Replace |
|---|
:*
| ; (do this one first)
|
,
| ;
|
=
| :
|
[*]
| nothing |
Your product name field will change so that the variations are now formatted correctly to be imported into Maropost Commerce.
Save your CSV file.
In Maropost Commerce, open your BigCommerce import template.
Find where the Name field is mapped to Product Name.
Change the Maropost Commerce field from Name to Item Specifics and click Save Changes.
Click Go Back and you'll be taken to the list of import templates. Upload your file and run the import.
All of your variation products will now be updated with their item specifics.
Next Steps
Before you start selling product on other sales channels, you may want to update your products further to fill the gaps not covered by this process. You can do this by manually changing the CSV file, performing an export & import from Maropost Commerce, or manually editing products. Some of the steps we suggest are: