In this Article
Overview
Catch mapping is required if you want to list products on Catch, that don't yet exist in the Catch catalogue. To register products you will need to set up your Catch category mapping and product field mapping. Both involve matching the data in your Maropost Commerce control panel to a Catch equivalent. The mapped fields will then be used to populate Catch automatically when you register products that aren’t already in the Catch catalogue. Because some data required by Catch may not be entered on your products, you may need to create custom product fields to hold the data, and populate then with the product import wizard.
Tip: The mapping allows you to “set and forget” your Catch integration. New products can register automatically when you enter them into Maropost Commerce. You will only need to maintain the mapping when you add new product fields or categories.
Category Mapping
Category mapping determines which Catch category your products will be registered in, based on the Maropost Commerce category. We recommend that you set up category mapping first.
-
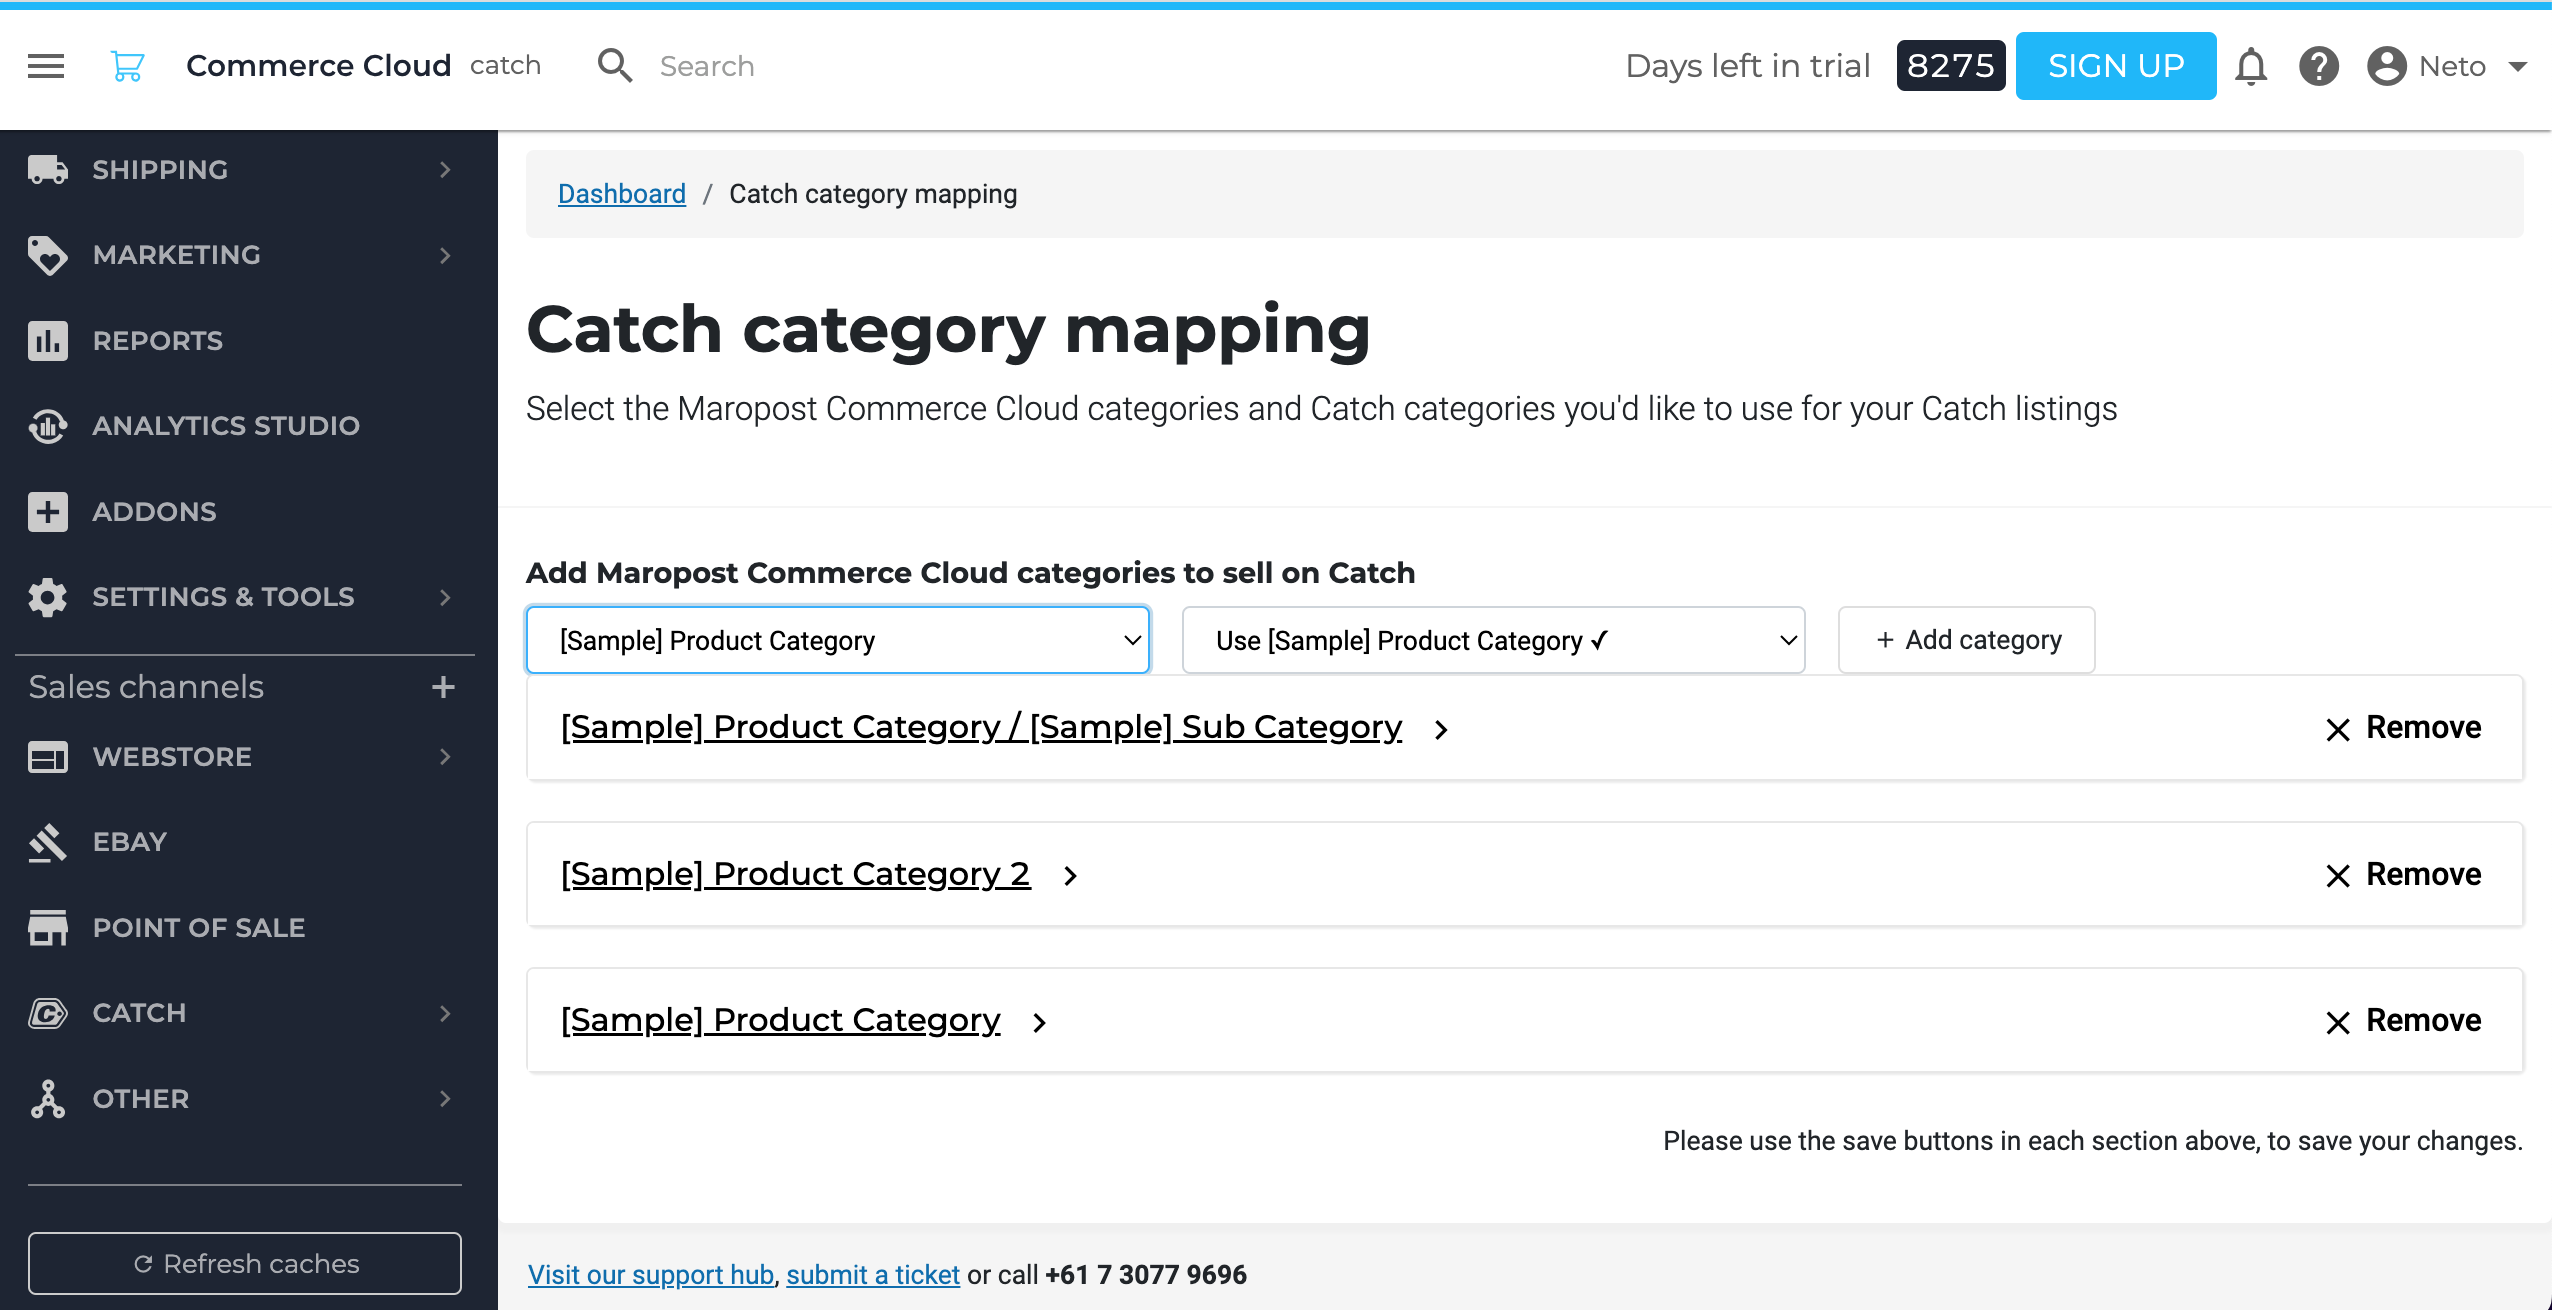
In your Maropost Commerce control panel navigate to Catch > Category Mapping.
-
Select a Maropost Commerce category that you want to sell on Catch using the drop down menus, and click the Add Category button. You don’t need to select every category level if a parent category matches a Catch category.
Tip: You can change the content type used for you category mapping in Catch > Settings under the Category Mapping section.
-
The category will be added, and you can now select the corresponding Catch category it applies to. Top-level categories will reveal subcategories for you to choose from. Keep selecting categories down to the final level, as products cannot be listed in a Catch parent category.
Please Note: The Catch categories in Maropost Commerce reflect what can be seen in the back end of Catch, not their front-end website.
-
Click the Use Category button to add your mapping.
-
Repeat these steps for each Maropost Commerce category you’re selling in. Once complete, click the Save button.
Please Note: Catch regularly updates their categories. When they do, you will need to revisit this page to update your category mapping.
Now that all of your product categories have been mapped, you can move on to product field mapping.
Product Field Mapping
Product field mapping is broken up into several parts based on Catch’s requirements. You can select from product fields (including custom product fields), product specifics, or hard-coded values when you match them to the Catch fields.
Important: Catch expects specific data for some product fields. Click the "i" icon to see what Catch is expecting, and any specific data will be displayed.
To map your product fields:
-
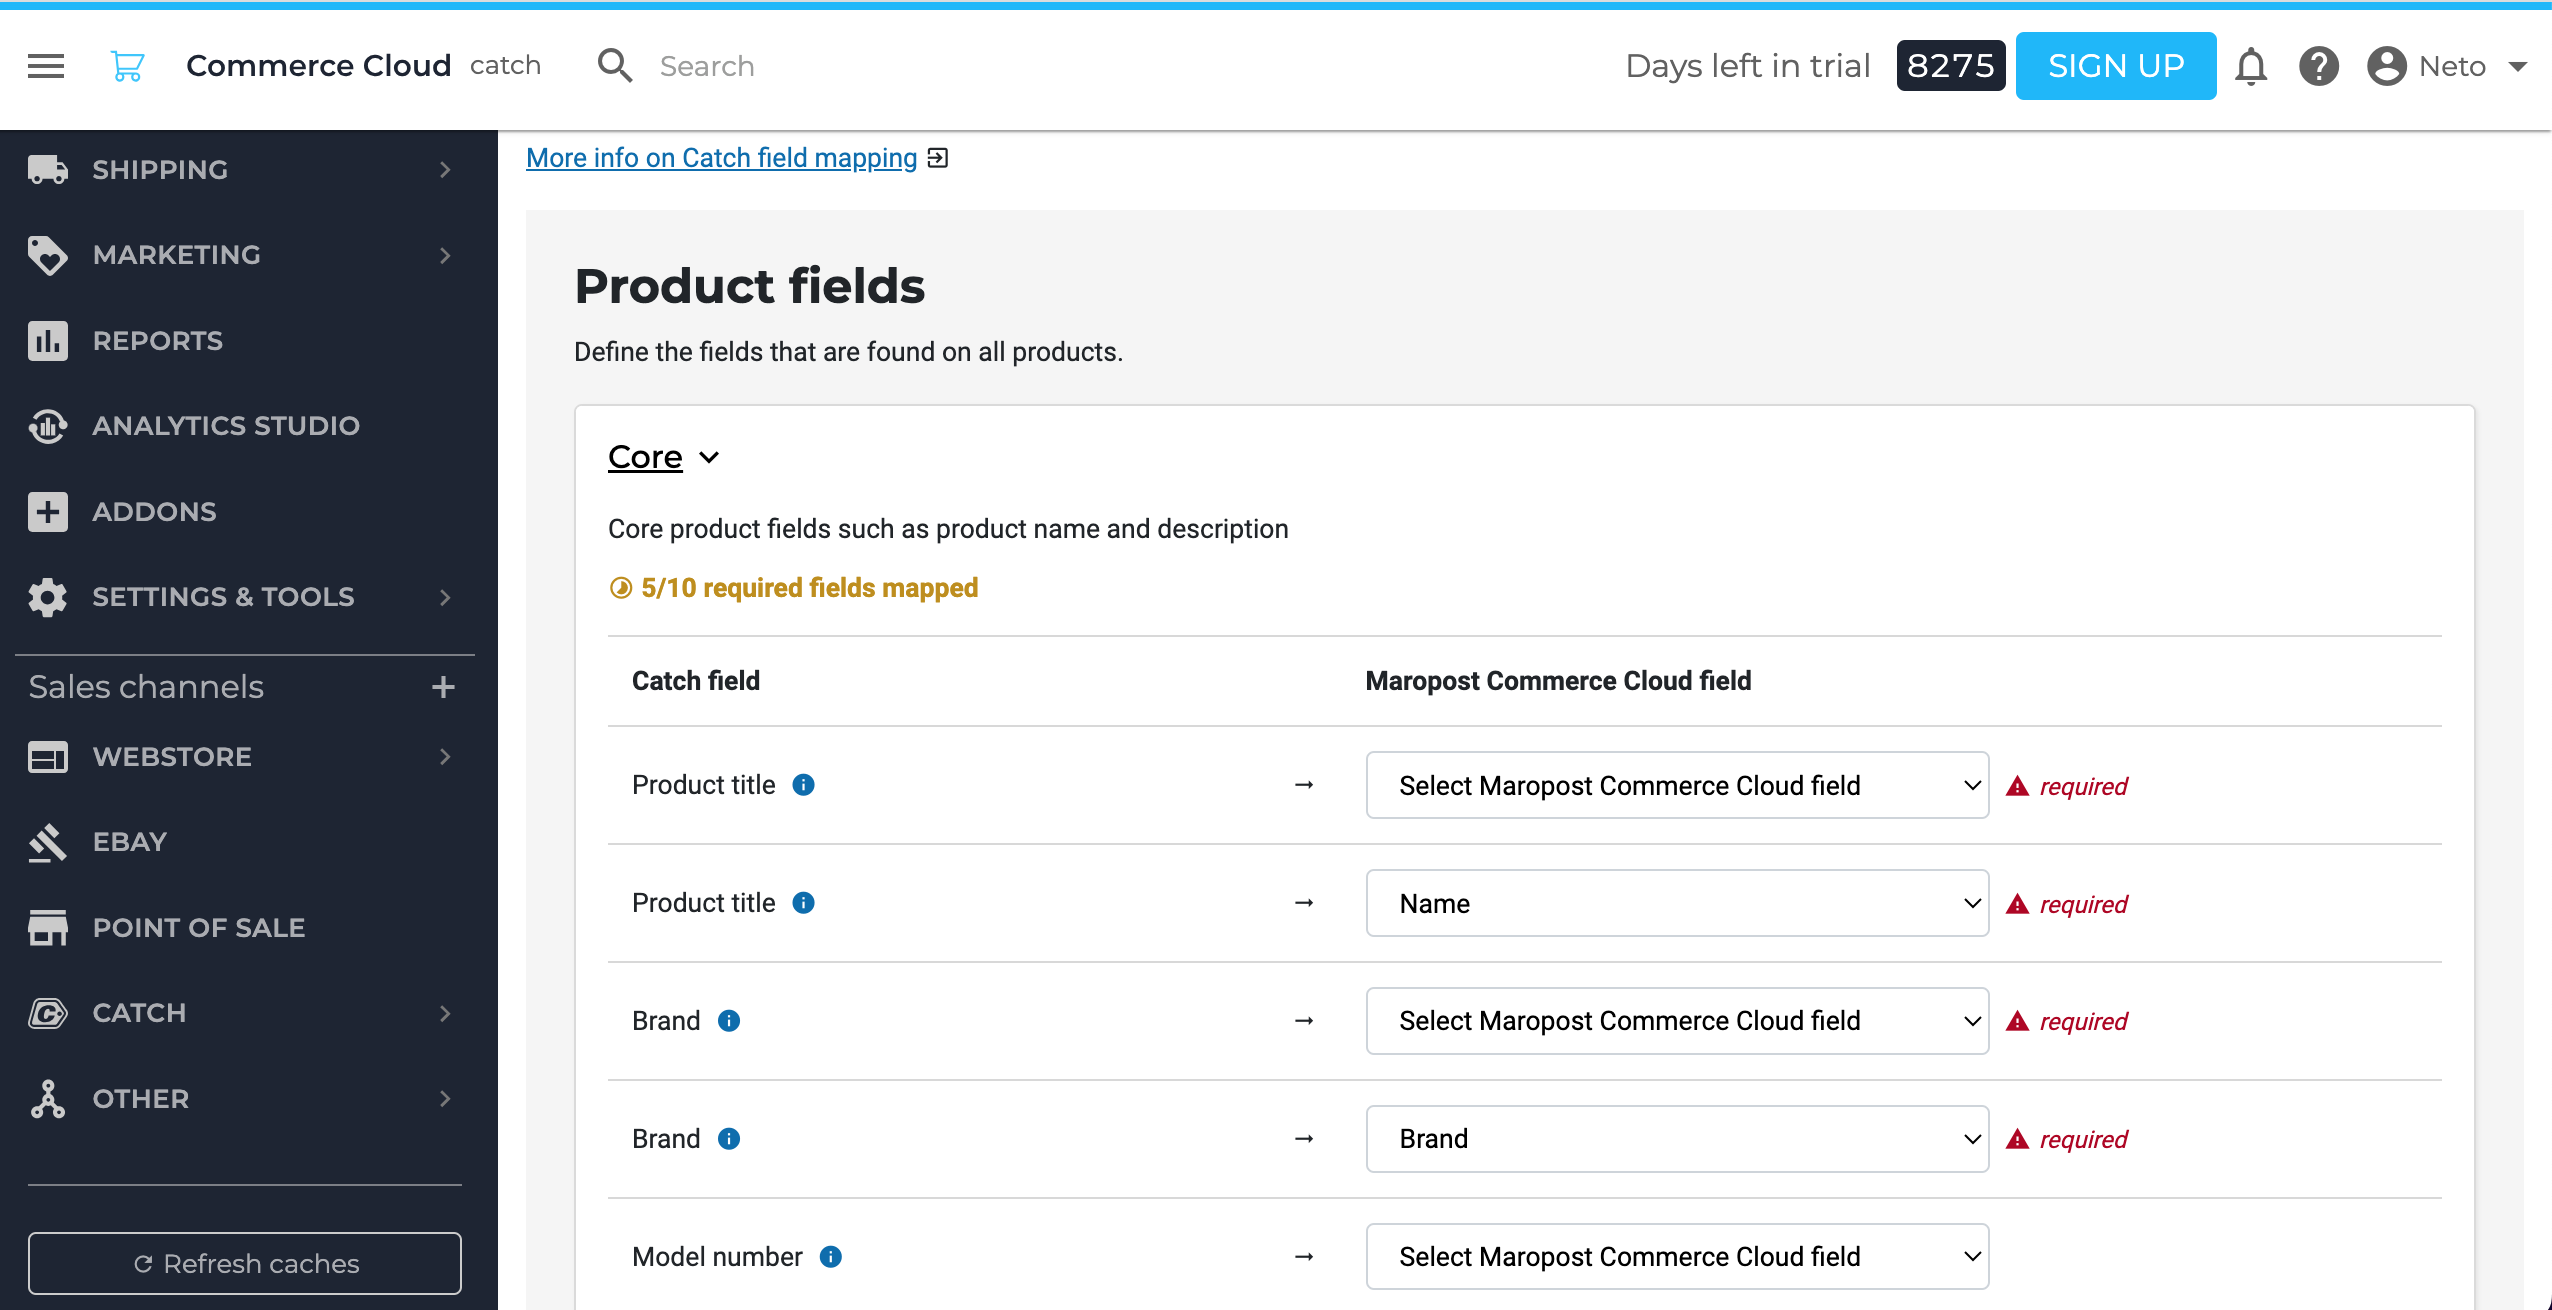
In your Maropost Commerce control panel navigate to Catch > Product field mapping.
-
You will see two main sections, Product fields and Category specific product fields, each with several subsections. Click on Core to expand the core fields which require mapping.
-
Match up the core Catch fields to appropriate Maropost Commerce fields, or use the defaults already selected.
Tip: Catch uses logistic classes to calculate the shipping cost of orders. They must be
set up in Catch. We recommend that you map the
Logistic Class field to a
custom product field (selection box) and populate your products with the logistic class names you've made in Catch. You can use either the full name or abbreviation. To see allowed values, click the 'i' icon.
-
If you opted for manual barcode detection you will have 2 extra fields to map in the Core section, Product Identifier and Product Identifier Type.
The product identifier must be mapped to a field that stores the product barcode (e.g. UPC, EAN), or MPN (manufacturer part number) value. For example, you may create a custom product field called Barcode, and populate it with the product barcode number for each product.
The product identifier type describes what type of identifier the product has on it. If all of your products use the same identifier (e.g. UPC) you can choose Type in a value and then enter the identifier type. If you use a mix of different identifier types, you will need to create a custom product field or item specific. You can then populate them individually, or in bulk using the product import wizard.
Click the Save button.
-
Click Product Discovery and map the key product features to your product fields. If you intend to list variation products, ensure that the Variant Colour Value and Variant Size Value fields are mapped to the colour and size specifics correctly. To learn more about variations on Catch, see the Catch Overview help article.
Tip: Colour refers to the base colour of the product, and Catch won't accept custom colour names. Click the 'i' icon to see a list of allowed values.
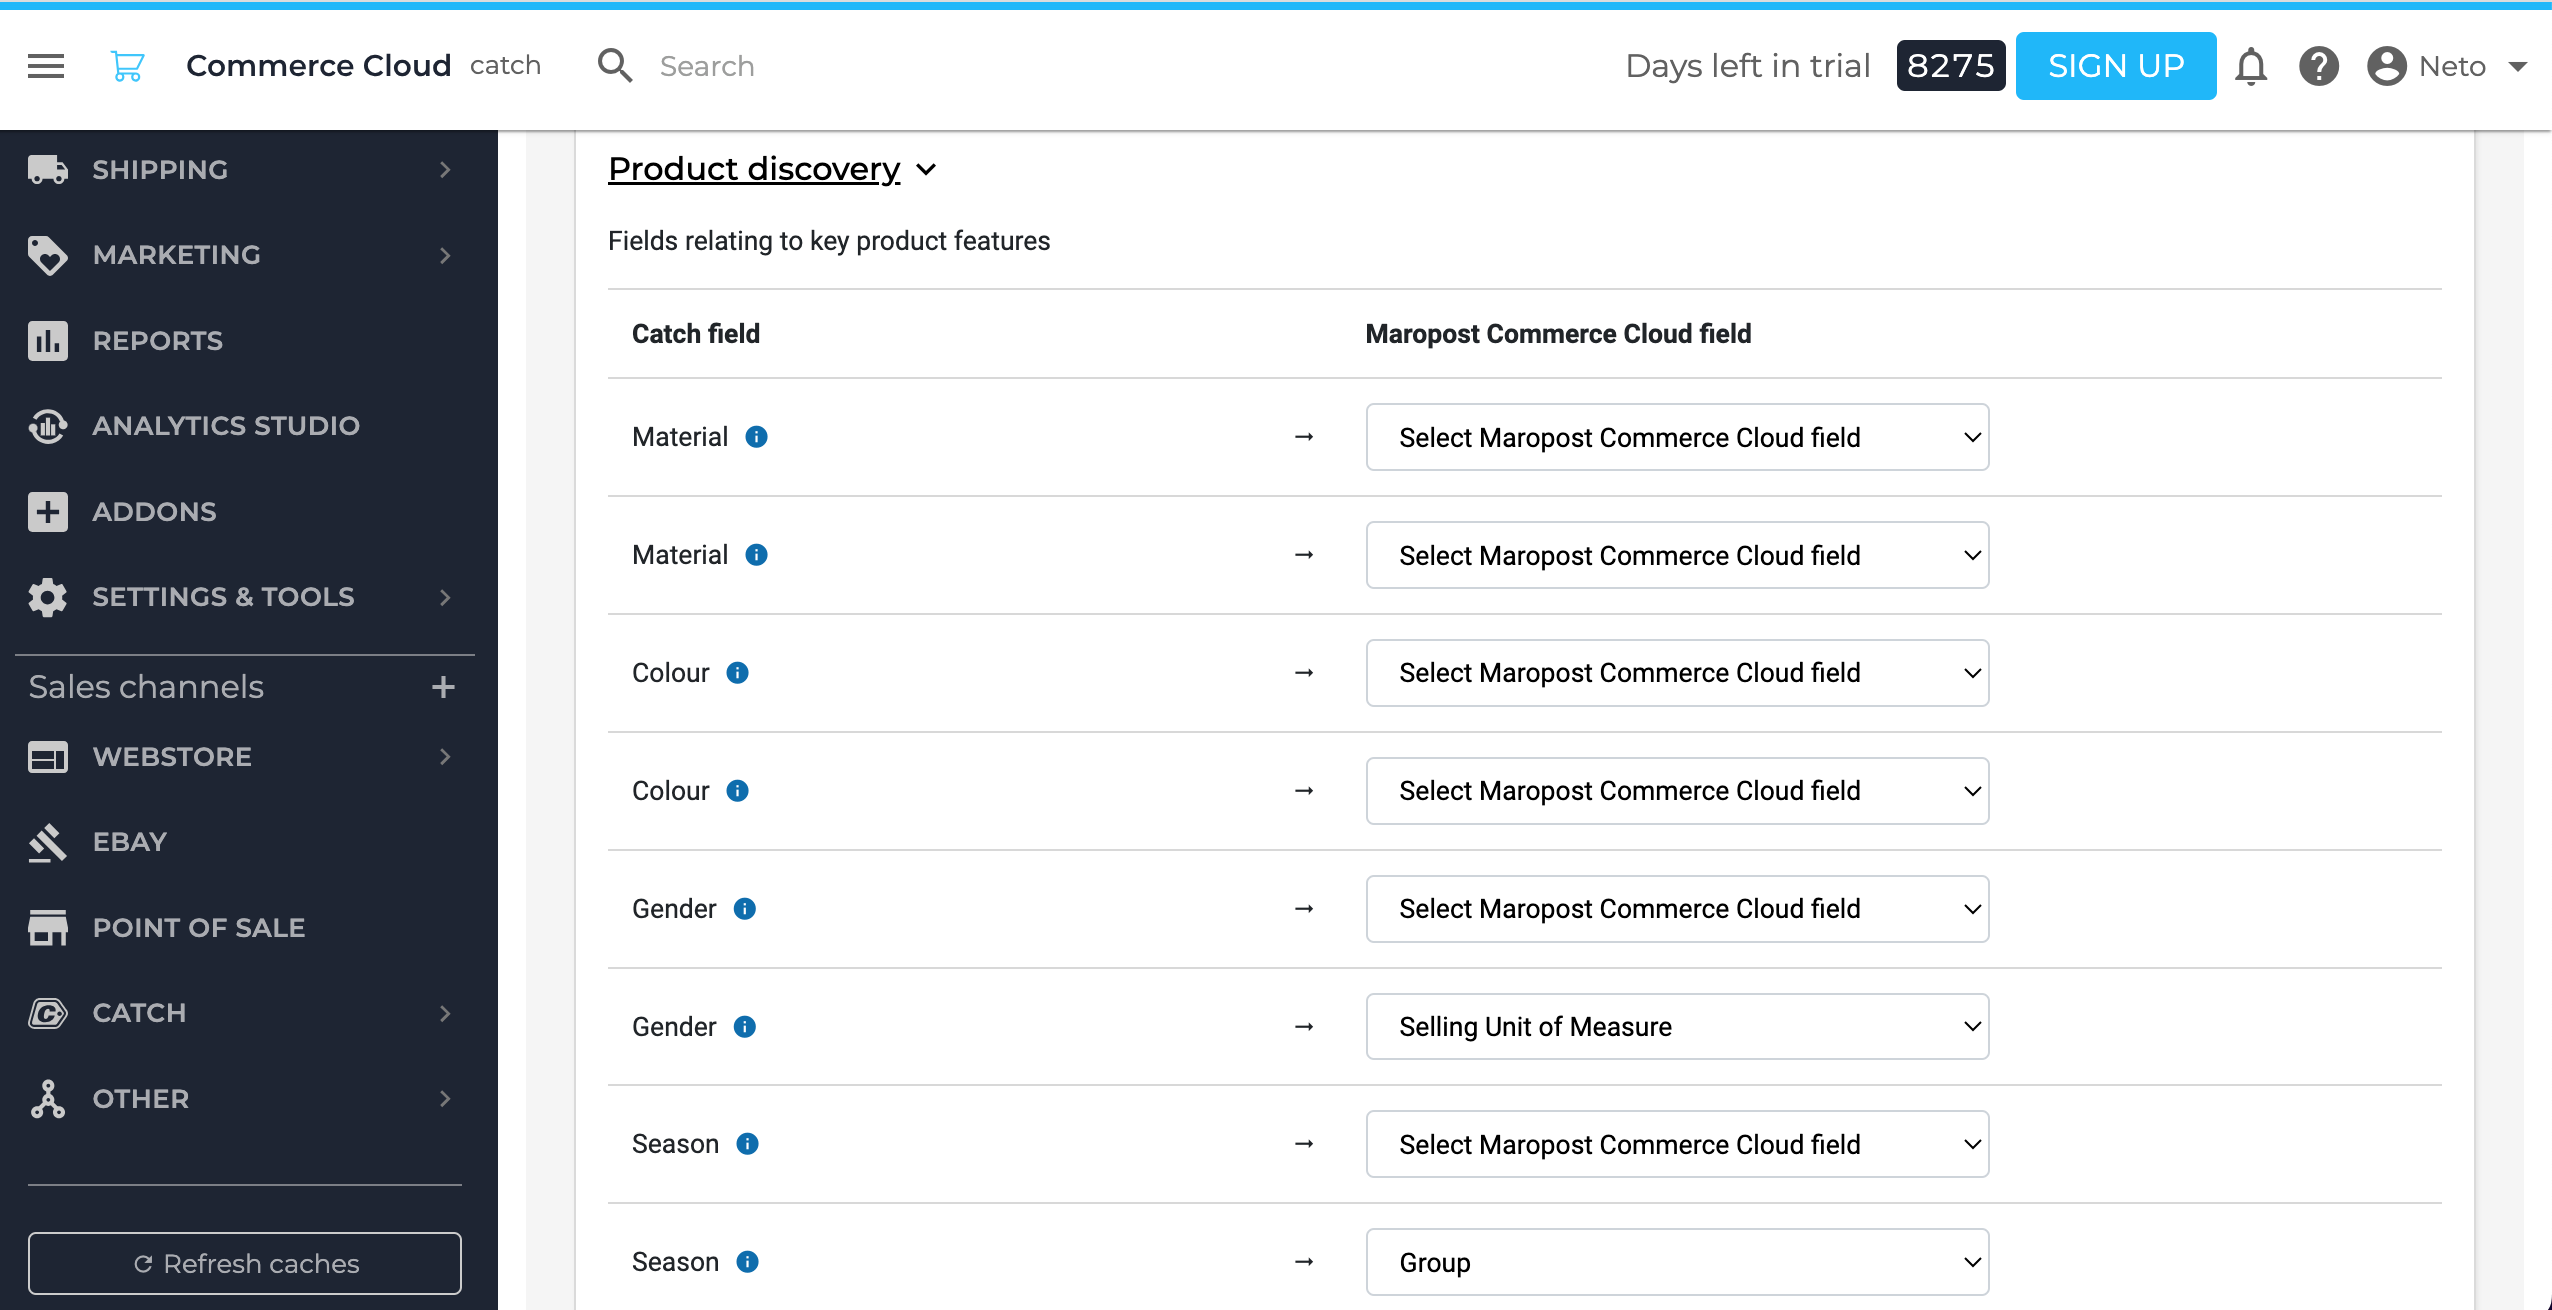
Click the Save button.
-
Click Images and map your product images to the Catch image fields. The defaults will be set, but you can change them to specific image fields.
Click the Save button.
-
Click Offer to map the selling dates, max order quantity and other fields.
Click the Save button.
-
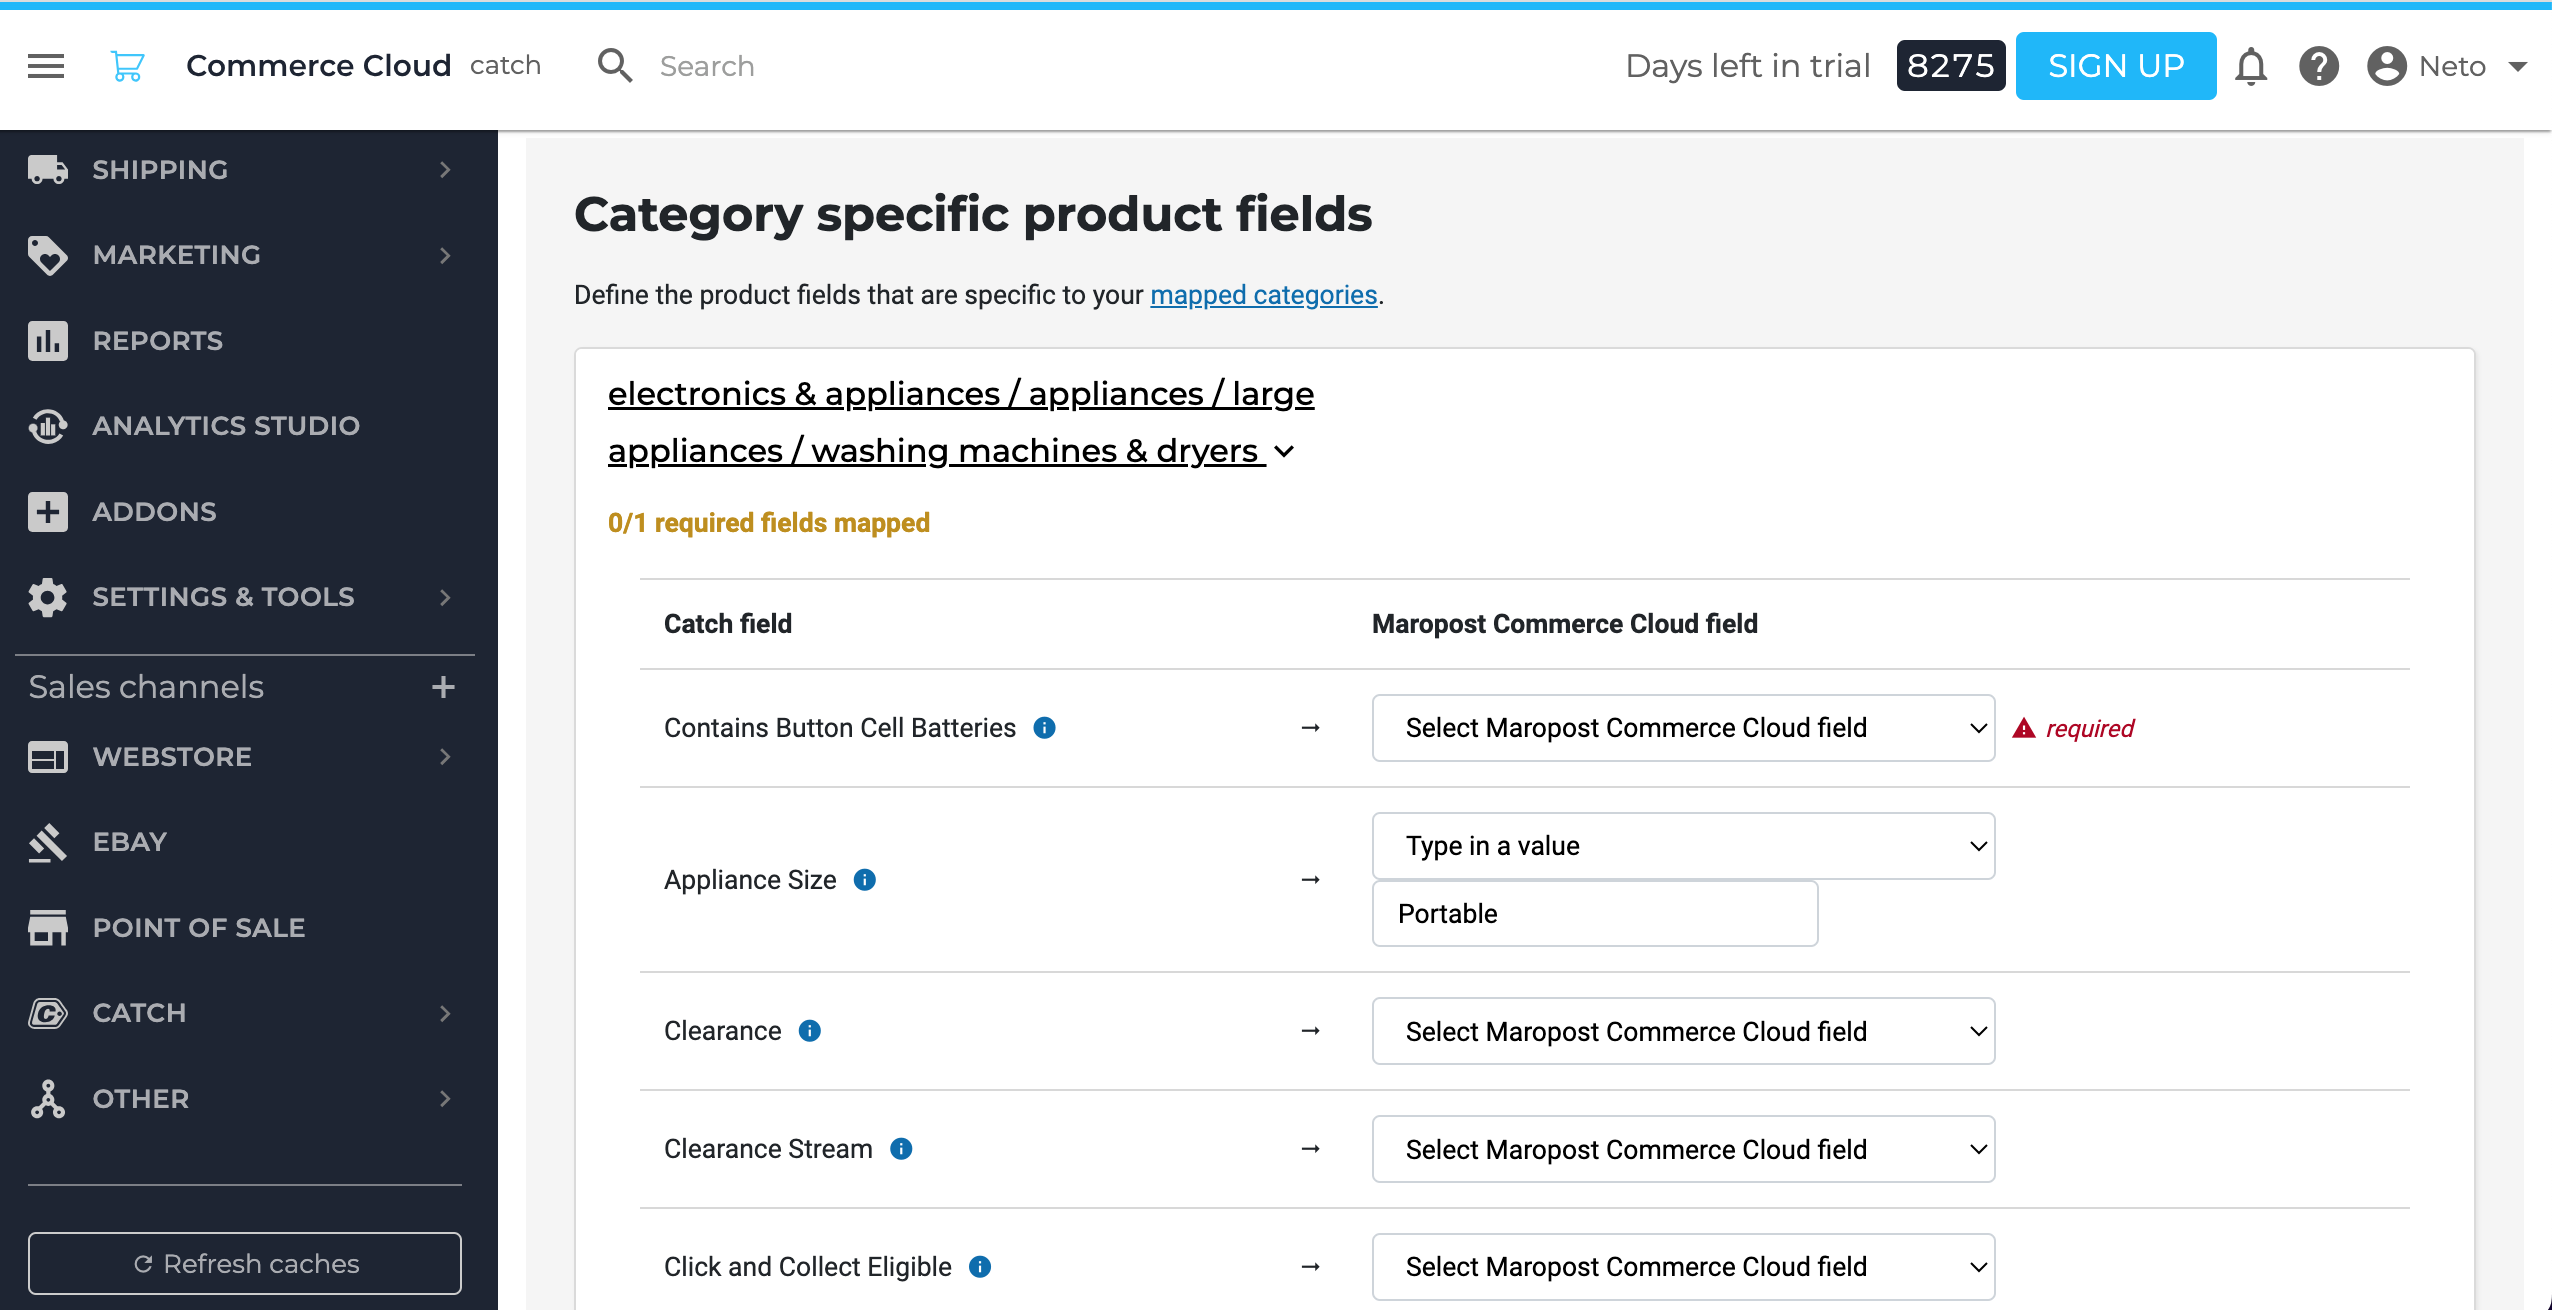
You can now move into the Category specific product fields section. Each category has specific fields that are required or optional to help you enhance your product listings.
Click on each product type and map any required fields.
-
Repeat for each product type, remembering to click the Save button in each section.
Please Note: Catch regularly update their categories. When they do, you will need to revisit this page to update your product field mapping.
You’ve completed your product field and category mapping, and are now ready to register and list products on Catch. To choose which products you list, please follow the steps to approve products for Catch.
Related Articles