Creating a shipping matrix manually is an advanced procedure. For a simplified way of using your own rates, please see this article.
Each component needs to be set up and linked to each other in order for the shipping to work correctly. This is referred to as the Shipping Matrix. At any stage of the configuration, you can check the mapping / your progress by going to: Shipping > Shipping Options.
Overview
There are a number of components to the shipping system:
Shipping Zones
Shipping zones are sets of postcodes grouped together due to close geographical proximity. Shipping zones are different for each carrier, and can even be different depending on your account type. Zones are used when the same Service Rate applies to a number of postcodes. For example, you may have a zone for Sydney Metro, which contains postcode 2000 (among others), where the shipping is free through Australia Post.
Shipping Service & Rates
Services and rates are what define the cost for a shipping service. Shipping Zones are linked to the service & rates, so that you can set the applicable charge for each zone. You can also define additional charges here, such as handling fees or fuel levies. The rates are then linked to a Category so that you can customise which rates apply to which products. For example, your free shipping to Sydney Metro may only be for products that are under 500g in weight.
Shipping Categories
Shipping categories are used to link specific products to a Shipping Service/Rates. Your system is set up with two shipping categories: Default and Dangerous goods, but you can create more to suit your needs. For example, you can create a Free Sydney Metro Delivery shipping category and assign it to your products under 500g in weight.
Shipping Options
Shipping options link your Shipping Categories to the Shipping Service/Rates, and are visible to the customer. In our example above, you may have the rates for the Free Sydney Metro shipping, along with eParcel rates for everyone outside of Sydney Metro.
When shipping is calculated in checkout or on the product page, the matrix is queries the Shipping Category to determine what Shipping Options are available. With this information, the linked Service & Rates are calculated based on the customers suburb/postcode, so that the shipping cost can be returned to the customer.
Labelling & Carrier Configuration
This element of the system links your integrated carrier account to your control panel to produce shipping labels. If you are not using the carrier integration module, or are using a non integrated carrier, you can link your services to a generic label to print plain address labels.
Shipping Manifests
When your integrated carrier account is set up in your control panel, electronic manifests are generated as part of the pack process. These manifests can be submitted to the carrier at the push of a button.
Set Up Shipping Zones
Neto comes pre-loaded with zones for many popular shipping services, such as eParcel, Couriers Please, StarTrack, TNT and Team Global Express. You can also import shipping zones using the zone import template if your carrier zones are not provided or you need to create custom zones. Note that carriers can change or update shipping zones from time to time. For this reason, we recommend always importing shipping zones received directly from the carrier.
- In your Neto control panel navigate to Settings & Tools > Shipping.

- Select Shipping Zones.

- Click on Import Shipping Zones.

- Download the Shipping Zone .CSV Template File and save it to your computer.

- Populate the spreadsheet using the zone data provided to you by your carrier. You can request this information from your account manager, but be sure to request it in an excel or CSV format, so it is easily copied into the import template. Be sure to save it as a CSV format when done.
- From the shipping zone import screen select Choose File and locate your saved file.

- Check the Test Upload button and click Upload file.

- A preview of the upload file will be displayed. Ensure that the data is correct, and if any errors are displayed, correct these in your CSV file and repeat the previous steps.

- When you are satisfied with the data, clear the Test Upload checkbox and click Upload File.
You will receive a success message at the top of the screen when these zones have been successfully imported.
Set up Shipping Services & Rates
- In your Neto control panel go to Settings & tools > Shipping.

- Select Shipping Services & Rates and click Add New.

-

Populate the below fields as required and Save.
Field Name | Field Description |
|---|
Name | The name of the shipping option that appears in your order tracking emails. |
Charge Type | Determines how you will charge for shipping. See table below for more information. |
Status | Toggles the rate table as active or inactive. |
Internal Description | The name of the shipping option that appears in your order tracking emails. |
Tracking URL | The tracking URL is emailed to the customer on dispatch of their goods so they can check the status of their delivery. |
Cubic weight modifier | How many kilograms equal 1 cubic meter (determined by your carrier). |
Packaging allowance % or kg | Buffer to the calculate order weight with which shipping charges are calculated per package (not visible to customer). |
Fuel levy % or $ | The percentage or dollar value added here will increased the system calculated shipping rates by this value (not visible to customer). |
Handling cost | The value added here will increased the system calculated shipping rates by this value (not visible to customer). |
Maximum Length | The upper size that your carrier will ship (determined by your carrier). |
Minimum Charge | The minimum that will be charged for this shipping option regardless of the rates defined |
Maximum Charge | The maximum that will be charged for this shipping option regardless of the rates defined |
GST | Checking Prices Are GST Inclusive will tell the system not to add gst to the shipping cost. |
Ship To PO Box | This will tell the system that this shipping option is available to PO box addresses. |
Ignore Physical Weight Of Products | Selecting this will mean that only cubic weight is used. |
Round Up To Nearest kg | This will tell the system to round all order weights up to the nearest kg. |
eBay Carrier Code | Used for tracking codes on eBay orders. |
- Select the relevant zones and click Add Zones - this will populate the zone fields.

-

Add the rate that you wish to charge for each zone, then Save And Close.
Rates can also be imported from a data file. Please refer to our detailed instructions for information on uploading rates from a CSV spreadsheet.
Charge Types
In Neto you can charge for shipping in the following ways:
Charge Type | Description |
|---|
Fixed Rate By Product (Standard) | Charge fixed shipping rates on an item by item basis. Only used when you have defined a set express or standard shipping price for individual items in your inventory table. |
Fixed Rate By Carton | Charge fixed shipping rates based on set quantities. |
Fixed Rate By Item Qty | Charge fixed shipping rates based on the item quantities and customers location. |
Fixed Rate By InvoiceTotal | Charge fixed shipping rates based on the invoice total and customers location. |
Fixed Rate By Item Total | Charge fixed shipping rates based on the total value of specific items on an order and customers location. |
Third Party Shipping Rate | Uses the third party hosted calculator to calculate shipping totals based on weight/ cubic dimensions of order |
Flat Rate | Charge a flat shipping rate to specified locations regardless of order total or items on order. |
Weight / Cubic | Charge for shipping based on the calculated order weight, cubic dimensions and customers location. |
Tracking URLs
The shipping tracking urls for popular carriers are:
Set Up Shipping Categories
Shipping categories are only used when there is a need to separate products into different shipping options. This can be used to permit certain items to be shipped by a specific option or carrier, or to charge a different shipping cost for these items. If you do not have this requirement, you can simply use the Default shipping category.
To set up a shipping category:
- In your Neto control panel navigate to Settings & Tools > Shipping.
- Select Shipping Categories.

- Select Add New.

- Name the category and give it a Description (if required), then Save.

You will now be able to map these categories to services when adding a shipping method.
If you would like to have more than one service available under one method, you can either create several methods and map them individually or you can create several categories and map them under one shipping method. This latter option is required to offer a shipping total at checkout when different shipping services are required for one order.
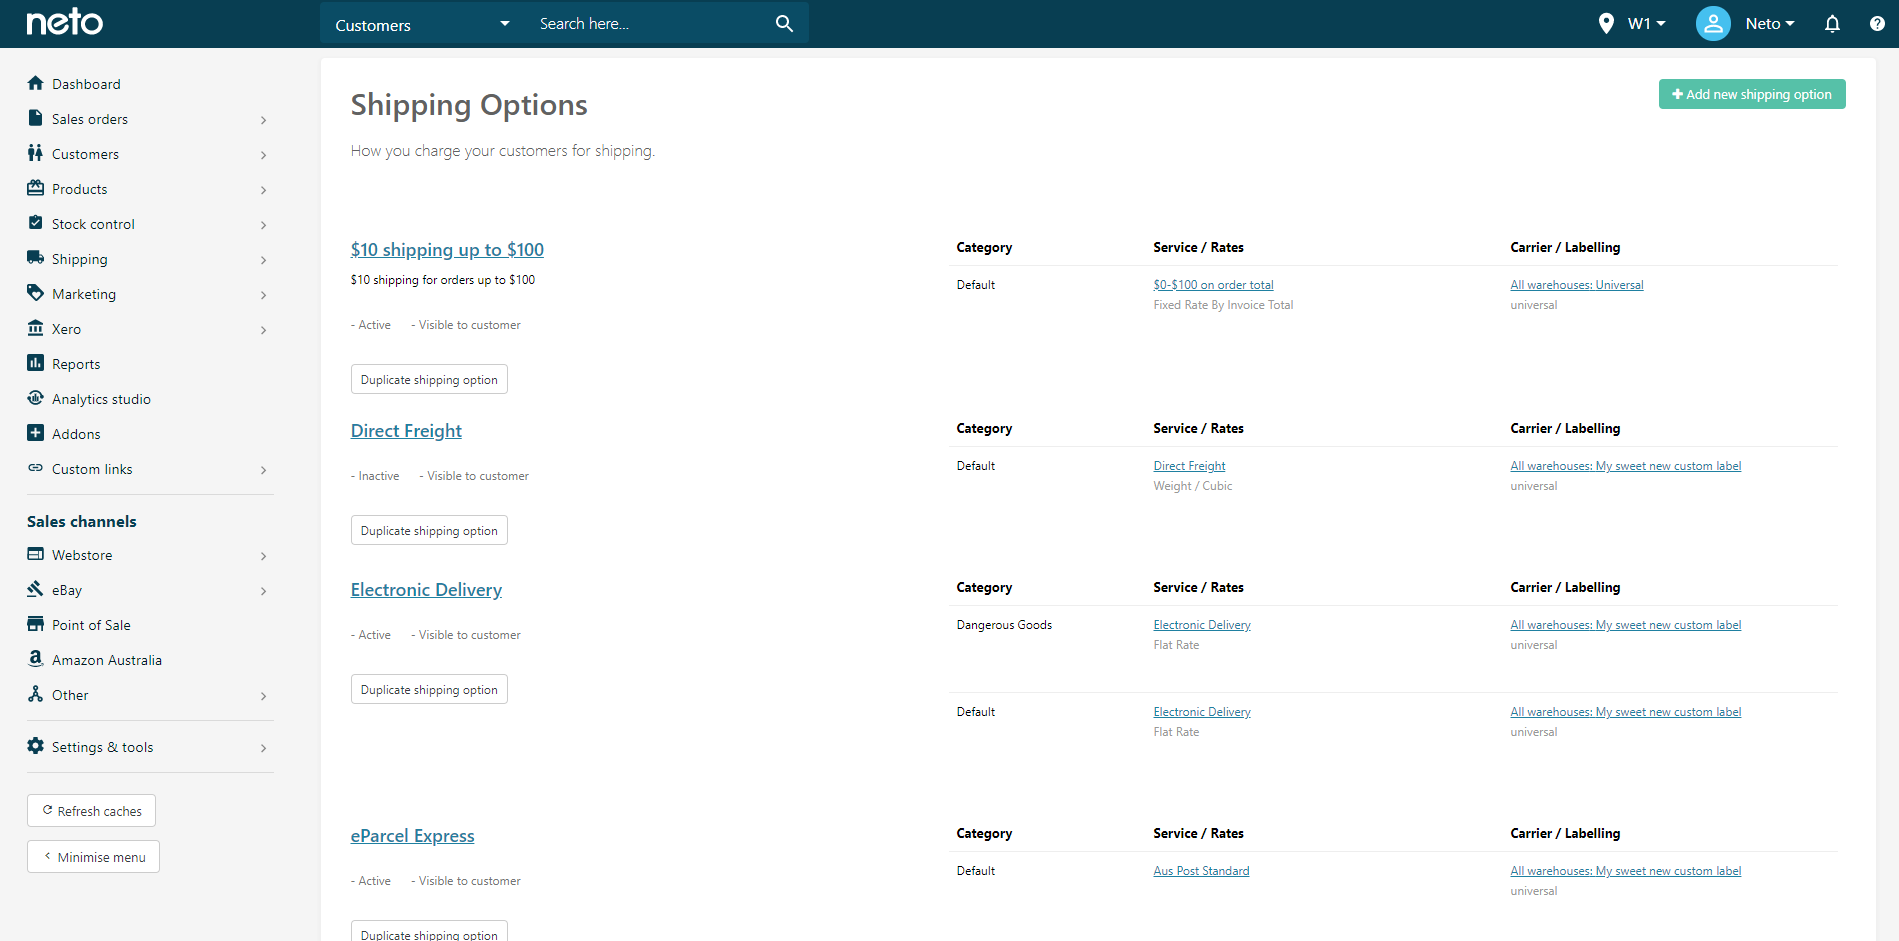
Set Up Shipping Options
Shipping methods are the services that are made available to customers on the website front end of your website or eBay. To add a new method
- In your Neto control panel navigate to Settings & Tools > Shipping.
- Select Shipping Options.

- Click the green Add New Shipping Option button.

- Populate the fields required and Save.
Field Name | Description |
|---|
Id | Generated automatically |
Name | The name of the shipping option that will be viewed by the customer. You can choose a broad option, like Standard Shipping or you can be specific, such as Australia Post Express eParcel |
Routing group | Options in the same routing group will be compared against each other, and only the cheapest option will be visible. Optional and can be left blank |
Status | This field controls whether the option is Active or Inactive in all parts of the system |
Visible to customers | This field controls whether the option is visible to customers on the website front end. You may choose to have shipping options that are active, but only available to staff or eBay |
Visible on eBay | This field controls whether the option is available to eBay orders so that you can have different shipping options for eBay and your website front end |
Can deliver to PO box | This field controls whether the option will display to an order with a PO box address. It can be used to eliminate a shipping option for carriers that do not deliver to po boxes. This does not apply to eBay orders, as the address details are provided after the transaction has been completed |
Minimum/maximum weight | The minimum and maximum weight fields can be used to limit the availability of a shipping option based on weight |
Description | This information is visible by front end website customers, and can be used to provide further information regarding the service. For example, estimated shipping times, or the address for a pick up option. |
Dispatch Email Text | Additional information emailed to customer when an order is dispatched |
Sort order | This field controls the order that shipping options are presented both on the website front end, and in the control panel, and which of these is the default option |
Pick up/delivery | Set this option to a pick up option or delivery by a carrier |
Method Type | Standard or expedited. Does not show to customers, used for reporting and API purposes only. |
Service Level | Normal or priority. Does not show to customers, used for reporting and API purposes only. |
Product Type | Used to set if the items will be physically shipped or delivered electronically |
Minimum/maximum charge | The minimum and maximum charge fields can be used to limit or set a base charge for this option. If you do not set these, it will default to the charges in the shipping option. |
This option is x when the order subtotal is over y | You can choose to offer free or discounted shipping over a specific order subtotal by entering values in these fields |
User Group Visibility | This can be used to limit shipping options to specific groups on your website front end or control panel. For example, you could offer a better or faster shipping service, but make this available only to customers in group B. When all groups are ticked, this option will be made available to all customers |
Map Your Shipping Categories To Shipping Services | Add Shipping Categories applicable to your options, and link them to Service/Rates. This determines which product (via the category) will have this option available as an option, and how shipping will be calculated from the rates |
Map this Option to eBay Shipping Services | Please refer to our guide on eBay Shipping Mapping |
Shipping Option Delivery Availability | Set the times and days when specific options are available to be selected by customers. These settings should not be changed from the default unless you have very specific delivery requirements, as incorrect configuration can result in the customer being unable to checkout |
Set up Carrier & Label Configuration
If you are using an integrated carrier we will assist you to set up your shipping labels and manifests as part of the setup process. Please complete the Shipping Carrier Label Setup Form for each of the carriers you wish to use. You will also need to have your shipping options setup for each carrier before the integration can be completed, as this is what the carrier integration is linked to.
If you're not using an integrated carrier, you can still print labels using a generic template. Neto Commerce Ship is not required for generic labels.
- In your Neto control panel navigate to Settings & Tools > Shipping.
- Select Carriers & Labels.

- Click on Add New and select the relevant carrier.

-
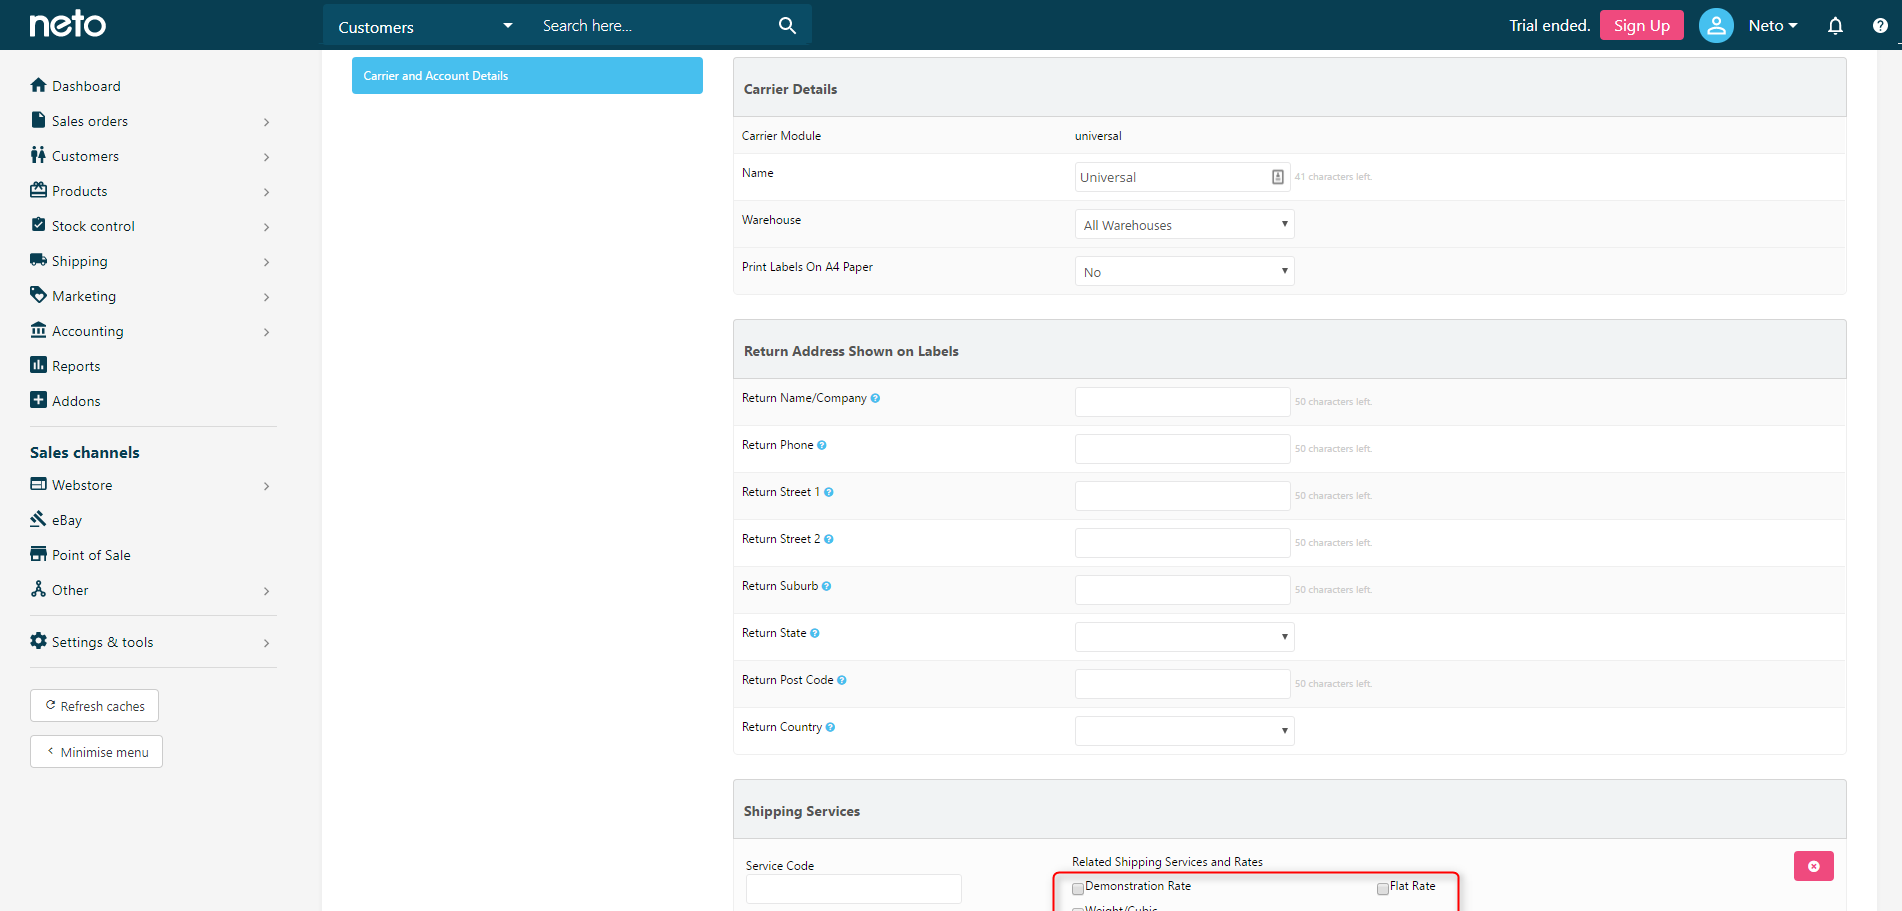
Be sure to enter the Return Address details, and check the boxes of the shipping options that you wish to link. Then click the Save & Close button.
If your return address details change or need to be updated you can edit these by opening the label and making the necessary changes.
Shipping Manifests
When using an integrated carrier, electronic manifests will automatically be created from the consignments generated when processing orders. Manifests can then be submitted to the carrier through your Neto control panel. Best practice is to submit your manifest only after the goods have been accepted by the carrier. Submitting a manifest is not a method of alerting the carrier that a pick up is required, so you will still need to book pickups in your usual manner.
To review and submit a manifest:
- In your Neto control panel navigate to Shipping > Manifests and Consignments.
- Click on the Manifest # to open it and review the information. You must ensure that all information is correct, as this information is used by the carrier to invoice you.

-

Once you have reviewed the manifest, it is ready to be submitted to the carrier by clicking Submit Manifest To Carrier.
You will receive a green confirmation message when this has been successfully submitted.
Once a manifest has been submitted, the system will automatically recognise this, and start a new manifest.