Please Note: The Shopify integration is available upon application. Please
contact us if you would like to have this enabled on your account.
In this Article
Before you Begin
The Shopify integration requires several steps be completed prior to set up:
-
Shipping rate names in Shopify must be unique. Maropost Commerce matches your shipping rates by their name, so ensure that domestic and international rates are not named the same.
Making them unique gives you better control over which shipping option appears on orders.
-
Add payment methods, such as AfterPay, PayPal, and Apple Pay In Maropost Commerce to match those in Shopify. They don't need to be functional, you can add them as offline payment methods so that they can be mapped during setup.
-
Install the customer groups add-on and set up a Shopify price group (optional).
-
Create an API key and password in Shopify.
-
In your Shopify admin panel, click on Apps in the side menu.
-
Click Develop apps near the bottom of the page.
-
Click Create a custom app.
-
In the App details section, enter a name for the private app (such as Maropost Commerce webstore connection) and your contact email address.
-
Click Create app.
-
Click on Configure Admin API Scopes and select the following permissions:
| Permission name | Access |
|---|
| Customers | Read |
| Fulfillment services | Read and write |
| Inventory | Read and write |
| Locations | Read |
| Orders | Read and write |
| Product listings | Read and write |
| Products | Read and write |
| Shipping | Read |
-
Click Save.
-
Click Install App and then Install. Copy the information on this page as you will need it in Maropost to connect to your Shopify account.
Set Up Shopify in Maropost Commerce
-
Click on Shopify in sales channels menu.
-
Click the Set up Shopify button.
-
Enter your Shopify account details which you copied earlier when creating the custom app:
- Admin API URL (your Shopify URL)
- API Key
- Admin API access token
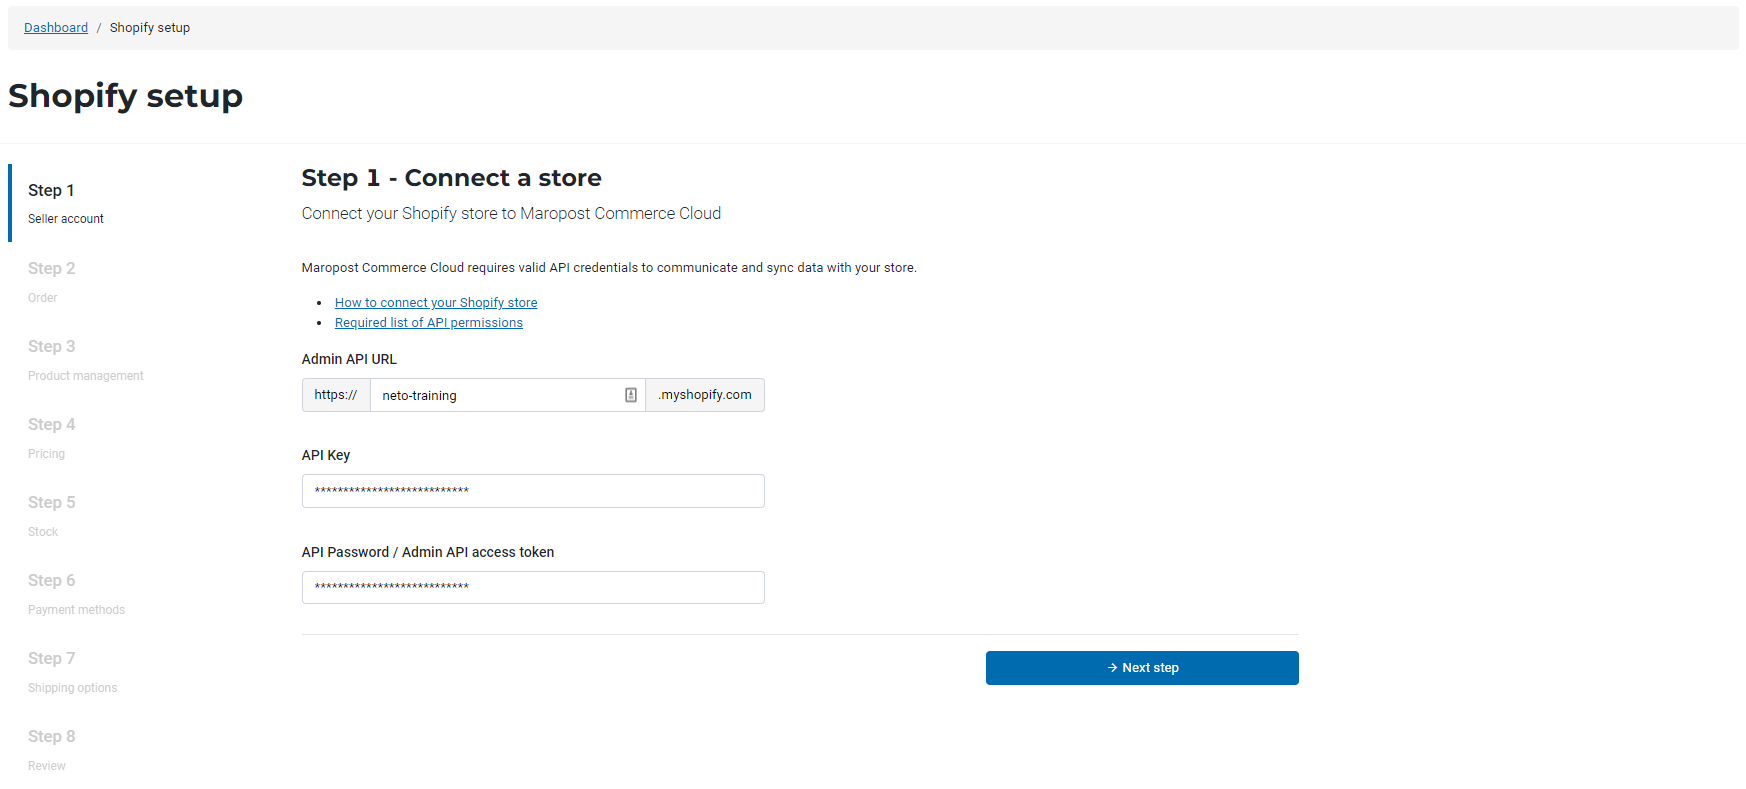
Click the Next step button.
-
Toggle Enable order import so that Shopify orders are downloaded into Maropost Commerce. Turn on the additional settings you want to use. Consult the table below for more information about each setting:
Tip: The order import runs approximately every 5 minutes.
| Setting | Description |
|---|
| Enable order import | Toggle on to import Shopify orders into Maropost Commerce. Required for other settings to appear. |
| Order payment statuses to import | Select which orders you want to import into Maropost Commerce by payment status. |
| Order status mapping | Select the Maropost Commerce order status that should appear on Shopify orders when they’re imported. |
| Order ID prefix | Toggle this setting on to set a prefix for all order numbers that are imported from Shopify. |
| Integration start date | Orders and payments made before this date will not be imported into Maropost Commerce. |
| Email customers when an order is fulfilled | Toggle on to send customers an email when their order is dispatched. |
| Sync order consignment details | Toggle on to send order tracking numbers to Shopify. |
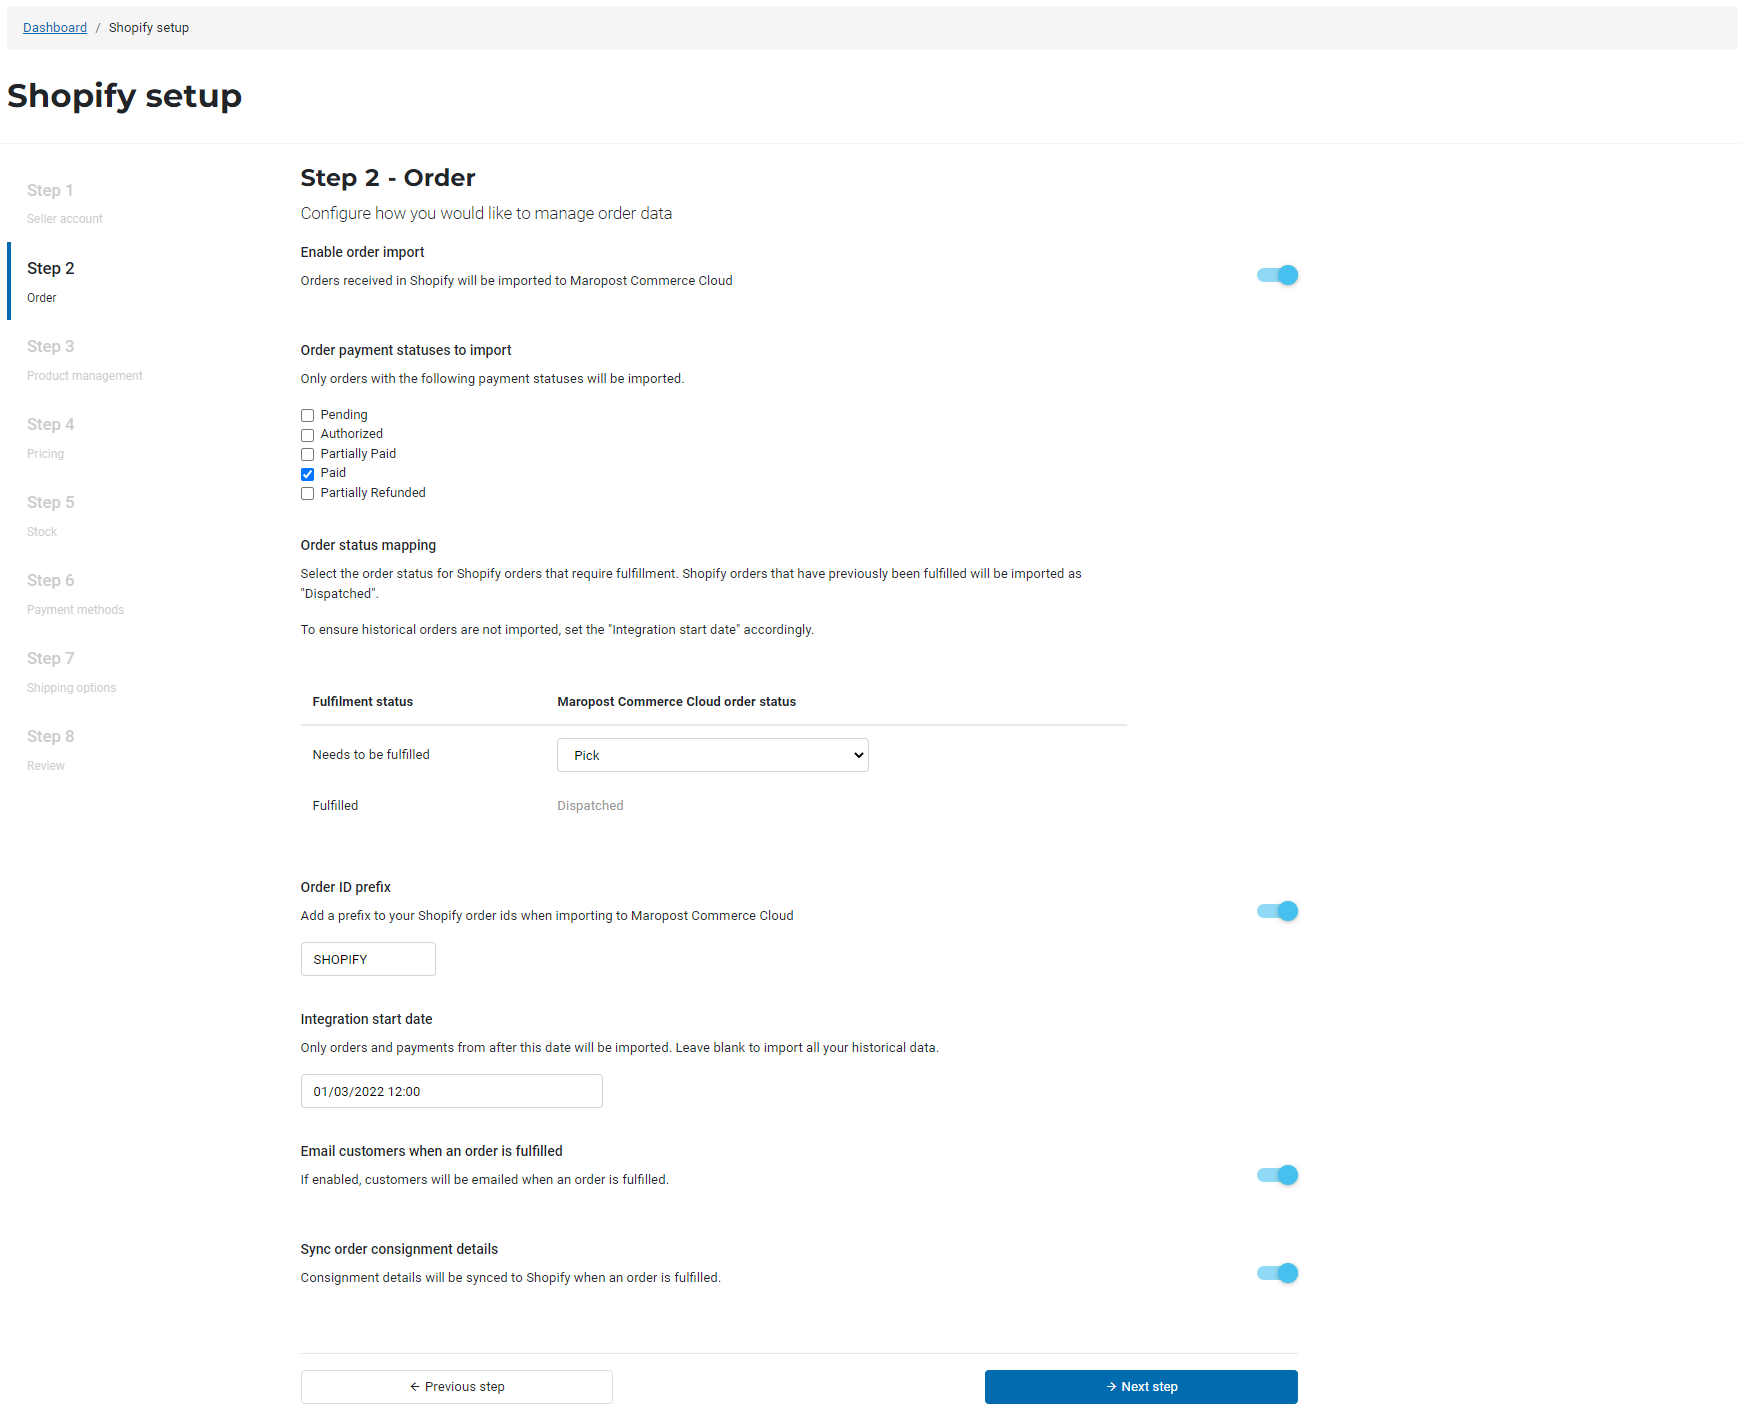
Click the Next step button.
-
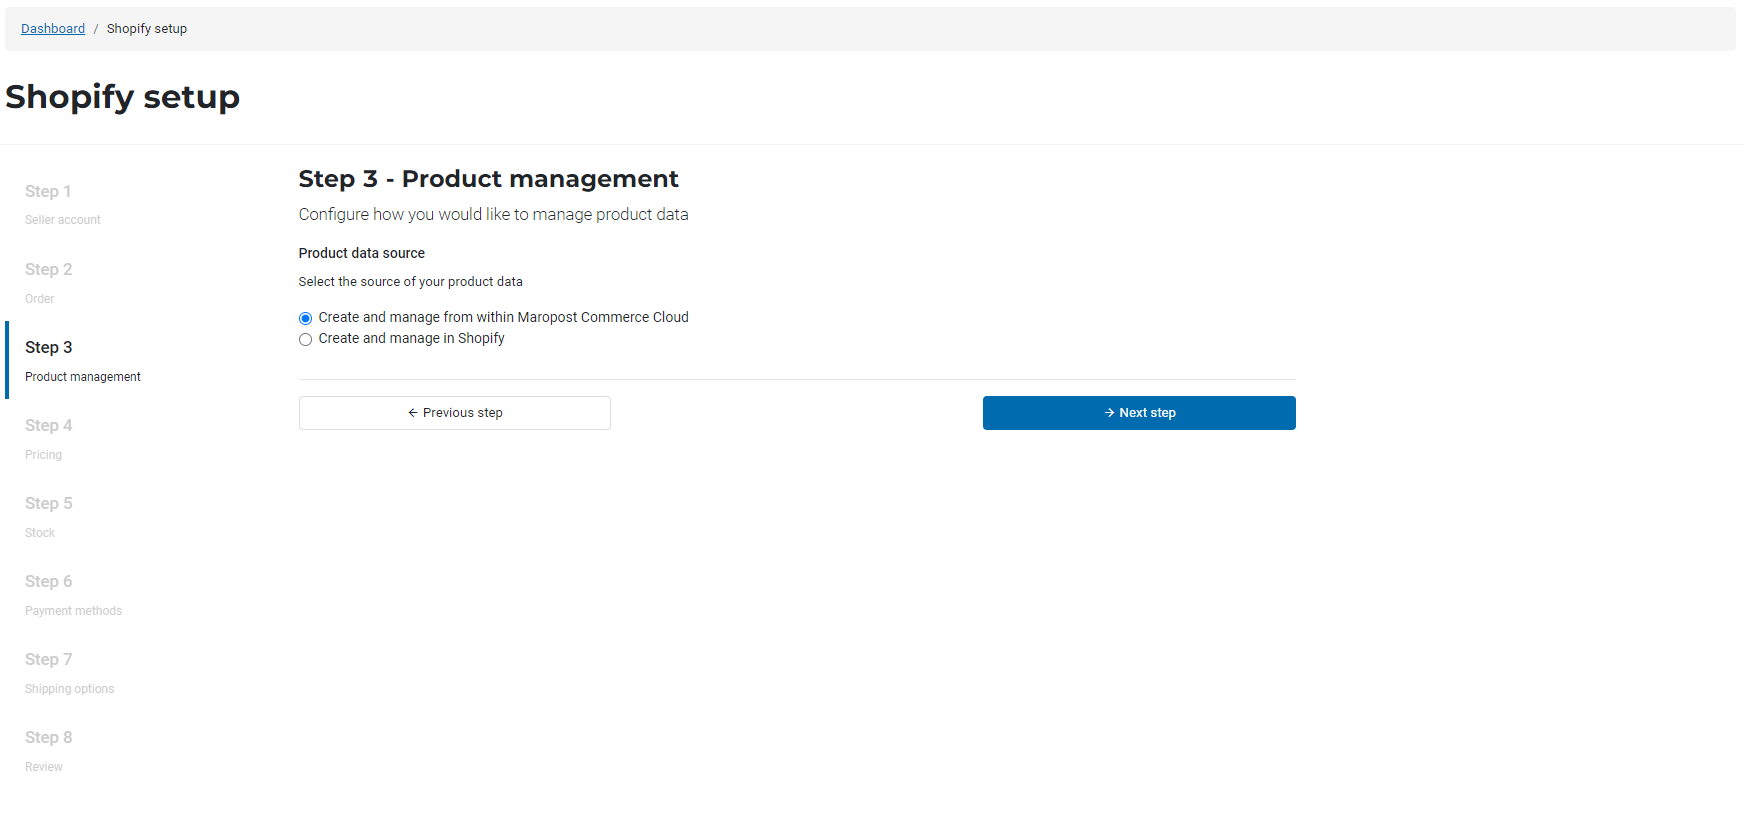
Choose if either Maropost Commerce or Shopify should be the source of truth for product data, then click the Next step button.
-
Select your product price settings. Consult the table below for more information about each setting:
| Setting | Description |
|---|
| Pricing value | Choose if you want to overwrite prices in Shopify from Maropost Commerce product prices, or to use the prices in Shopify. |
| Customer group | Select the customer group which has prices for your products in Shopify. |
| Empty product price | If you selected a customer group that isn’t the default, you can choose to use the default group’s price. This is only used if the group you selected has empty price fields. |
| Enable promotion pricing | Toggle this setting to send promo prices during the promo price times. |
| Tax | Toggle if the prices you send to Shopify products include tax. |
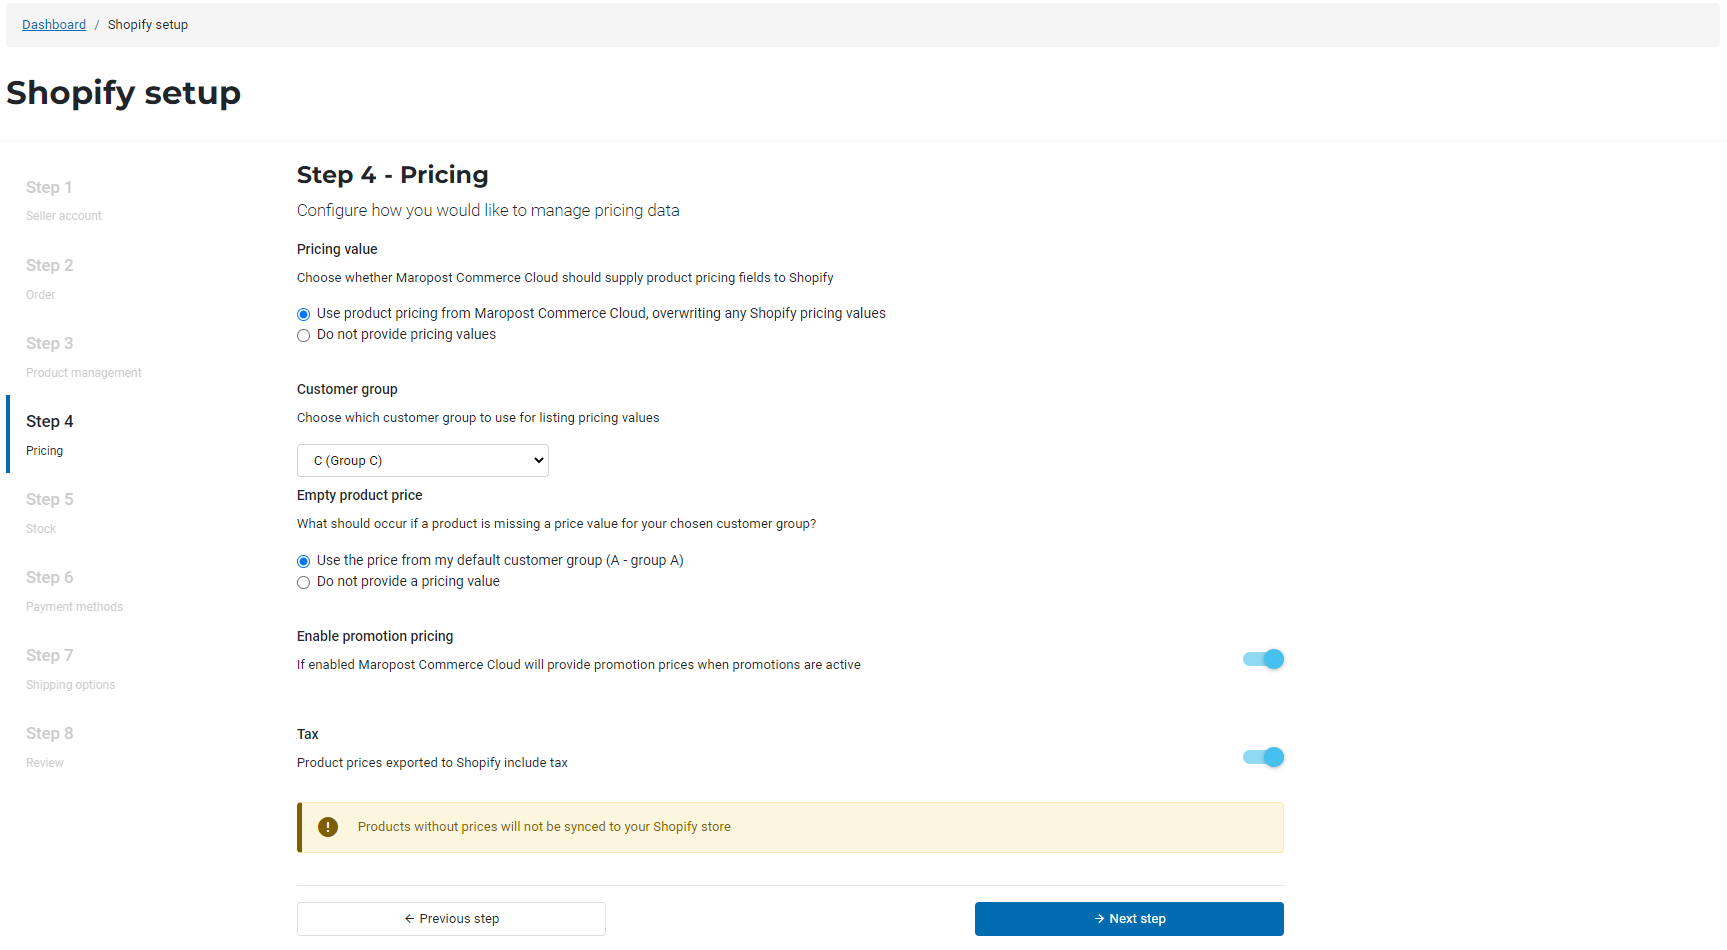
Click the Next step button.
-
Select your product stock level settings. Consult the table below for more information about each setting:
| Setting | Description |
|---|
| Enable stock sync | Choose if you want to overwrite stock levels in Shopify from Maropost Commerce products, or to use the stock levels in Shopify. |
| Stock level limit | Push the full stock amount on each product to Shopify, or set a maximum amount of stock to appear on products in Shopify. |
| Stock level buffer | Set an optional buffer to exclude a set amount of stock from appearing in Shopify. |
| Select a location to send and receive stock updates | This is the warehouse in Shopify where the Maropost Commerce stock will be populated. |
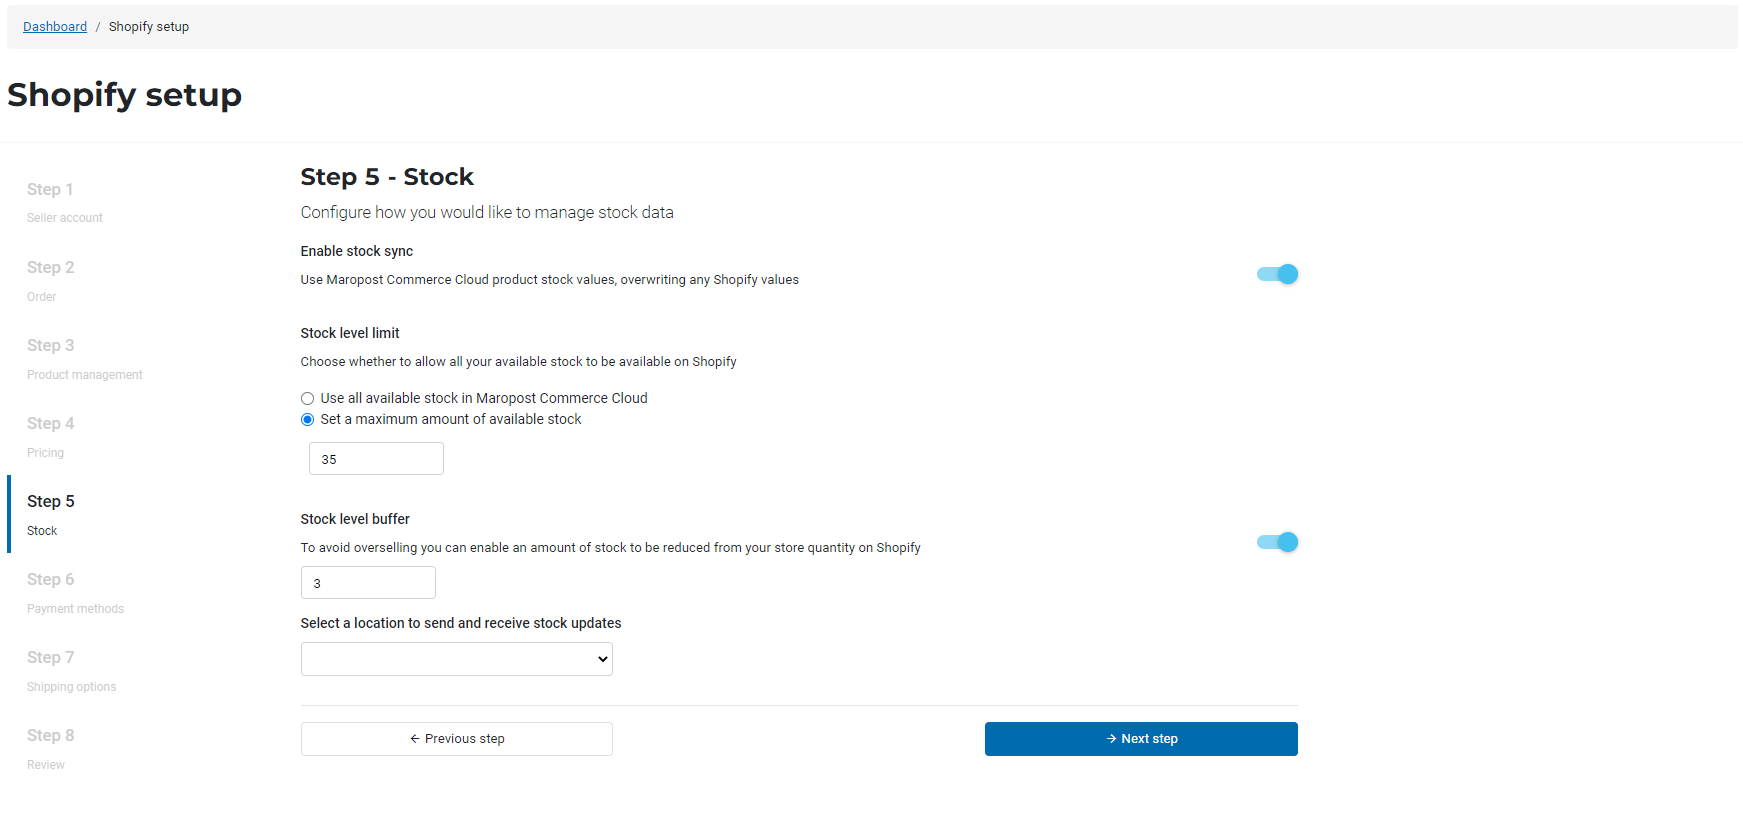
Click the Next step button.
-
Map your Shopify and Maropost Commerce payment methods so that payments appear correctly when orders are imported, and can be reconciled in your accounting integration.
Click the Add new button and enter the Shopify identifier in the table below, then match it to a corresponding Maropost Commerce payment method.
Important: Shopify may change their payment identifiers from time to time making them appear as unpaid in Maropost Commerce. Follow
these steps to find the payment identifier so that it can be mapped.
| Payment method | Shopify payment gateway mapping identifier |
|---|
| Shopify Payments | shopify_payments |
| Paypal | paypal |
| AfterPay | afterpay |
| Zip Pay | zip |
| Gift cards | gift_card |
| Manual | manual |
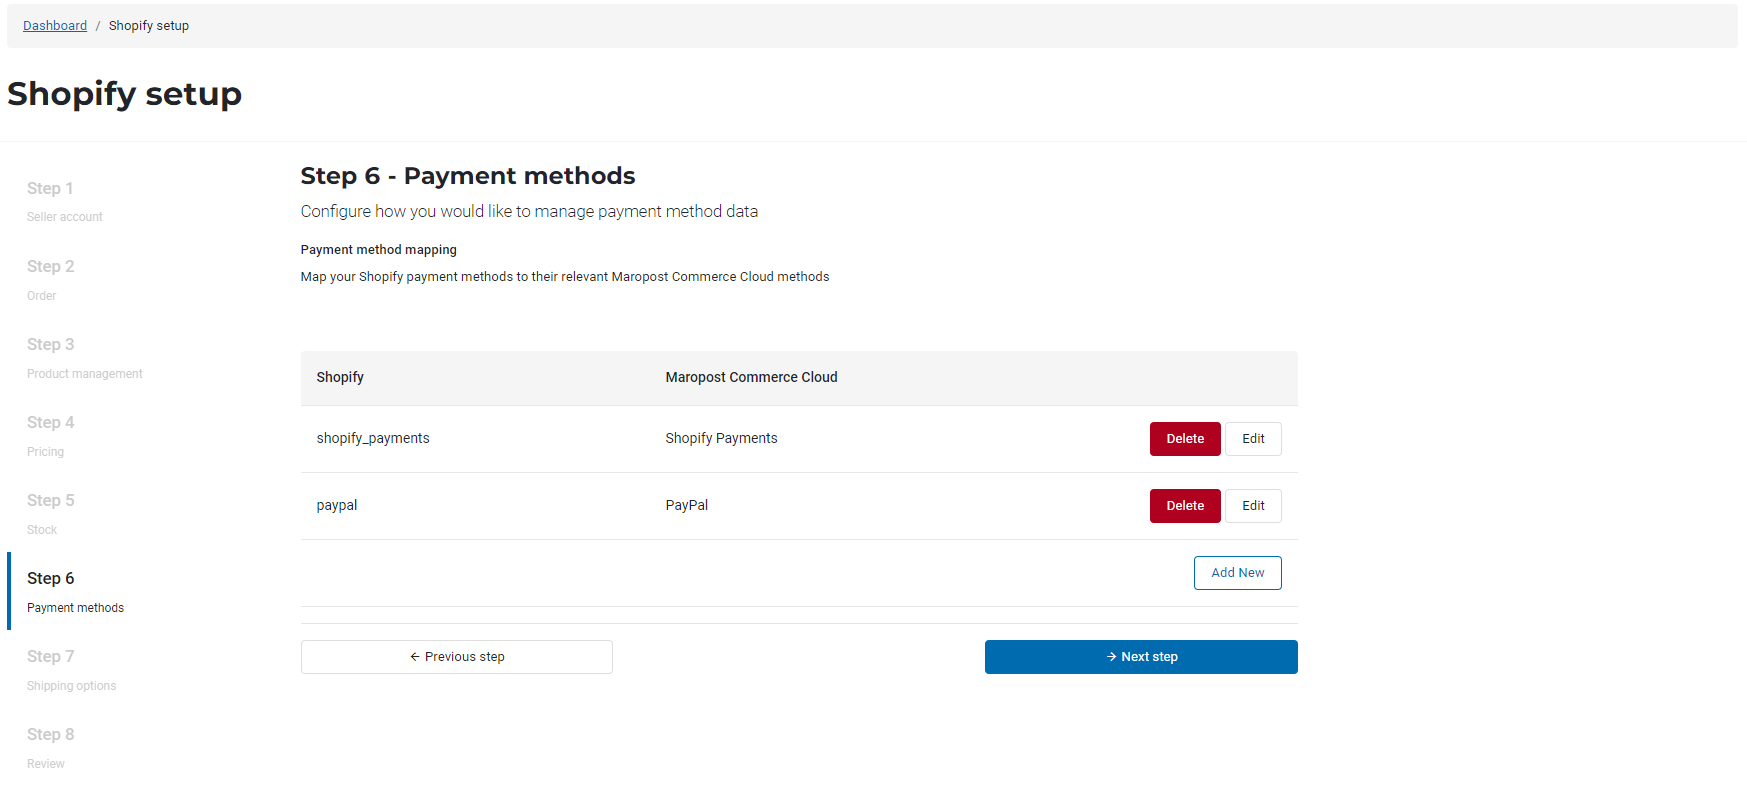
Click the Next step button.
-
Map your Shopify rates to Maropost Commerce shipping options so that orders display the correct shipping service when they’re imported.
Important: Shopify shipping rate names need to be entered exactly as they appear. As a result, all Shopify shipping rates must have unique names for Maropost Commerce to identify them.
Click the Add New button and enter the Shopify rate name. Then select the matching Maropost Commerce shipping option.
You can also select a fallback shipping option in case the shipping service in the Shopify order doesn’t match a Maropost Commerce shipping option.

Click the Next step button.
-
Review your settings. You can always change them later from the Shopify > Settings menu. Click the Complete setup button.
Product Field and Image Mapping
The Maropost Commerce Shopify integration can populate specific data into your Shopify product fields. You can use existing product fields or create custom product fields to make the data specific to Shopify. In your Maropost Commerce control panel, navigate to Shopify > Product field mapping.
| Shopify Field | Description | Recommended Maropost Commerce Field |
|---|
| Product Name | Name or title of the product. | Name |
| Barcode | Global trade identification number (GTIN), such as a UPC, EAN, or ISBN. | UPC/EAN |
| Cost | Cost price of the product. | Cost Price |
| Product Description | Product description. | Description |
| Product Type | Broad generic category of the product. | N/A |
| Tags | Keywords used to describe the product. | N/A |
| Vendor | Product provider. Can be used to show the brand or manufacturer. | Brand |
| Variant Image | Primary image of the product. | Main Image |
| Image 1, 2, 3, and so on | Additional product images. | Alt Image 1, 2, 3 and so on. |
Approve Products for Shopify
To sync products between Maropost Commerce and Shopify you need to mark them as ‘approved’ in Maropost Commerce. This lets Maropost Commerce to create products, and update the price and stock levels on Shopify, keeping them in sync with your marketplace listings.
Products in Maropost Commerce can be approved in three ways:
Individually
-
In your Maropost Commerce control panel navigate to the Products > Active page.
-
Click on the product SKU you want to sync with Shopify.
-
Select the Approved for Shopify checkbox.
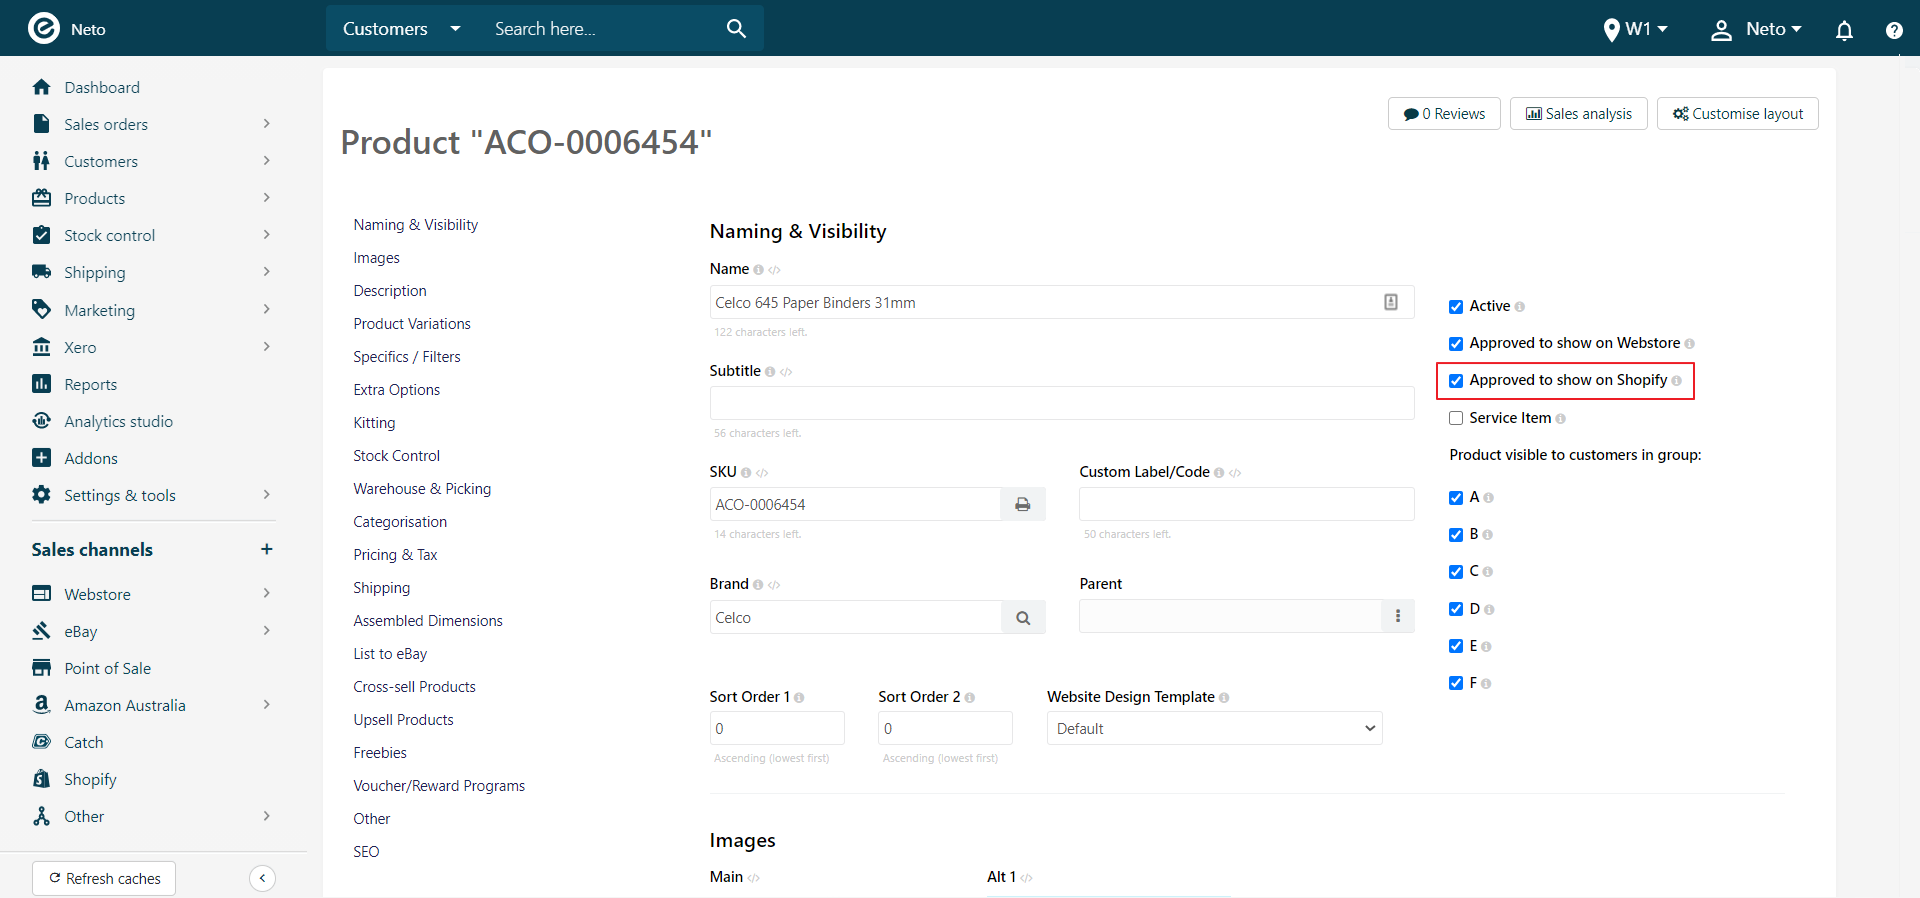
-
Click the Save button.
-
Repeat the process for each product to approve.
In Bulk
-
In your Maropost Commerce control panel navigate to Products > Active.
-
Select the checkboxes next to each product you want to approve for Shopify.
-
Click the With x Selected button (beneath the product list) and select Approve for Shopify from the options.
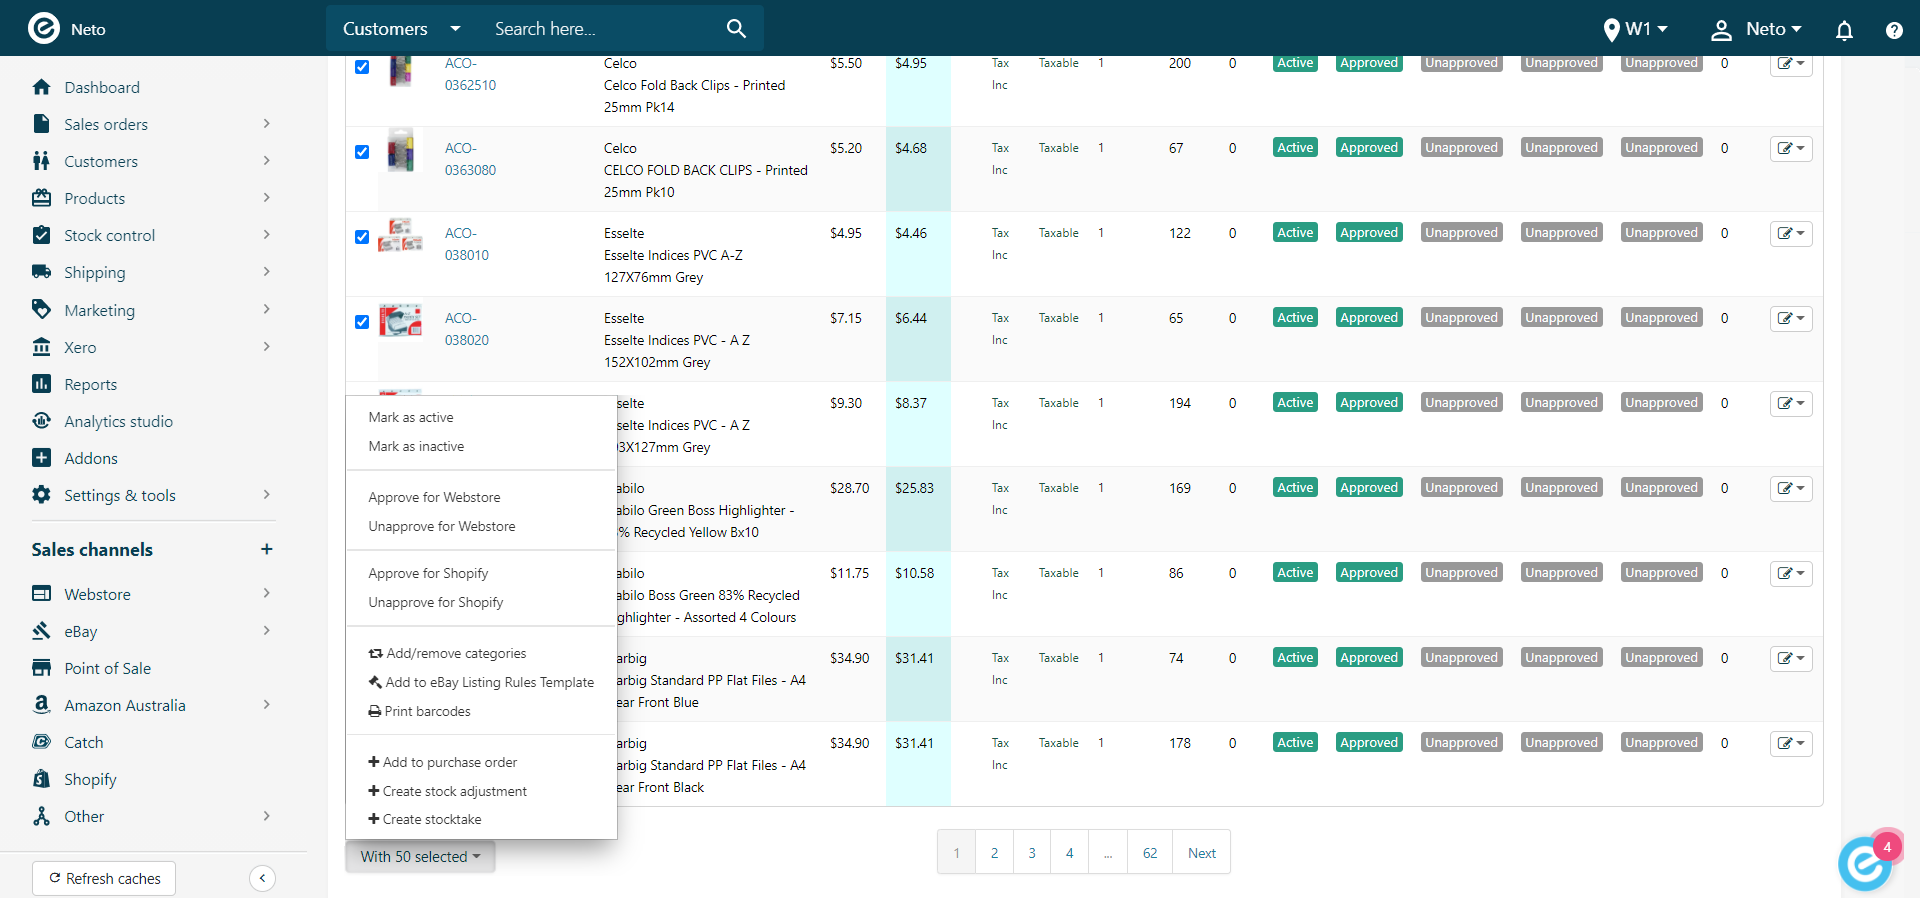
-
Click the OK button in the confirmation.
-
Repeat the process for each group of products to approve.
Import Wizard
The import wizard can be used to update the Approved for Shopify field for every product at the same time. It's easiest to generate a list of product SKUs that you want approved first. You can do this one of two ways:
The method you use depends on your own situation. If you have products in Maropost Commerce that aren't in Shopify that you want exported, create the list from Maropost Commerce. If you don't want them in Shopify, generate the file in Shopify. In both instances you only need the SKU of the products. Once you have your file:
-
In your Maropost Commerce control panel navigate Settings & Tools > Import Data.
-
Click the Perform complex import button and select Start Data Import Wizard from the Pop-up menu.
-
On the Upload File page, click the Browse button and locate the file to upload.
-
Click the Continue to Next Step button.
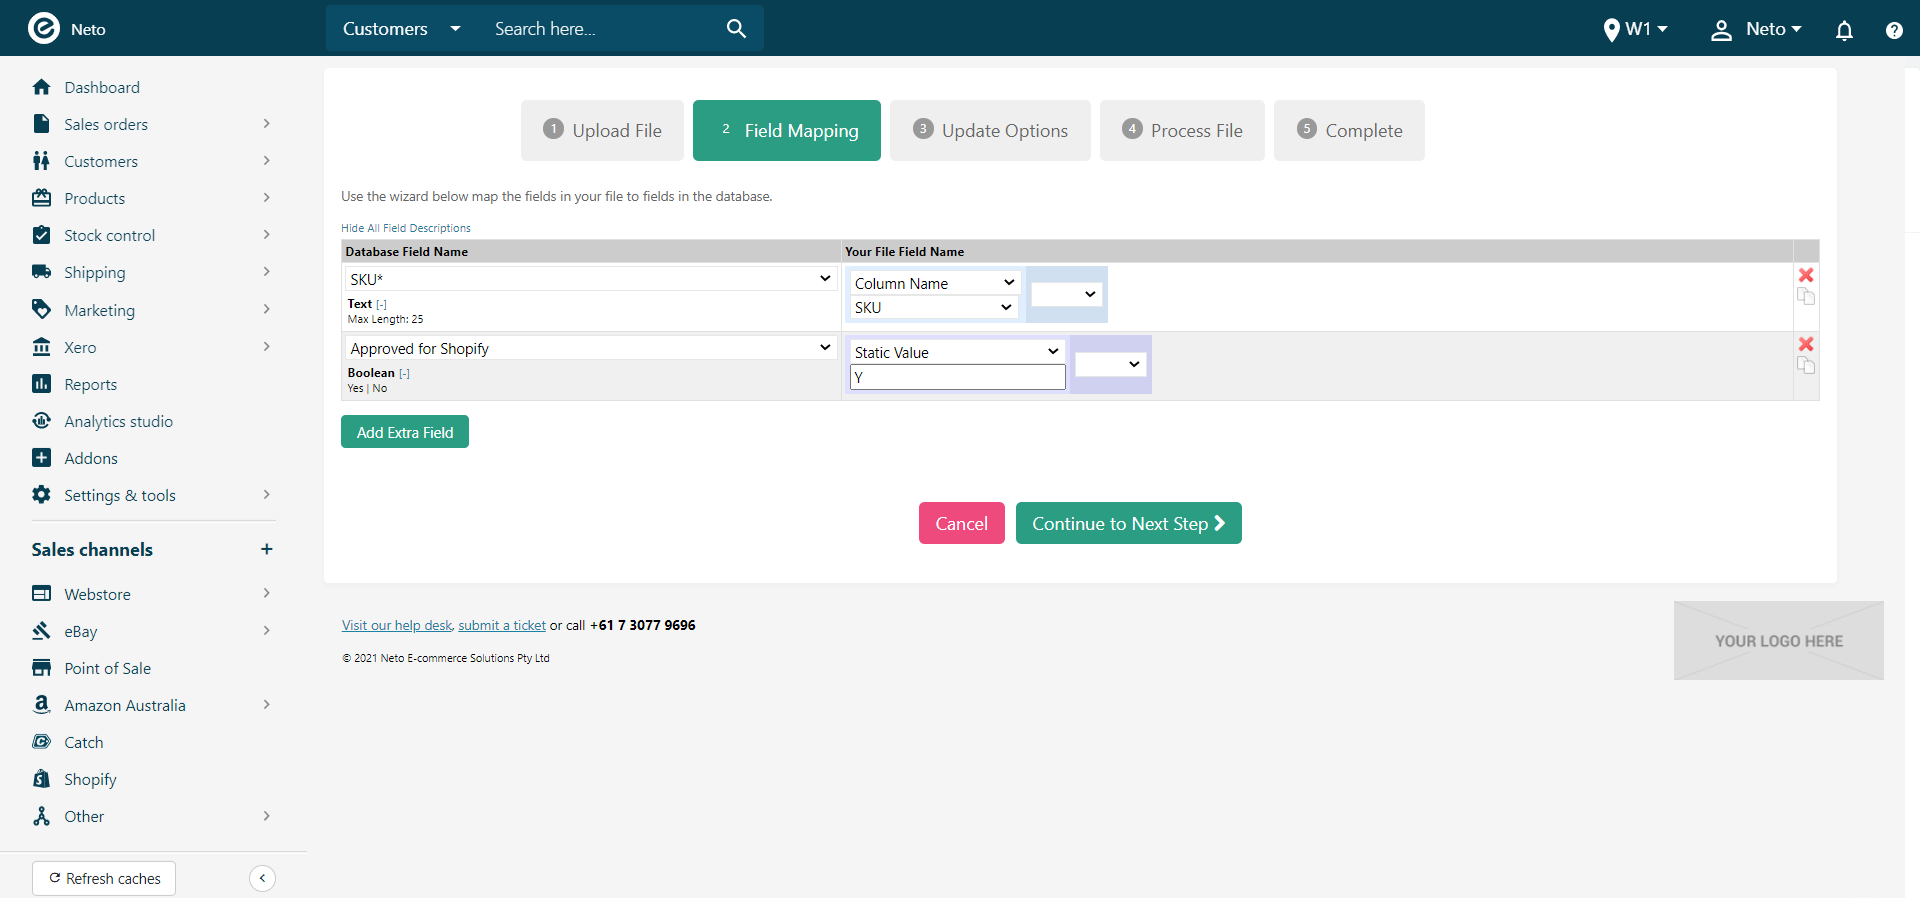
The SKU field in Maropost Commerce must be matched with the SKU field in Shopify.
-
Select ‘SKU*’ from the Database Field Name field dropdown menu.
-
Click the Add Extra Field button.
-
Select ‘Approved For Shopify’ from the Database Field Name drop down menu.
-
Change the Column name dropdown to ‘Static Value’ and a blank field will display beneath.
-
Enter ‘Y’ in the blank field. This will hard code the approved field so that it's yes for all the products you import.
> -
Click the Continue to Next Step.
-
Select Update Existing Products Only from the How Do You Want To update Your Database drop down box.
-
Click the Continue to Next Step button.
-
Click the Process File Now button.
Maropost Commerce will start updating all the product SKUs as Approved For Shopify. Allow up to 10 minutes to complete the import process depending on the number of products you’ve imported.
Maropost Commerce will now create products, and update the prices and stock levels of your products on Shopify.
Shopify Parcel Tracking
Dispatched orders can send the consignment/tracking number back into Shopify, so your customers can track their order correctly. To display the correct carrier in the customer notification, you need to map the Maropost Commerce shipping rates to the Shopify shipping method:
-
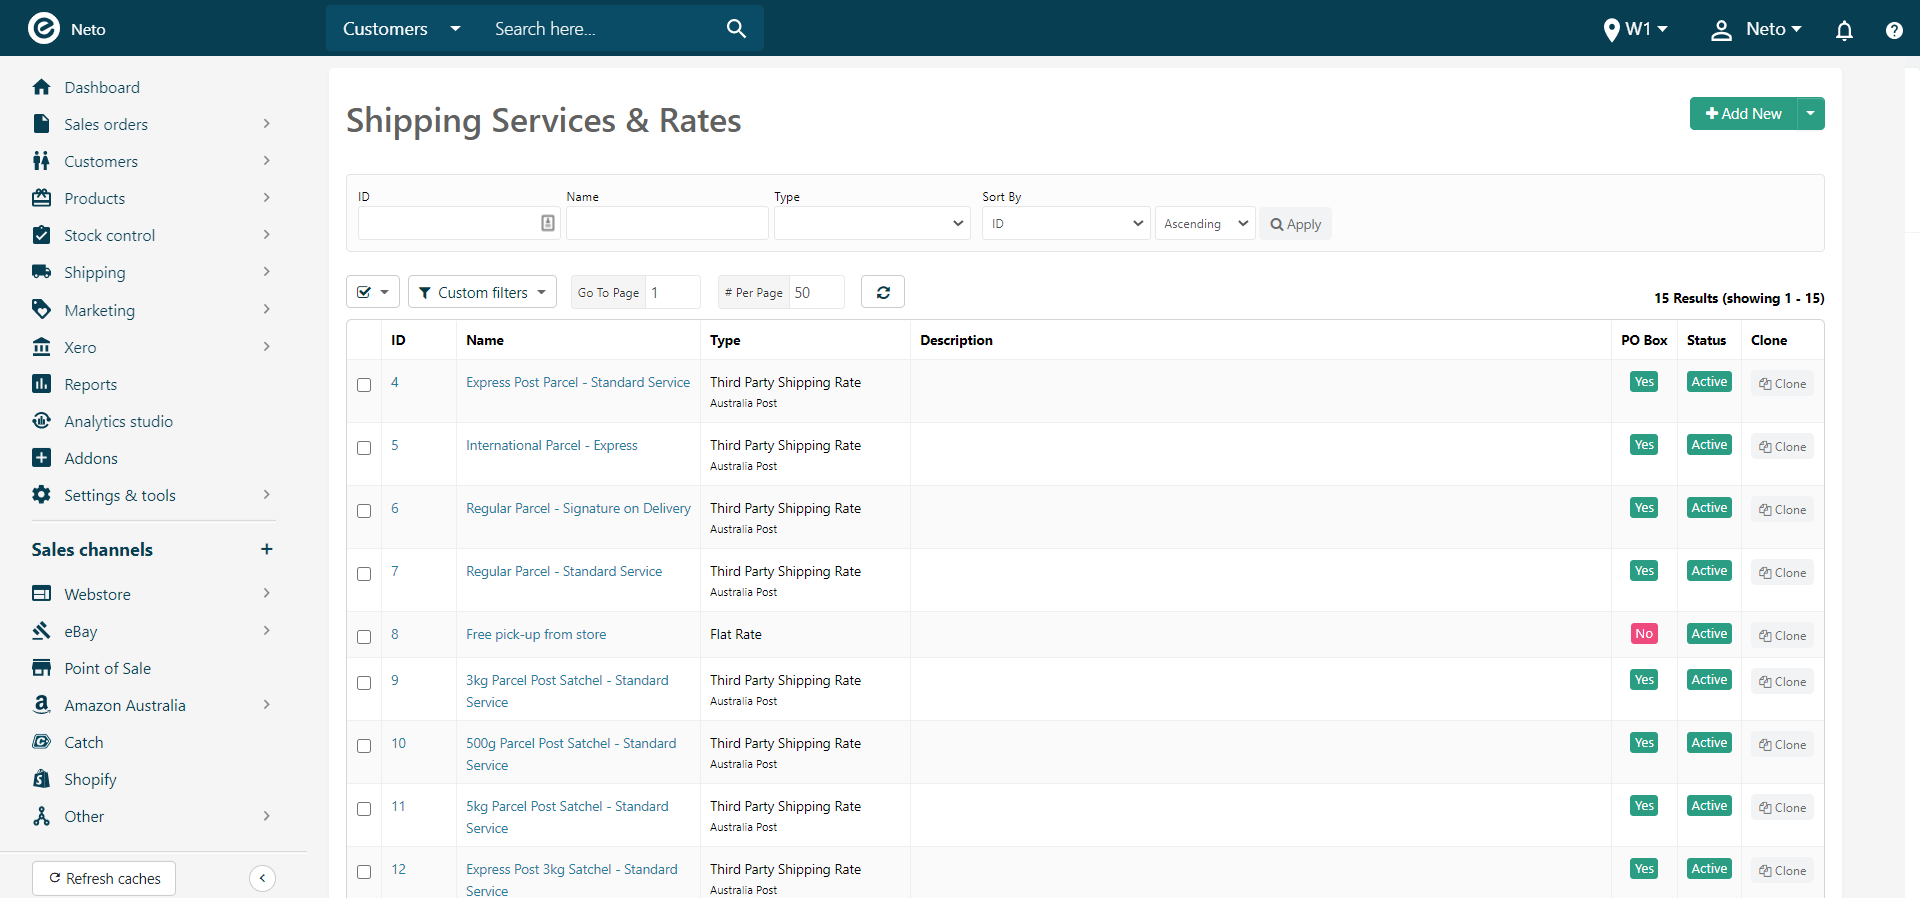
In your Maropost Commerce control panel navigate to Settings & tools > Shipping.
-
Click on Shipping Services & Rates.
-
Click on one of the shipping rates that you use for Shopify orders to edit its details.
-
Scroll down to the Marketplace carrier mapping section. In the drop down menu, select the carrier that these rates apply to for Shopify.
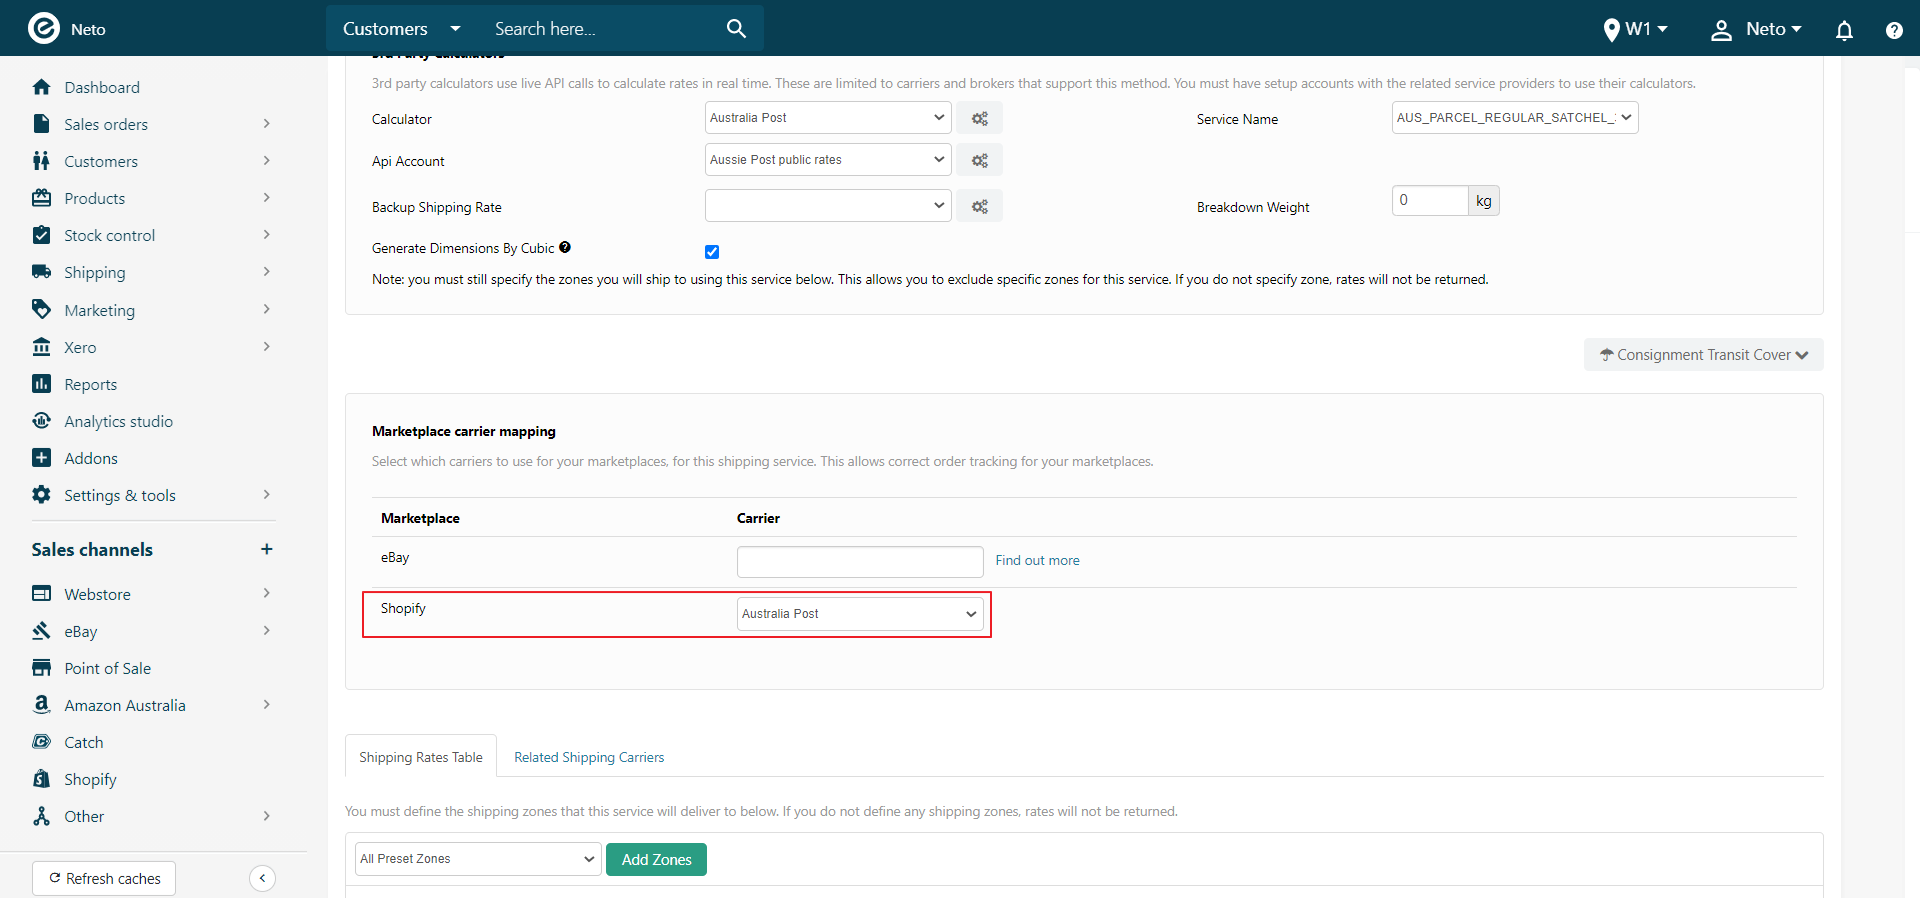
-
Click the Save & Close button.
-
Repeat these steps for any other rates you use for Shopify orders.
Map Payments for Unpaid Orders
Shopify payment methods which aren't mapped display as unpaid when they're imported into Maropost Commerce. To fix these, you need to find the payment method ID:
-
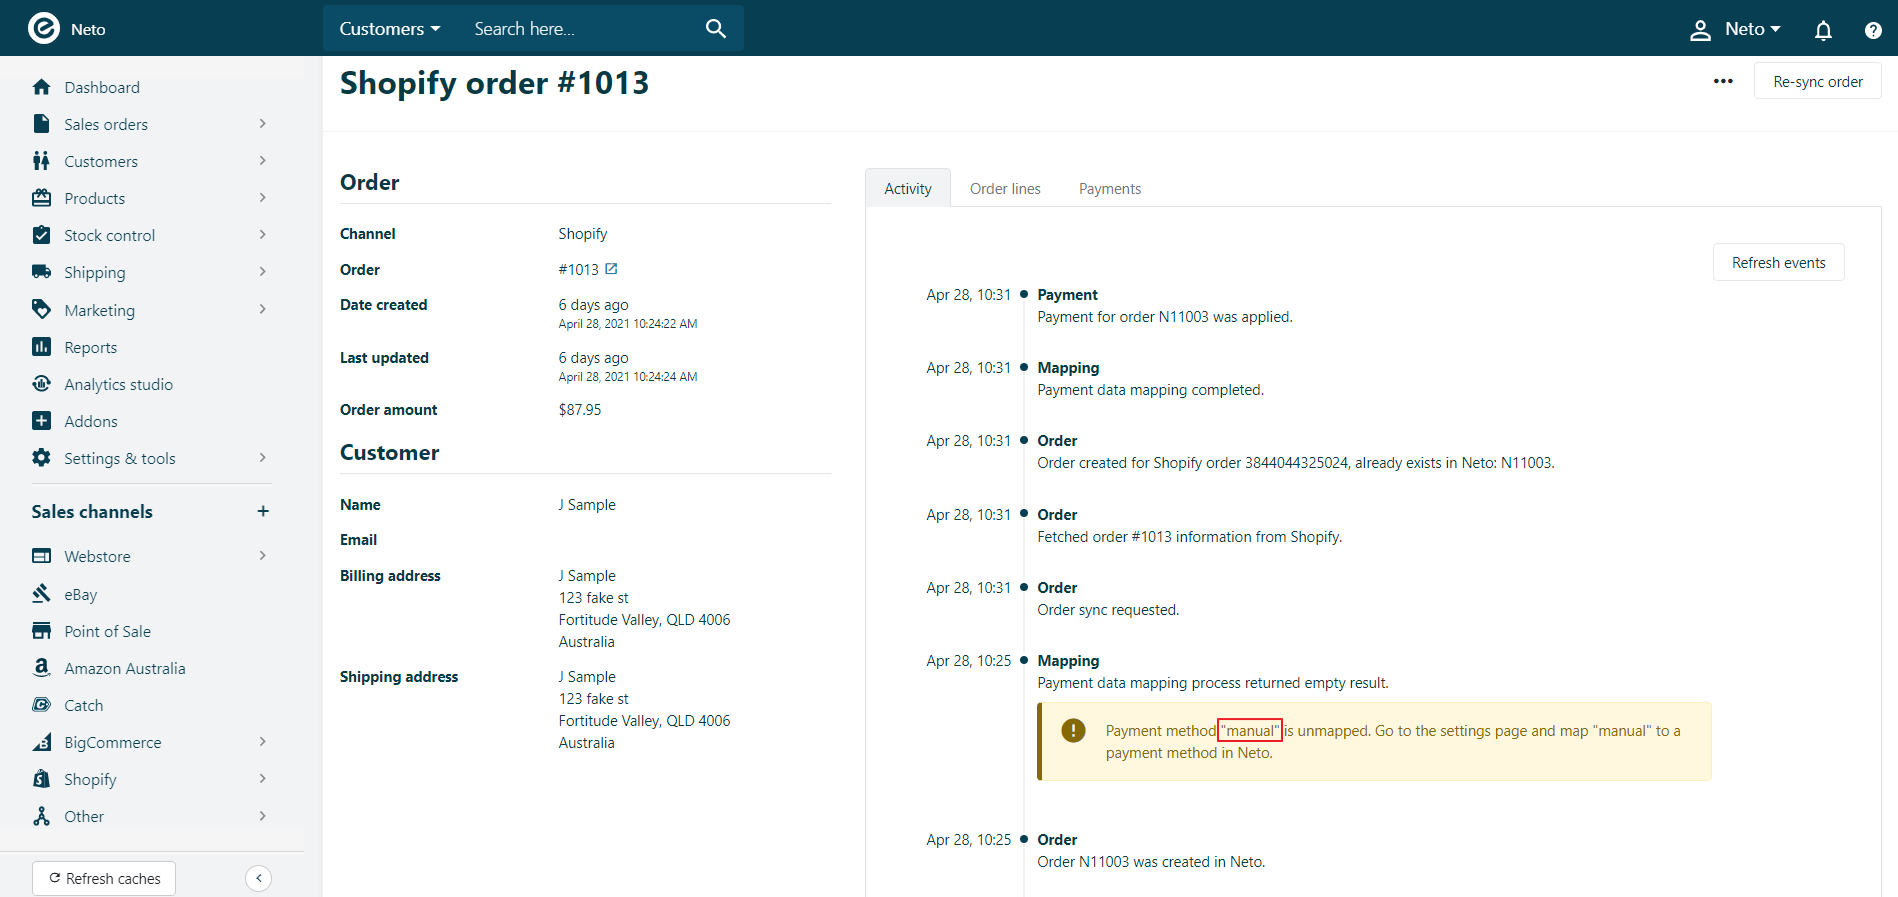
In your Maropost Commerce control panel navigate to Shopify > Orders.
-
Search for the unpaid order using the Maropost Commerce or Shopify order ID, and click on the Shopify order ID.
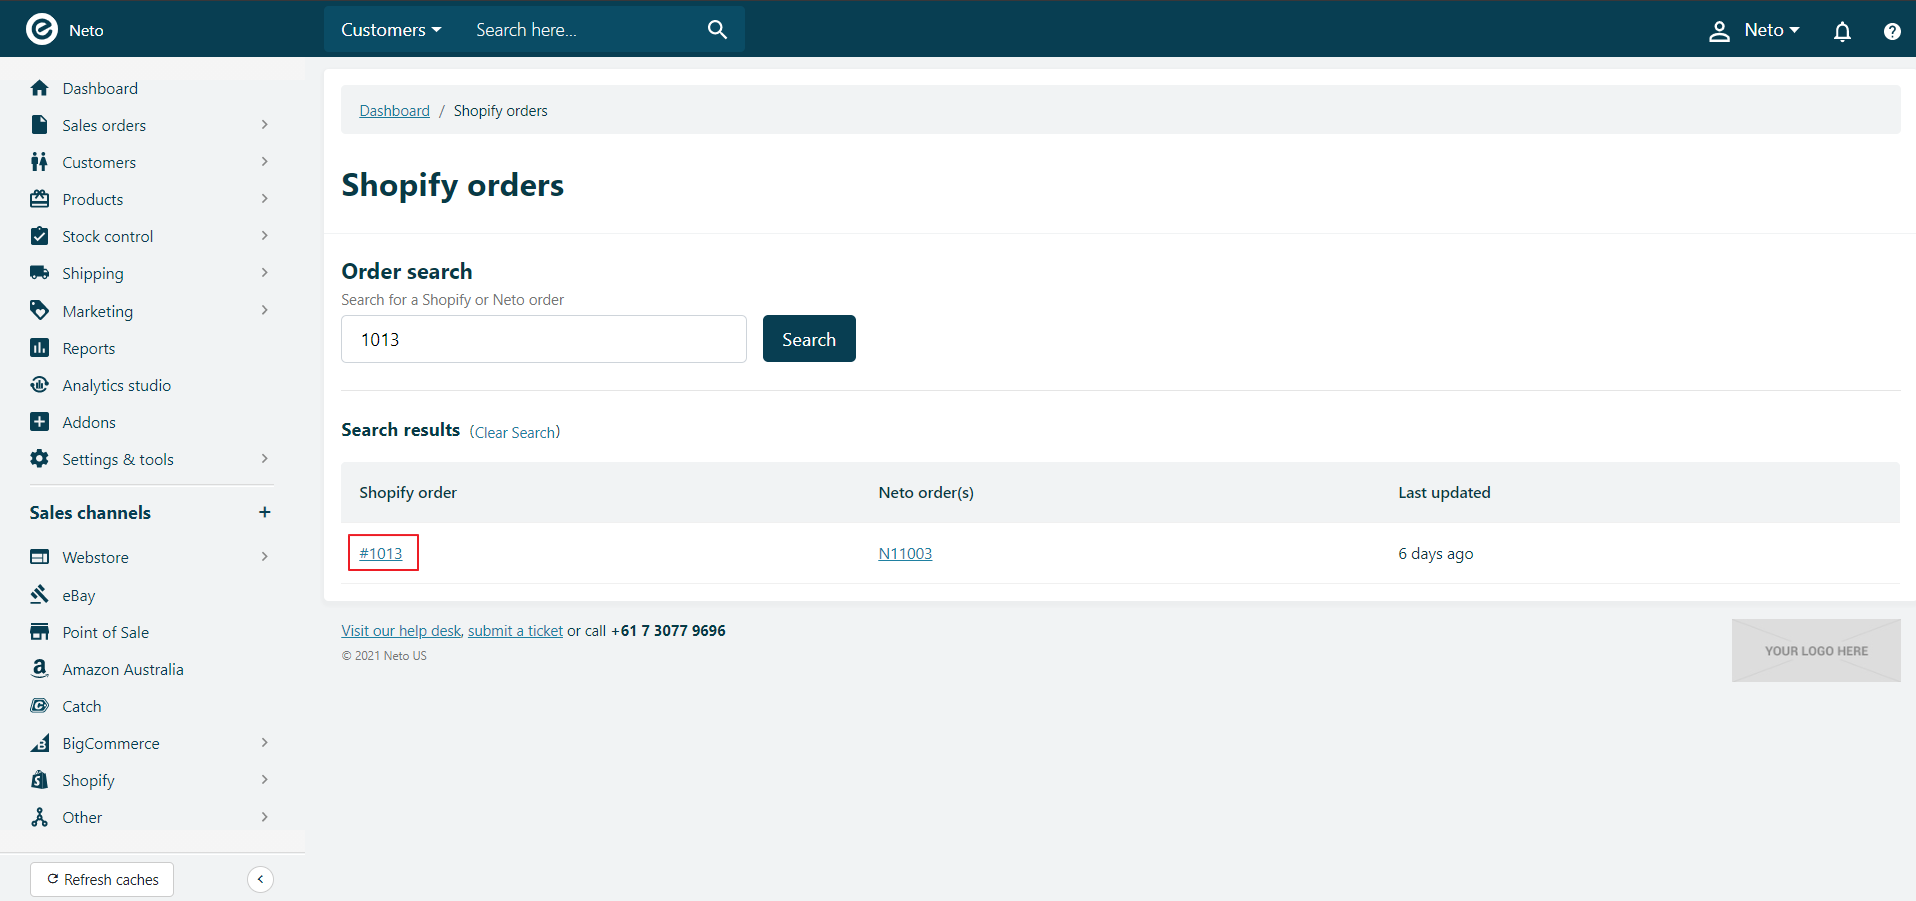
-
On the Activity tab look for the payment mapping error.
-
The unmapped payment ID is displayed so that you can map it in the Shopify > Settings page.