In this Article
Install Catch
To install Catch in your Maropost Commerce Cloud control panel:
-
In your Maropost Commerce control panel click on Catch from the side menu.
-
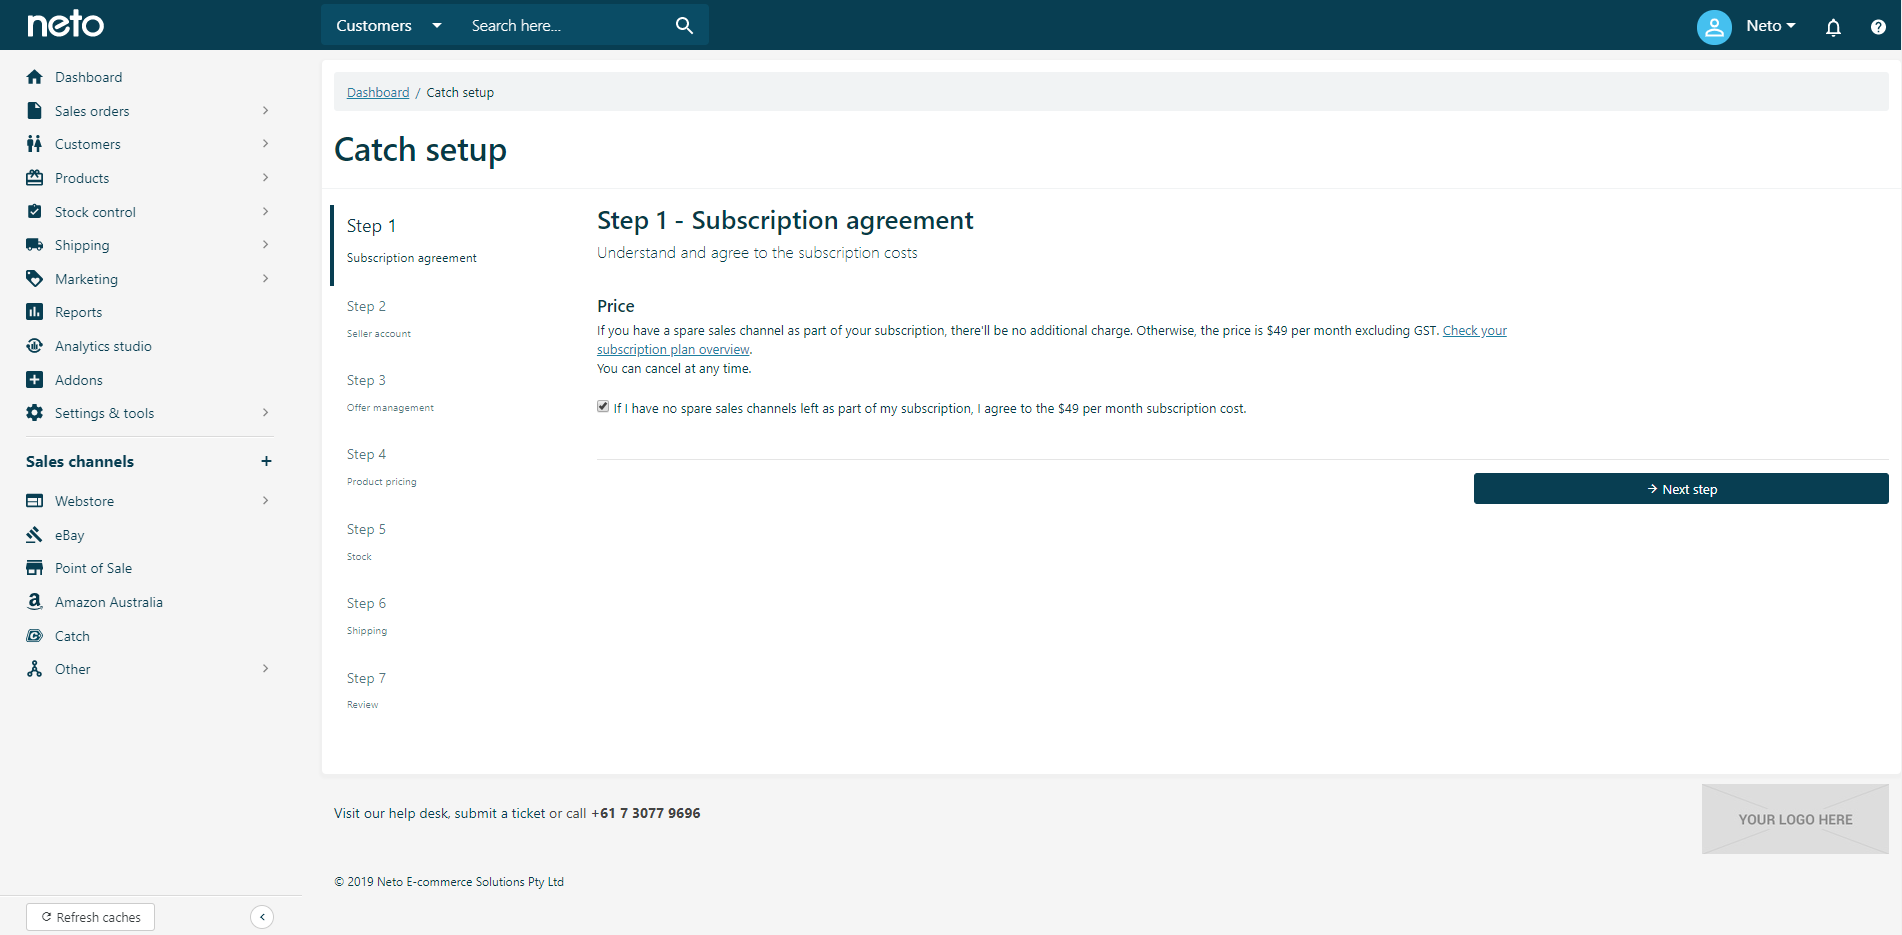
Click the Set up Catch button.
-
Select the checkbox to agree to a subscription upgrade if you have no sales channels available, and click the Next Step button.
Link your Catch Account
You now need to add your Catch account API key so that Maropost Commerce can connect to it. To find your API key:
-
Log in to your Catch account. If you don't have a Catch account sign up here.
-
Click on your email address / username in the top right corner of the page.
-
Click API Key (under My User Settings).
-
Click the Generate a New Key button.

-
Copy the API key that appears, and paste it into the API Key field in Maropost Commerce. Then click the Next Step button.

Offer Management
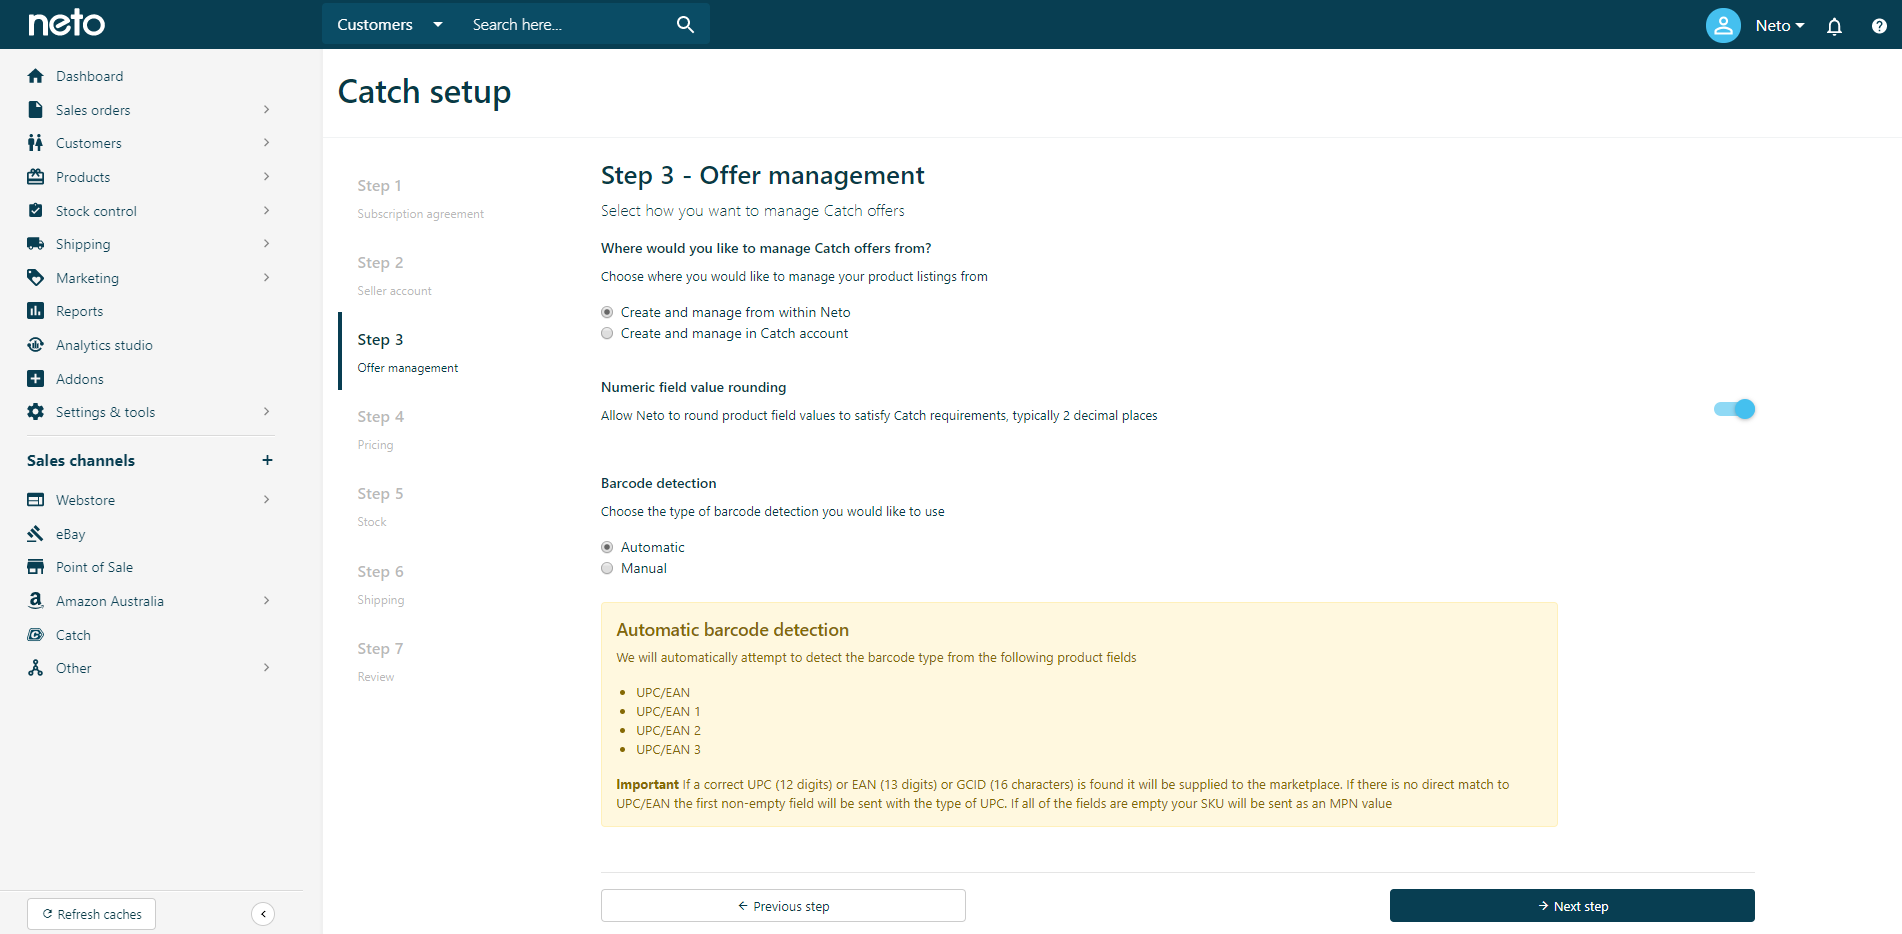
Offer management determines how your products on Catch are controlled. The set your offer management:
-
Select the radio button that indicates how you want to manage your offers, in Maropost Commerce or in Catch. If you select Catch, no products or stock levels will update from Maropost Commerce, the integration will only manage sales orders.
-
Select the Allow Maropost Commerce to round product fields toggle to ensure weight, length, width and height fields meet Catch’s requirements.
-
Select if you want barcodes automatically detected, or if you want to define them manually. Automatic detection looks at the UPC/EAN fields on the product to determine what type they are. If you choose manual you will need to map the product field and barcode type in the Catch product field mapping.
-
Click the Next Step button.
Product Pricing
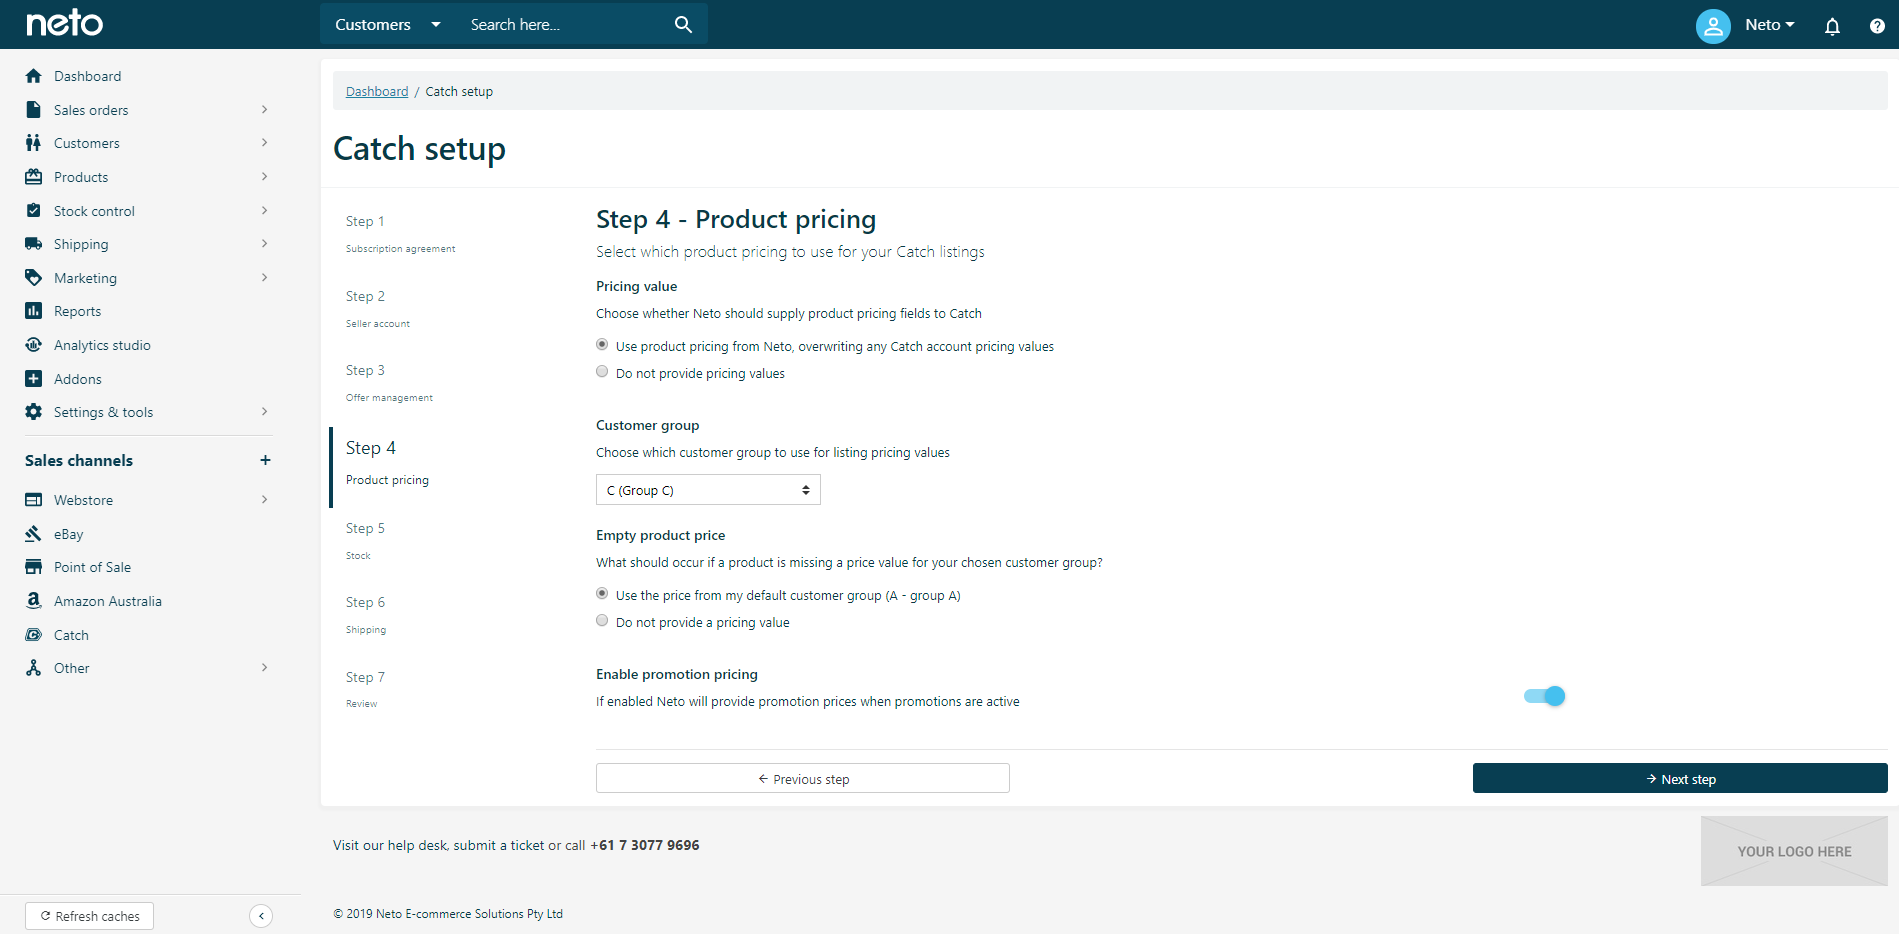
In this step you set up the product prices you want displayed on Catch, and can enable promotion prices. To set your product pricing:
-
Select the radio button to choose if product prices are sent from Maropost Commerce or not. If you choose to not provide prices from Maropost Commerce, you will need to update prices in Catch.
-
If prices are updated from Maropost Commerce, you can select a specific customer group for the prices.
-
If you select a customer group other than the default, you can choose what happens if products don’t have a price for that group. Select either Use the price from my default customer group or Do not provide a pricing value.
-
Toggle the Enable promotion pricing setting if you want Catch to receive promotion prices.
-
Click the Next Step button.
Stock
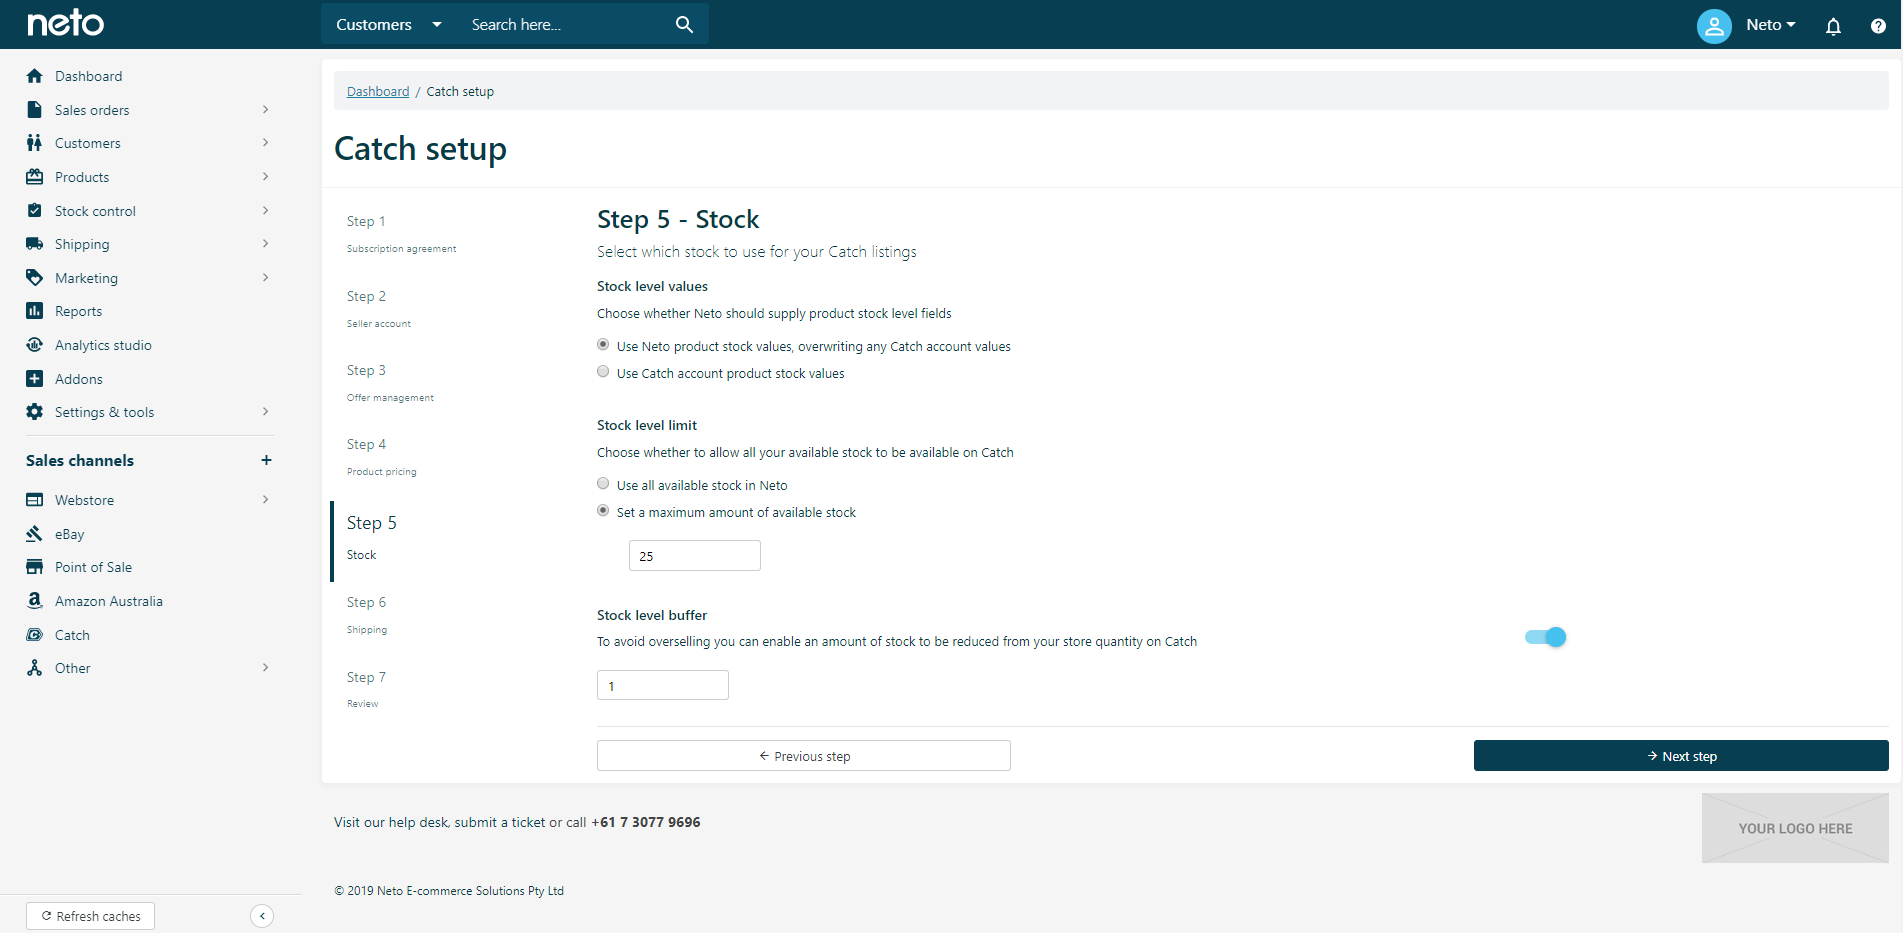
In this step you can set up how much stock (inventory) is uploaded to Catch, and how it is managed. To set your stock settings:
-
Select the radio button to choose if stock levels are sent from Maropost Commerce or not. If you choose to not provide stock from Maropost Commerce, you will need to update stock levels in Catch.
-
If stock is managed from Maropost Commerce, you can choose to list all stock, or set a maximum amount to list for each product.
-
The Stock level buffer will help prevent overselling by hiding an amount of stock from Catch for other sales channels. Set a buffer amount (optional) and click the Next Step button.
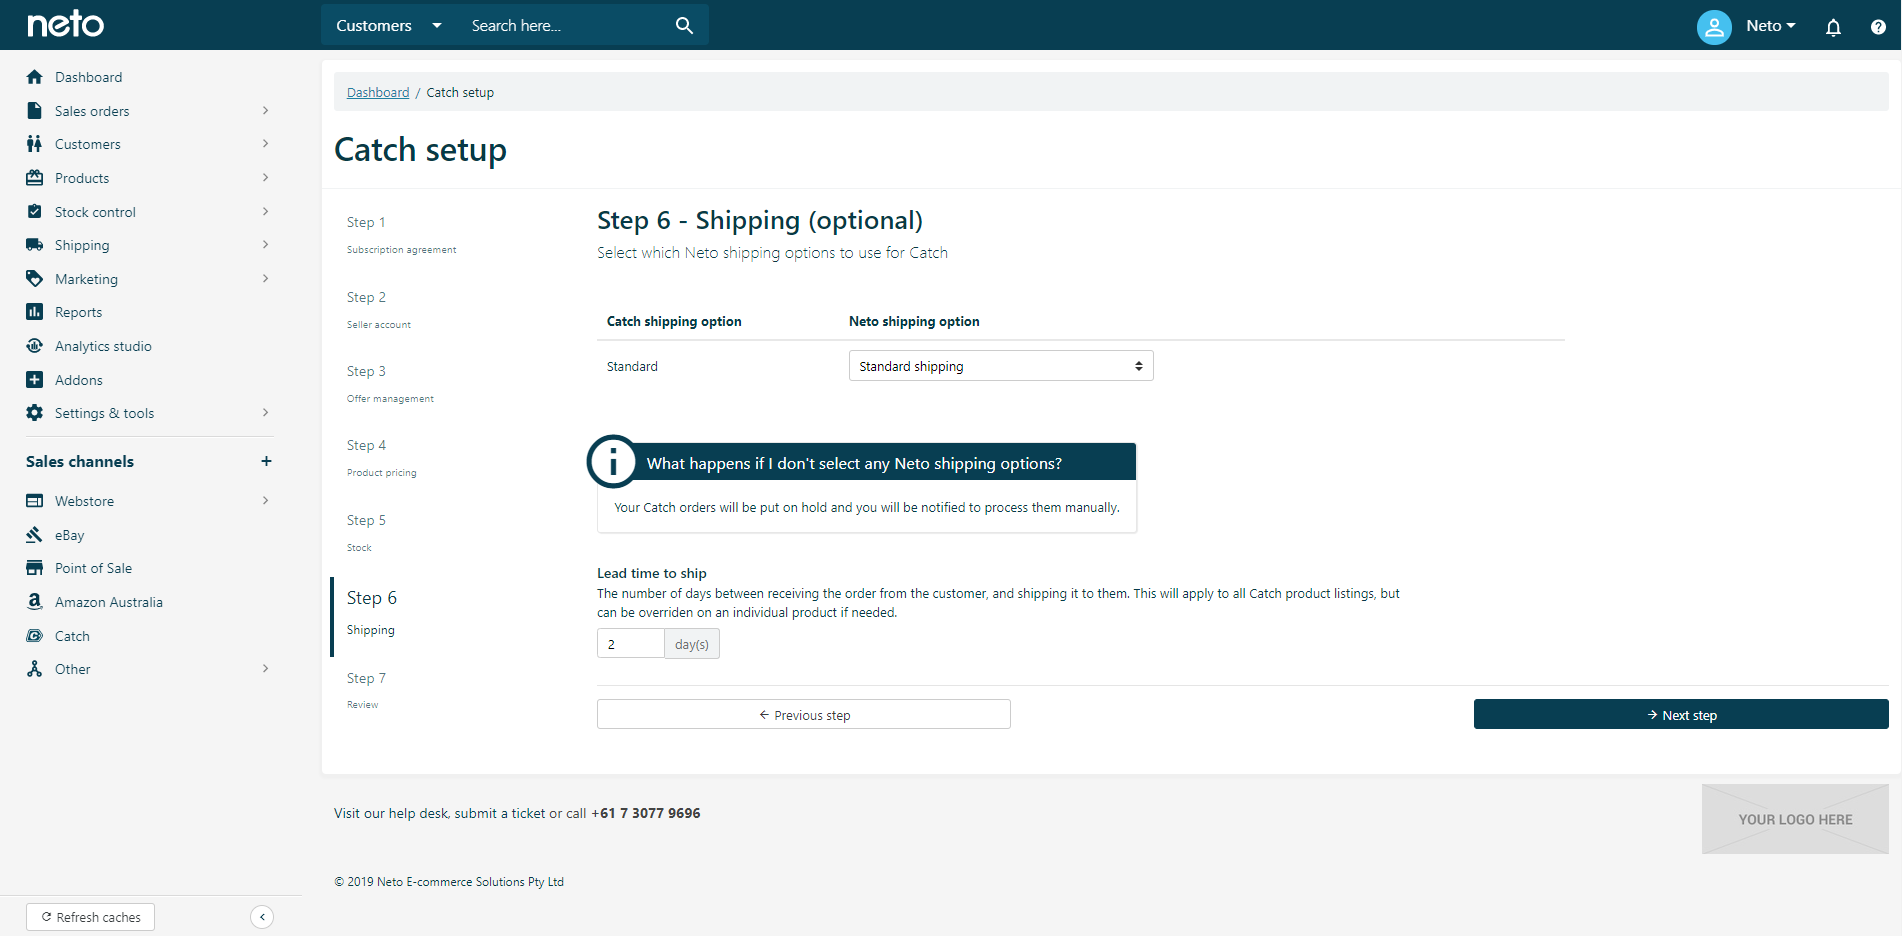
Shipping
To set your shipping settings:
-
In the shipping step, select a shipping option in Maropost Commerce to appear on Catch sales orders automatically.
-
Set a default Lead time to ship your sales orders. You can override this value on products that may have a longer handling time. Then click the Next Step button.
Tip: Catch only supports one tracking number per order, so we don't recommend that you split or combine Catch orders.
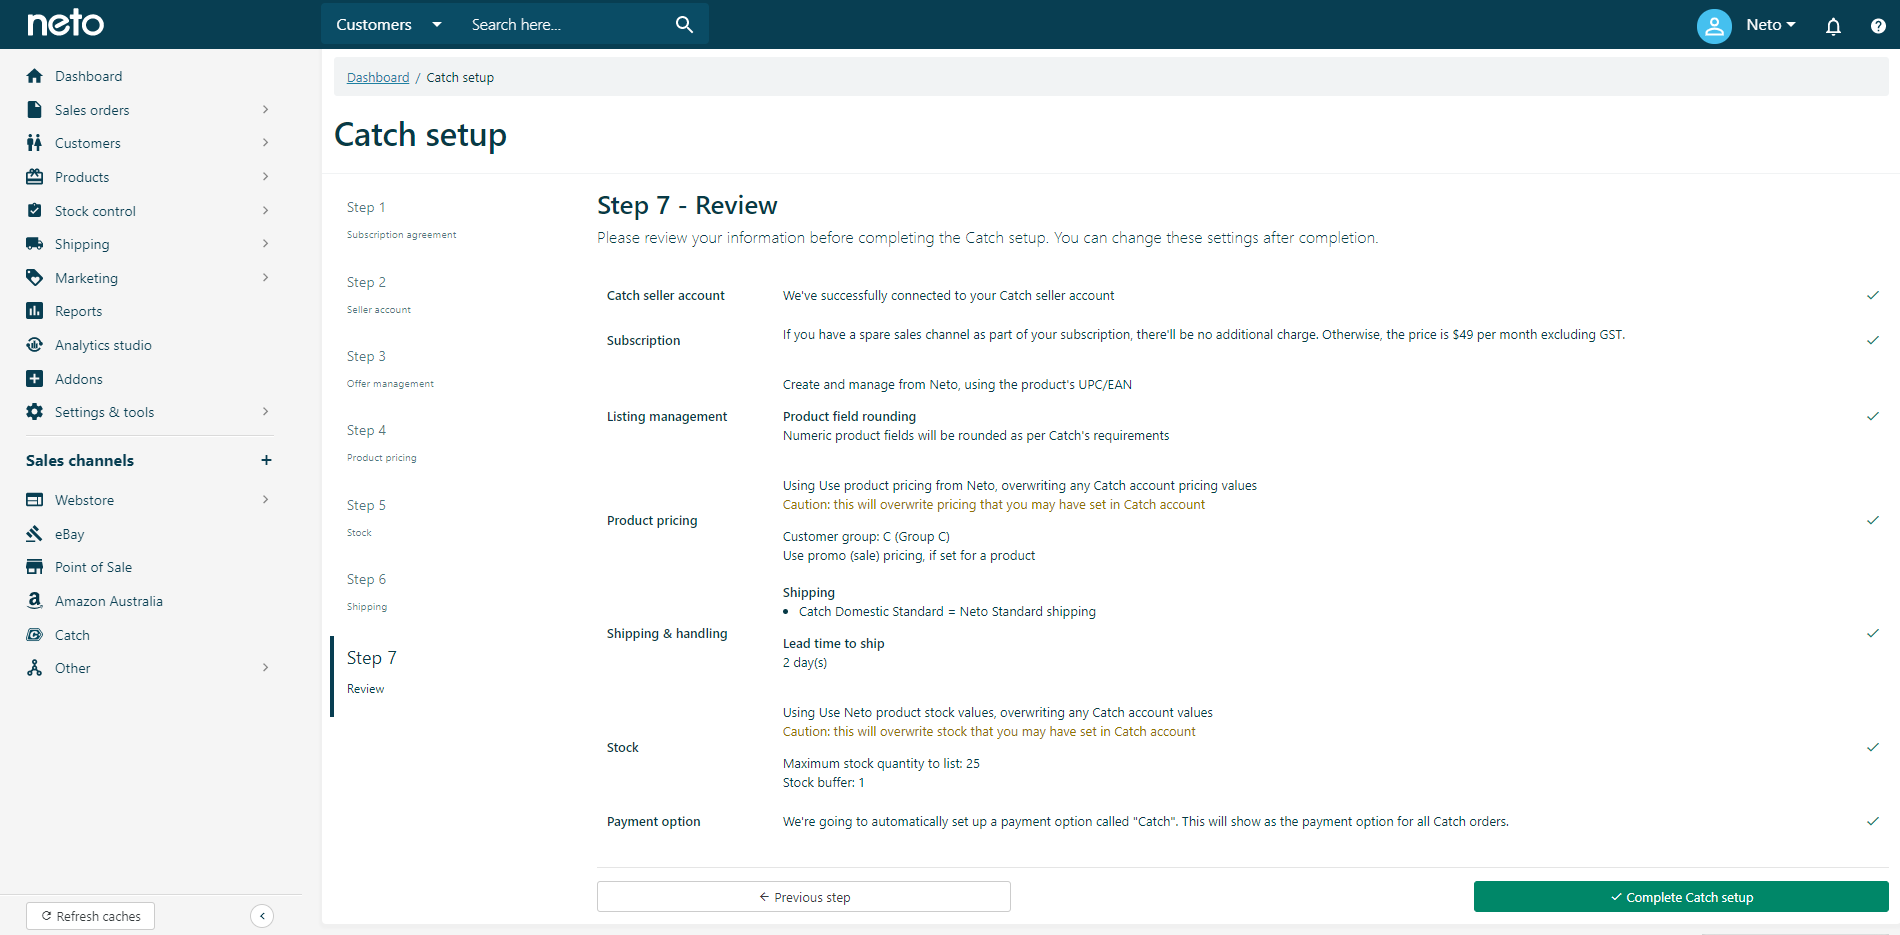
Review
Review all the settings for your Catch integration to ensure it is set up to your satisfaction. Click the Complete Catch setup button and your integration with Catch will be enabled.
Carrier Mapping
We strongly recommend that you set up carrier mapping before moving on to product field and category mapping. Carrier mapping tells Catch which shipping carrier an order has been sent with, so that they correct tracking details are given to your customer. To set up carrier mapping:
-
In your Maropost Commerce control panel navigate to Shipping > Shipping Options.
-
Locate a shipping option which will be used for Catch orders, and click on the link under the Service/Rates column.
-
In the Marketplace carrier mapping section, select your Catch shipping carrier from the drop down menu. If your carrier is not in the list, select Other and type the name of the carrier in exactly.
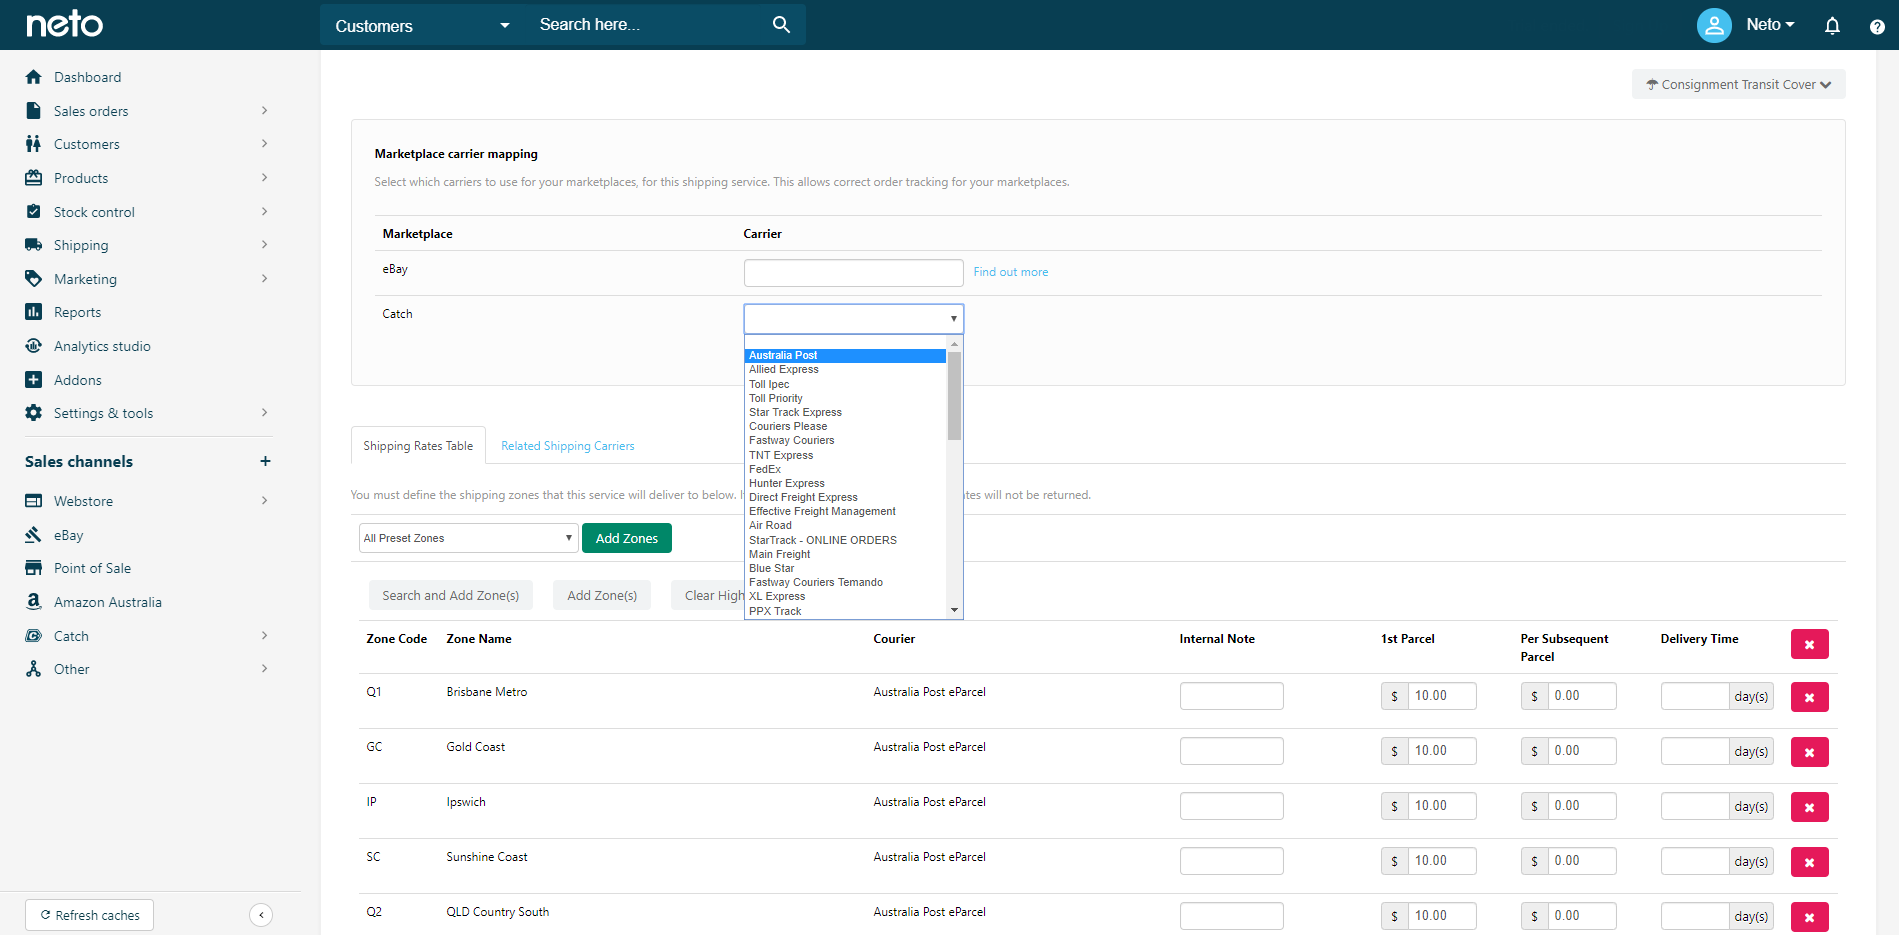
-
Click the Save & Close button. Repeat these steps for any other shipping options you use to dispatch Catch orders.
Your control panel is now connected to Catch and set up to sync data. We recommend that you set up Catch category and field mapping before approving products to list on Catch.
Related Articles