Neto's import and export wizards are powerful tools that allow you to manipulate information on your products, customers, categories, sales orders and content through automated and scheduled processes. These tools can push and pull data in from third party applications, spreadsheets, and other formatted files to populate your Neto control panel, make changes in bulk, or receive updates on a regular basis.
File Data
When importing data from a different site or getting information from suppliers, it's imperative to be able to easily import the data into your webstore. In Neto you can import:
- Products & Product Categories
- Content
- Customers
- Orders
- Order shipping tracking, status updates and proof of delivery data.
Data can be imported from XML or CSV files. Exports can also be generated in XML or CSV format, though CSV is easier to manipulate.
You can convert an Excel file into a .CSV file by using the Save As File Type feature, and selecting CSV, which is in all versions of Excel. For Mac users, ensure you save the CSV in MSDOS format.
Templates
Import and export processes can be run as a one-off or you can set up schedules to import on a regular basis. Schedules require a template so that the same fields and settings can be applied each time the process is run. Templates can be created manually or during the import or export wizards. Templates save settings so that you can easily import or export data in the same format again.
Import Templates
- In your Neto control panel, navigate to Settings & Tools > Import Data.
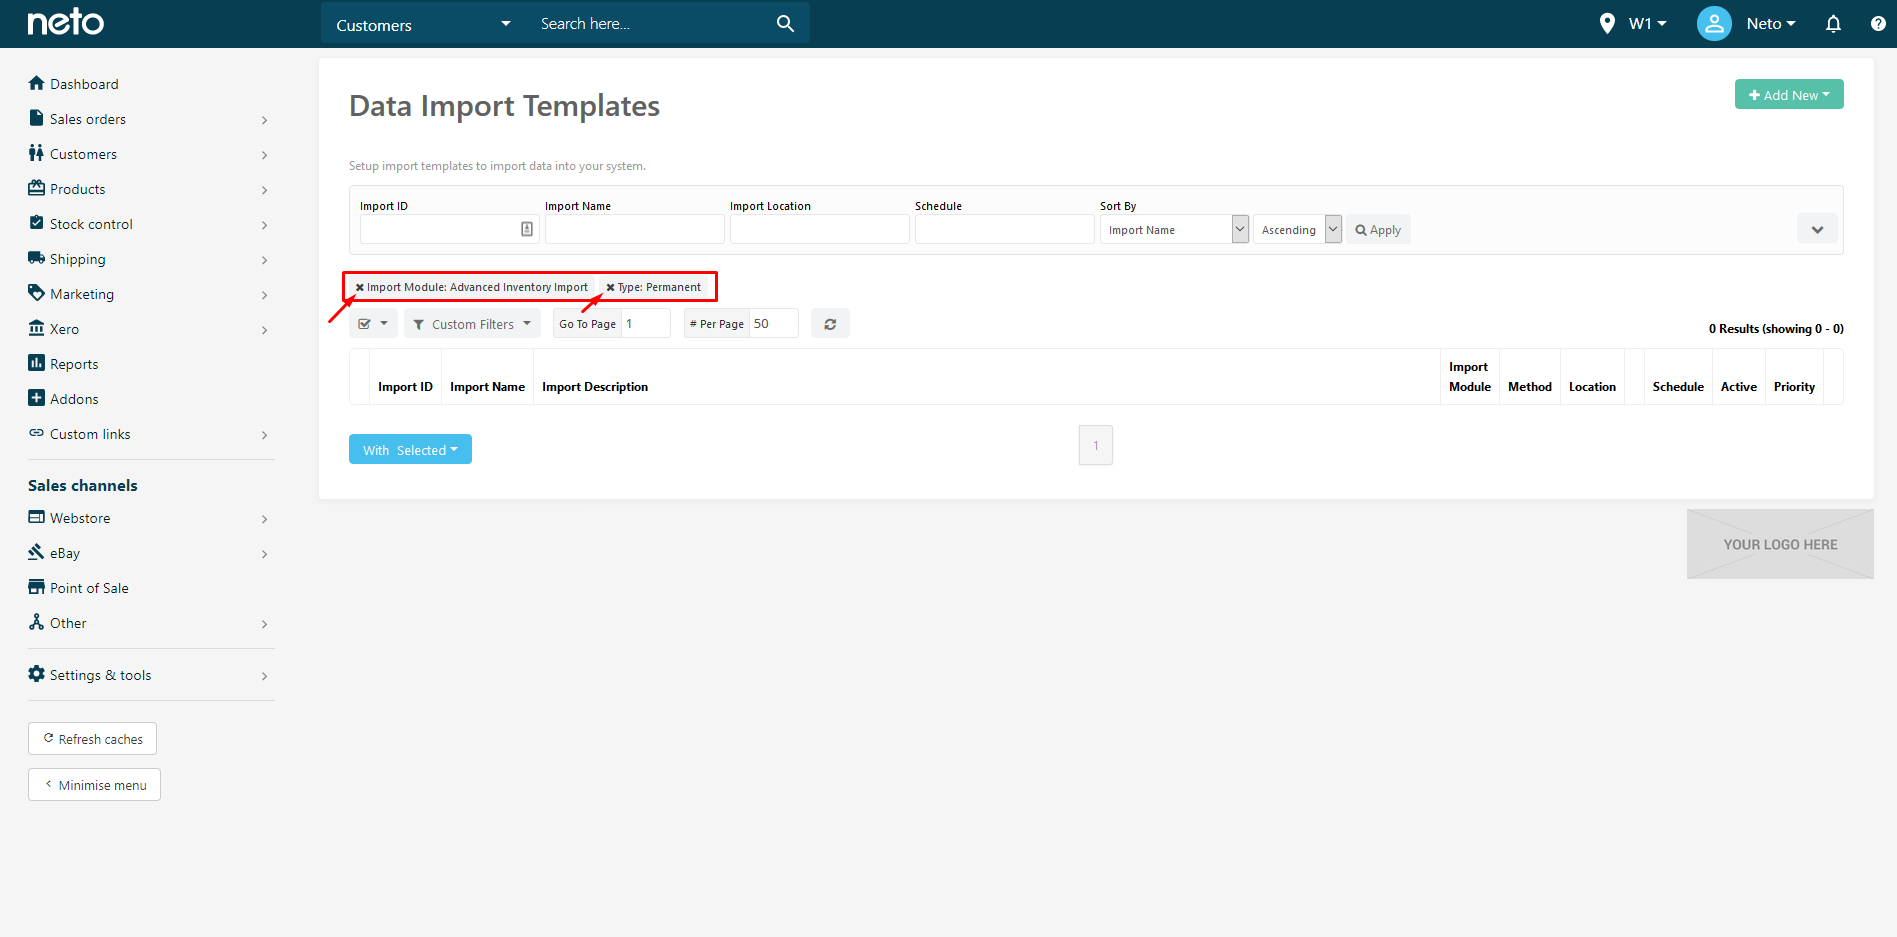
- Click the Perform complex import button and choose Use Existing Custom Import Templates.
- The inventory import templates will display by default. If you want to view the other templates, simply remove the two filters as per the screenshot below.
Export Templates
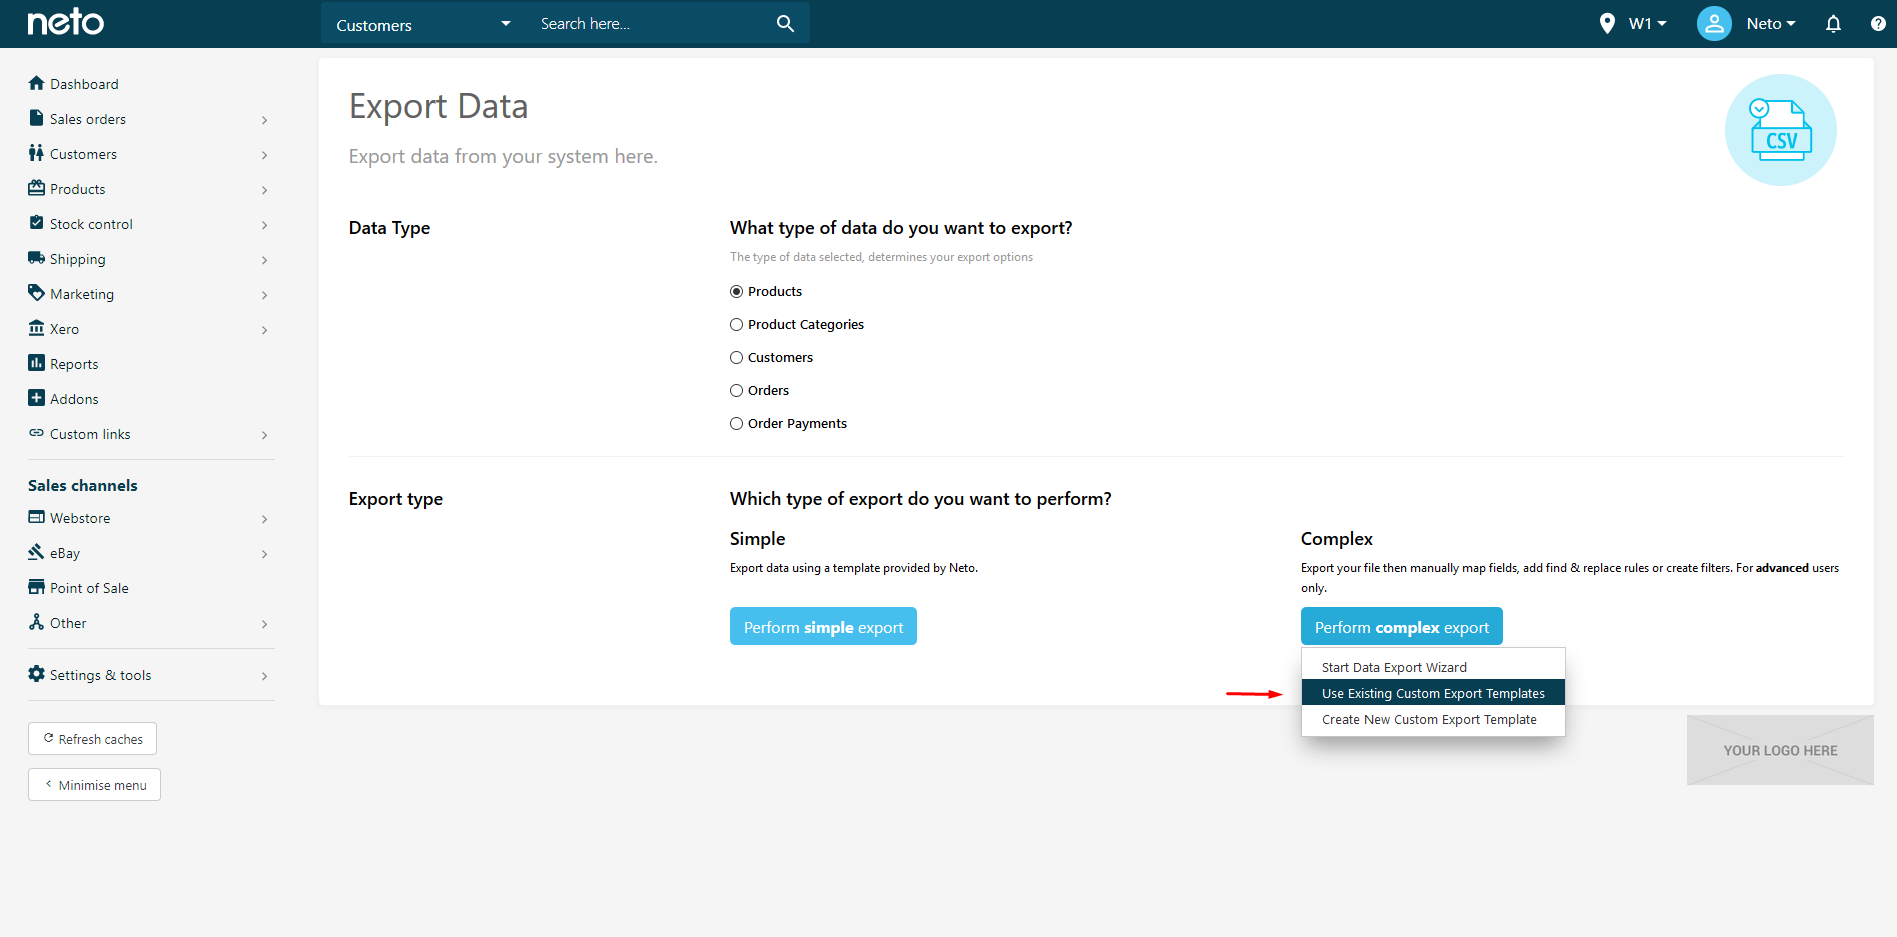
- In your Neto control panel, navigate to Settings & Tools > Export Data.
- Click the Perform complex export button and choose Use Existing Custom Export Templates.
Advanced Field Mapping
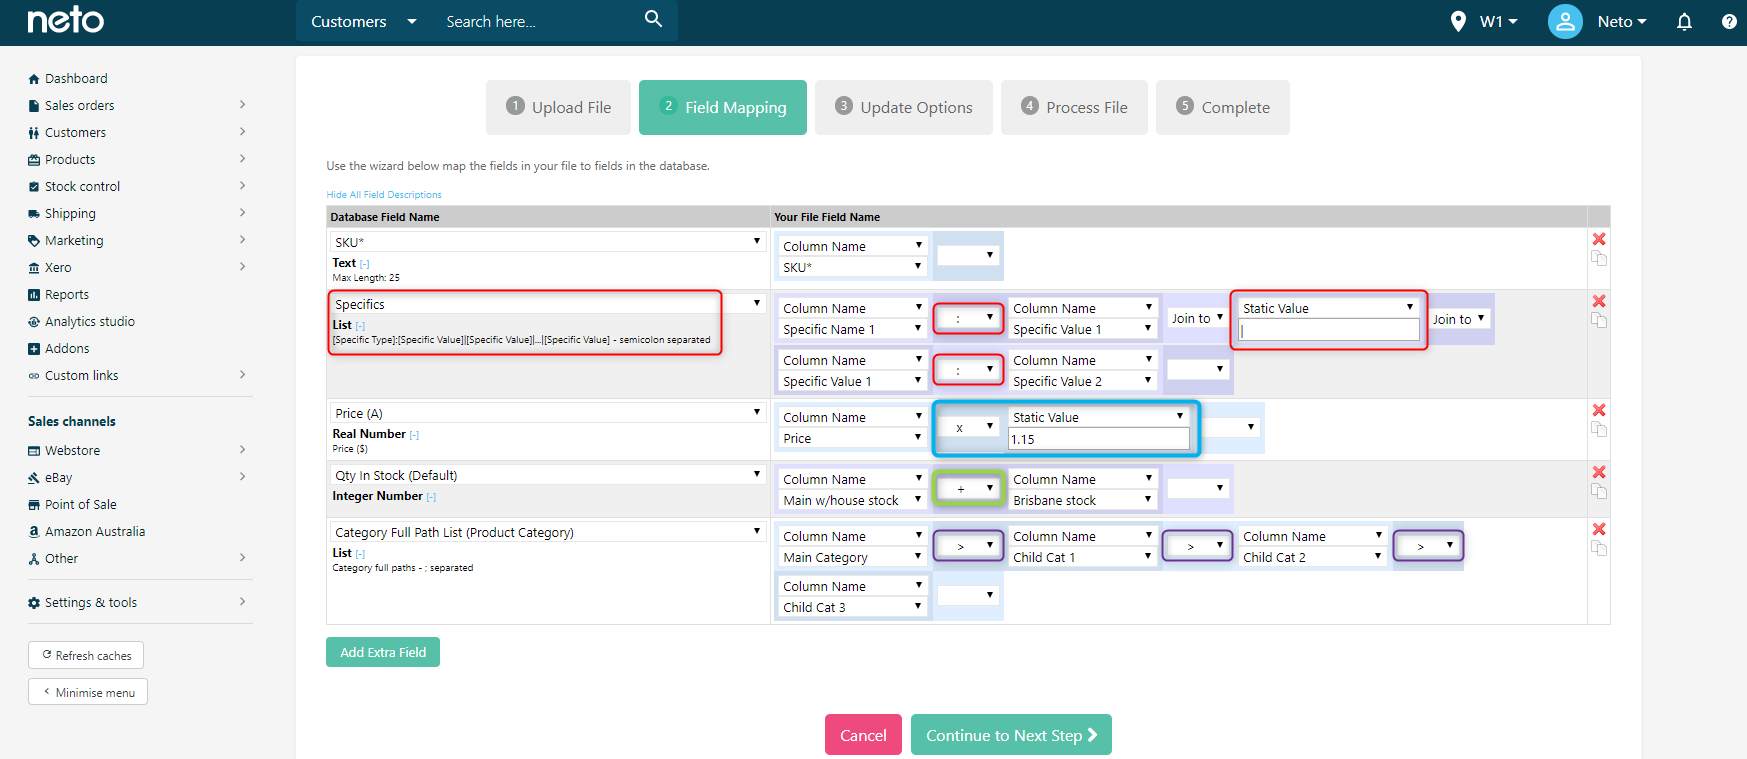
In step 3 of the import wizard you'll need to map the Neto database fields to the fields in your spreadsheet. This is a powerful tool with lots of functionality beyond matching up one field to another. For example, if a value is going to be the same for each product you're importing, you can instead map a static value. You might use this when flagging products as Active, by setting the static value to Yes.
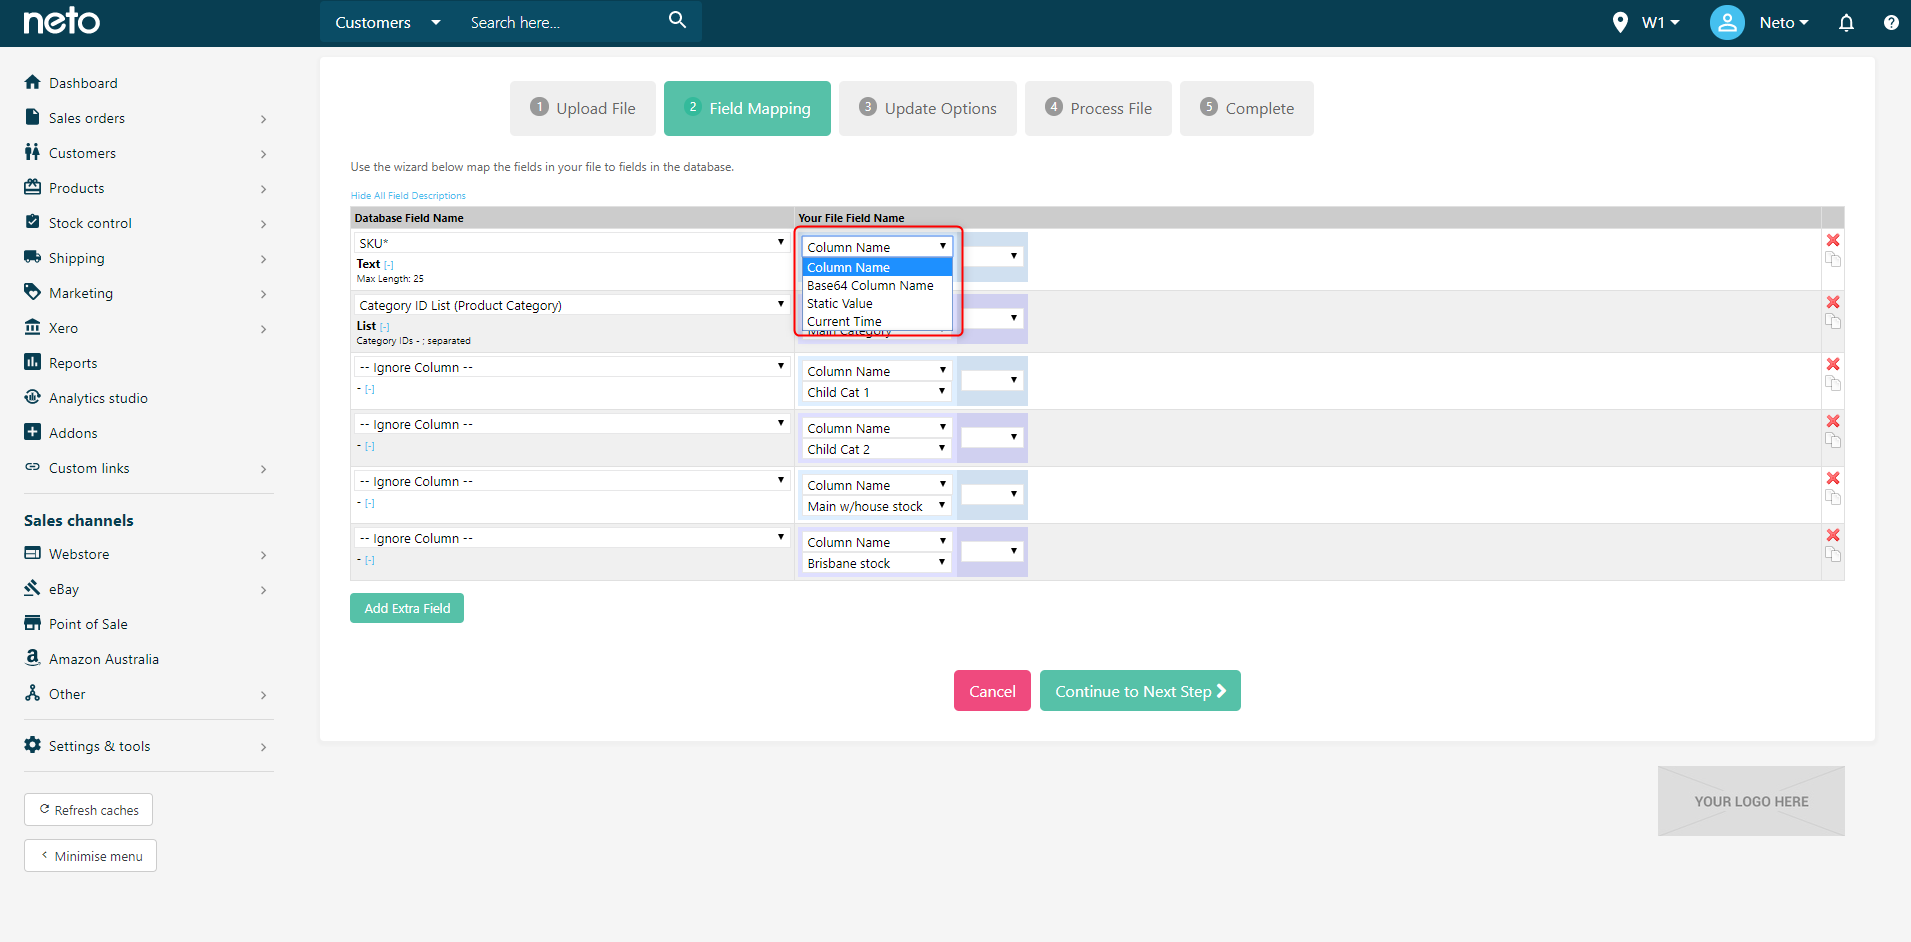
You'll also notice tools for performing calculations, joining fields, and inserting characters or values.
The Join to option allows you to map one or more columns from your spreadsheet to a single Neto database field. You can also join spreadsheet fields to static values that you define during import. For example, join a subtitle to the static value stocktake sale on now to add this line of text to your product subtitles.
You can use fields from your file more than once. For example, you can map the customer address field in your file to their Billing Address and Shipping Address.
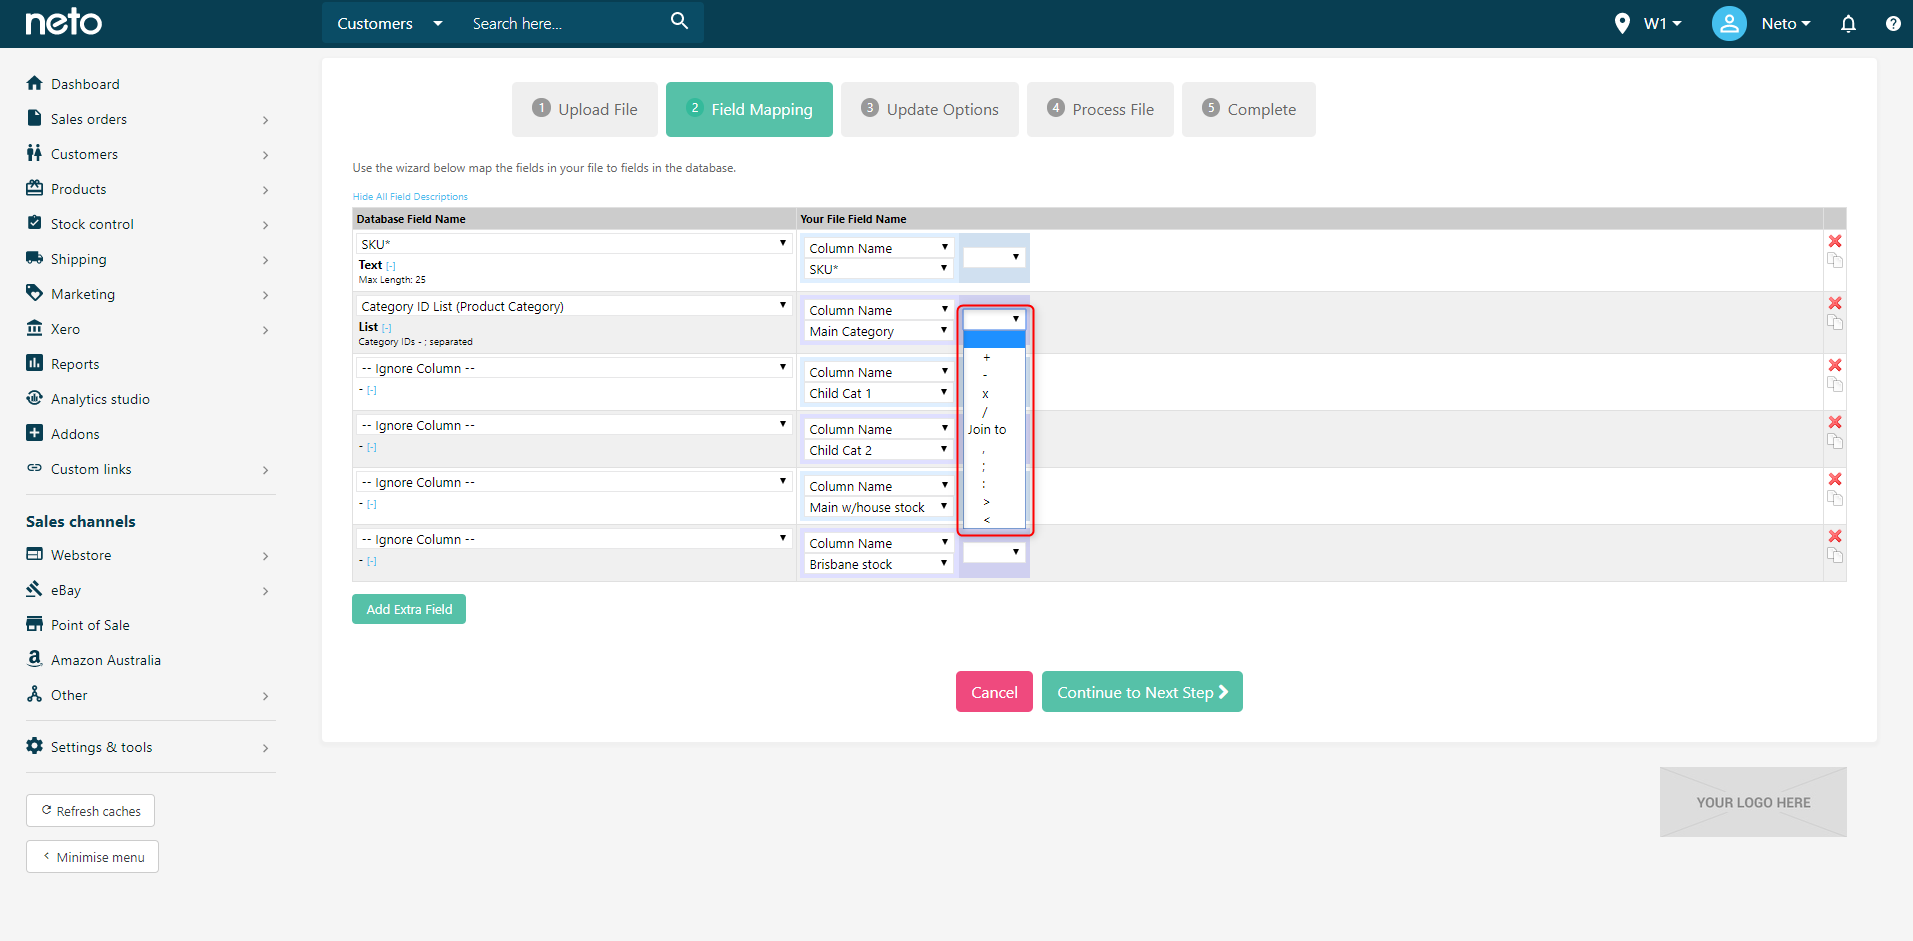
There are 4 calculation tools (add, subtract, multiply, divide) that can be applied to numerical fields such as price, or warehouse stock. A simple use for the calculation tools is to increase price by multiplying your existing price
There are also 5 characters that can be inserted before, after, or in between fields: comma (,), semi-colon (;), colon (:), greater than (>), and less than (<). These symbols are used as formatting for certain fields in Neto, such as category separators (greater than), specifics (colon), or to denote the end of certain fields (semi-colon).
The image below shows just how some of these join to, static value, and calculation fields work in a practical sense.
Schedule Recurring Imports & Exports
Now that you've saved and imported your order import template as per above, you can turn this into a regular recurring data feed to automate this process whenever you like.
- In your Neto control panel navigate to Settings & Tools > Import Data.
- Click Perform complex import and select Use Existing Custom Import Templates.
- Click on your order template to setup the import schedule.
- Scroll half way down the page and click on the Import Method & Schedule tab.
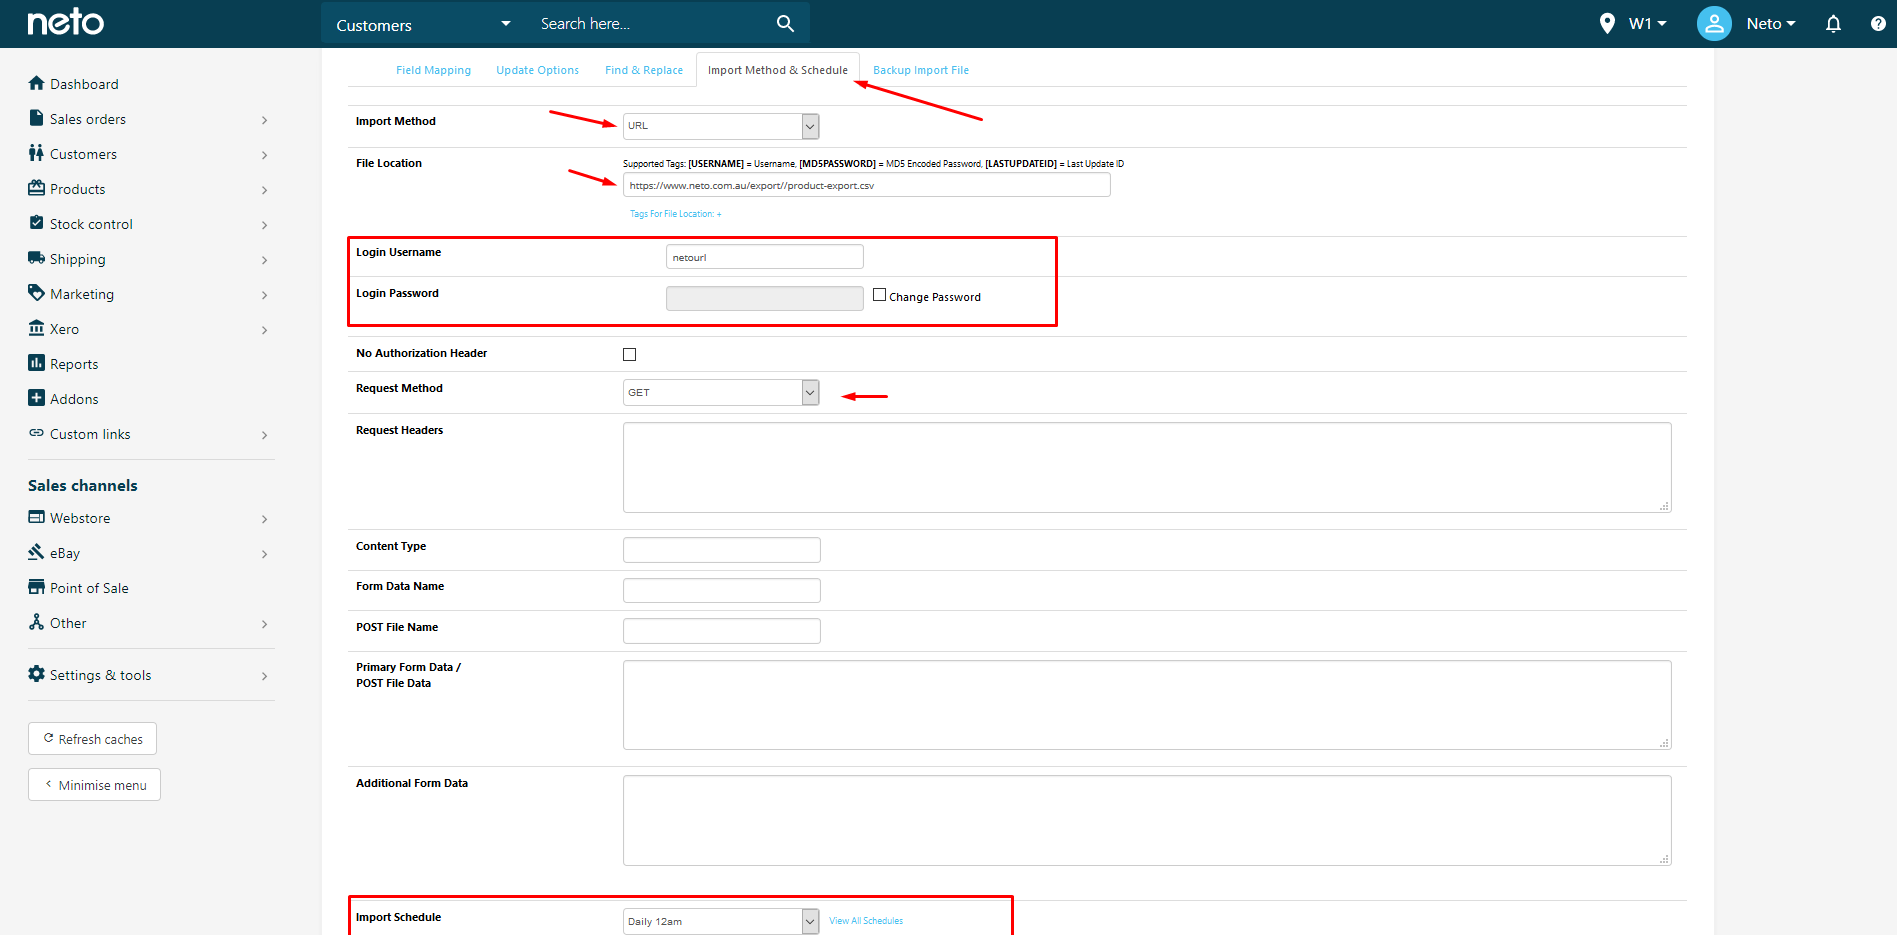
- Enter the Import Method you wish to use to upload your file automatically to the system (selecting either FTP site or a URL) and filling out the file location. If you plan to use FTP, add the login and password details in the section underneath.
- For Request Method, select GET.
- Scroll down to Import Schedule which you can select the time and dates for the data to be imported.
- Click Save Changes and your feed will now be active and automated.
Import & Export Batch Processes
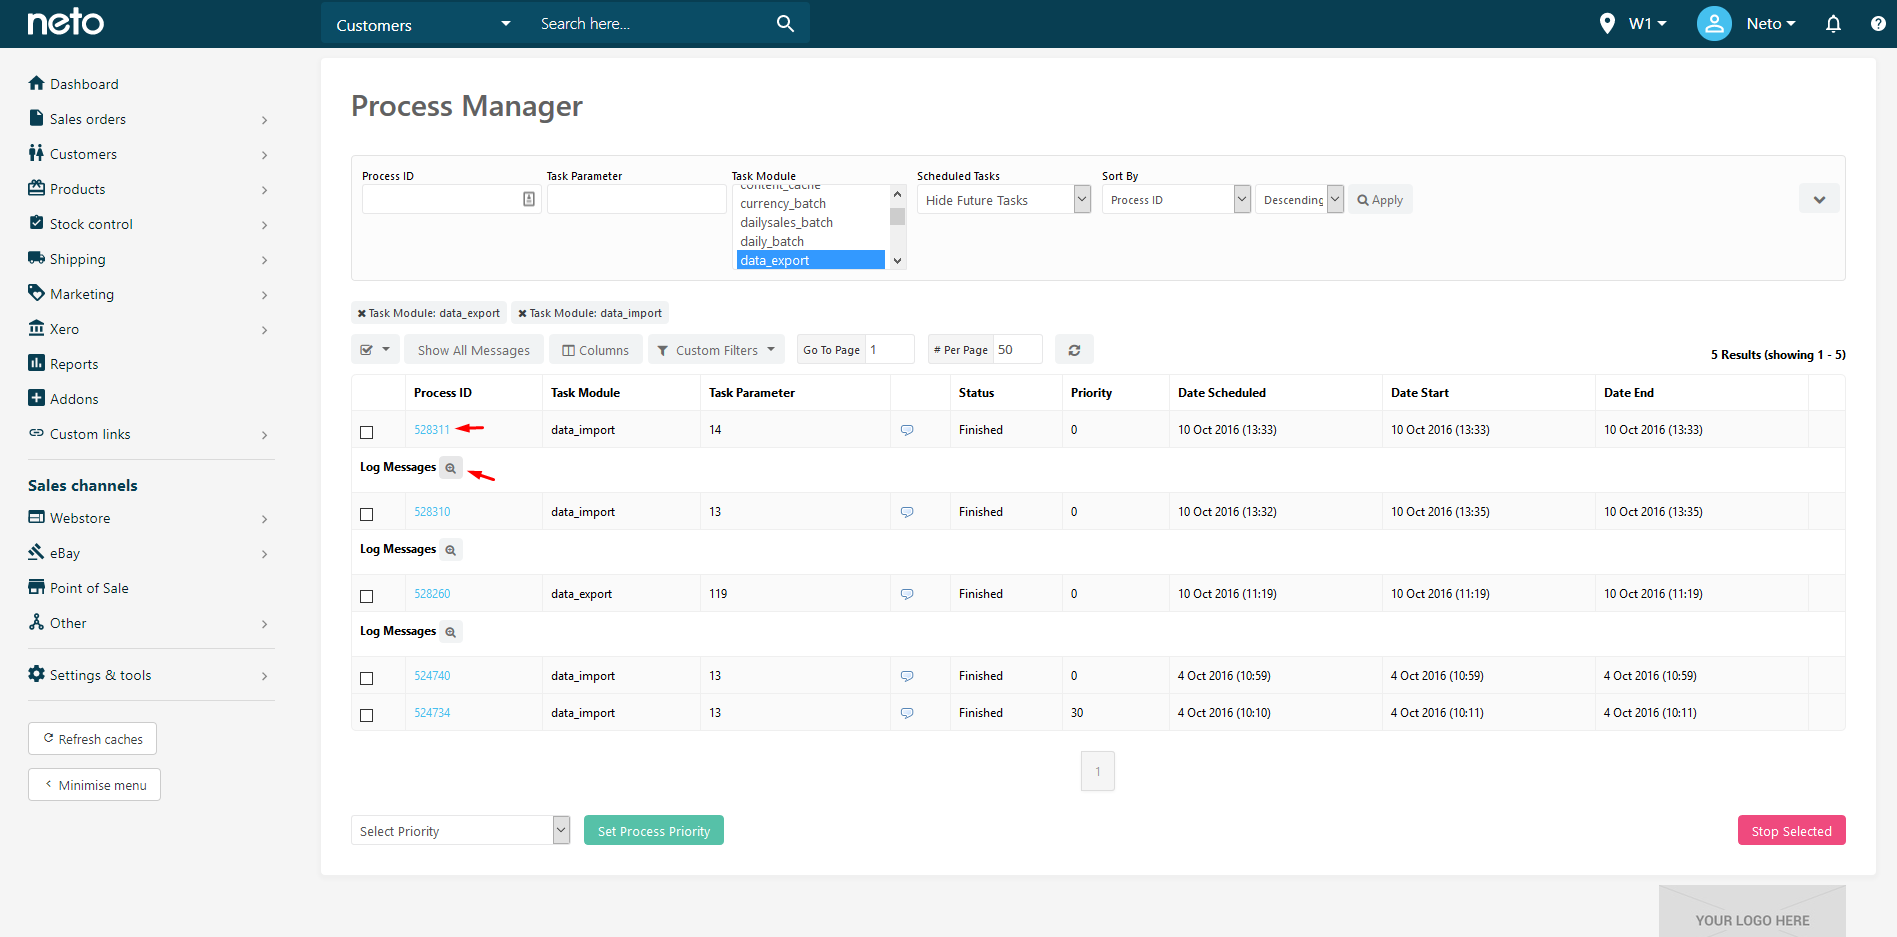
When and import or export runs (either scheduled or manually) you can view the progress or results in the process log:
- In your Neto control panel, navigate to Settings & tools > All settings & tools.
- Click on the Import and Export tab and click Import/Export Processes.
- Each process has a unique ID that you can drill into. It will typically show you the number of items that have imported/ exported and any errors. You can also click the magnifying glass icon to show a summary of the progress.
Data Migration
Can I continue selling on my existing store during migration?
Yes. Your existing store will remain open until you complete our Go Live form to activate your Neto website. We don't impose any restrictions on when you have to complete the Go Live form by, so you're welcome to take your time.
What should I expect during my data migration?
- While we complete your data migration as soon as we possibly can, the average wait time you'd expect would be between 1-3 weeks. We'll touch base with you should we require extra time or information, so it's best to keep an eye on your emails to avoid potential delay.
- We'll send an email to let you know when the migration is finished. We suggest that you check that all of the imported data has come through correctly and let us know of any issues. Have a look at the section below titled 'What is included in migration?' so you know what should be there and what you'll need to manually input.
Please Note: It's important to check that your product SKUs have imported correctly after migration. We may omit spaces or characters like '/'. Inconsistent SKUs mean that sales will not push to your accounting software.
- Once the data migration is confirmed, you can go through and alter the design of your store, review your site content and get everything ready for launch.
What should I be doing during migration?
First and foremost, please do not make changes to products, categories or customers during migration as these will be overwritten. You're more than welcome to log in to the control panel to have a look around and setup your shipping and payment methods though. See our Neto Launch Plan guide to help you during migration.
How do I send my Neto website live?
Once you're happy with the setup, preview your site and check each page thoroughly. Click all the links, read all of the content and make sure everything appears as it should. You should also place one or two sample orders to ensure the checkout process runs smoothly.
Please remember, that customer orders are not included in your data migration and are billed at $160 per hour if you'd like us to bring them across. If you're paying for order migration, make sure you do one final import on the day you go live with Neto to bring across any customer orders that have been placed in the interim.
Once you're all set, click the Launch button on your control panel dashboard and complete the Go Live form.
What is included in Migration?
You'll see a list of what we do and don't include in our data migration service below.
After migration, your store will look different to what it did before. If there's any design alterations you need to make, you can always use our theme editor to alter the look of your store, or code changes in the control panel.
Migration Includes:
Categories:
- Category Names
- Sub Category Names
- Category Images
- Descriptions
- SEO Meta Description, Page Title & Keywords
- Existing Category URL
Products Details:
- Product Price (Cost, RRP, Default Price, different user group pricing)
- Product Name
- Product Categories
- Descriptions
- Product Images
- Variations (Size, Colour etc)
- SKU
- Brand/Manufacturer
- Search Keywords
- Stock levels
- SEO Meta Description, Page Title & Keywords
- Existing Product URL
- Custom fields (may attract additional fees)
Customers Details:
- First Name
- Last Name
- Billing Address
- Shipping Address
- Email
- Phone
Migration Excludes:
- Customer Passwords
- Customer Credits/Refunds
- Orders
- Multi-level Pricing
- Blog posts
- Product Reviews
- Store Settings
- Templates, HTML, CSS
- Site wide discounts/coupons/vouchers
- Content/Information Pages (eg. About Us, Contact Us etc)
Extra Billable Options:
- Product Reviews
- Orders
- Blog Posts