Overview
Parts compatibility allows sellers to show a variety of vehicles that are compatible with a part or accessory in a single listing.
With parts compatibility, you can create one listing describing a single part, and add a complete list of compatible vehicles from more than 37,000 models.
Benefits
More potential sales
- Buyers can easily find parts that fit their specific vehicle.
- Listings with parts compatibility information appear higher in search results as they are more relevant to the buyer.
- Gives customers more confidence that the part will fit the vehicle they are buying.
Less potential cost
- Decreased fees from duplicate listings.
- Less time and money spent on returns.
- Fewer resources are devoted to answering customer questions about whether the part will fit their specific vehicle.
Set up Parts Compatibility
There are various ways to set up eBay parts compatibility, as discussed below:
ePID in Custom Product Field
Note: This is the recommended method. Also, know that it does not support compatibility notes.
This method tags the vehicles that are compatible with a given SKU by using the Custom Product field to host the list of compatible eBay Product IDs (ePIDs).
Follow the Steps below:
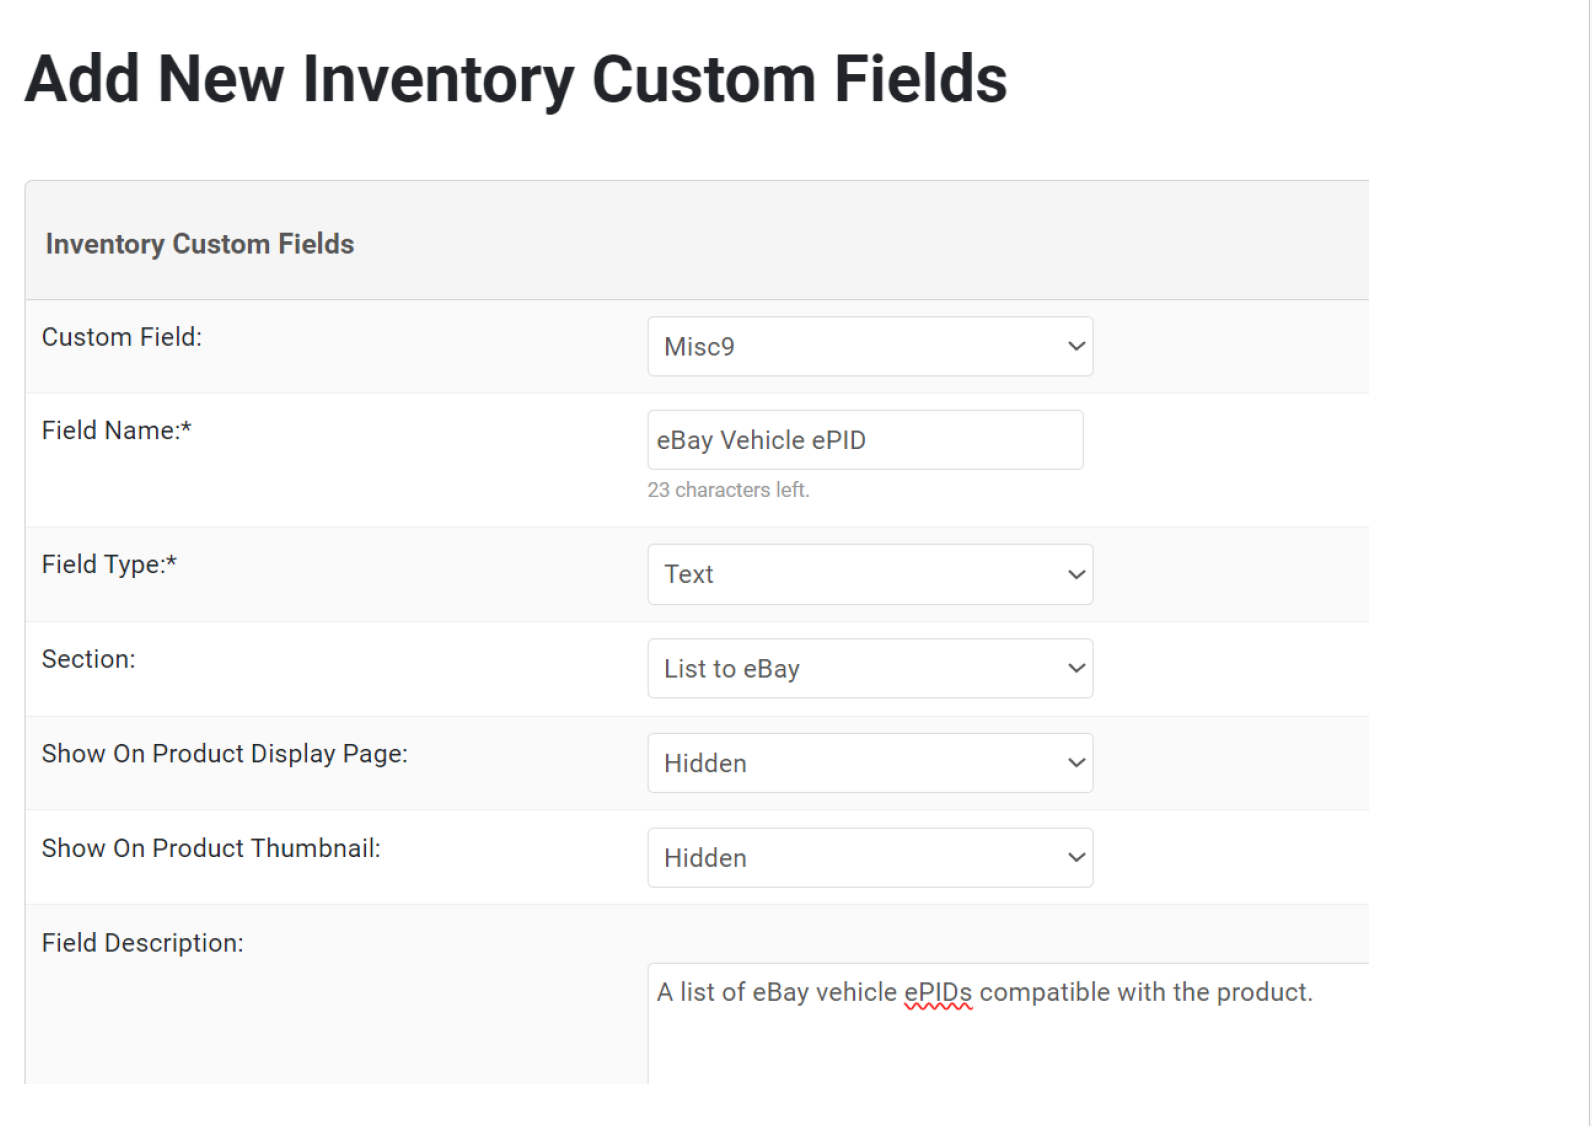
- Create a Custom Product Field as per the instructions in the Add and Manage Products article. Make sure that the Field Type is selected as "Text". Other fields can be filled as per your preference. See the screenshot below as an example:
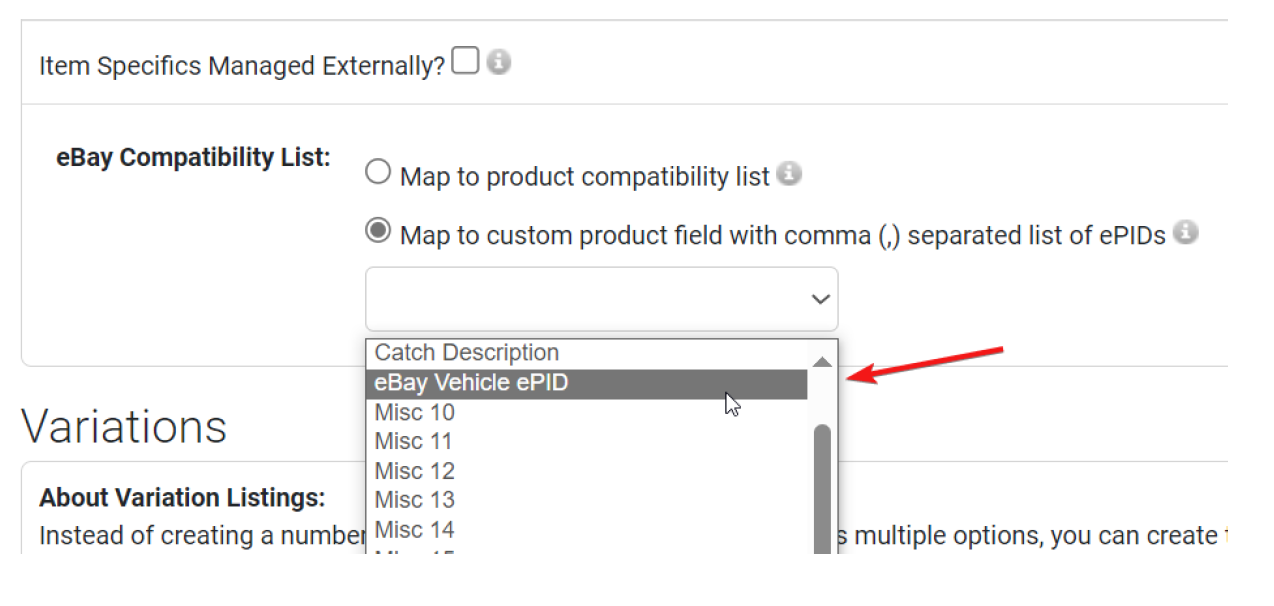
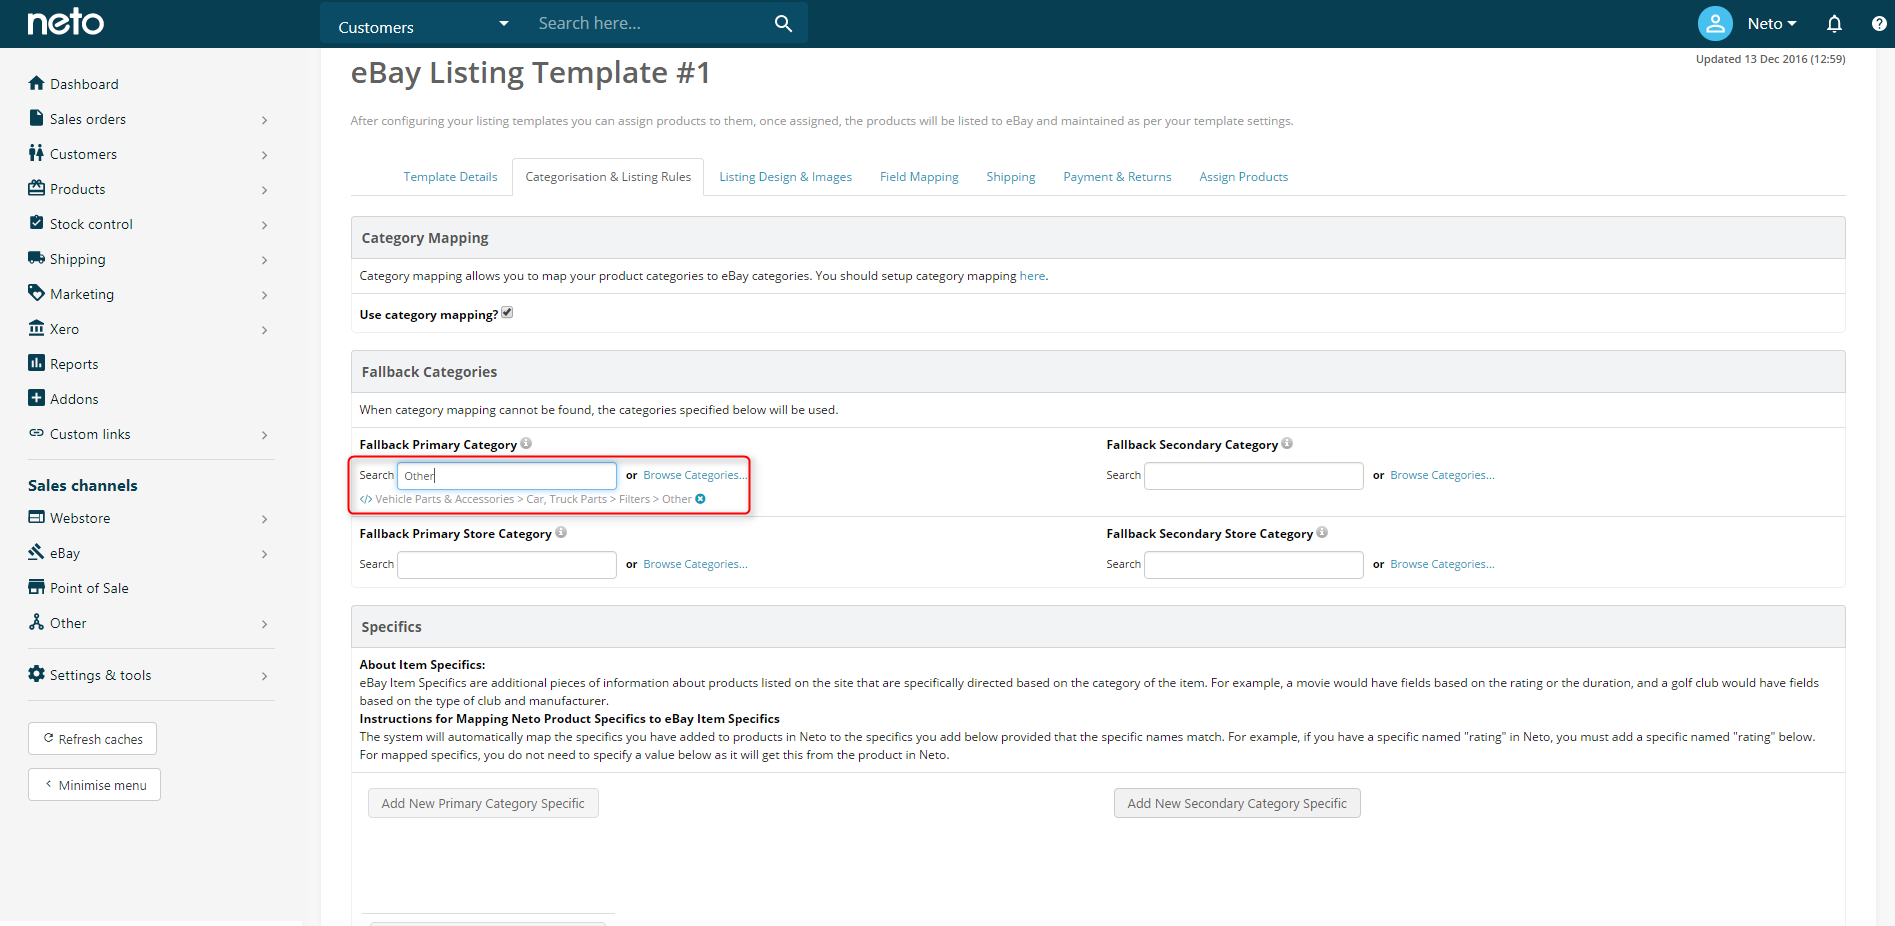
- On the Listing Rule Template, navigate to the Categorisation & Listing Rules tab.
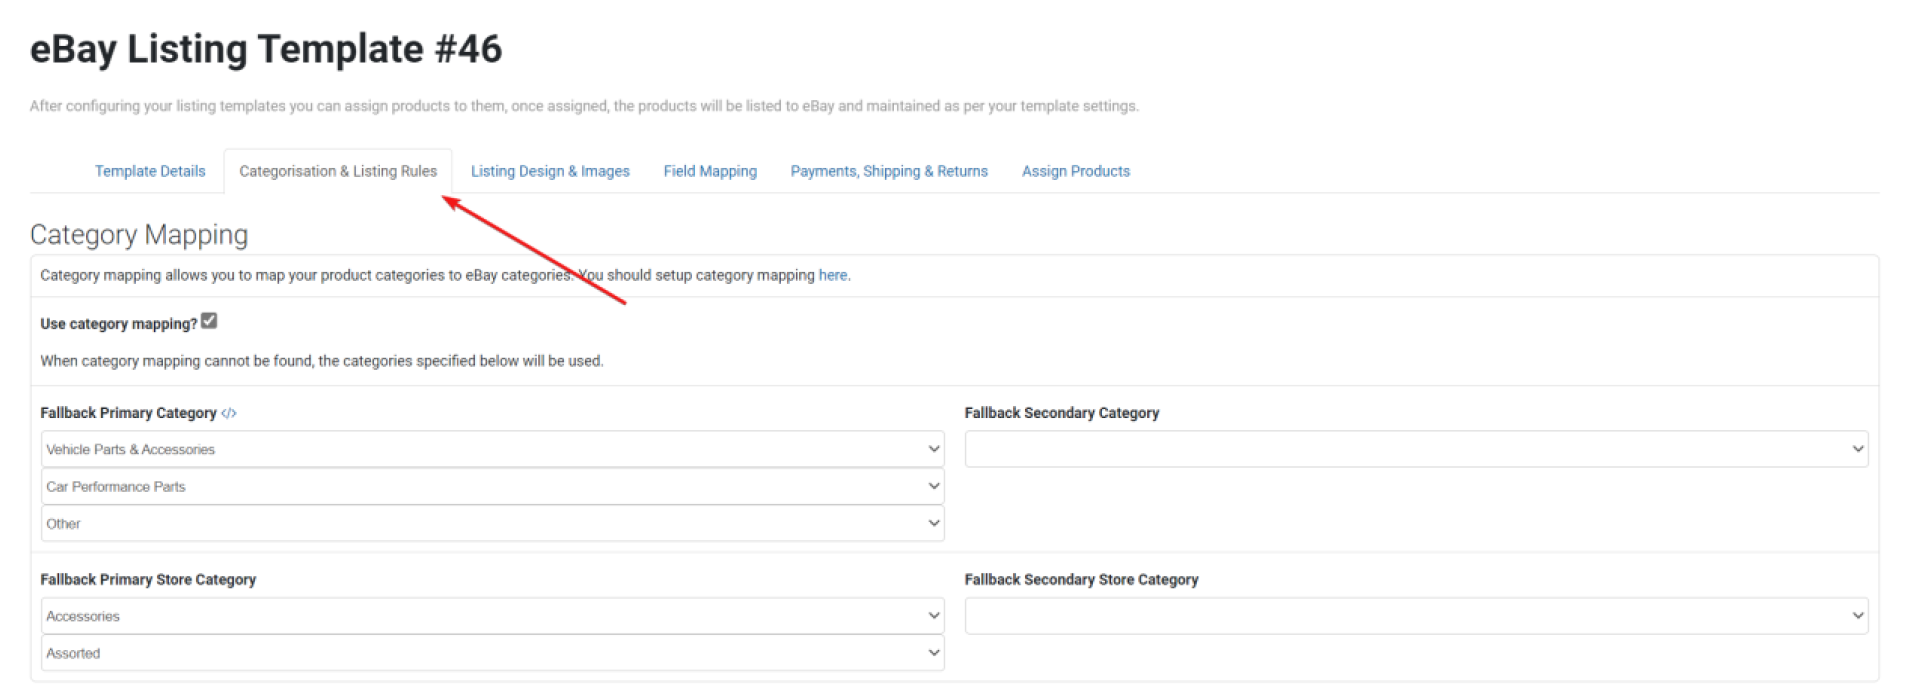
- Scroll down to locate the eBay Compatibility List menu and select "Map to custom product field with comma (,) separated list of ePIDs".
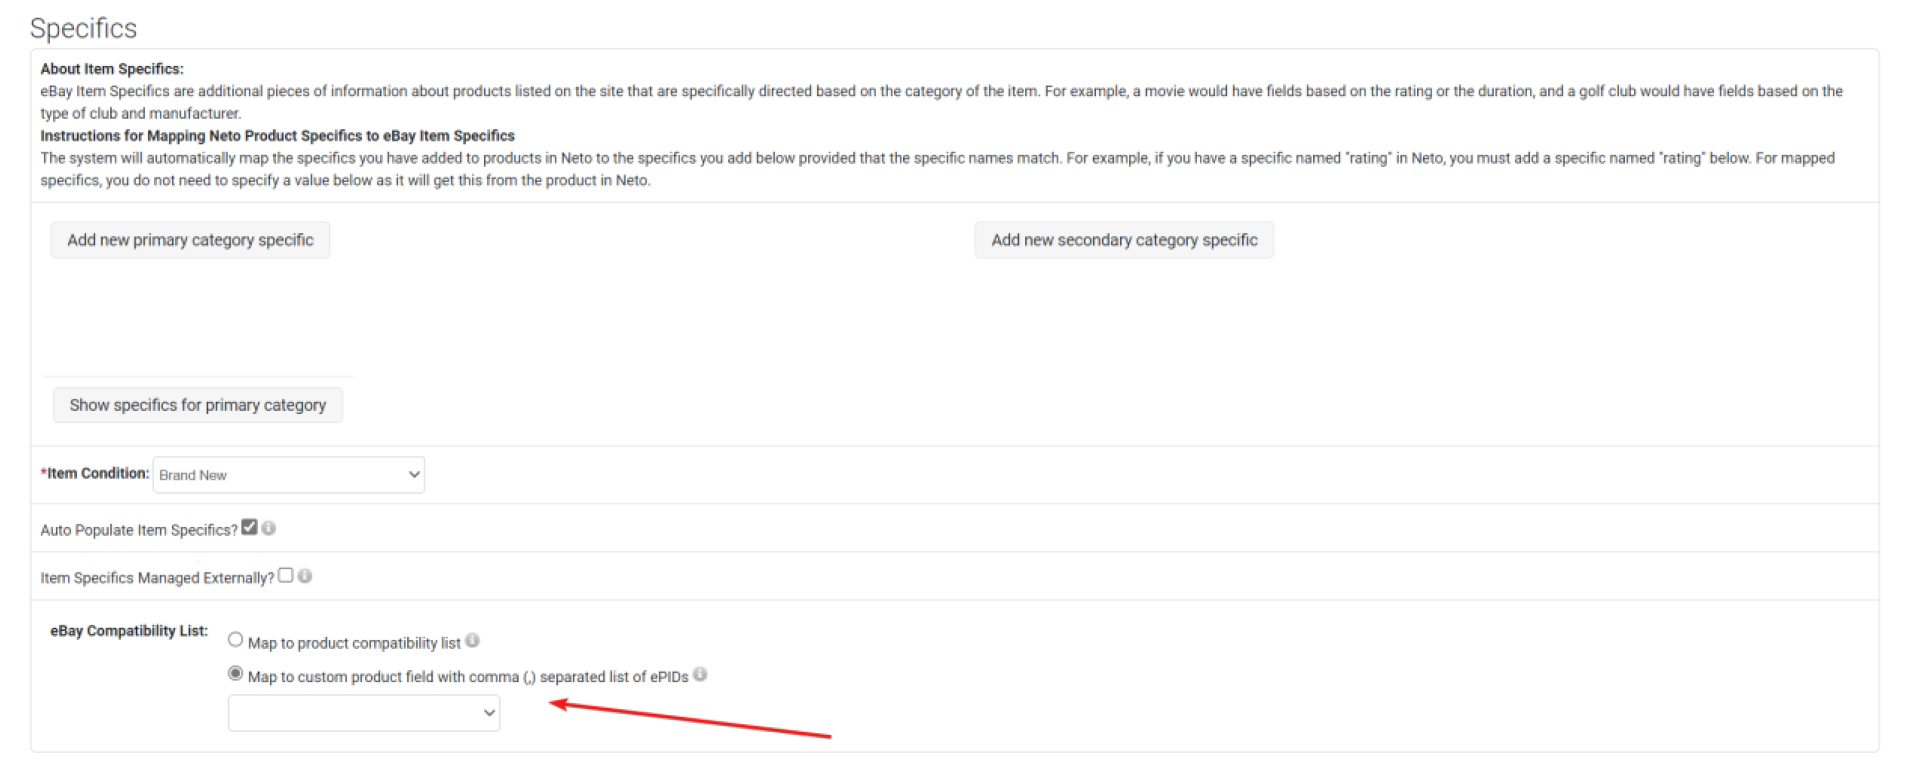
The eBay Compatibility List menu will only be visible if the selected Fallback Primary Category is compatible with eBay Parts Compatibility.
- In the dropdown menu, select the Custom Product Field that you created in Step 1.
- On the product Edit page of any product associated with the Listing Rule Template, enter a comma-separated list of vehicle ePIDs. The ePIDs can be found in the eBay Master Vehicle List (MVL).
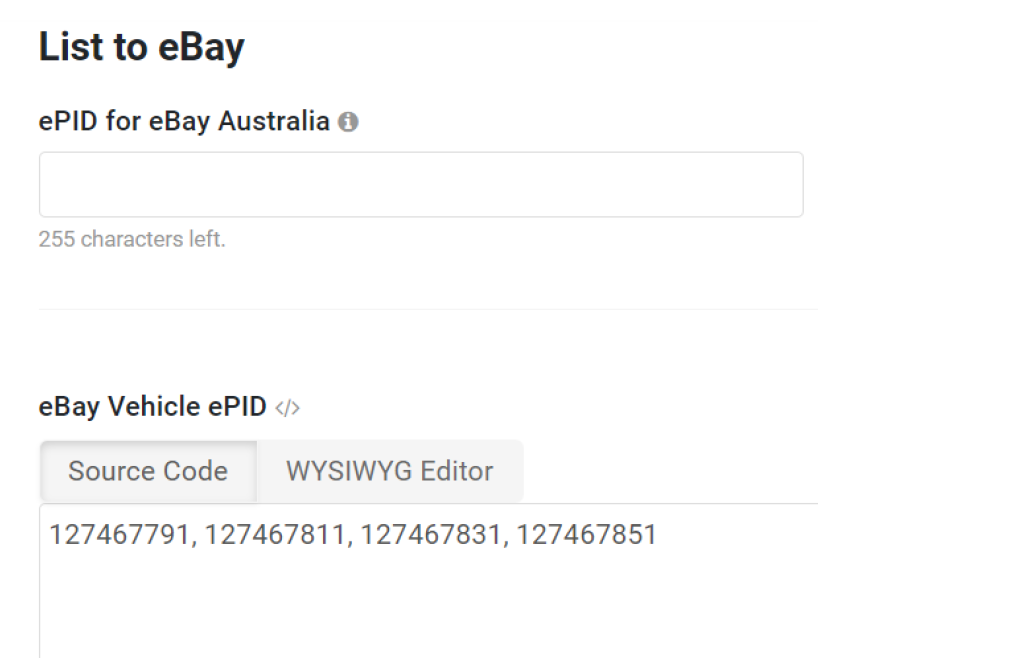
The default "ePID for eBay Australia" field visible in the "List to eBay" section refers to Product ePIDs used for eBay Product Based Shopping Experience configuration. It is not suitable to host the vehicle ePIDs.
- You may now revise your listings to push the vehicle list to eBay.
ePID as Content Type
Warning: Only use this method if compatibility notes are absolutely required. Creating a "content type" tree, that is category tree, may affect webstore performance even if unused on the webstore frontend.
This method tags the vehicles that are compatible with a given SKU by using Content Type to assign ePIDs to the products as a Category.
Follow the steps below:
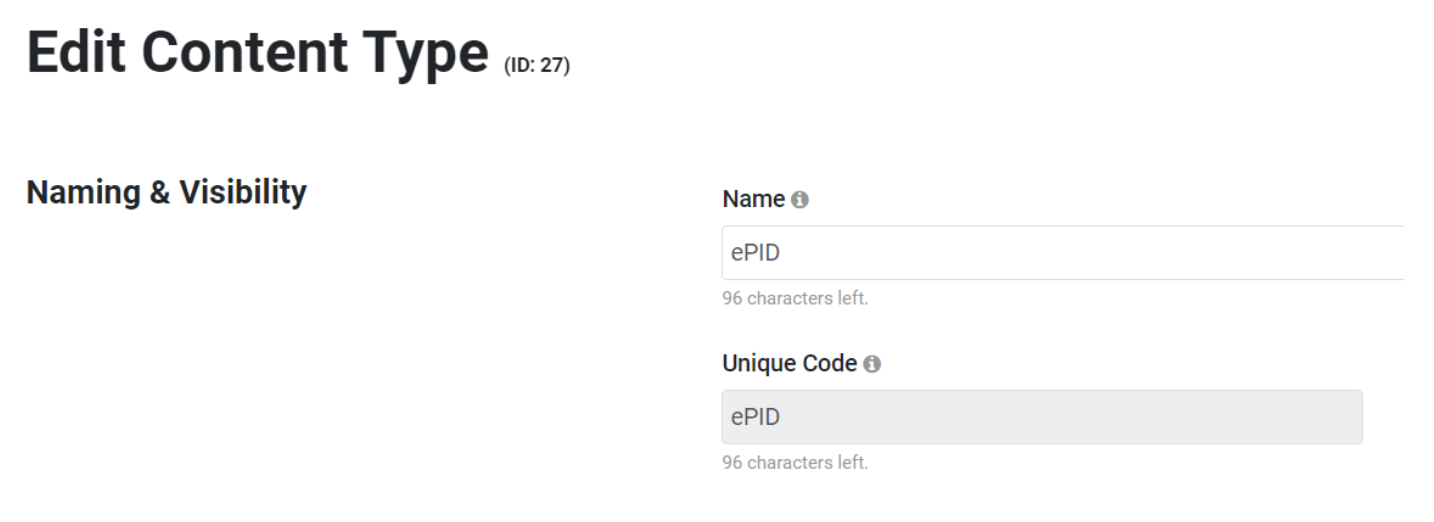
- Create a new Content Type with the following settings:
- Name: "ePID"
- Unique Code: "ePID"
- Download and open the eBay Master Vehicle List.
- Rename the "ePID" column to "Name".
- Delete all other columns.
- Save the file as a CSV.
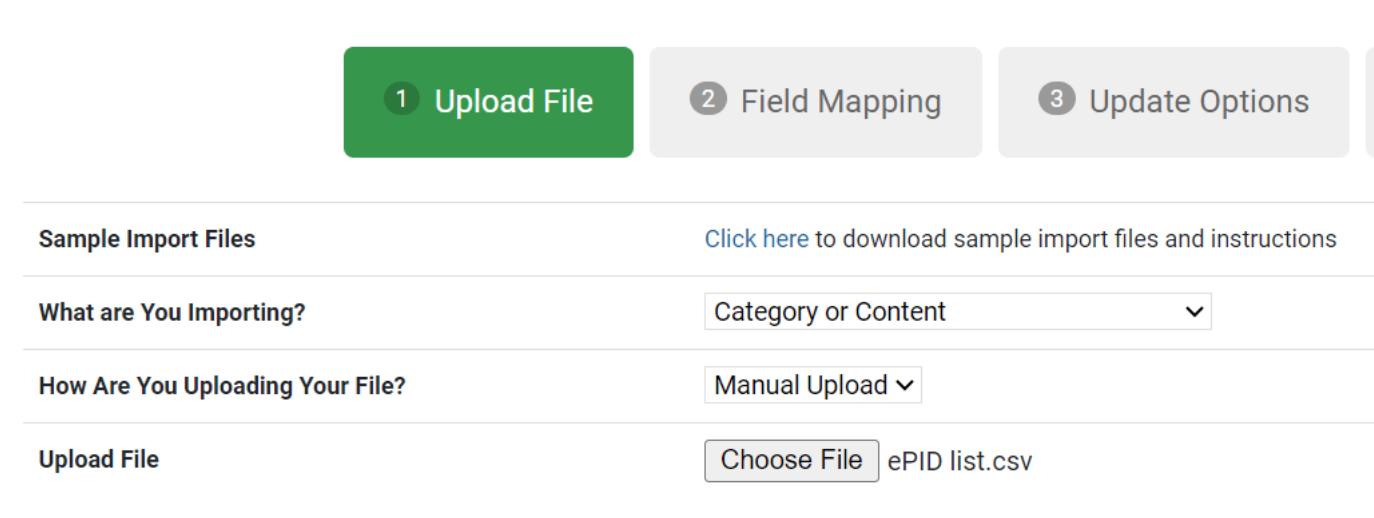
- Start the Data Import Wizard. Select "What are you importing?" as "Category or Content" and upload the file created in Step 2.
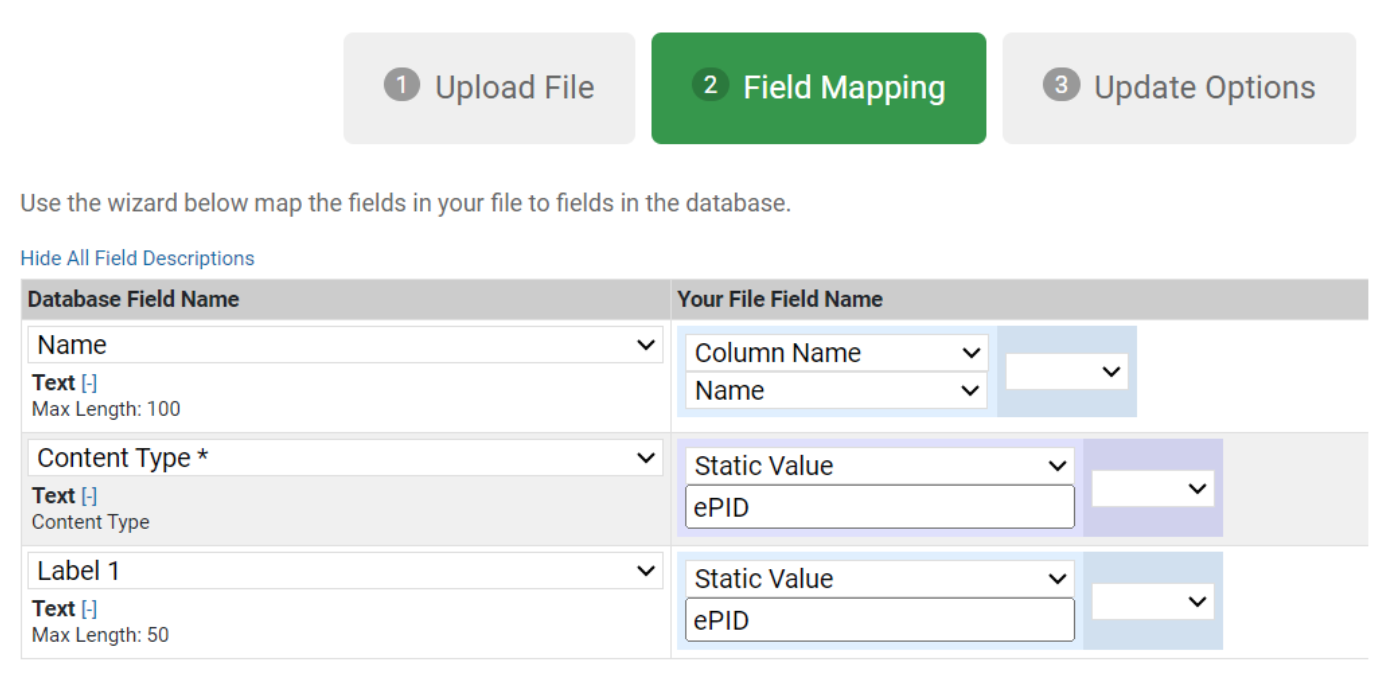
- Click "Continue to Next Step" and on the Field Mapping step, map as below:
Name -> Column Name = "Name"
Add Extra Fields:- Content Type* -> Static Value = "ePID" (this MUST match the Content Type name created on Step 1 of these instructions)
- Label 1 -> Static Value = "ePID" (this MUST BE exactly "ePID")
Then, complete the Import Wizard.
- On the Listing Rule Template, navigate to the Categorisation & Listing Rules tab and locate the eBay Compatibility List menu.
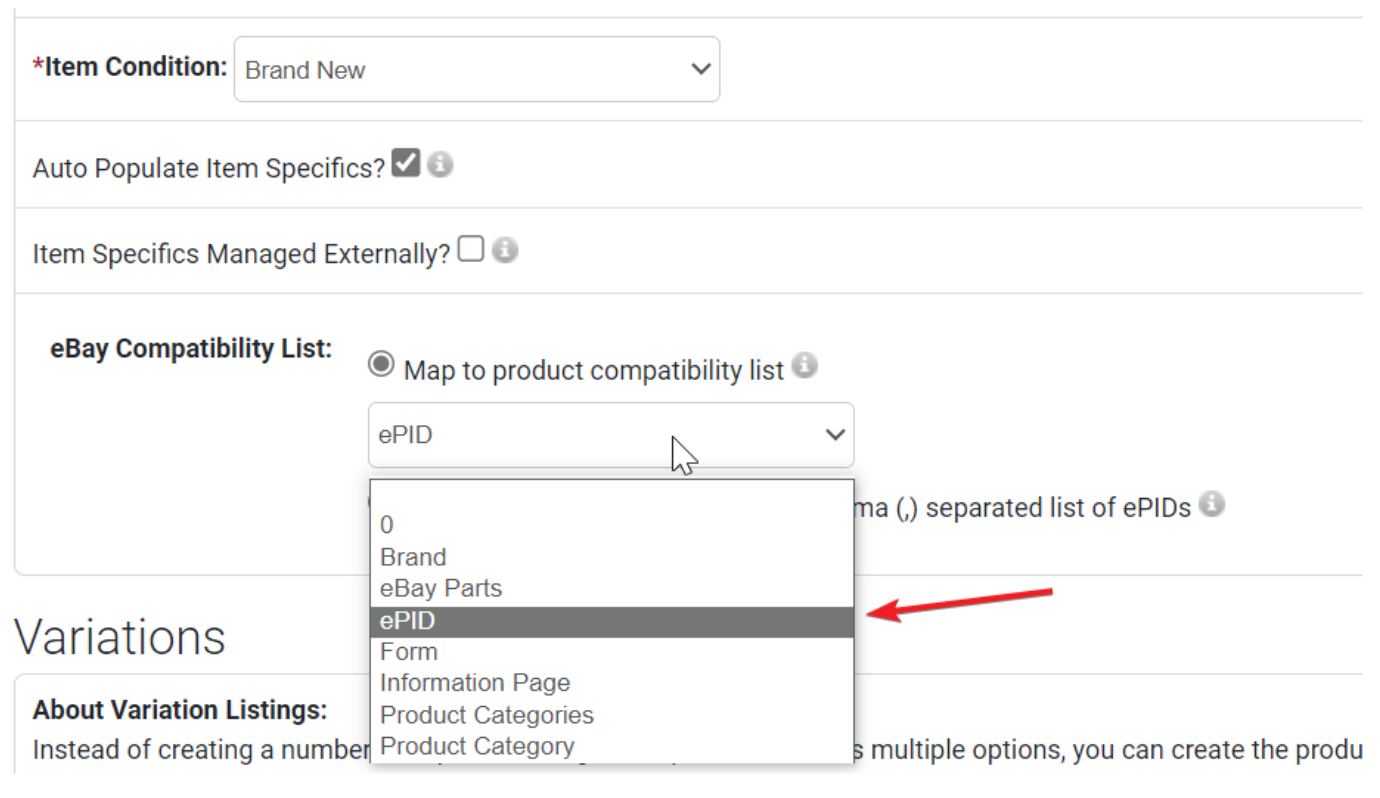
The "eBay Compatibility List" menu will only be visible if the Fallback Primary Category selected is compatible with eBay Parts Compatibility.
Select Map to product compatibility List = "ePID" (the Content Type created on Step 1) and Save.
- You can now select or import the relevant ePID onto the products. Follow the instructions in Add and Manage Products to add Categories (in this case, "ePID") to products manually or in bulk.
- You may now revise your listings to push the vehicle list to eBay.
Make, Model, Submodel
Warning: This is a legacy method and may cause backend and front-end latency.
If your product has data that correlates to the make, model, year, variant, and so on, you can use this to match to an eBay parts compatibility tree. The compatibility tree requires you to map make, model, variant, year, submodel & engine.
- Create the Category Tree
- Assign Parts Compatibility to Products
- Set up the Listing Rules Template
Create The Category Tree
Before you begin to categorise your products, you first need to create a category tree to house the category data.
- In your Neto control panel, navigate to eBay > Setup & Tools and choose Import eBay Categories.
- Select Import eBay Vehicle Compatibility Categories from the drop-down menu and click Continue.
- Choose the eBay Category Tree to download. If you are setting up parts compatibility for the first time, select Create A New Category Tree and Only Insert New Records. Name the tree Parts Compatibility.
- When complete, click Import Data.
Assign Parts Compatibility To Products
Now that you've created your category structure, you can assign it to your products. There are two methods, individually and in bulk (though export & import).
Individually
Parts Compatibility can be assigned to products in the same way as product categories. Please follow the how to add a product to a product category instructions, remembering to select Parts Compatibility instead of Product Category.
Bulk Method
To assign parts compatibility to multiple products at once, use the Neto Import Wizard to upload a CSV file with your products and the associated compatibility information.
Below is an example of how you can structure the layout of the CSV file.
SKU | Make | Model | Submodel | Year | Variant | Engine | Notes |
|---|
SKU_1 | Holden | Commodore | VX Sedan 3.8 i V6 | 2002 | RWD Petrol 3.8L 6cyl 152kW L36(231CUV6) | 3791cc 152kW (Petrol) | Auto |
SKU_1 | Holden | Commodore | VU Ute 3.8 | 2002 | RWD Petrol 3.8L 6cyl 152kW | 3791cc 152kW (Petrol) | Auto |
SKU_1 | Holden | Commodore | VY Wagon 3.8 i V6 | 2002 | RWD Petrol 3.8L 6cyl 152kW L36(231CUV6) | 3791cc 152kW (Petrol) | Auto |
SKU_1 | Holden | Commodore | VY Sedan 3.8 i V6 | 2002 | RWD Petrol 3.8L 6cyl 152kW L36(231CUV6) | 3791cc 152kW (Petrol) | Auto |
SKU_2 | Holden | Commodore | VZ Sedan 3.6 i V6 | 2004 | RWD Petrol 3.6L 6cyl 175kW HB,LE0 | 3565cc 175kW (Petrol) | Auto |
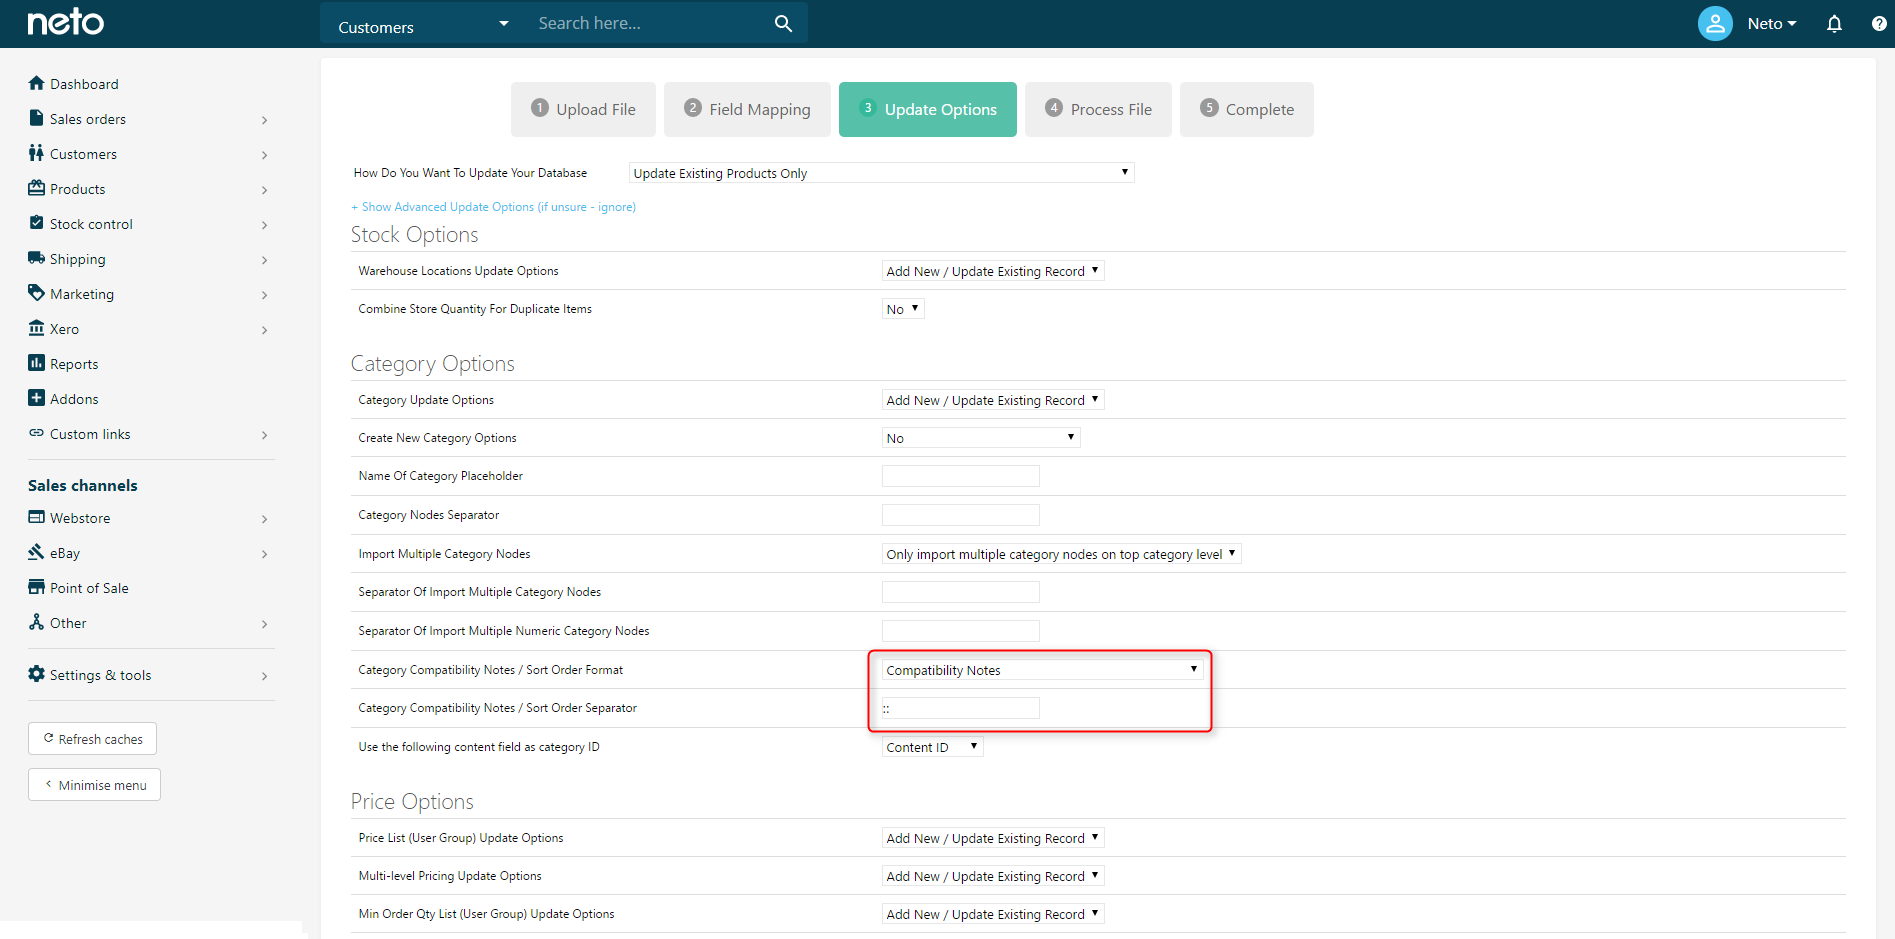
The template for importing the above file would look like this

Important: The notes section uses :: as a separator which is defined on the Update Options tab of the import wizard.
Set up the Listing Rules Template
All products using this rules template will now push the Parts Compatibility data assigned through to eBay.
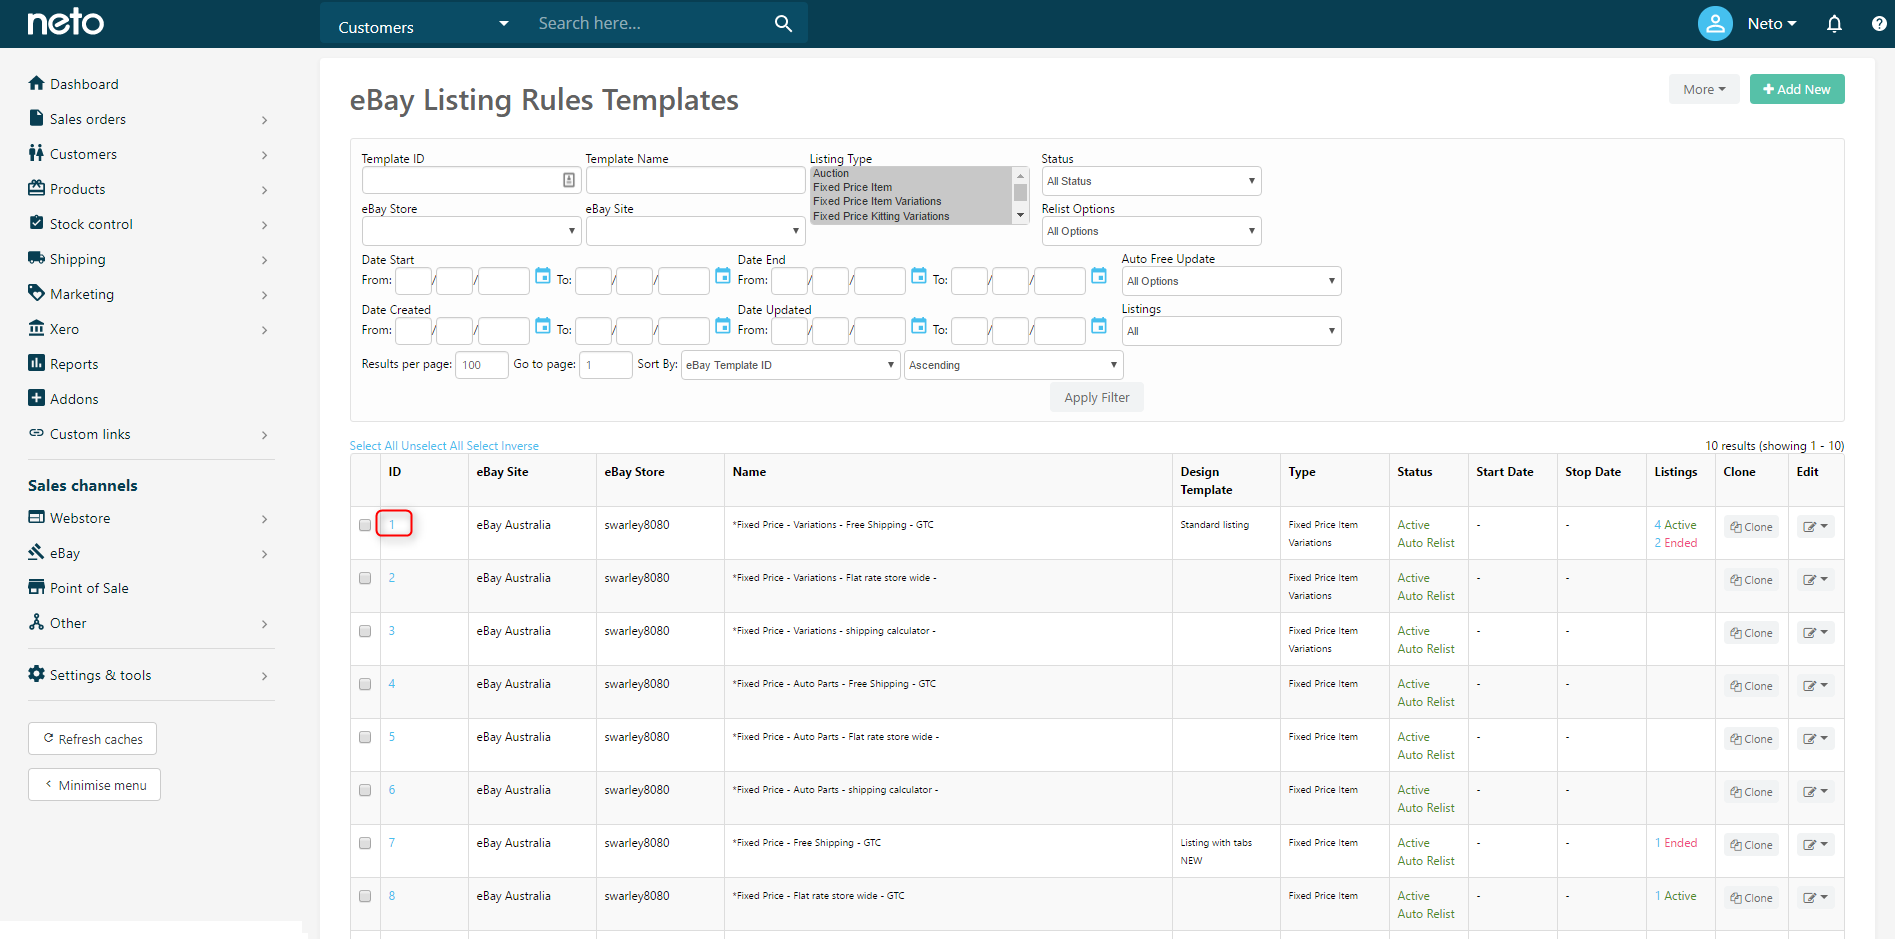
- In your Neto control panel, navigate to eBay > Listing Rule Templates.
- Open the template you wish to use to list parts compatibility by clicking on the appropriate ID.
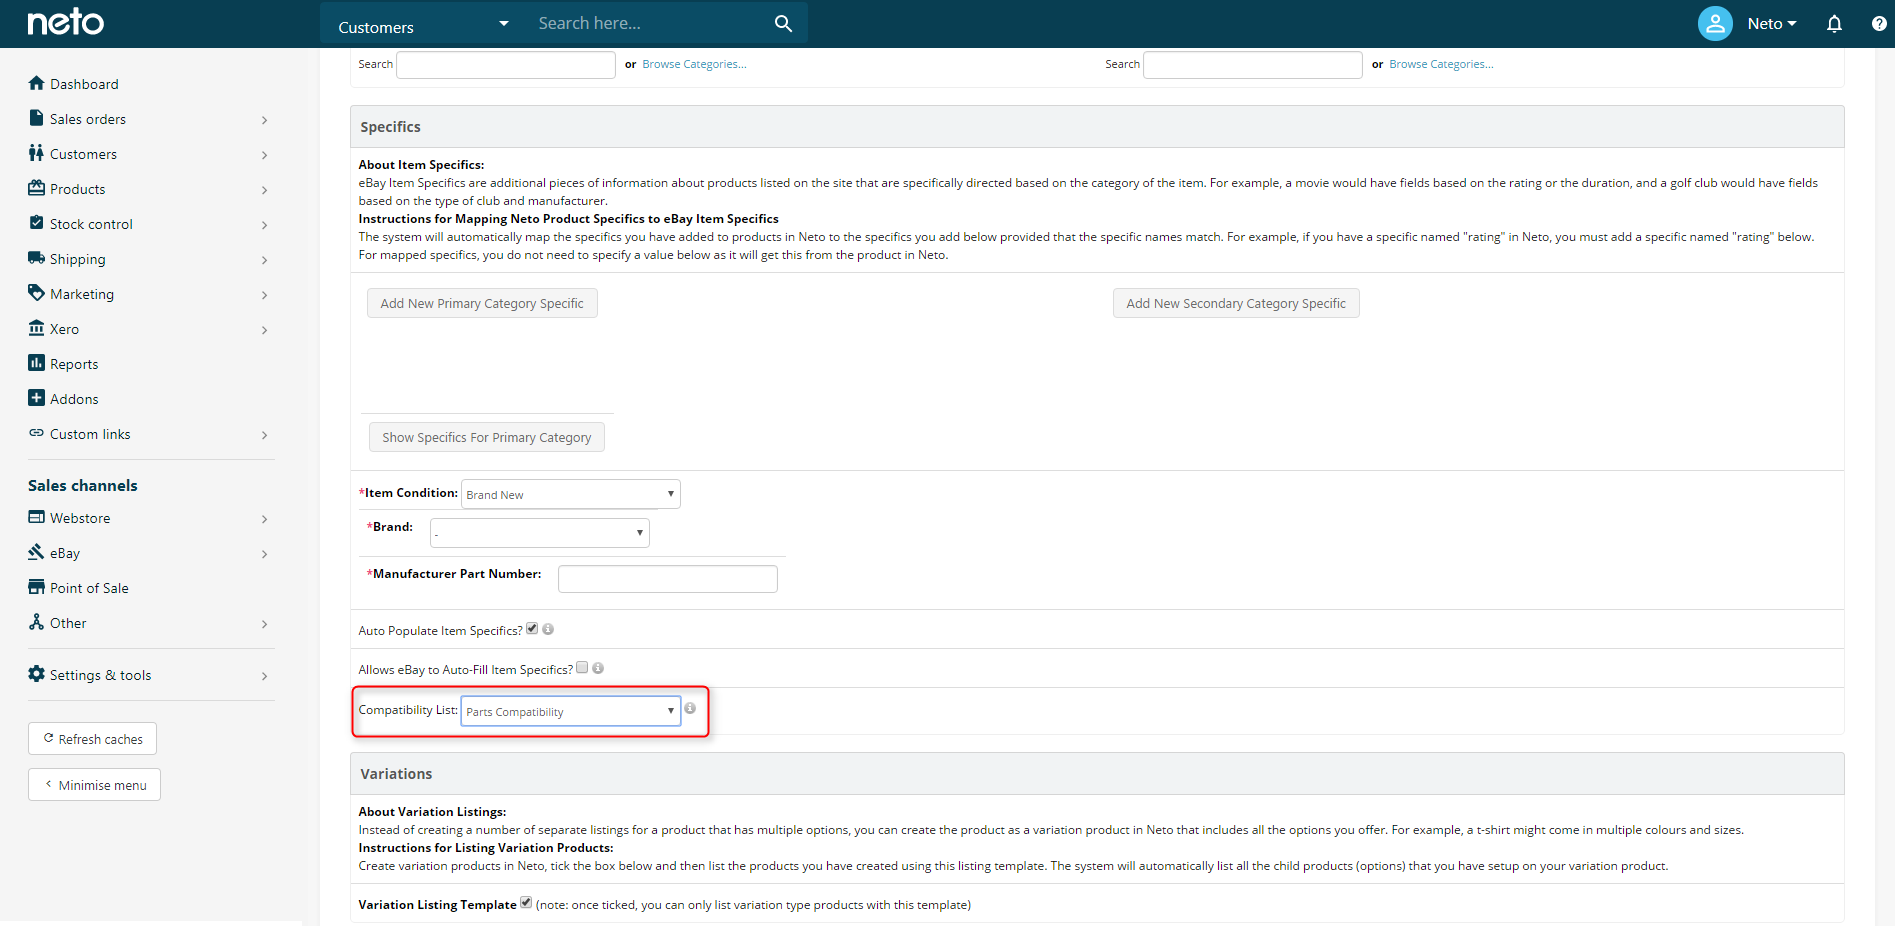
- On the Categorisation & Listing Rules tab, select a fallback category that allows part compatibility (e.g., Vehicle Parts & Accessories > Car, Truck Parts > Exterior > Other).
- A drop-down will appear under the Specifics section called Compatibility List. Select Parts Compatibility and click Save.
KType
Warning: This is a legacy method and may cause backend and front-end latency.
The kType mapping allows you to define which makes and models of cars are compatible with the product by a reference number associated with each product. That reference number is called a kType code.
The master list of kType data is available to download from eBay.
- Create the Category Tree
- Import kType Codes into Neto
- Set up the Listing Rules Template to use kType
Create the Category Tree
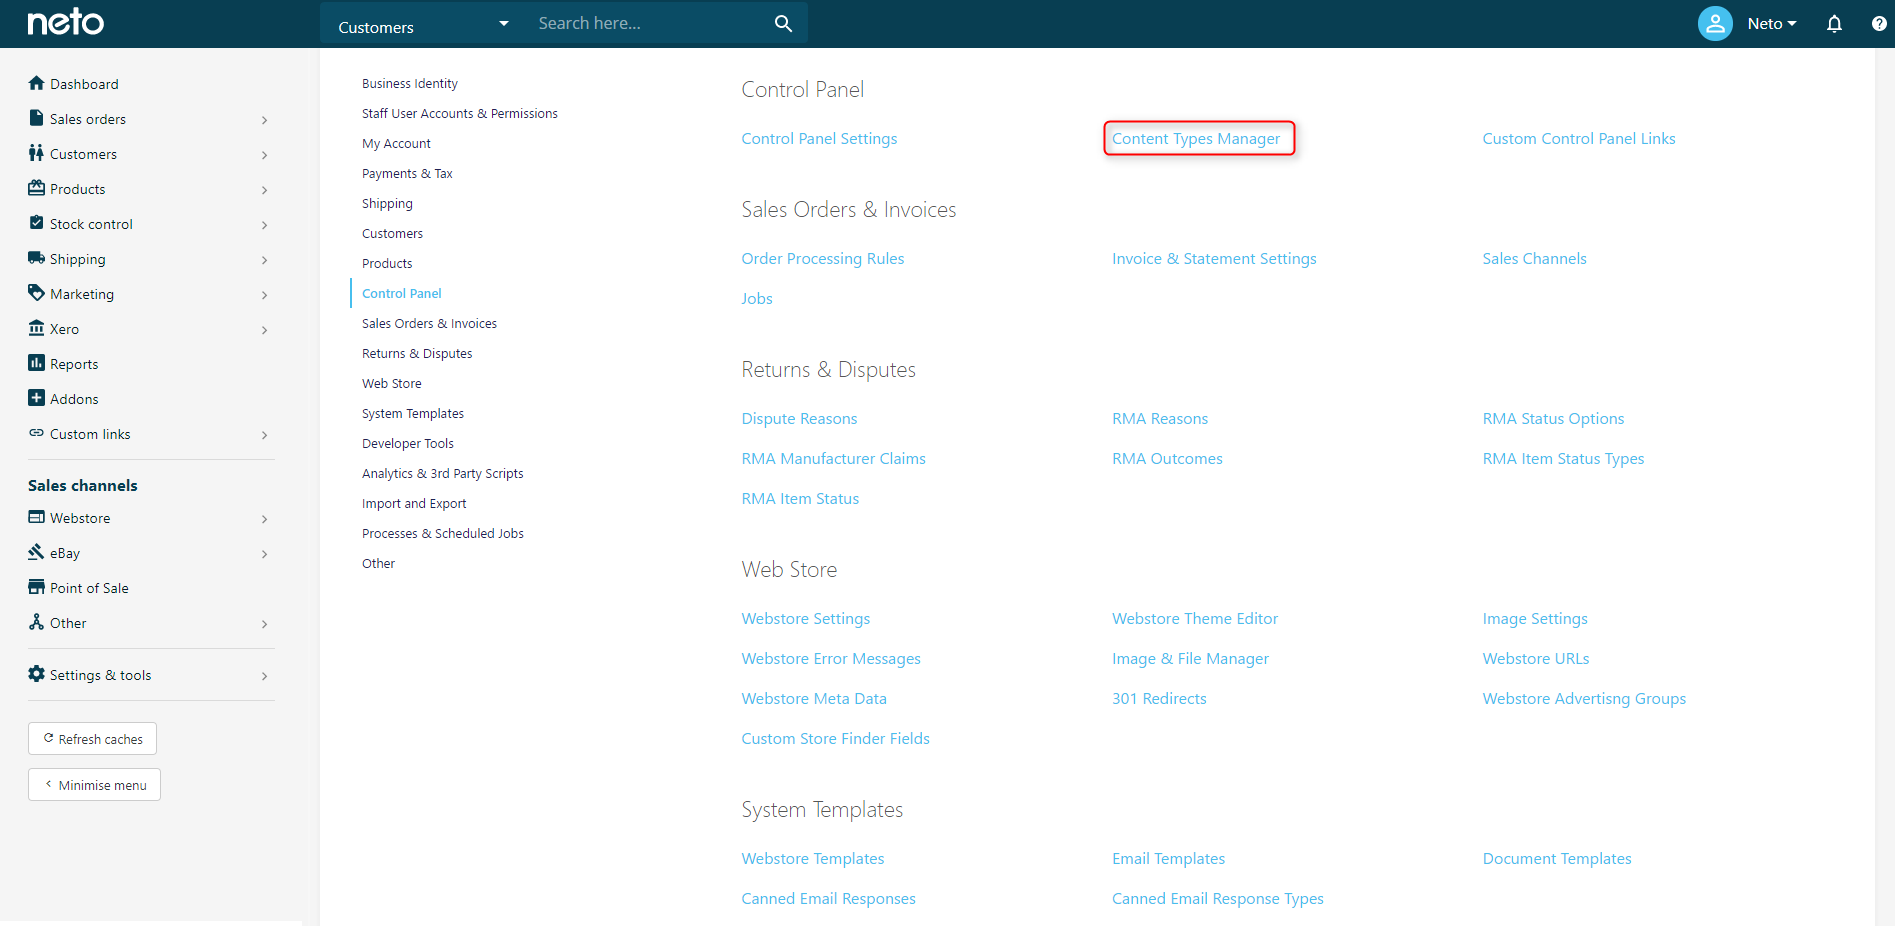
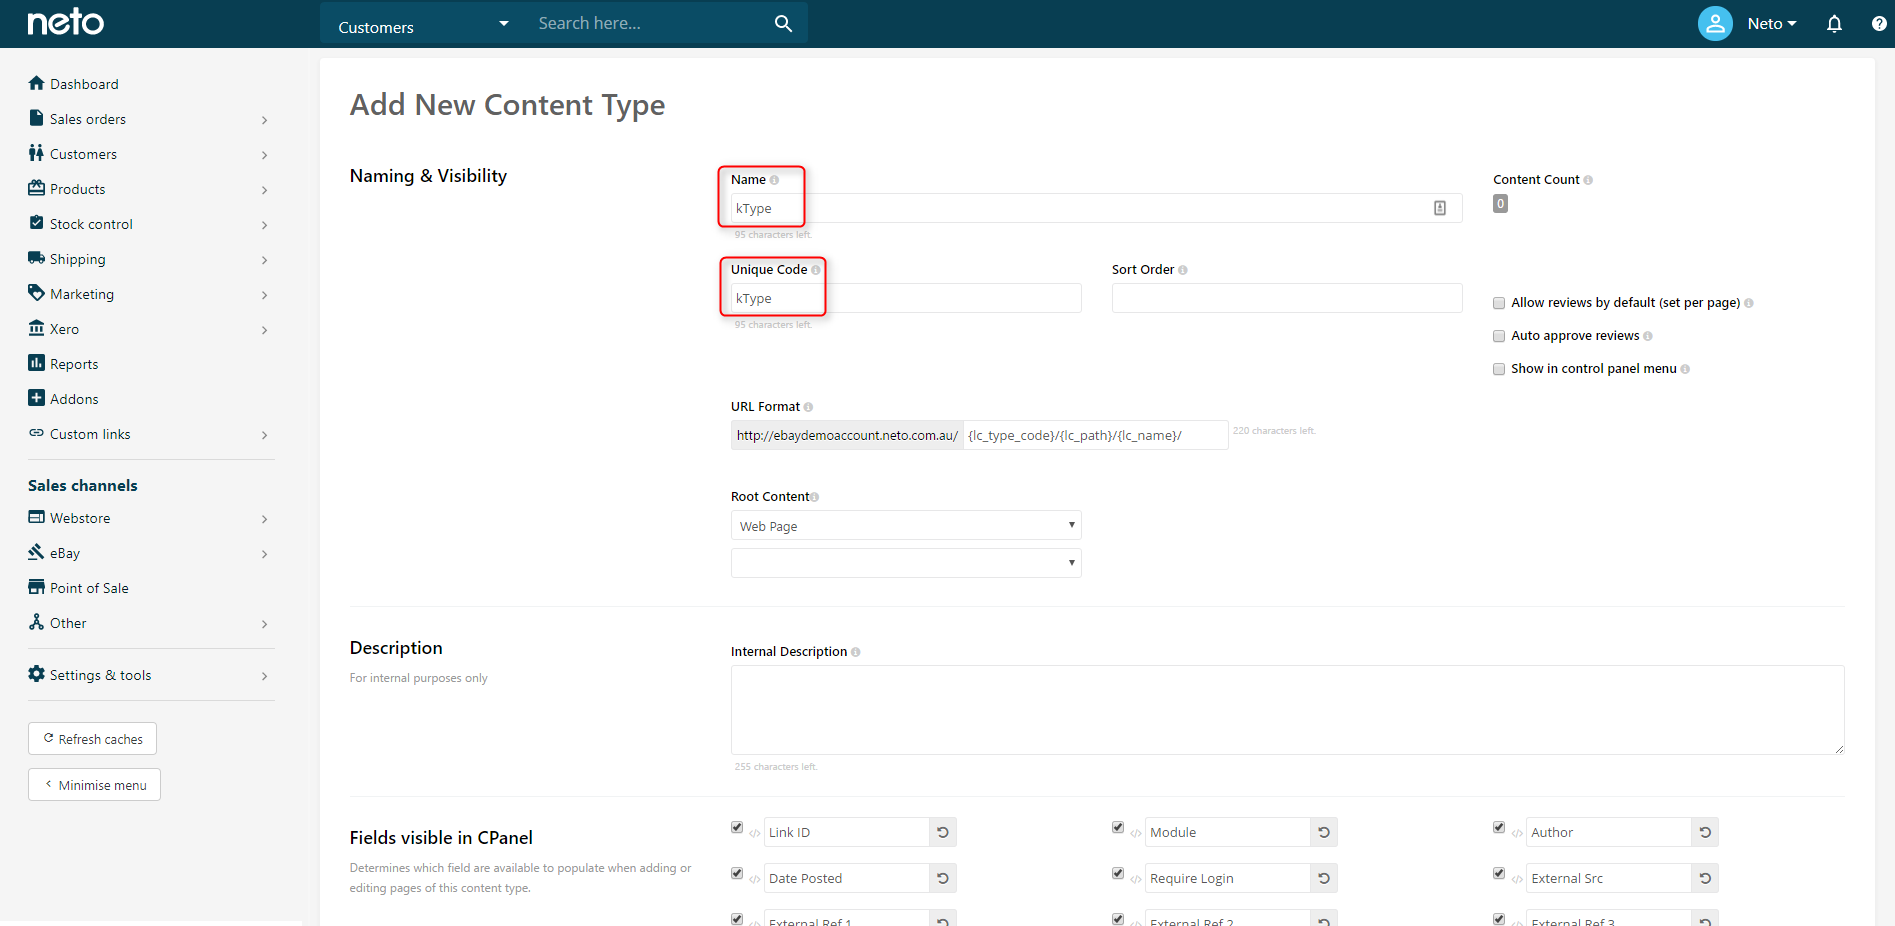
- In your Neto control panel, navigate to Settings & Tools > All Settings & Tools.
- Under Control Panel, click Content Types Manager.
- Click Add New.
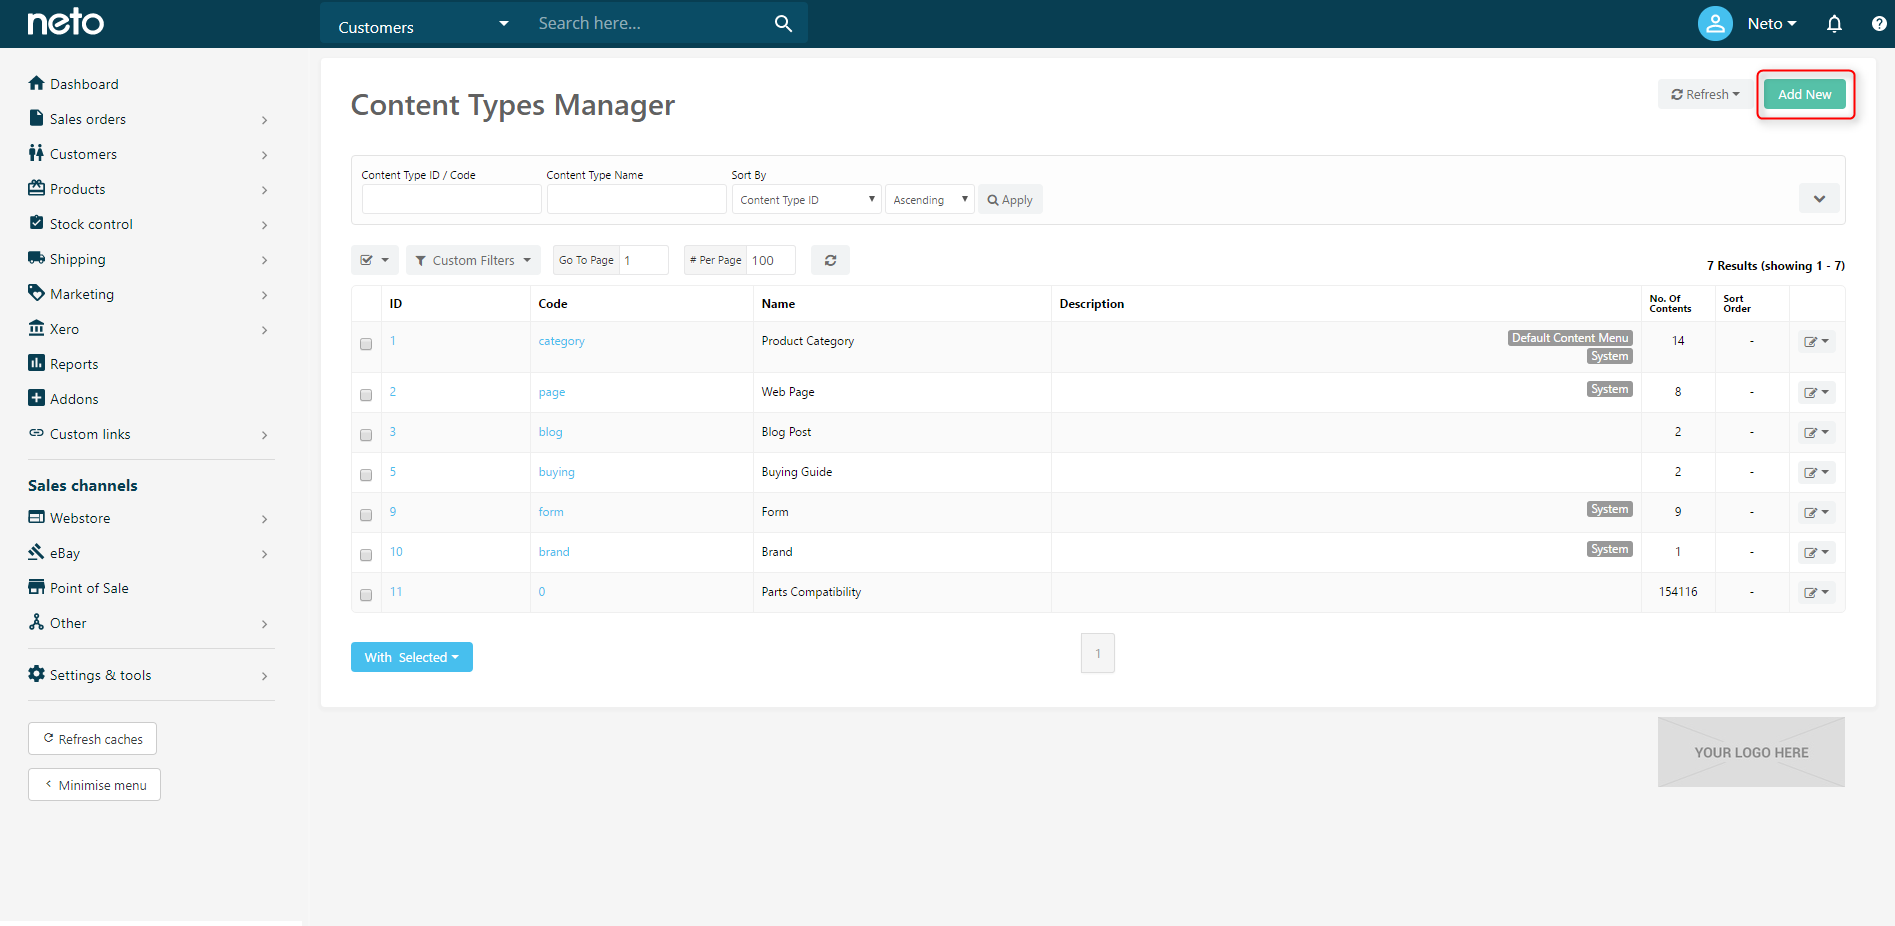
- Populate the Name and Unique Code fields with kType and click Save & Close.
Import kType Codes into Neto
- Download the latest kType code list.
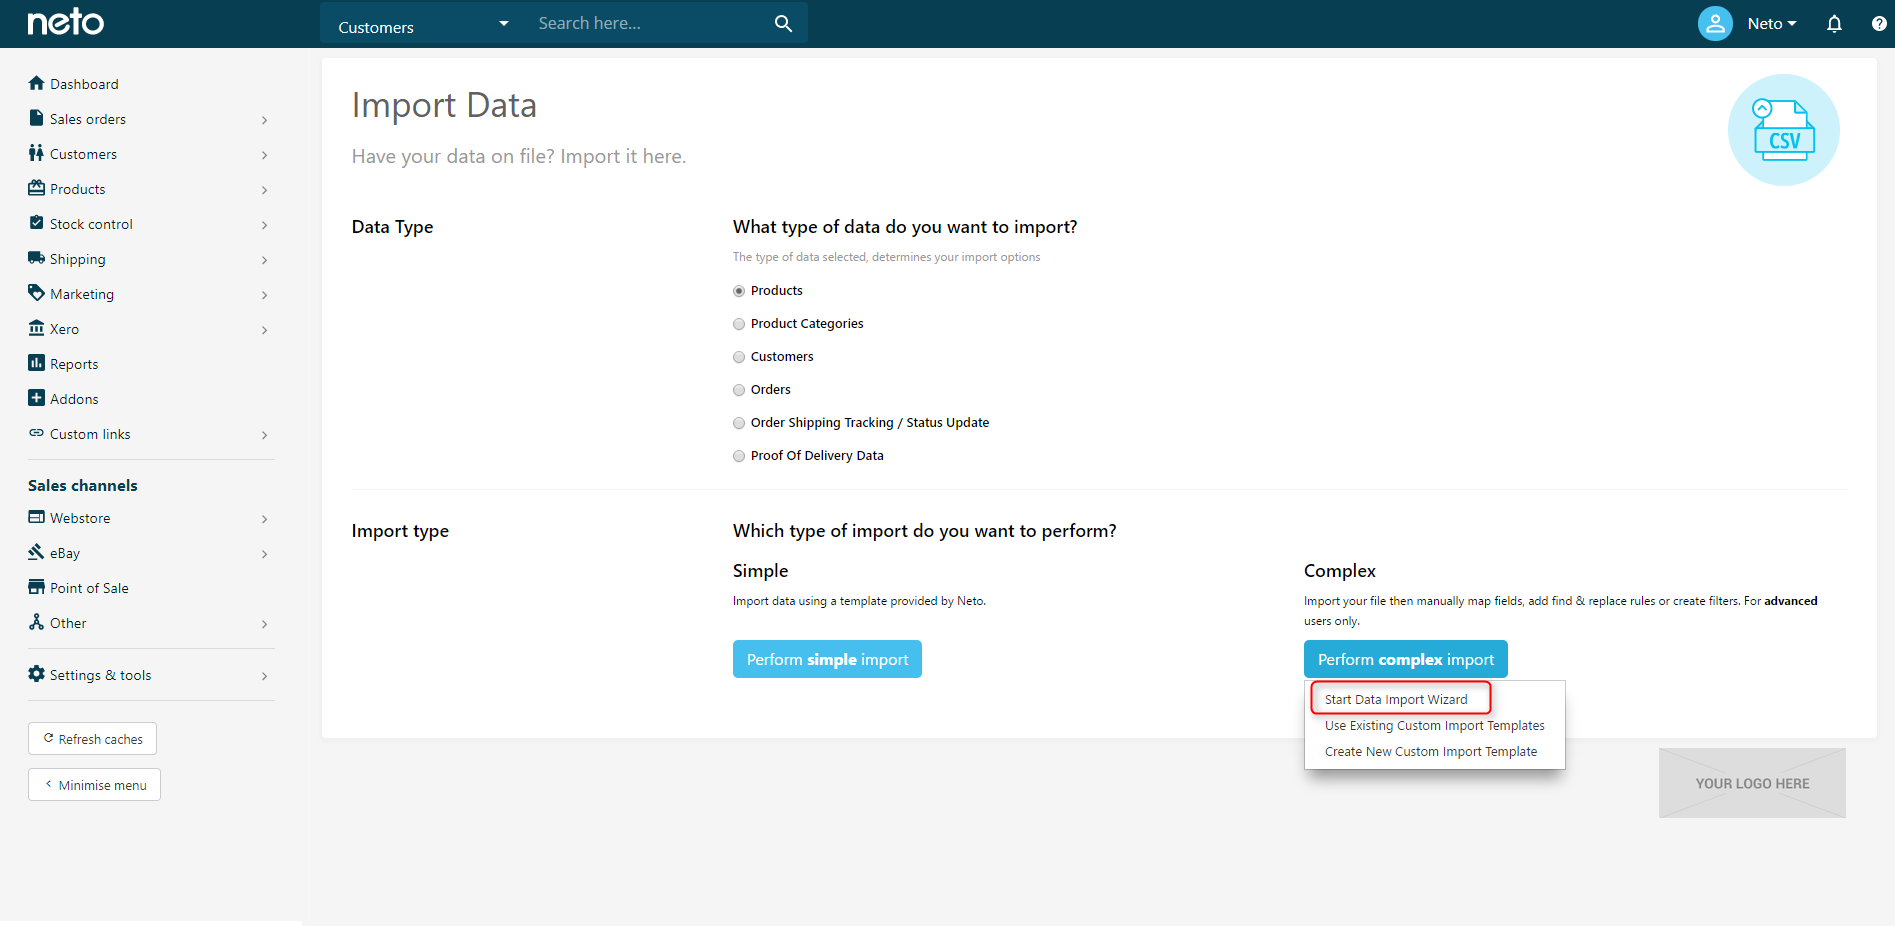
- In your Neto control panel, navigate to Settings & Tools > Import.
- Click Perform Complex Import and then choose Start Data Import Wizard.
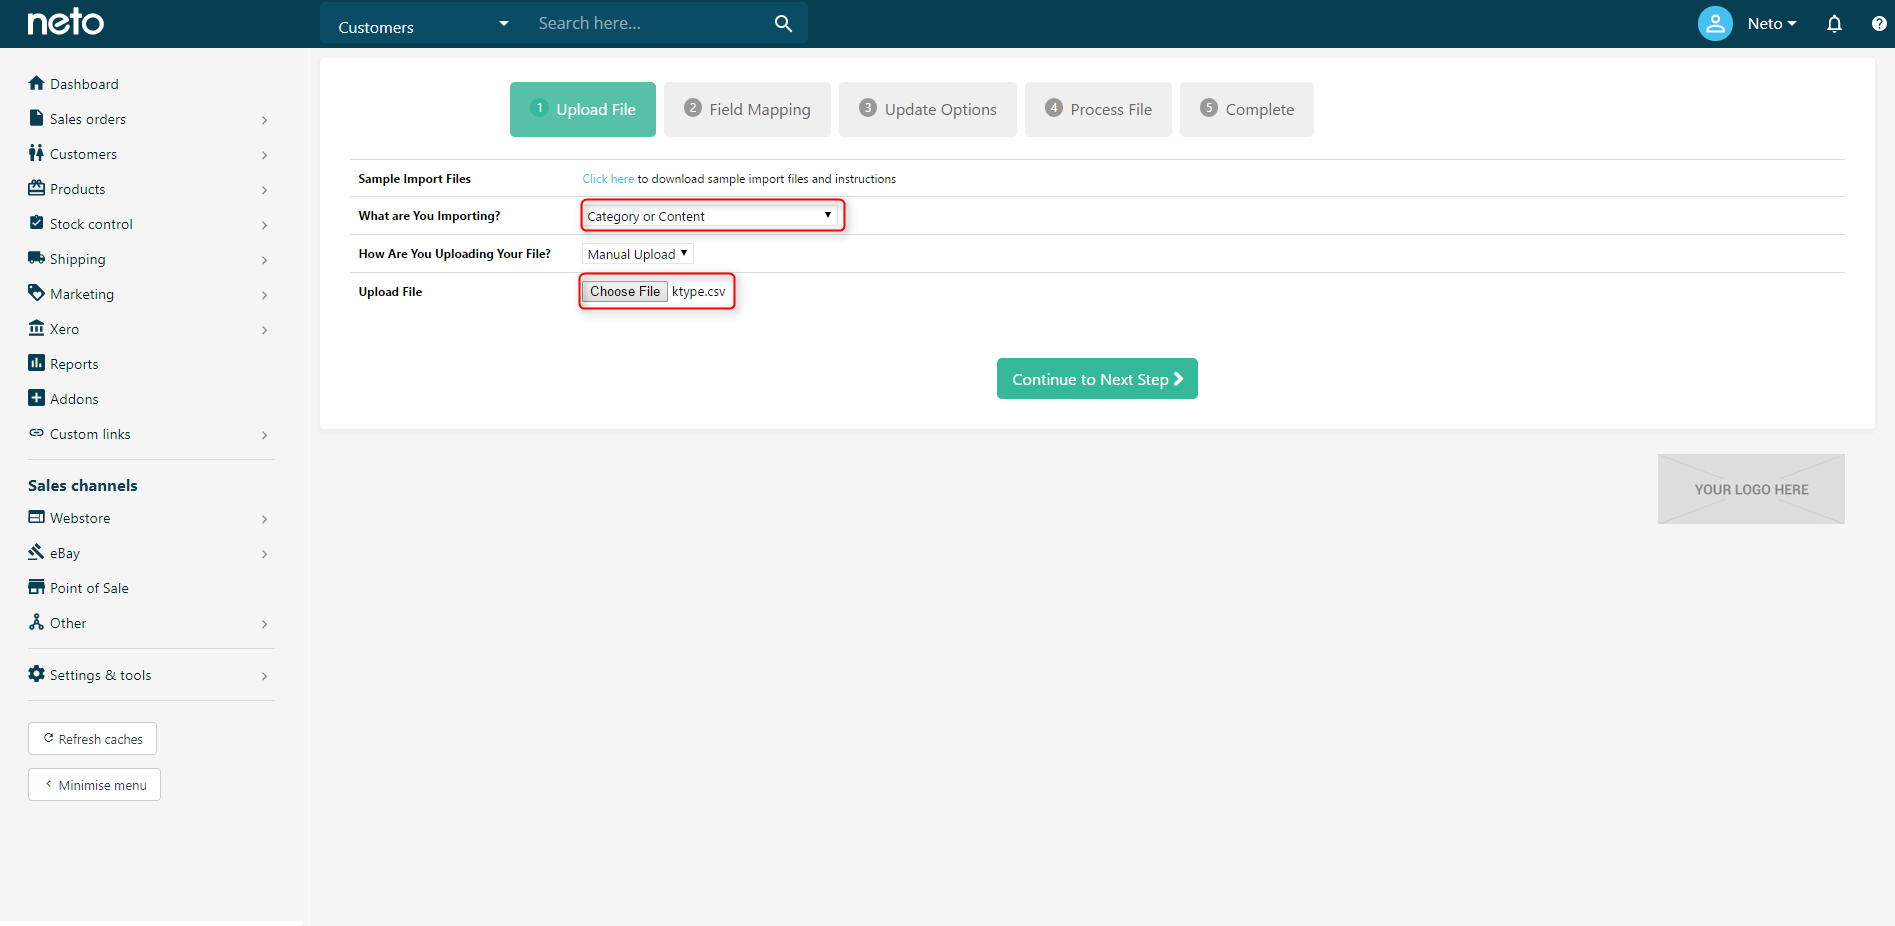
- Select Category Or Content in the What Are You Importing? drop-down box. Then click Choose File and upload the kType code list. When complete, click Continue To Next Step.
- Modify the field mapping to look like the image below and click Continue To Next Step.

- Click Continue To Next Step again and then Process File Now.
Note: Due to the size of the file, it may take several minutes for the file to be imported.
Assign kTypes codes to products
Like category information, kTypes also need to be applied to your products so eBay can read the information, and this can be done individually or in bulk.
Individually
KType codes can be assigned to products in the same way as product categories. Please follow the how to add a product to a product category instructions, remembering to select kType instead of Product Category.
Bulk Method
To assign kType codes to multiple products at once, it is best to use the Neto Import Wizard to upload a CSV file with your products and the associated kType codes.
Set up the Listing Rules Template to use kType
- In your Neto control panel, navigate to eBay > Listing Rule Templates.
- Open the template you wish to use to list using kType codes by clicking on the appropriate ID.

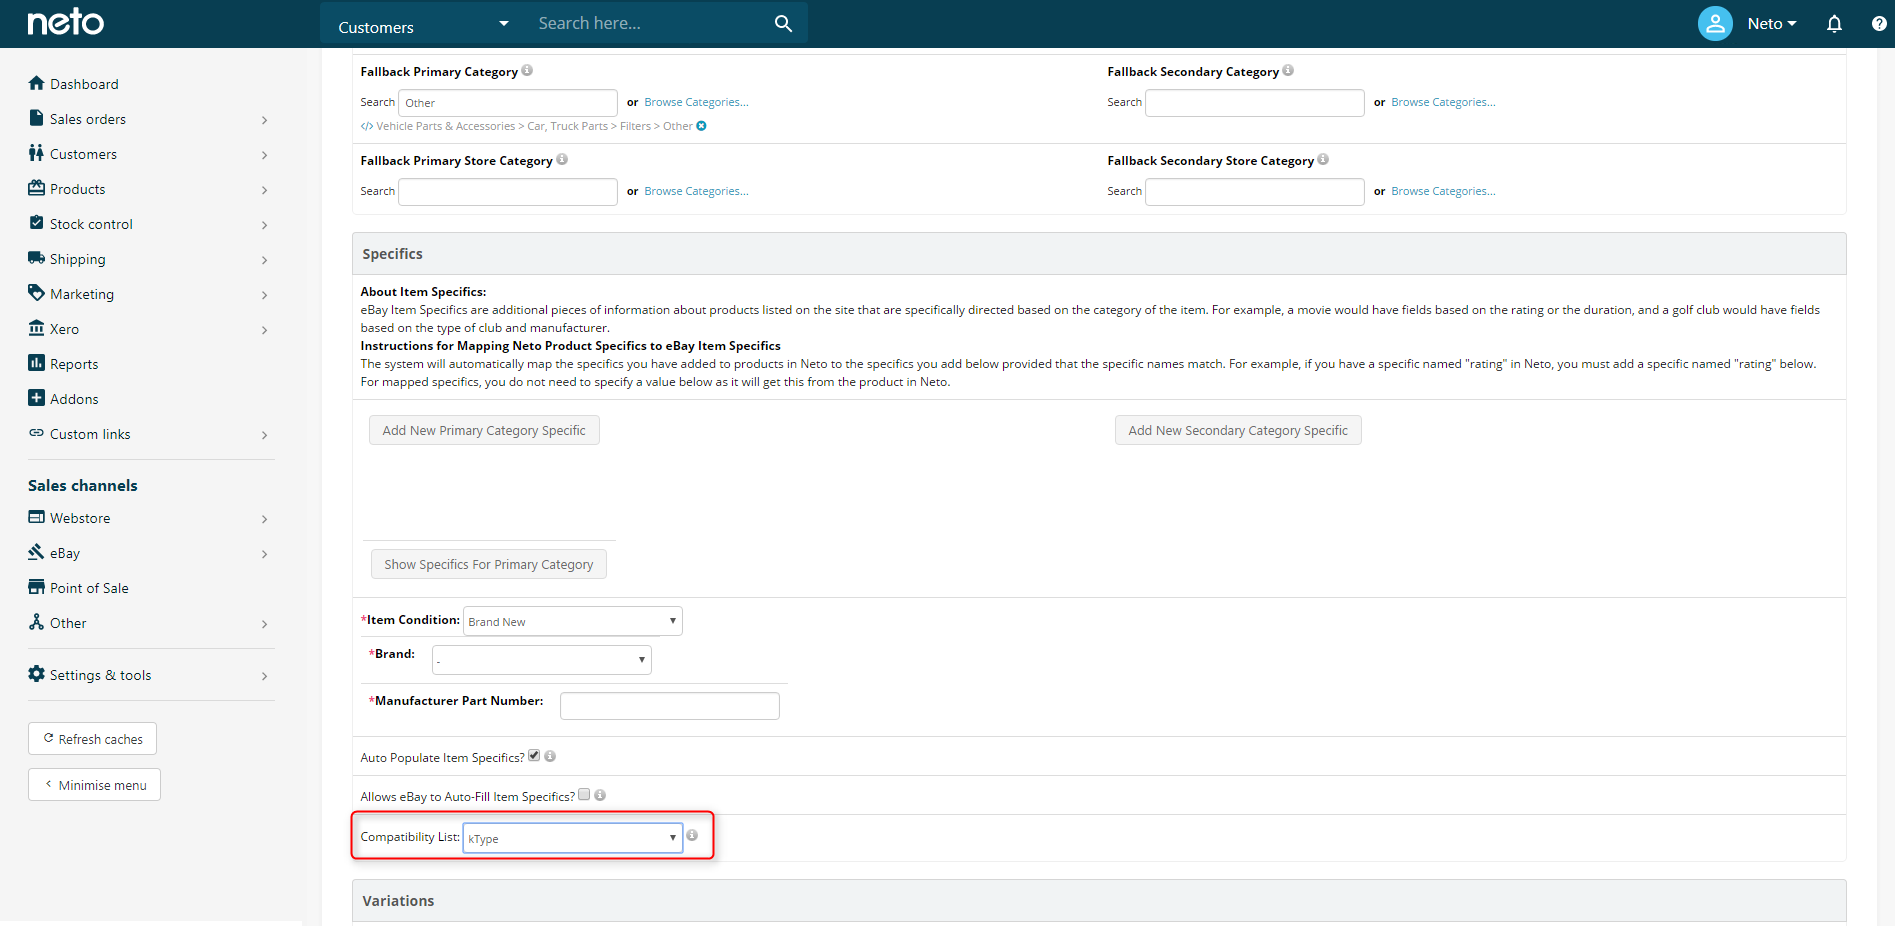
- On the Categorisation & Listing Rules tab select a fall back category that allows compatibility.

- A drop-down will appear under the Specifics section called Compatibility List. Select kType and click Save.
- All products using this rules template will now push the kType data assigned through to eBay.
Update eBay Parts Compatibility Categories
- Download the Latest Parts Compatibility Information
- Update eBay Parts Compatibility Categories
- Update Products With Inactive Compatibility
Download the Latest Parts Compatibility Information
If you haven't yet downloaded the parts compatibility information at all, follow these steps.
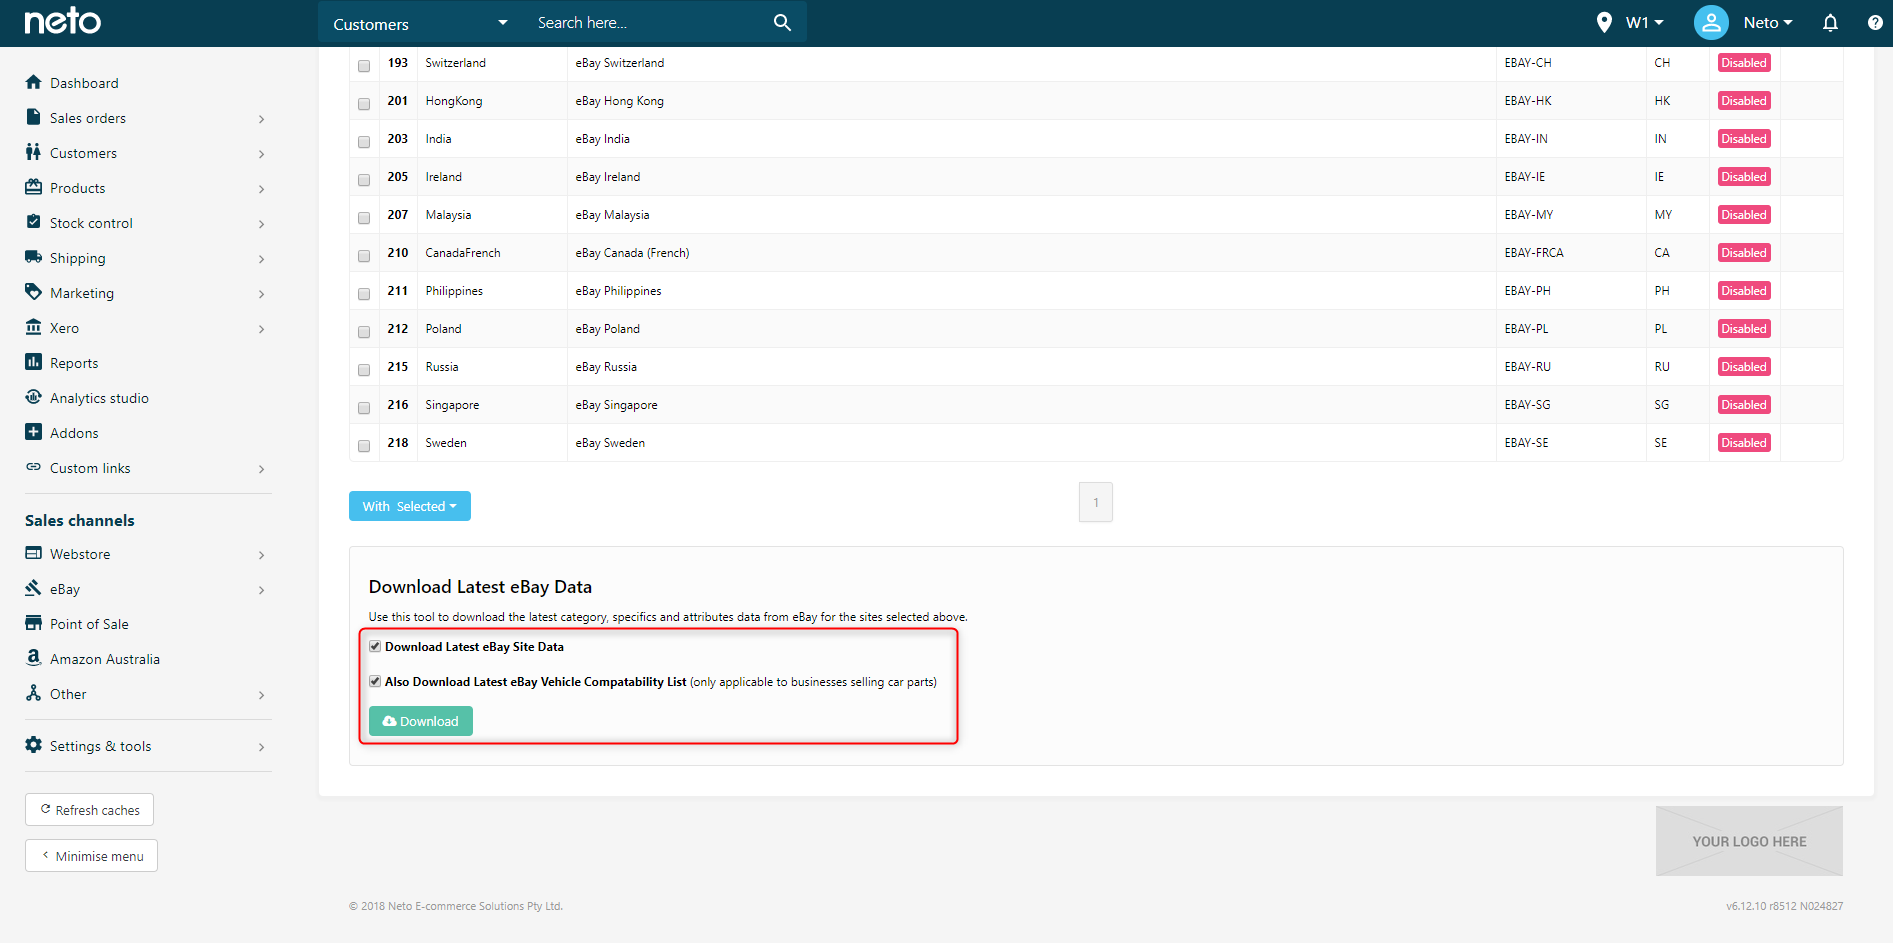
- In your Neto control panel, navigate to eBay > Setup & Tools.
- Click Site Manager.
- Select the boxes which correspond to the eBay sites you're trading on (e.g. Australia, US, UK).
- This download will take 15 - 30 minutes to complete, depending on the number of sites you've selected.
Update eBay Parts Compatibility Categories
eBay periodically updates its category structure, including its parts compatibility. So that you can access the latest data, the categories need to be downloaded into Neto so they can be applied to your products. Follow the steps below to update your parts compatibility.
- In your Neto control panel, navigate to eBay > Setup & Tools.
- Click on Import eBay Categories.
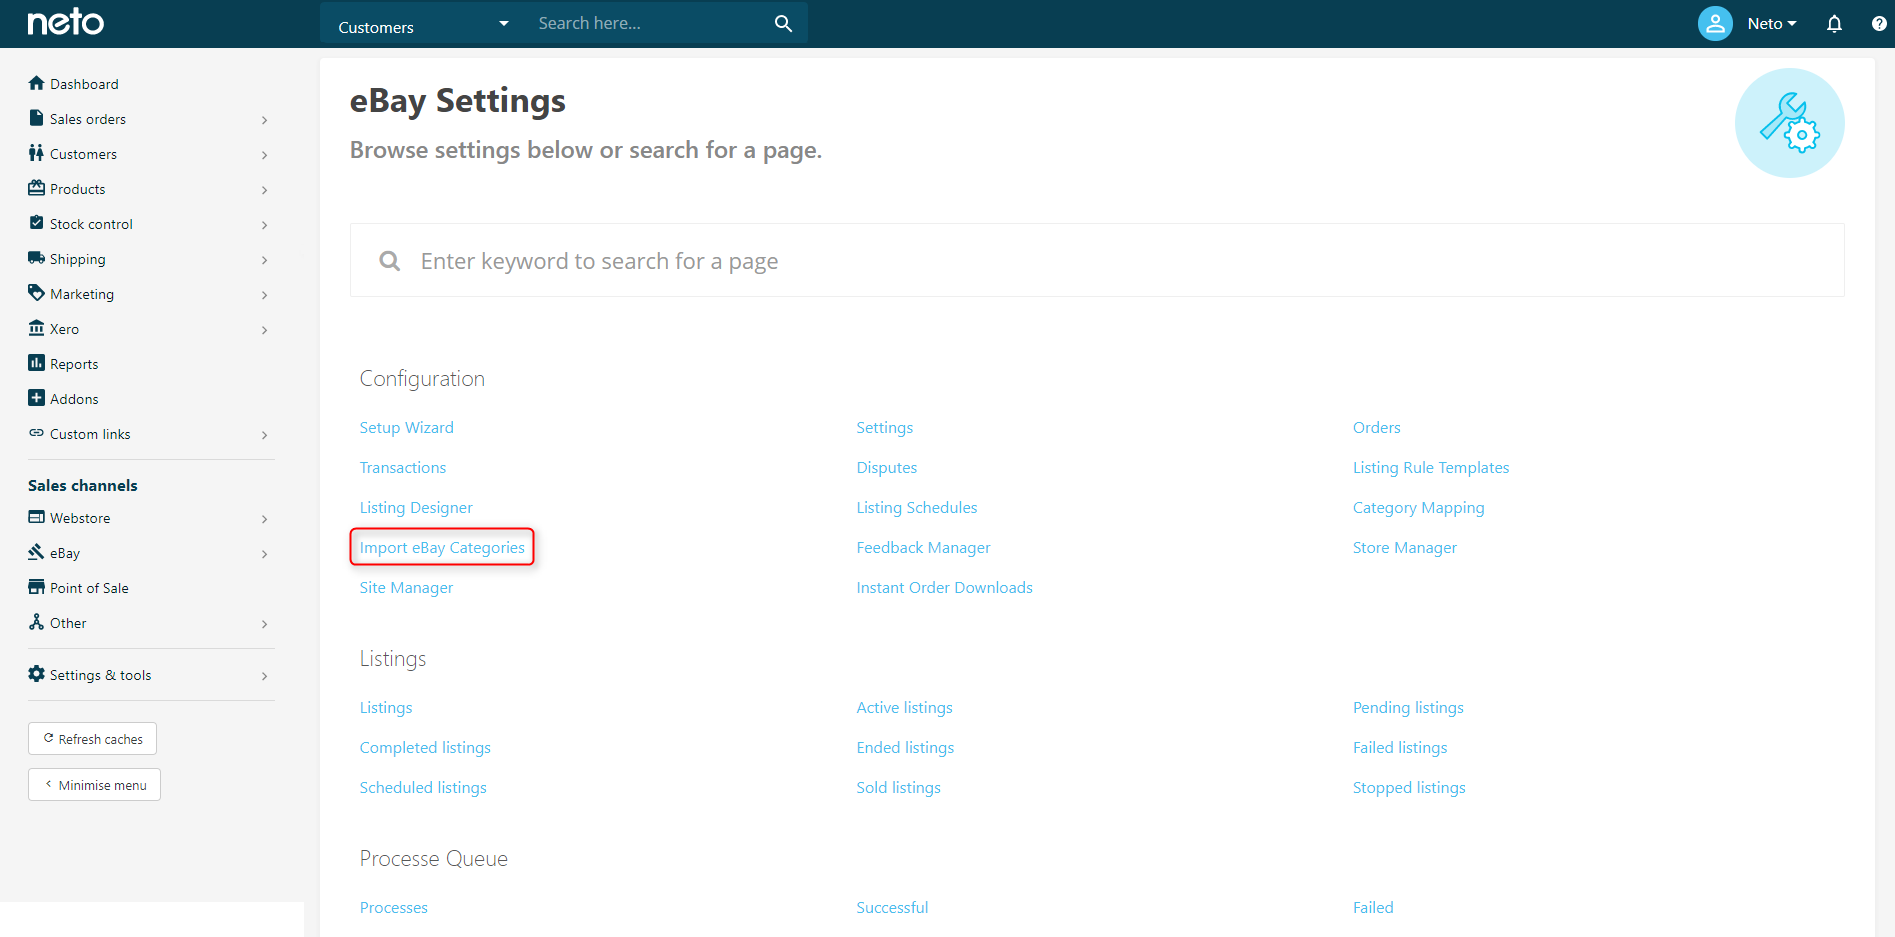
- From the drop-down list, choose Import eBay Vehicle Compatibility Categories and click Continue.
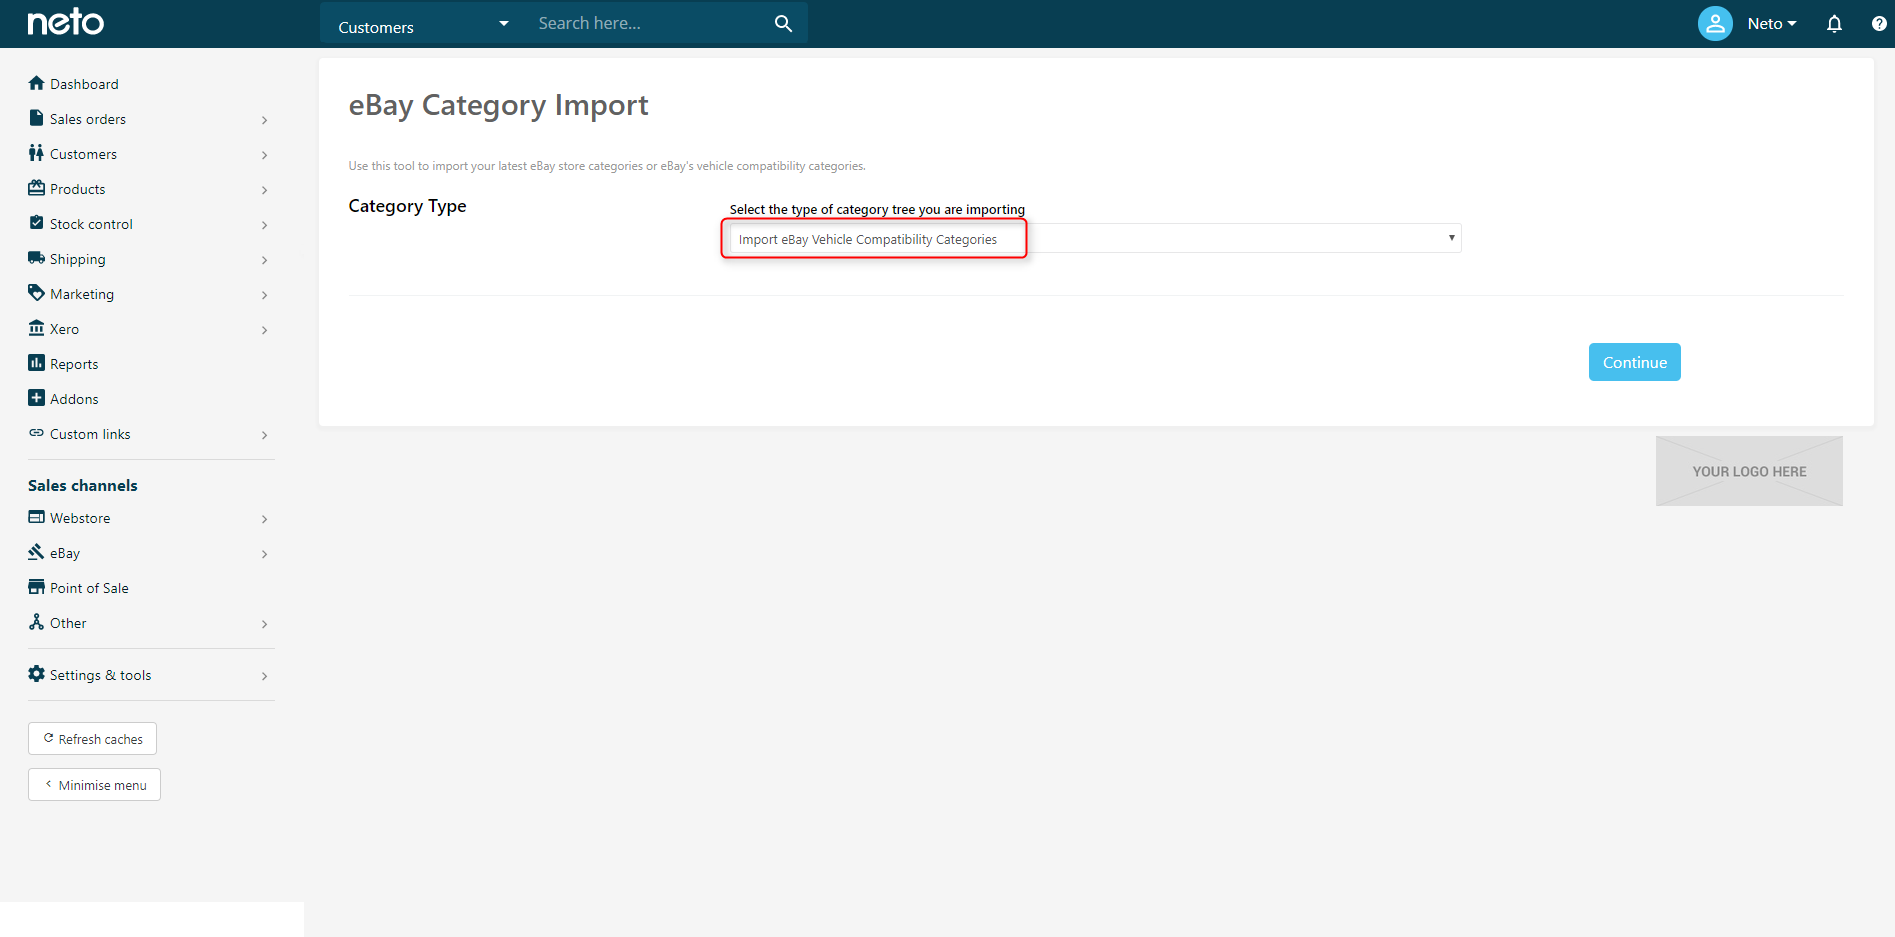
- Select the compatibility tree you wish to download. For eBay Australia, this will be Vehicle Parts & Accessories > Car, Truck Parts > Exterior > Other.
- Select the Neto category tree to update, or to start over from scratch, select Create New Category Tree.
Update Products With Inactive Compatibility
eBay will often remove outdated parts compatibility categories in their updates, so these must also be removed from products. To find products with inactive categories:
- Select if you want to replace the existing category tree or just insert new records. If you only insert new records, old categories that are no longer in use won't be marked inactive.
- Once these settings are selected, click Import Data. Parts compatibility will now be downloaded, and may take up to an hour to complete. Once done, you'll receive a confirmation screen telling you how many categories were created and updated.
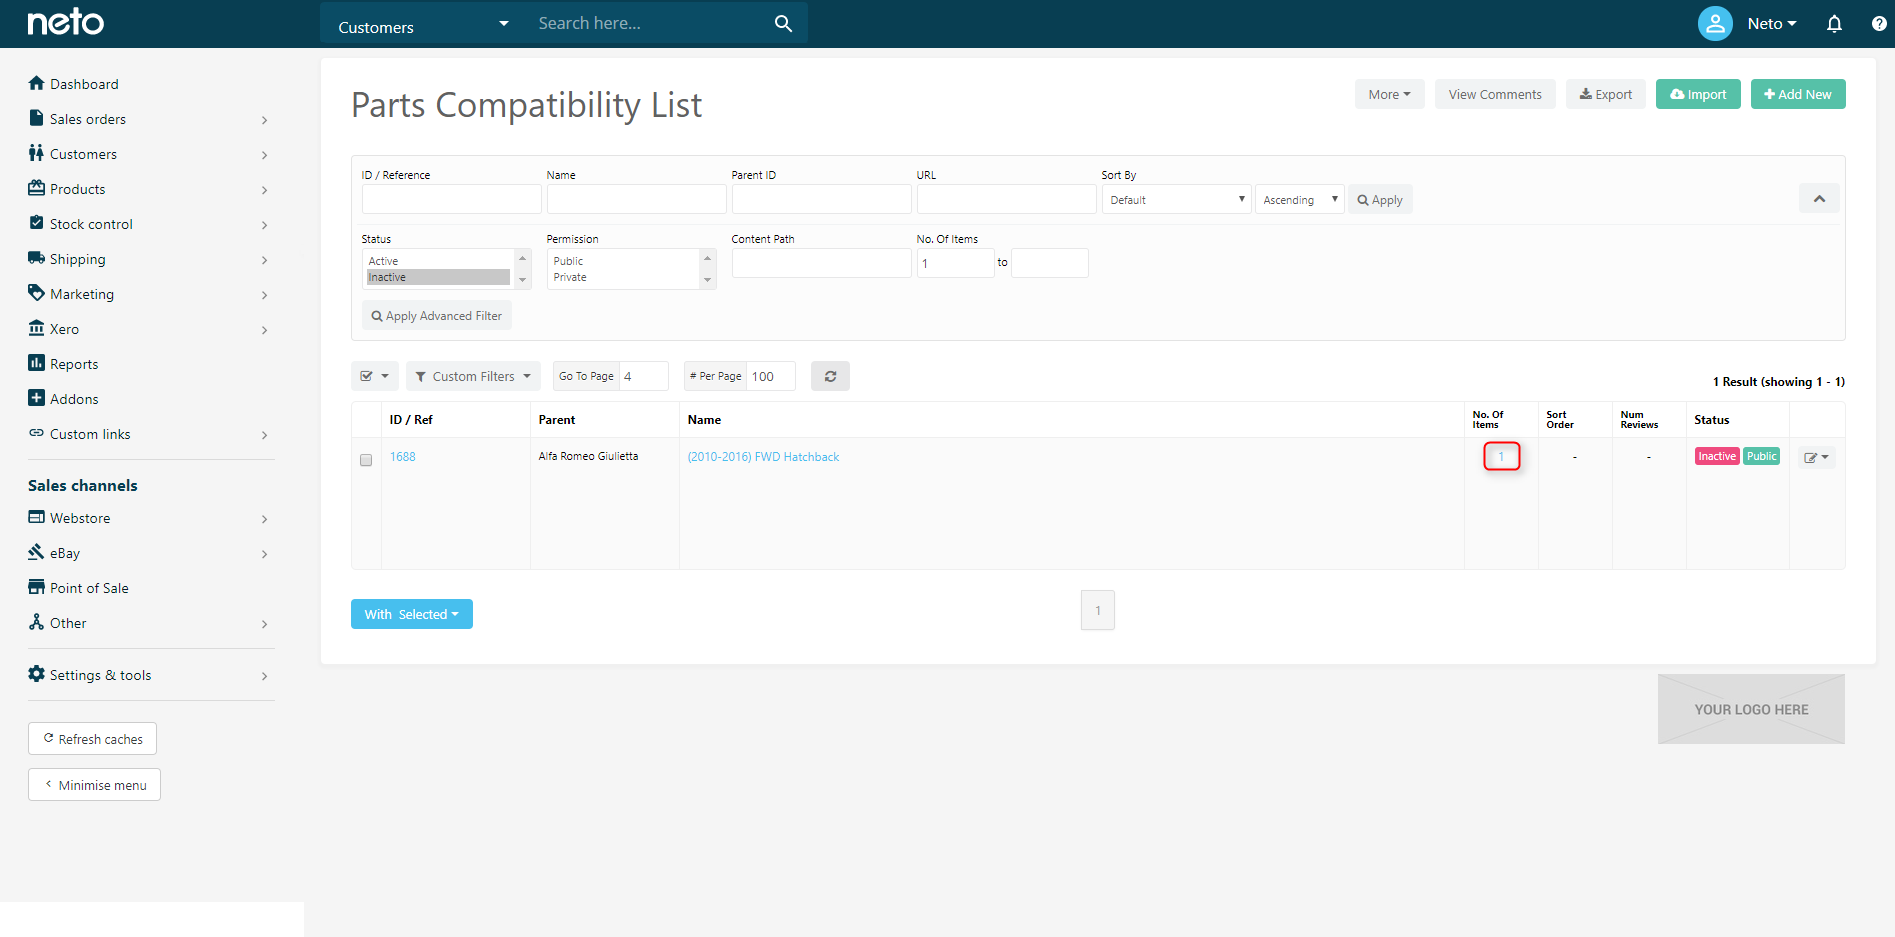
- In your Neto control panel, navigate to Webstore and choose the parts compatibility tree.
- Expand the search filters. Set the status to Inactive, and No. Of Items from 1 to blank, then click Apply.
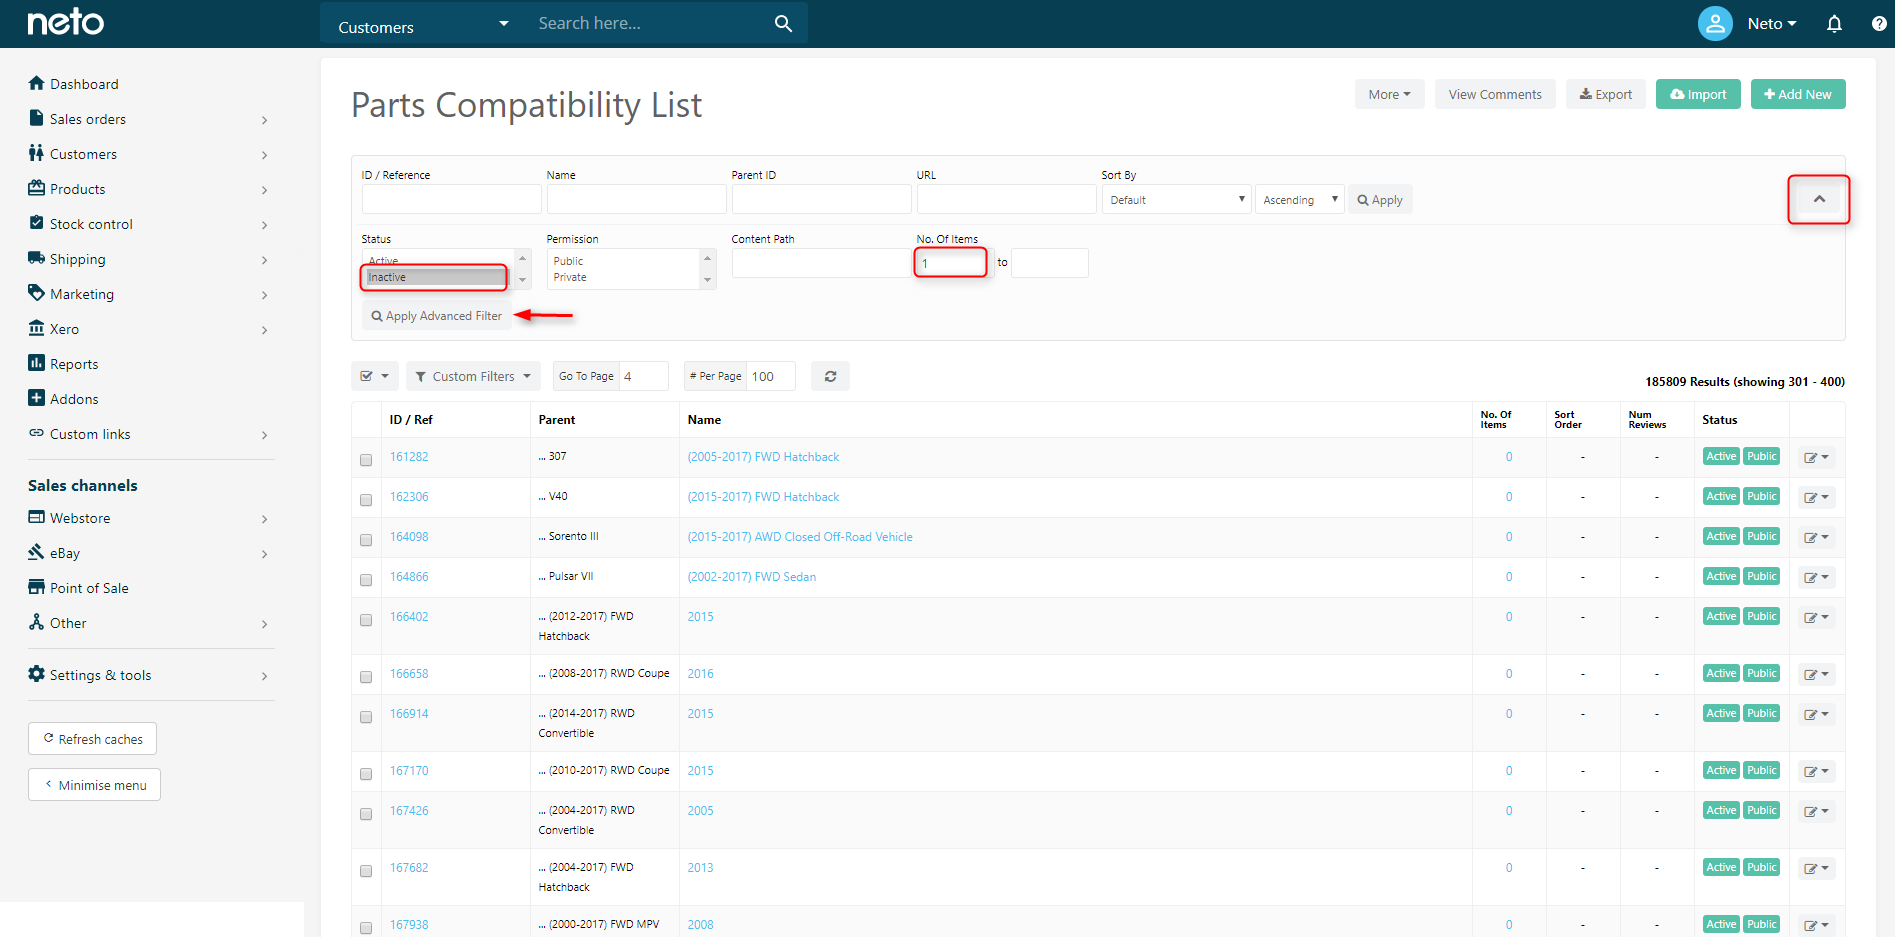
- For each inactive category, click the number in No. Of Items to see the products affected. Open them and remove the inactive category to prevent revision errors.