You can create highly targeted audience segments based on contact behavior, preferences, and engagement patterns to send more relevant email campaigns. This segmentation capability enables marketing teams to deliver personalized messaging that can substantially improve engagement rates and campaign effectiveness compared to mass email approaches.
The Next Generation Segment Builder, including AI-powered segment creation, streamlines the process of building complex audience criteria while ensuring precision targeting. When properly utilized, strategic segmentation typically leads to better campaign performance through improved relevance and helps optimize your email marketing ROI through more efficient audience targeting.
Maropost Marketing Cloud enables you to group contacts and build segments based on certain criteria, which you can use to send personalized campaigns.
To learn briefly about segmentation and its importance in Maropost Marketing, see Introduction to Segments. And to learn more about the rules and all the conditions applicable to creating the segment, see Segment Rules.
In this Article
- Creating a New Segment Manually
- Creating a New Segment via the AI Builder
Creating a New Segment Manually
To create a new segment, perform the following steps:
From your Maropost Marketing Cloud account, visit the Audience section and select Segments. On the Email Segments Index page, click on New Segment.

We are currently providing two options. You can either choose the Legacy Builder to create segments in the original UI format or you can select our recommended option of the Next-Generation Builder wherein you can build segments with up-to-date rules, criteria, and attributes. In this example let’s focus on the Next-Generation Segment Builder.

On the Next Generation Builder page, enter the segment name. Select the “Include all active contacts” option if you want to include all contacts that are registered in Maropost Marketing Cloud, irrespective of whether they are subscribed to a list or not. This option however will still exclude contacts that are in the DNM (Do Not Mail) lists. If you wish to create segments for only subscribed users, you can untick the active contacts checkbox.

If you want your contacts to fulfill all the rules in the segment, you can enable the Match All toggle. This option will cause all the rules to be connected by an “AND” logic. If disabled, the segment will fetch contacts that match any one or more rules specified in the segment.

Note: The “Match All” (AND) toggle will be enabled by default.
Next, start building your ruleset by first choosing a category. Upon selecting a category, a field placeholder emerges. Select an option from the given list.

Now select an attribute for the selected field. Sometimes, you will be asked to insert specific conditions depending on the attribute you have selected. The contacts need to fulfill these additional conditions so they can be fetched into the segment.

By using the Add Criteria option, a rule can have one or multiple conditions connected by an “AND / OR” logic. Hence, contacts will have to satisfy either all or any one of the conditions within a rule, to be added to a segment.

Note: Criteria within a rule are connected by an “OR” logic by default. This logic can however be switched to an “AND” logic by clicking on the “AND” bubble displayed to the right of the “OR”.
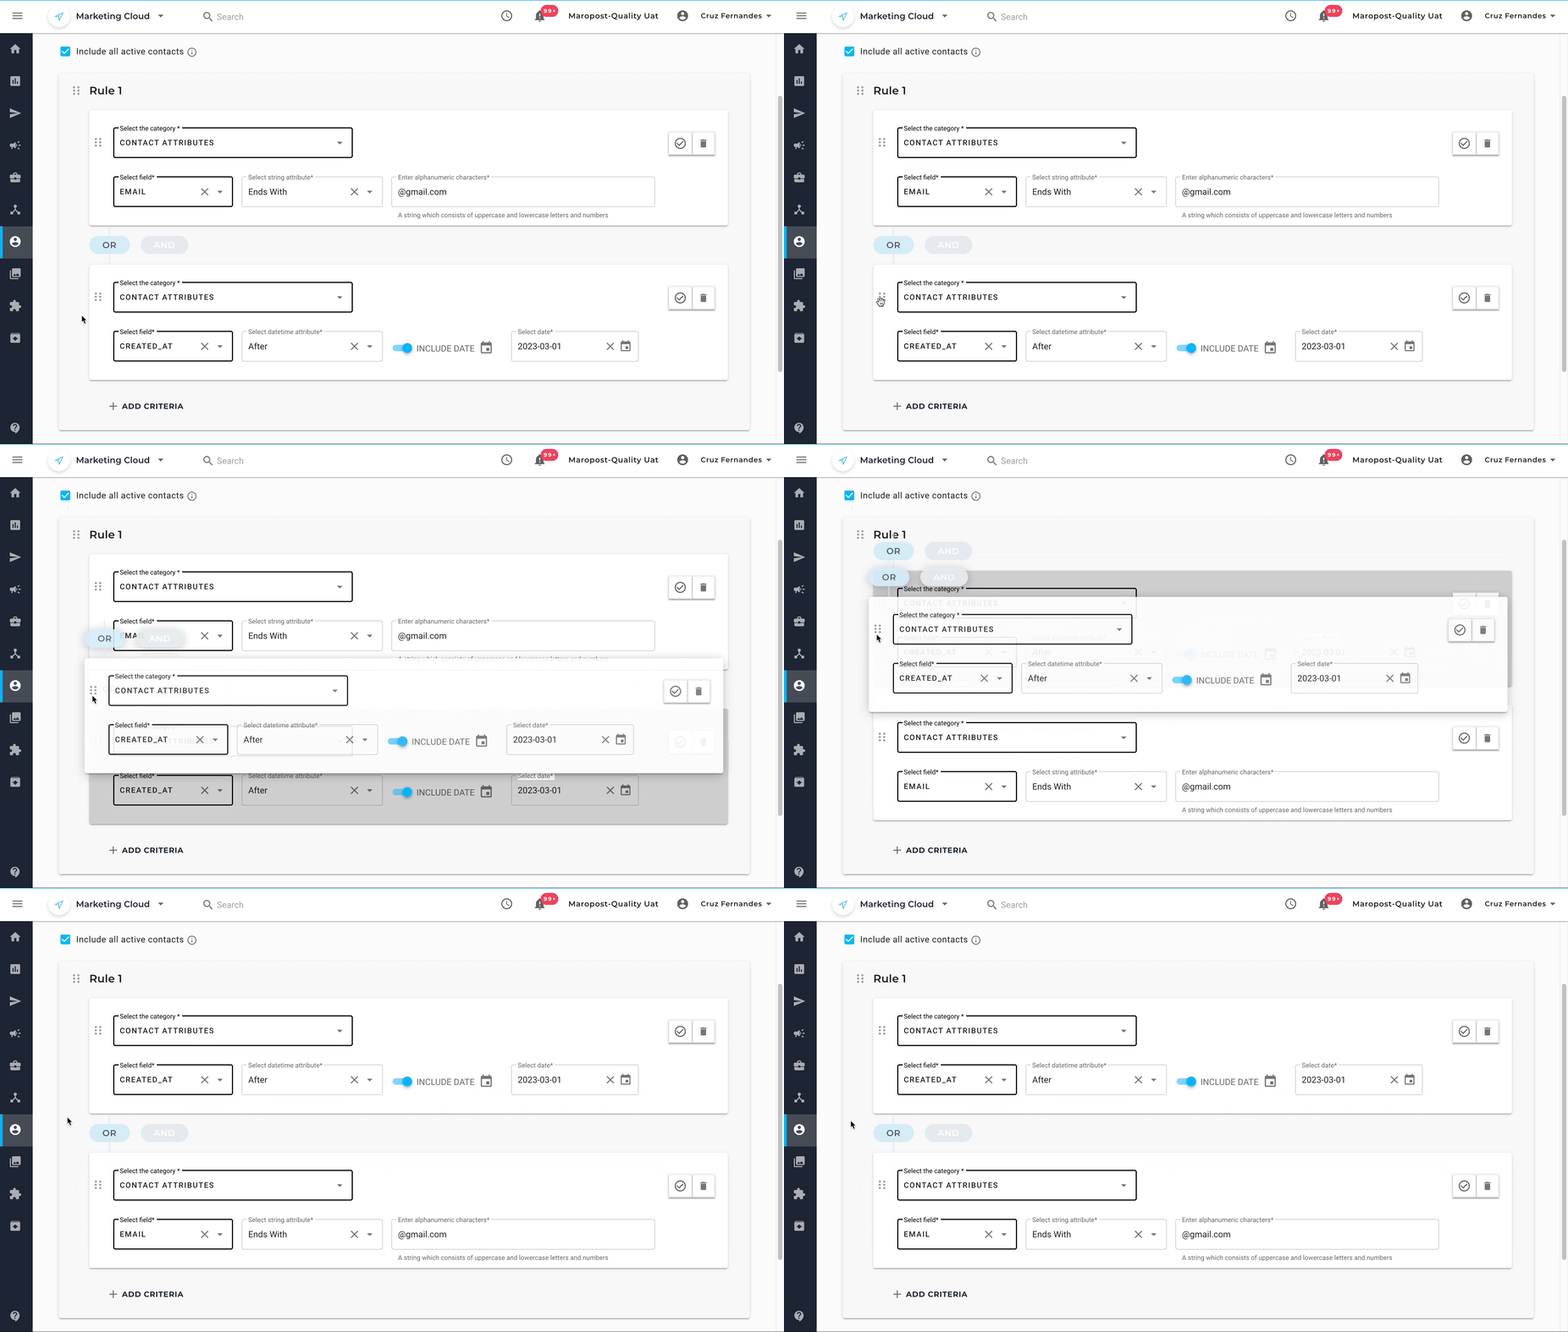
The Next Generation Segment page allows you to drag and rearrange the rules (or the conditions within them) as per your need.

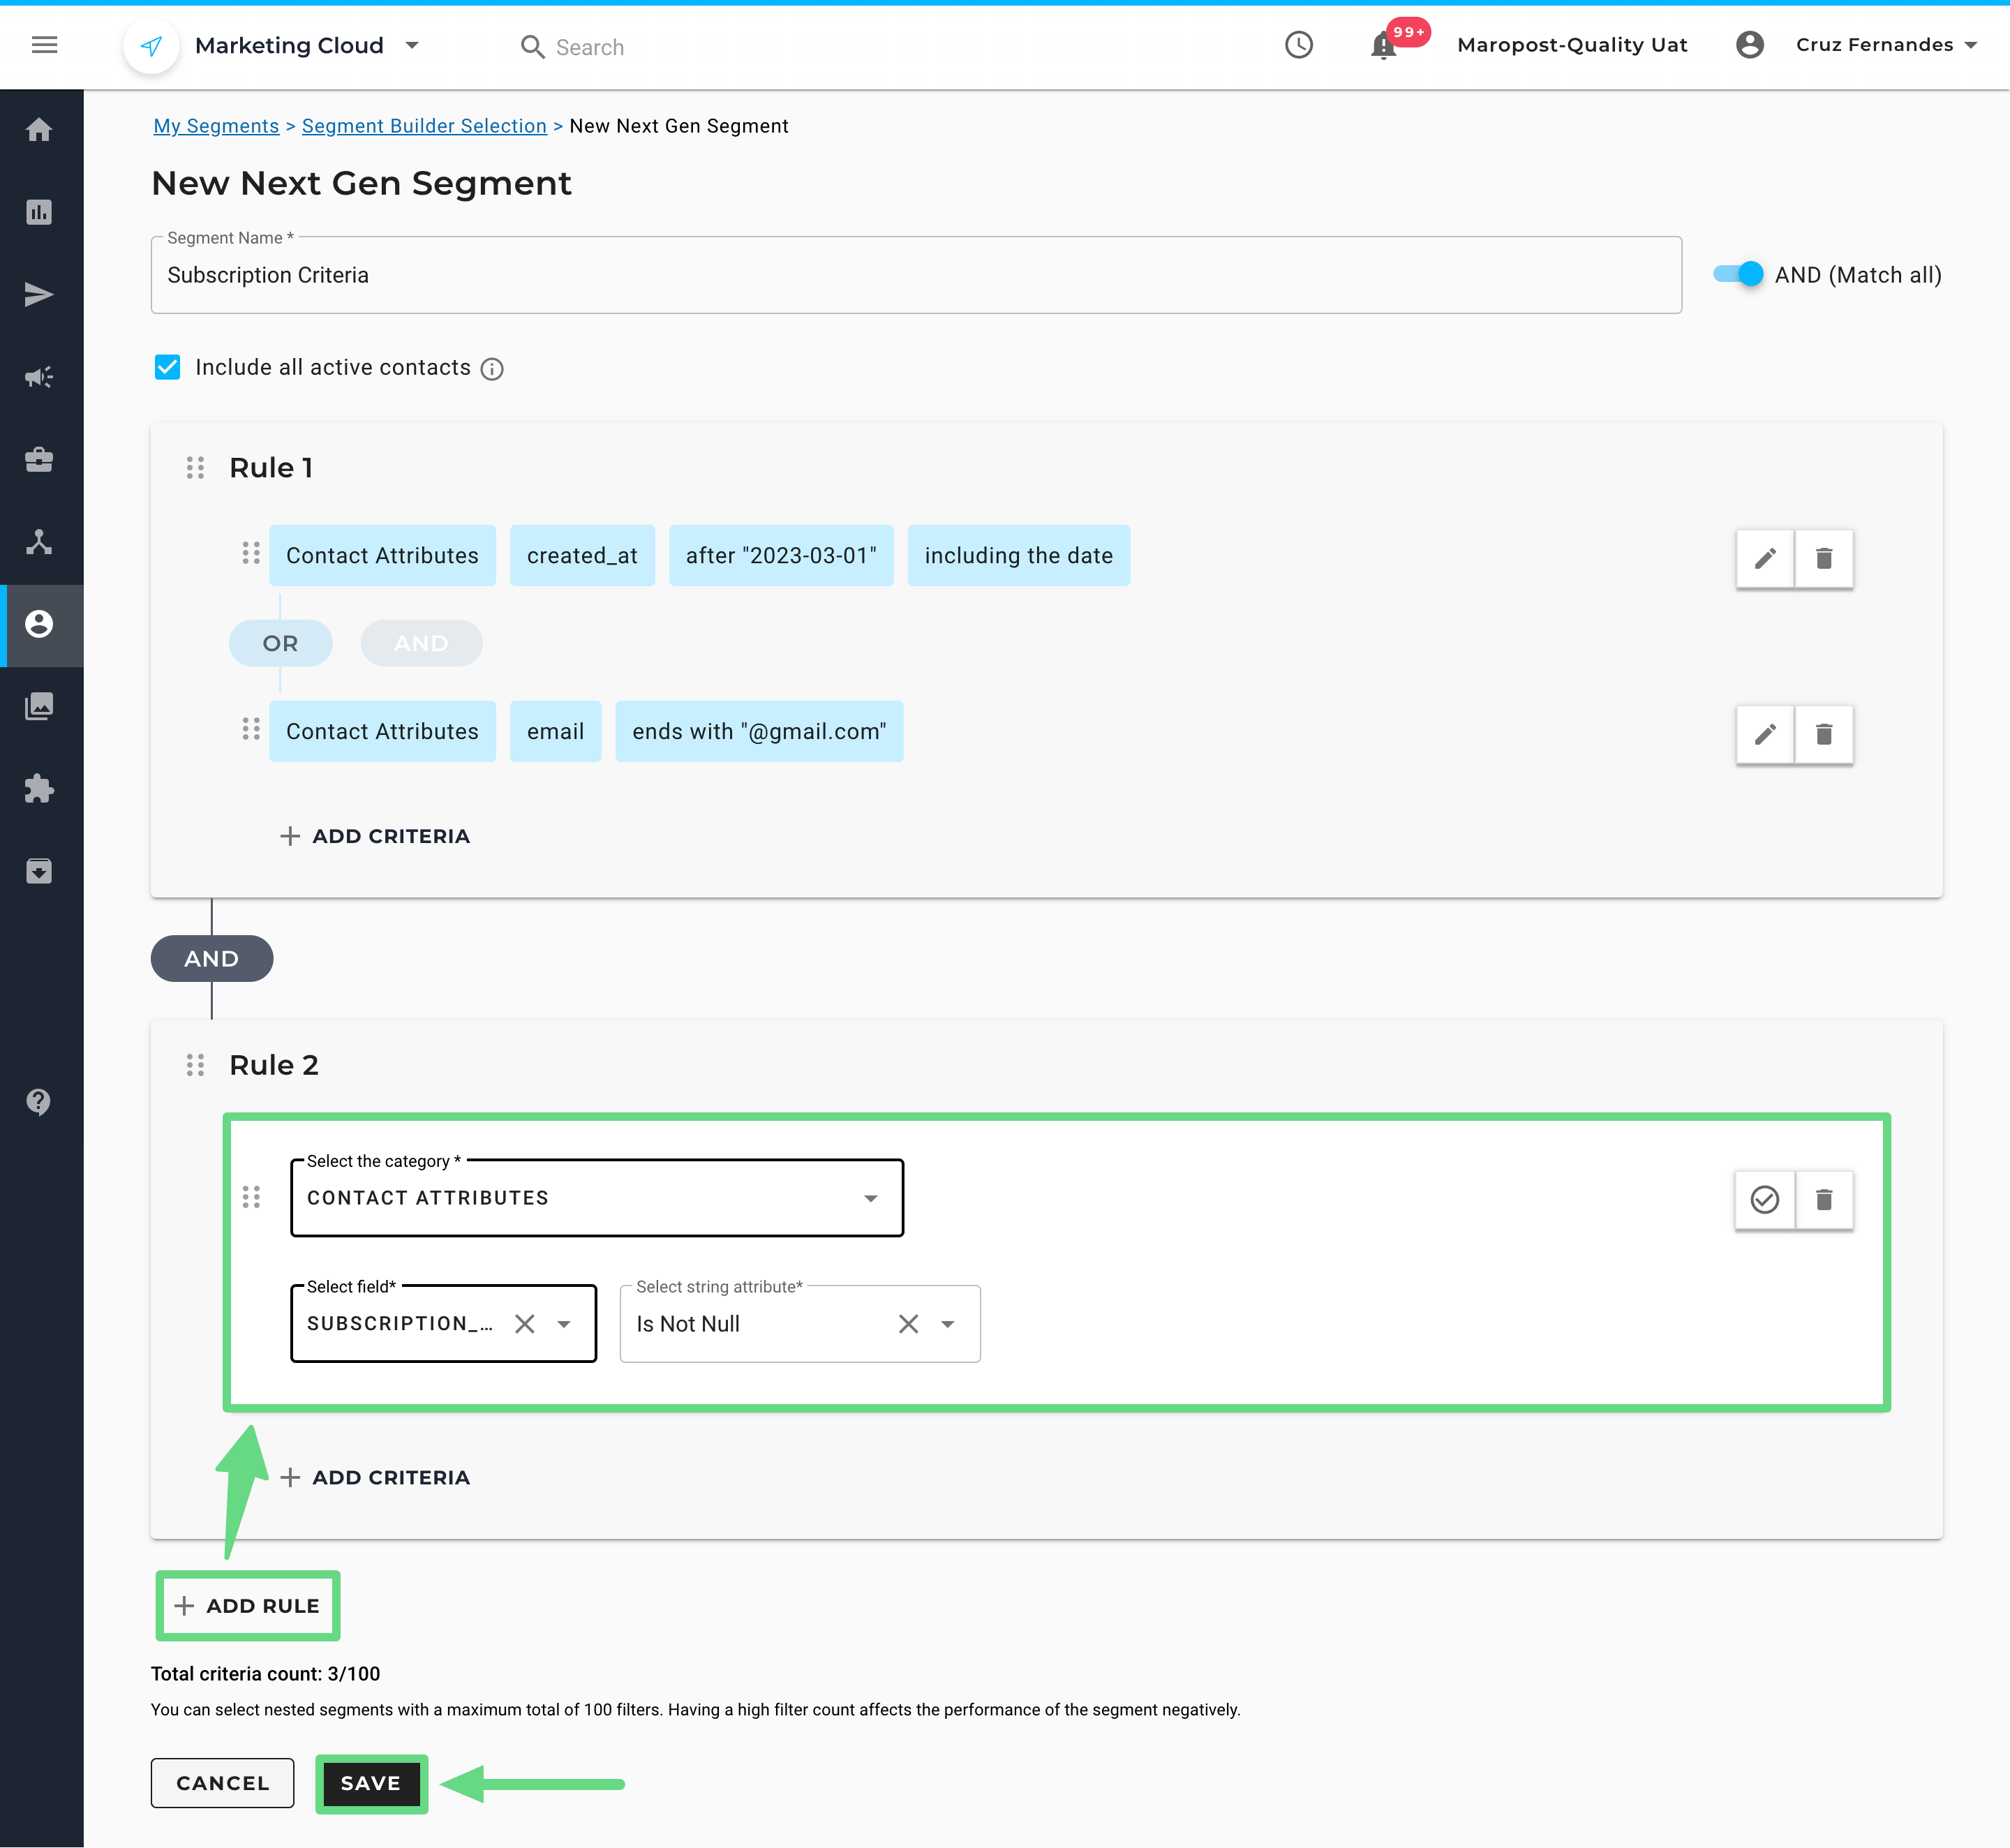
Once you have finished preparing the rules, click on the Confirm icon to see the human-readable explanation of your segment criteria. Please note that you’ll still need to save your segment for your changes to take effect. If you wish to delete any rule or condition, a Discard icon is also available.

A segment can have multiple rules. To add them, click on the Add Rule option. By default, multiple rules are connected with an “AND” logic. This means contacts will have to satisfy all the main rules so they can be fetched in a segment. Click on Save to complete the Segment creation process.

Note: The maximum number of rules and the criterias within them make up the whole segment. To improve the segment's performance and efficiency, keep the total number of filters (i.e. rules & criteria altogether) limited to 100.
Creating a New Segment via the AI Builder
Instead of manually inputting the conditions in the segment builder, you can use our Natural Language Processing toolkit, based on our AI builder, to systematically create a set of conditions for your segments in no time.
To begin creating segments, select the Next Generation Segment Builder option.

The segment builder page opens up, and a side panel gets expanded, prompting you to enter a segment rule keyword or a basic description of the segment.

If you are having difficulty mentioning certain keywords, use the Segment Prompts to view a list of general sentences that can be used to create a rule based on your requirements.

Click on the Preview Rule to see the layout structure and the order in which the segment categories and their attributes are inserted in the segment builder region. It also displays a list of contact records that meet the criteria, along with the total segment count.

Once you are satisfied with the results provided by the AI builder, save the changes made.

The segment category and its conditions get preloaded in the segment builder. Similarly, you can use the Build With AI button to create multiple rules or conditions within a rule to create segments much more quickly and effectively.

Creating RFM-based segments using the AI Builder:
With the AI builder, you can construct segments that fetch contacts based on their recency, frequency, and monetary (RFM) purchasing timelines with your business and how often they engage with your promotional drives.
To begin constructing the segment, first type in the keywords that denote contacts in the RFM groups (such as Champions, Loyals, etc.) that are important for your business growth. Next, fetch contacts who have recently kept in touch with your email reminders/notifications by typing in keywords that describe a high activity rate (such as “high engagement”) and the date/time at which they last interacted with your campaign.

Thus, the AI builder can develop complex RFM & engagement type segments for different time intervals. With several such segments at your disposal, you can plan and strategize your marketing initiatives by sending only relevant messages to your target audience.
To learn more about analyzing a contact’s purchasing and Engagement metrics, read our Unlock Customer Insights with eRFM Analysis article.