You can streamline your email marketing workflow by creating and scheduling campaigns directly from your Salesforce Classic interface. This integration eliminates the need to manually export contact data and significantly improves campaign targeting accuracy by leveraging your real-time CRM information.
When properly configured, this approach helps optimize your marketing efficiency by automatically syncing your latest prospect and customer data at send time. This ensures your campaigns reach the most current audience segments while reducing the operational overhead typically associated with managing separate marketing and CRM systems.
The email campaigns to be sent through Marketing Cloud can be created entirely within the Salesforce Classic user interface. You can use Salesforce Campaigns and Salesforce Reports to define the target audience of your email campaign.
Create and Schedule an Email Campaign
When you create and schedule an email campaign in the Salesforce user interface, it immediately appears in Maropost as a scheduled, priority send campaign. On the scheduled date and time, Maropost retrieves the latest targeted audience from Salesforce before sending the campaign.
Create and Schedule a Maropost Campaign in Salesforce
Follow the steps to create and schedule a Maropost email campaign in the Salesforce interface:
- Within the Salesforce Classic user interface, click on the 'Maropost Campaigns' menu tab, then click the [New] button to display the 'New Maropost Campaign' screen.

The information for the Mailing Address section defaults to that of your Salesforce organization. You can change it here for the email campaign.
- Click Save to save the email campaign. You'll immediately see the email campaign displayed in View mode so that you can proceed to the next step.

- Click the 'Select Content' link in the 'Content/Brand Information' section of the screen. A new page appears with 1000 of the most recently created email content sorted in alphabetical order for you to choose from.

- After selecting the content, click Save to return to the original screen. You'll notice that your campaign is now in DRAFT mode. At this point, the Maropost campaign only exists in your Salesforce organization. It has not been created within Maropost yet.
- Scroll down to the 'Salesforce Campaign List Builder' section to add a Salesforce campaign and/or a Salesforce report as the targeted audience for your email campaign. Click the (+) icon to search and add the campaign or report.
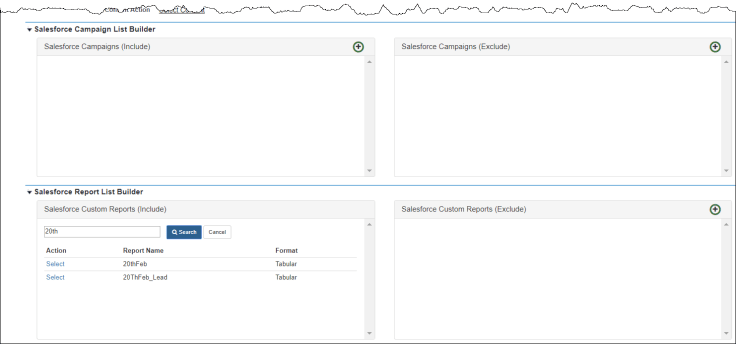
You can add any combination of Salesforce Campaigns and Salesforce Reports to define your target audience, including which campaigns and reports to use for inclusion and which to use for exclusion. You can remove your selection by clicking the (X) icon.
- Scroll back up to the 'Email Message Information' section of the screen.

- Click the 'Schedule Campaign' link in the Campaign Action. After the screen refreshes, you'll see that the Campaign Status has changed from 'Draft' to 'Scheduled', and that the Campaign Action link has changed to 'Cancel Campaign.'
Verify the Campaign in Maropost
After a campaign is created and scheduled in the Salesforce interface, the campaign appears in Maropost as a scheduled campaign.

When you look at the campaign details, you'll see that each Salesforce campaign and Salesforce report that you've selected for inclusion is listed as a separate list. Each campaign and report that you've selected for exclusion is listed as a suppressed list.
The contact count shows as '0' because the campaign hasn't yet been sent. At send time, Maropost makes an API call to your Salesforce organization to retrieve the selected Leads and Contacts. That is when the true count of the lists will be displayed.
Regardless of whether the record is a Lead or a Contact in Salesforce, it always maps to a Contact record in Maropost.
Editing a Scheduled Campaign
You can make any changes you want to a Maropost campaign until 15 minutes before the scheduled send time. To make changes to the campaign, you will first need to cancel it and then reschedule it.
View the campaign's detail screen and click the 'Cancel Campaign' link for the Campaign Action. After the screen refreshes, you'll see that the Campaign Status has changed to 'Canceled' and that the Campaign Action link has changed to 'Reschedule Campaign.'

If you look in Maropost for that same campaign, you'll see that its status is now changed to 'Draft.' This safeguard is in place to prevent a campaign from being sent before you've had the chance to complete your changes.
Once you've made your changes, click the 'Reschedule Campaign' link for the Campaign Action. After the screen refreshes, you'll see that the Campaign Status has changed back to 'Scheduled' and that the Campaign Action link has changed to 'Cancel Campaign.'
If you look in Maropost for that same campaign now, you'll see that its status is changed to 'Scheduled.'
Email Campaign Reports
You can find the consolidated email campaign delivery and response metrics on the ANALYTICS > Campaign Reports page. You can also click the campaign name on the CAMPAIGNS > Email Campaigns index page to get to the report.
Maropost for Marketing refreshes all email campaign summary metrics every 10 minutes.
