A Trigger widget is an element that is required to start a Journey. Through a trigger, a contact enters the Journey and experiences the rest of the elements depending on the construction of the Journey.
You may have multiple triggers starting a Journey. However, be aware that the more triggers you have, the more difficult it will be to know which trigger enabled a contact to enter the Journey.
New Subscription
The New Subscription trigger initiates when a new subscriber is added to the list selected in the trigger. It enables you to select multiple lists so that you can trigger the Journey to all the contacts that are subscribing to different lists at the same time.
The following screenshot shows how the New Subscription widget appears on the canvas:

The following screenshot shows the New Subscription dialog box that appears when you double-click the widget:

At the top-right corner of the widget's dialog box, you can see the number of contacts who entered the Journey from this trigger. You can further click the count to see the details of the contacts in this Journey.

Campaign Opened
The Campaign Opened trigger initiates when a user opens a campaign that was selected in this trigger. This trigger starts a Journey based on campaign opens. You can add multiple campaign IDs in the trigger using comma separation.
The following screenshot shows how the Campaign Opened widget appears on the canvas:

The following screenshot shows the Campaign Opened dialog box that appears when you double-click the widget:

Link Clicked
The Link Clicked trigger initiates a Journey when someone clicks on a link sent by you through a normal campaign, A/B campaign, or Journey campaign.
The following screenshot shows how the Link Clicked widget appears on the canvas:

The following screenshot shows the Link Clicked dialog box that appears when you double-click the widget:
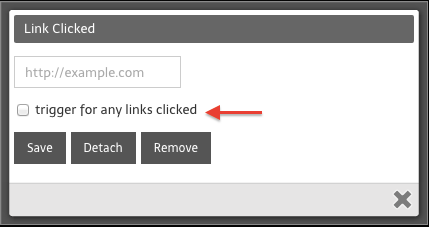
If you select the ‘Trigger for any links clicked’ checkbox, then the Journey will trigger for all contacts who click on any link from all of your sent normal campaigns, A/B campaigns, or Journey campaigns at any point.
Product Purchased
The Product Purchased trigger initiates the Journey for contacts who are purchasing a single or multiple products, depending on your trigger selection.
The following screenshot shows how the Product Purchased widget appears on the canvas:

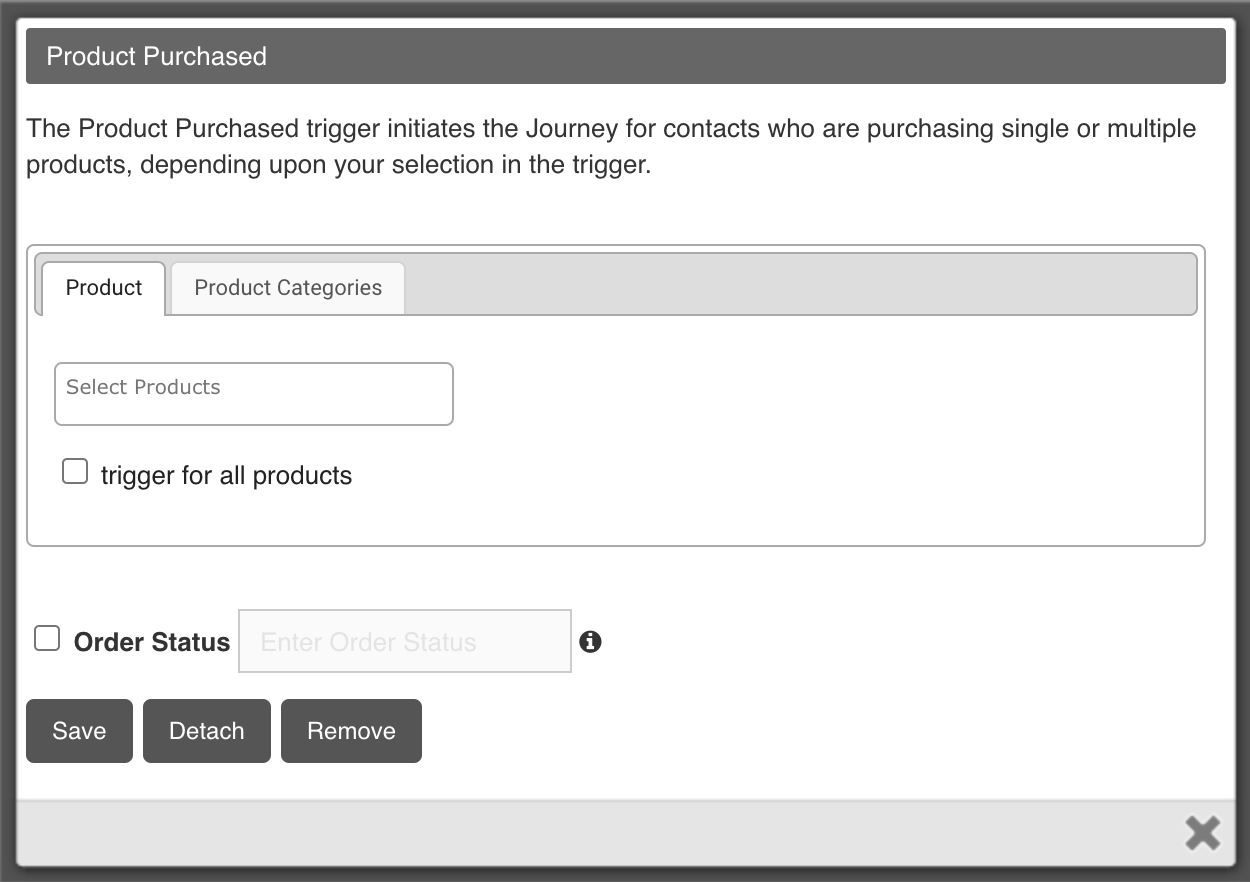
Double-click the widget to see the Product Purchased dialog box, where you can set up the Journey trigger options.
On the Product tab of the Product Purchased trigger, you can select the products for which Journey will be triggered. The Select Product drop-down field shows all the products that are stored for your account. These products are fetched from the cart integration in your account. You can also add and manage products on the PRODUCT CATALOG tab of the Product Recommendations page. For more information, see Product Catalog.
You can select the trigger for all products checkbox to trigger the Journey for all the contacts who purchase any product. To trigger the journey only for contacts with a specific order status (for example, sale, refund, abandon, or cancel), select the Order Status checkbox, and then enter the order status in the adjacent text box.
On the Product Categories tab of the Product Purchased trigger, you can select the product categories for which Journey will be triggered. The Source drop-down field shows all the integration sources. Based on the selected source, the available Brands and Product Categories for the integration are shown. You can then select the ones for which you wish to trigger the Journey.

Total Revenue
The Total Revenue trigger is initiated when a contact’s revenue equals what is set in the trigger. For example, if you set $10 as the revenue generated, then when a contact’s total revenue reaches $10, this trigger will add that contact to the Journey.
The following screenshot shows how the Total Revenue widget appears on the canvas:

The following screenshot shows the Total Revenue dialog box that appears when you double-click the widget:

Form Event
The Form Event trigger is initiated when a subscriber fills the form selected in the trigger. You can select multiple forms in this trigger. It works instantly, so the contact is added to the Journey as soon as they fill out the form successfully.
The following screenshot shows how the Form Event widget appears on the canvas:

The following screenshot shows the Form Event dialog box that appears when you double-click the widget:

API Event
The API Event trigger can add a contact to a Journey by making a POST API call. You can use the contact ID, email address, or table value in order to trigger the Journey for a contact. The method is ‘POST’. To view the POST calls necessary to initiate this trigger, double-click on the widget.
The following screenshot shows how the API Event widget appears on the canvas:

The following screenshot shows the API Event dialog box that appears when you double-click the widget:

Segment Event
The Segment Event trigger is based on segments. The trigger is not instantaneous. You need to select a time frame for it to work. Only one segment can be selected in this trigger.
The following screenshot shows how the Segment Event widget appears on the canvas:

The following screenshot shows the Segment Event dialog box that appears when you double-click the widget:

Contact Field Updated
The Contact Field Updated trigger contains all the default and custom fields created in your account. The trigger initiates when any of the selected fields are changed for a contact. You can select multiple fields in this trigger. The trigger initializes immediately.
The following screenshot shows how the Contact Field Updated widget appears on the canvas:

The following screenshot shows the Contact Field Updated dialog box that appears when you double-click the widget:

Table Field Updated
The Table Field Updated trigger is specific to relational tables that have a column defined as 'sendable'. Depending upon your selection, the trigger is initiated either when a record is created or updated.
Note: The Table Field Updated Journey trigger will ONLY work when the contact’s table field is updated through the Relational Tables API, or manually from the user interface, or by uploading a file. Table field updates made by external applications, or by uploading a file via Data Journeys, will not activate this trigger.
The following screenshot shows how the Table Field Updated widget appears on the canvas:

The following screenshot shows the Record Updated tab of the Table Field Updated dialog box:

The following screenshot shows the Record Created tab of the Table Field Updated dialog box:

Subscription Changed
The Subscription Changed trigger is initiated when a subscription of a contact changes, for example, from unsubscribed to subscribed. You can select multiple lists in this trigger.
The following screenshot shows how the Subscription Changed widget appears on the canvas:

The following screenshot shows the Subscription Changed dialog box that appears when you double-click the widget:

Tag Event
The Tag Event trigger initiates when a contact gets added or removed from a tag. In this trigger, you can select two functions at the same time – contact added to a tag and contact removed from a tag.
The following screenshot shows how the Tag Event widget appears on the canvas:

The following screenshot shows the Tag Event dialog box that appears when you double-click the widget:

Web Page Event
The Web Page Event trigger is initiated when a contact visits a page on your website or clicks a link on your website.
Note: The trigger requires you to have implemented Maropost’s web tracking on your site.
The following screenshot shows how the Web Page Event widget appears on the canvas:

The following screenshot shows the Web Page Event dialog box that appears when you double-click the widget:

You can define the following on-site events that initiate the trigger:
Page Views – A contact enters the Journey as soon as they view the page specified in the trigger.
✔️ Points to Remember:
- The URL must be for a page that is tracked by the Maropost web tracking script.
- You must enter the fully qualified URL of the web page as it is recorded by the Maropost web tracking script.
- By default, the Maropost web tracking script records the domain and path of the web page. It does not record query string parameters appended to the page URL.
- If your web developer is overriding the default page URL, then you must enter the page URL according to the overridden URL.
Link Clicks – A contact enters the Journey as soon as they click a link specified in the trigger.
✔️ Points to Remember:
- The URL must be for a link on a page that is tracked by the Maropost web tracking script.
- The web page corresponding to the link URL does not have to be tracked by the Maropost web tracking script.
Web Funnel – A contact enters the Journey depending upon when they complete, abandon, or recover a web funnel. Use this trigger to send remarketing emails to contacts who abandon a funnel. For example, abandoned a shopping cart, didn’t complete a membership profile form, didn’t finish a questionnaire or survey, and so on.
Abandoned Cart
The Abandoned Cart trigger is initiated when a user abandons their shopping cart. A shopping cart is considered abandoned after one hour of cart creation. To learn more about how to set up abandoned cart emails, see Sending Abandoned Cart Emails to Your Neto, Shopify, or ClickBank Contacts.
