You can capture contact profile attributes automatically from your website to enable more relevant messaging and significantly improve subscriber engagement. This feature helps optimize your email marketing ROI by collecting valuable subscriber data during website interactions, which enables personalized communication that typically leads to better open rates and reduced unsubscribe rates.
When properly configured, contact attribute capture streamlines your workflow by automatically populating your contact database with behavioral and demographic information. This enhanced data collection helps ensure your email campaigns reach the right audience with relevant content, improving campaign effectiveness while reducing manual data entry effort.
The Contact tab displayed in the Script Builder allows you to pass values collected from the website into your Contacts Database in Maropost. The screen shows you the standard fields (email, first name, last name, phone, and fax) and each of the custom fields that you have created in your Contacts Database.
As the examples indicate, you have the full range of JavaScript to pass both the static and dynamic values to each of the contact fields. You can even reference JavaScript variables that are defined in other places on the web page.
REMEMBER: If you want the Maropost web tracking script to reference a variable that you've defined elsewhere on your web page, you'll need to place the web tracking script on the web page below where you have defined the variable.
Setting Up Web Tracking on Marketing Cloud
- From the Navigation panel, go to Audience and select the Email Contact Lists option. Choose an Email List from the index page.

- Visit the Contacts section.

- Select and copy the email you want to add as a static address.

- Now visit the Web Tracking section under Audience. Choose the domain wherein you'll want to insert the static address.

- Click on the Script Builder tab.

- Insert the email address in the "var email = function" field. Click on Submit.

- Now you must place the Marketing Cloud script in your Neto store account. To do that, first, go to the Integration section and copy the script from the builder.

- Log in to your Neto Store account (Commerce Cloud) >> Settings and Tools >> Custom Scripts.

- Select the Neto store tracking script.

- Paste the MMC script in the Page Header section of your Neto store. Click on Save.
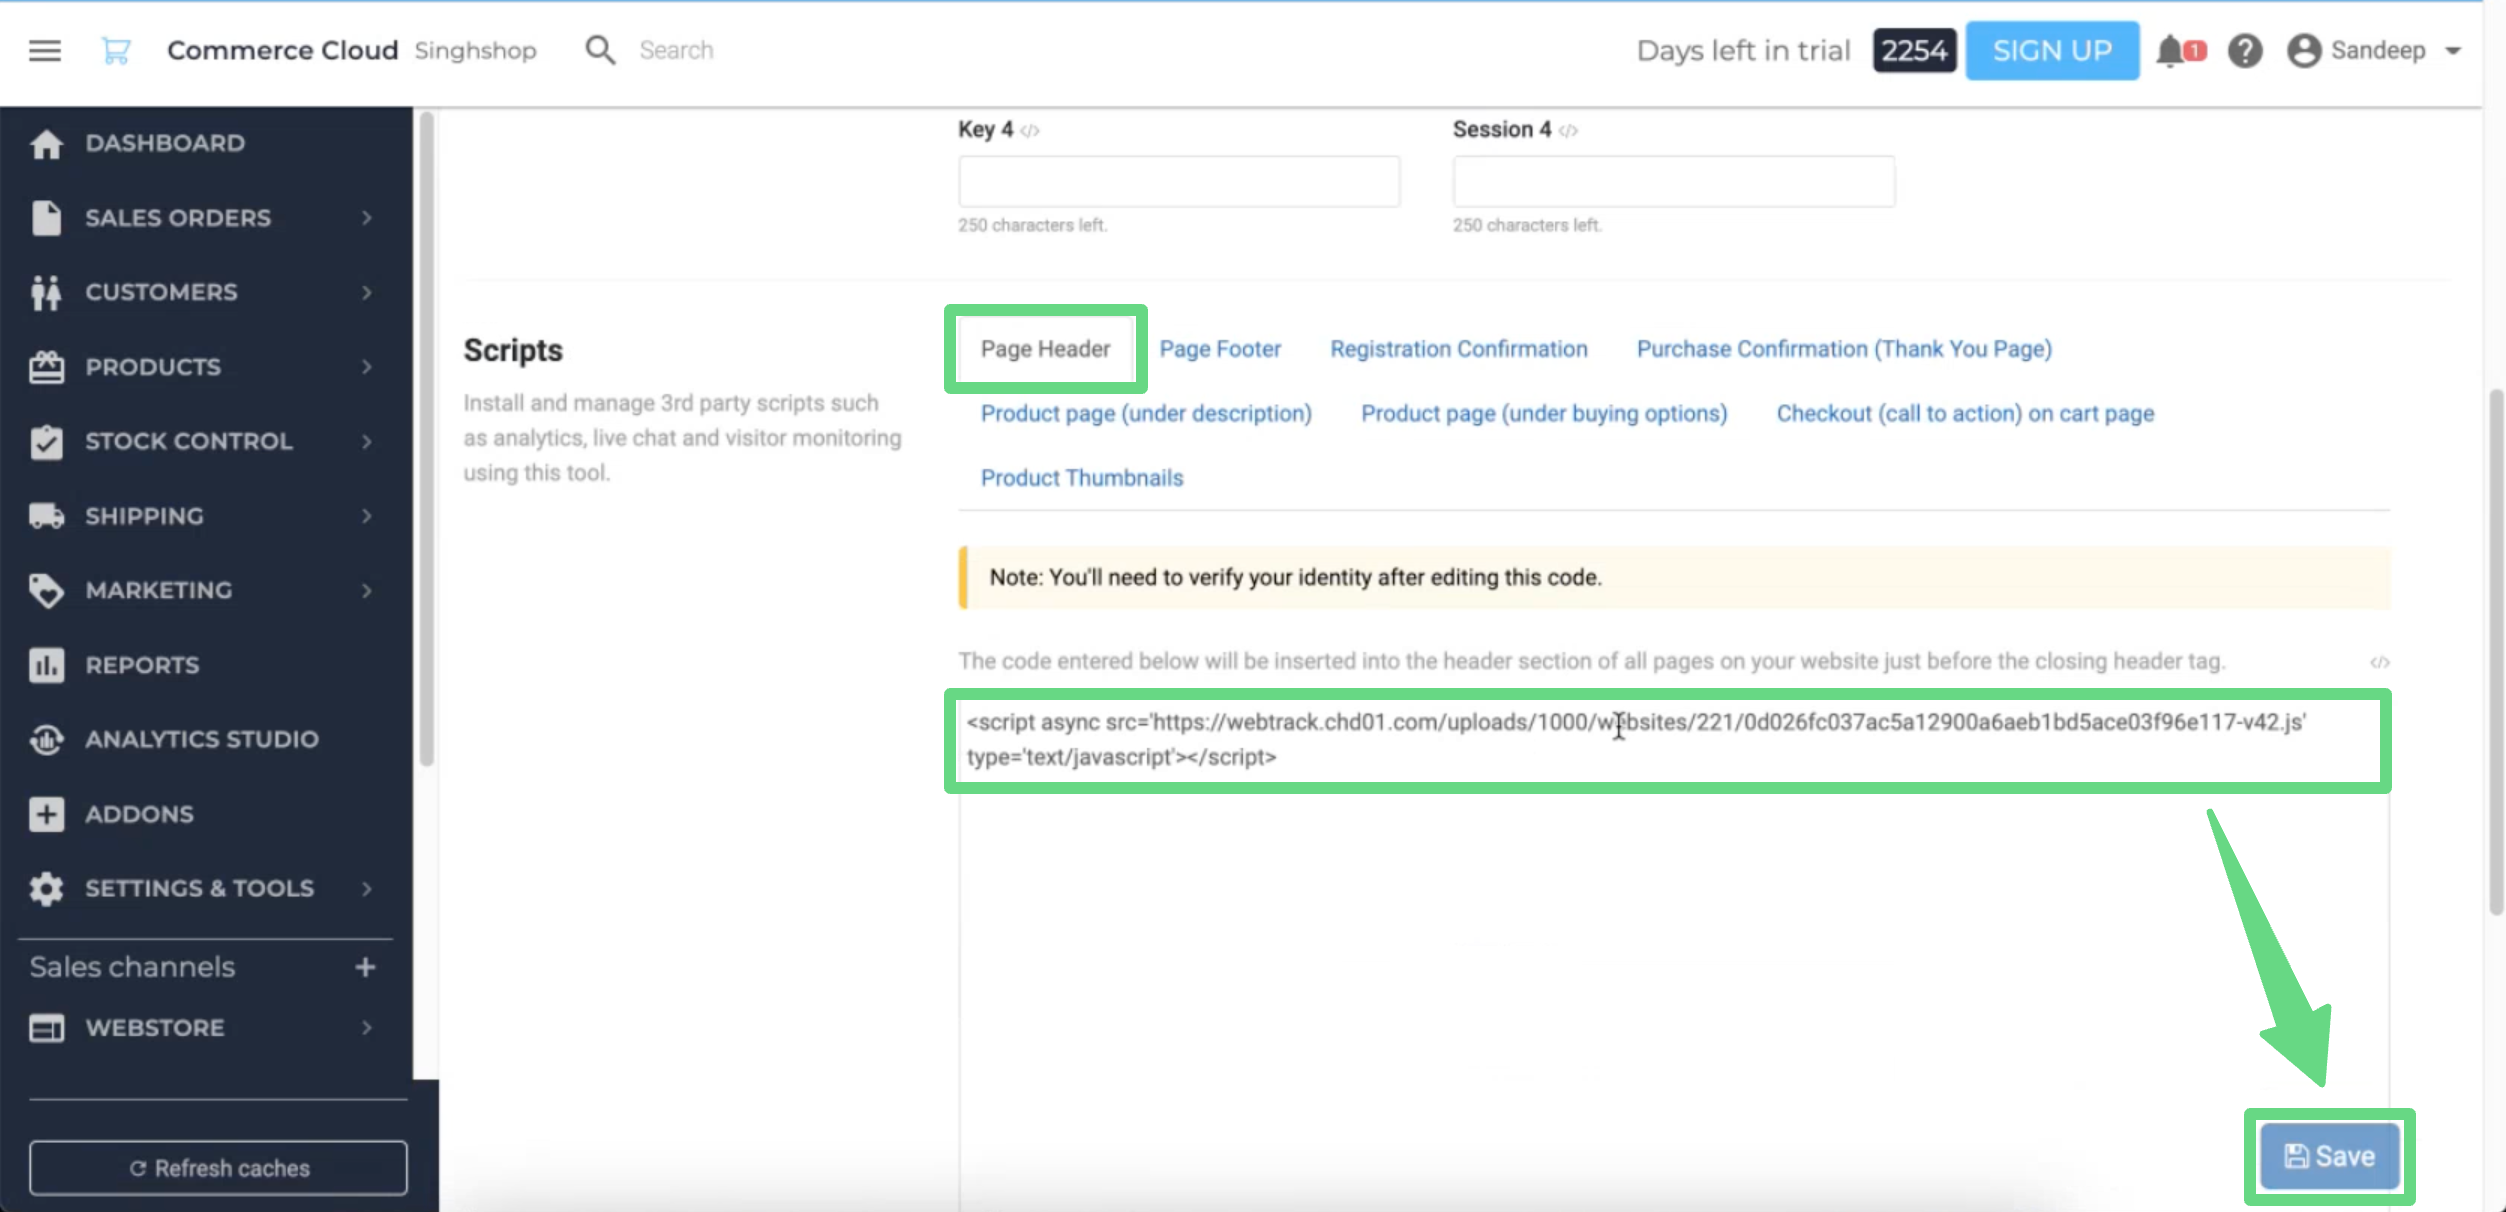
- You will receive a security token on your email ID, so you can verify the changes that you have made.

Once the token has been verified, you have successfully set up Web Tracking for your website.
Upon creating the static email, the cookies will be initialized and will begin recording the activities of users who visit your website. These cookies are namely: "_maro_account_id", "_maro_contact_id", and "_maro_campaign_id".
Now, whenever a contact (new or existing) visits your website either directly or through a campaign, its various activities are recorded, ranging from page views to orders placed. If the user has an email address already registered in your MMC account, their page view will be attributed to that contact. If this is an anonymous user without any email information stored, a new contact record will be created, and the page view will be attributed to the new contact.
A classic example would be a shopping cart scenario in which an anonymous site visitor enters an email address during the shopping process to receive the purchase confirmation email, and then checks the option to 'Also receive promotional emails.' In this case, the browser cookie will not set up a contact ID; instead, the email address becomes the lookup key.
Additional information about the email field
Normally, you would not include this optional attribute because the contact's ID is automatically read from the browser cookie that was set when the contact clicked through to the landing page from the email. Even if you provide the email address, the tracking script will ignore it as long as the contact ID is present in the cookie.

In the above example, there is a field in the web page whose ID is 'myEmail.' This line of JavaScript instructs the web tracking script to accept the value of the 'myEmail' field as the value for the email address of the contact.
The Contact tab also allows you to assign Contact Tags to any contact who has viewed each web page on the site.

In the above example, 'myTag' is a JavaScript variable that has already been defined and whose value has been set earlier in the web page. Note also that 'Static Tag' is a static value for the Contact tag, and it is defined with single quotes. The contact tag should be present in your account. Otherwise, it will not add the contact to the tag written in your script.
Setting Up Dynamic Order Tracking on Marketing Cloud
- To set up order tracking, we will first provide you with an order script which you'll need to place in the Orders section of the script builder in your MMC account. Click on Submit to initiate the process.

- A new link will be generated which needs to be placed in the order script of your Neto account. To do that, go to the integration section and copy the newly generated link.

- Login to your Neto account, go to the Settings section, and select Custom Scripts.

- Select the Neto store in which the order script needs to be placed.

- Paste the MMC script at the end of the Neto Store code under the Purchase Confirmation (Thank You) section. Click on Save.

You have successfully set up dynamic order tracking for your website.
Adding mp_processor.html file on Neto SFTP server
Whenever web tracking is set up for a Neto account, you may notice additional URL extensions next to your website URL. These are cookies generated to track the user's visit to your website, and they store the information in your MMC account. However, these extensions can cause interference in tracking capabilities if users are using additional tracking tools such as Google Analytics. To prevent this, we have created a mechanism wherein a user can create a file path and store the file internally for our web tracking to work.
- To begin with, you need to create a file known as "mp_processor.html". Next, you need to go to your MMC account >> select your domain >> Under the Integration section, copy the HTML script.

- Paste this script in the "mp_processor.html" file. Now, log in to your Neto SFTP server and connect.
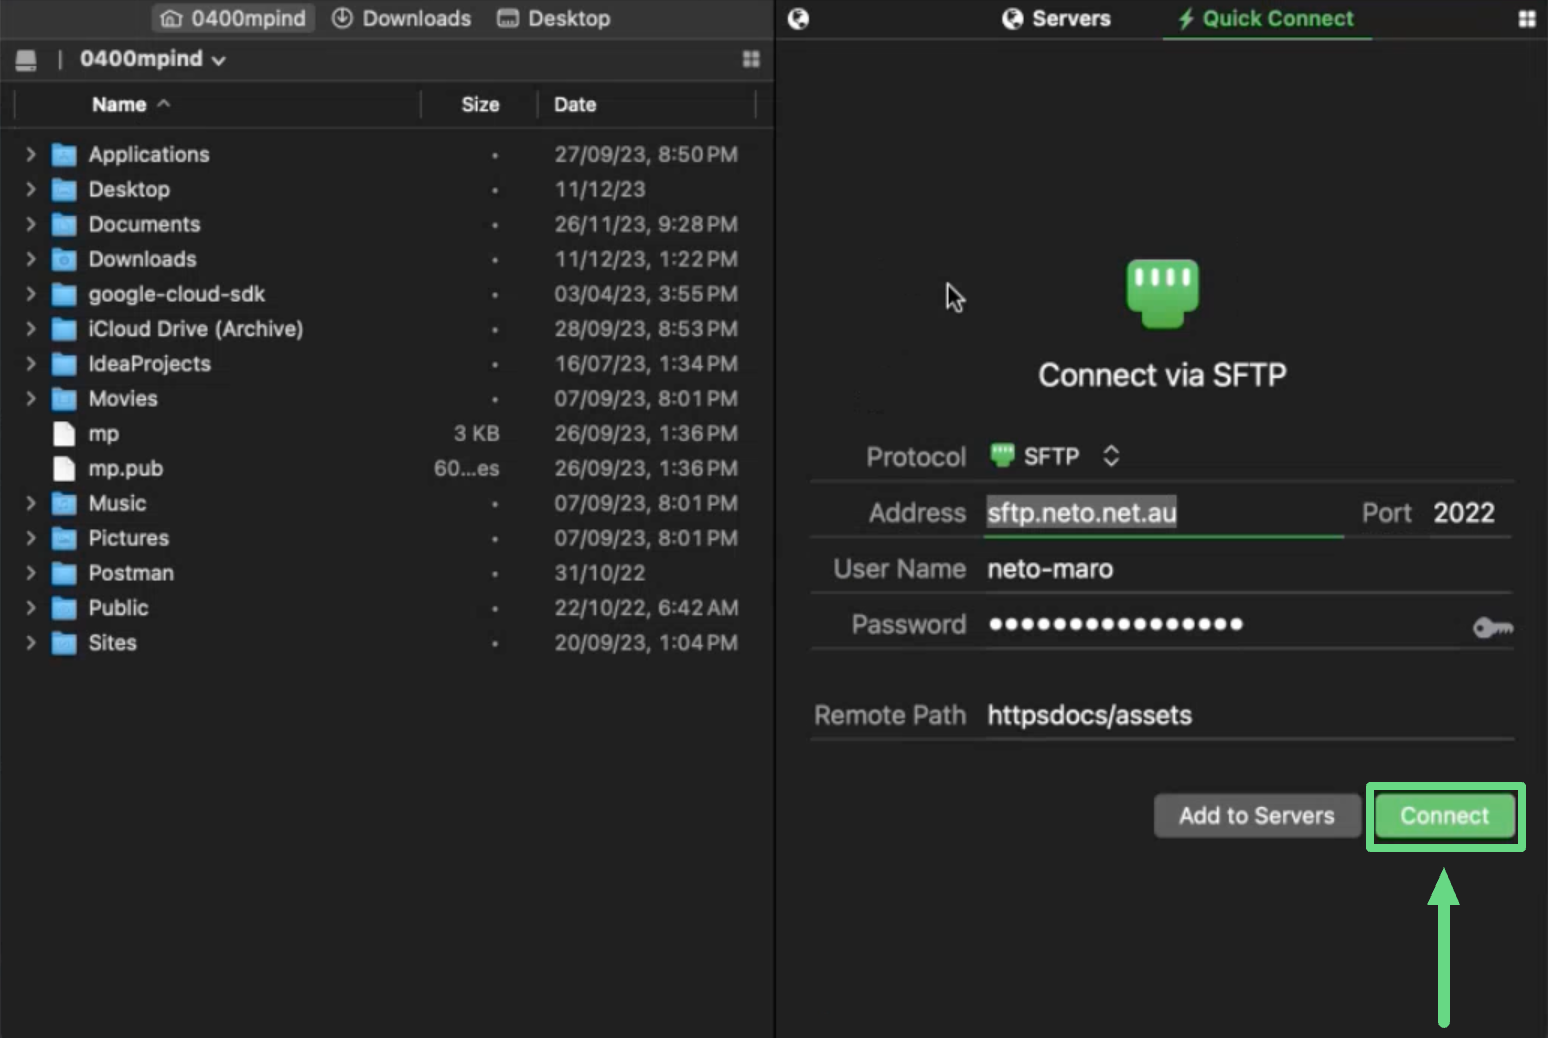
- Follow the file path: "httpdocs" >> "assets" and place your "mp_processor.html" file in it. Make sure your file name is correct since it will be processed in the backend for cookie generation and tracking purposes. Save the changes you have made.

- Once the file has been added to the Neto SFTP server, go back to your MMC account and select the domain from the Web Tracking section via the Actions tab. In the File Path field, add the URL including the file name at the end. This URL should be publicly accessible for the file to be traced in the backend. Save your changes.

- By adding the "mp_processor.html" file in the Neto SFTP server, the tracking cookies will be generated internally and your website will load without any additional extension next to your website URL, thus preventing any tracking issue that could arise by using Analytical tools.
