The Storefront module in Commerce Cloud offers you a centralized, easy-to-navigate space to manage everything related to your online store. The Intro Page acts as your home base — where you can view, access, and configure all your sales channels.
Whether you're managing a single brand or multiple storefronts, this is the starting point for tailoring your online store’s look, feel, and behavior.
Sales Channels Dashboard
When you first enter the Storefront section, you're taken to the Sales Channels dashboard — a list of all the online stores you've created or are in the process of setting up.
Each store is displayed with important metadata in a table view:
- Store ID (e.g.,
#95): A unique identifier automatically assigned to each store. - Title: The internal name you’ve given to your storefront. This is also clickable and leads to the setup.
- Type: Shows whether it’s a Web Store, or another sales channel type (future-ready).
- Description: Useful for noting the store’s purpose, such as “Main Brand Site” or “Testing”.
- Date Added: Timestamp of when this store was created.
- Actions: Contextual menu for options like editing or removing the store.
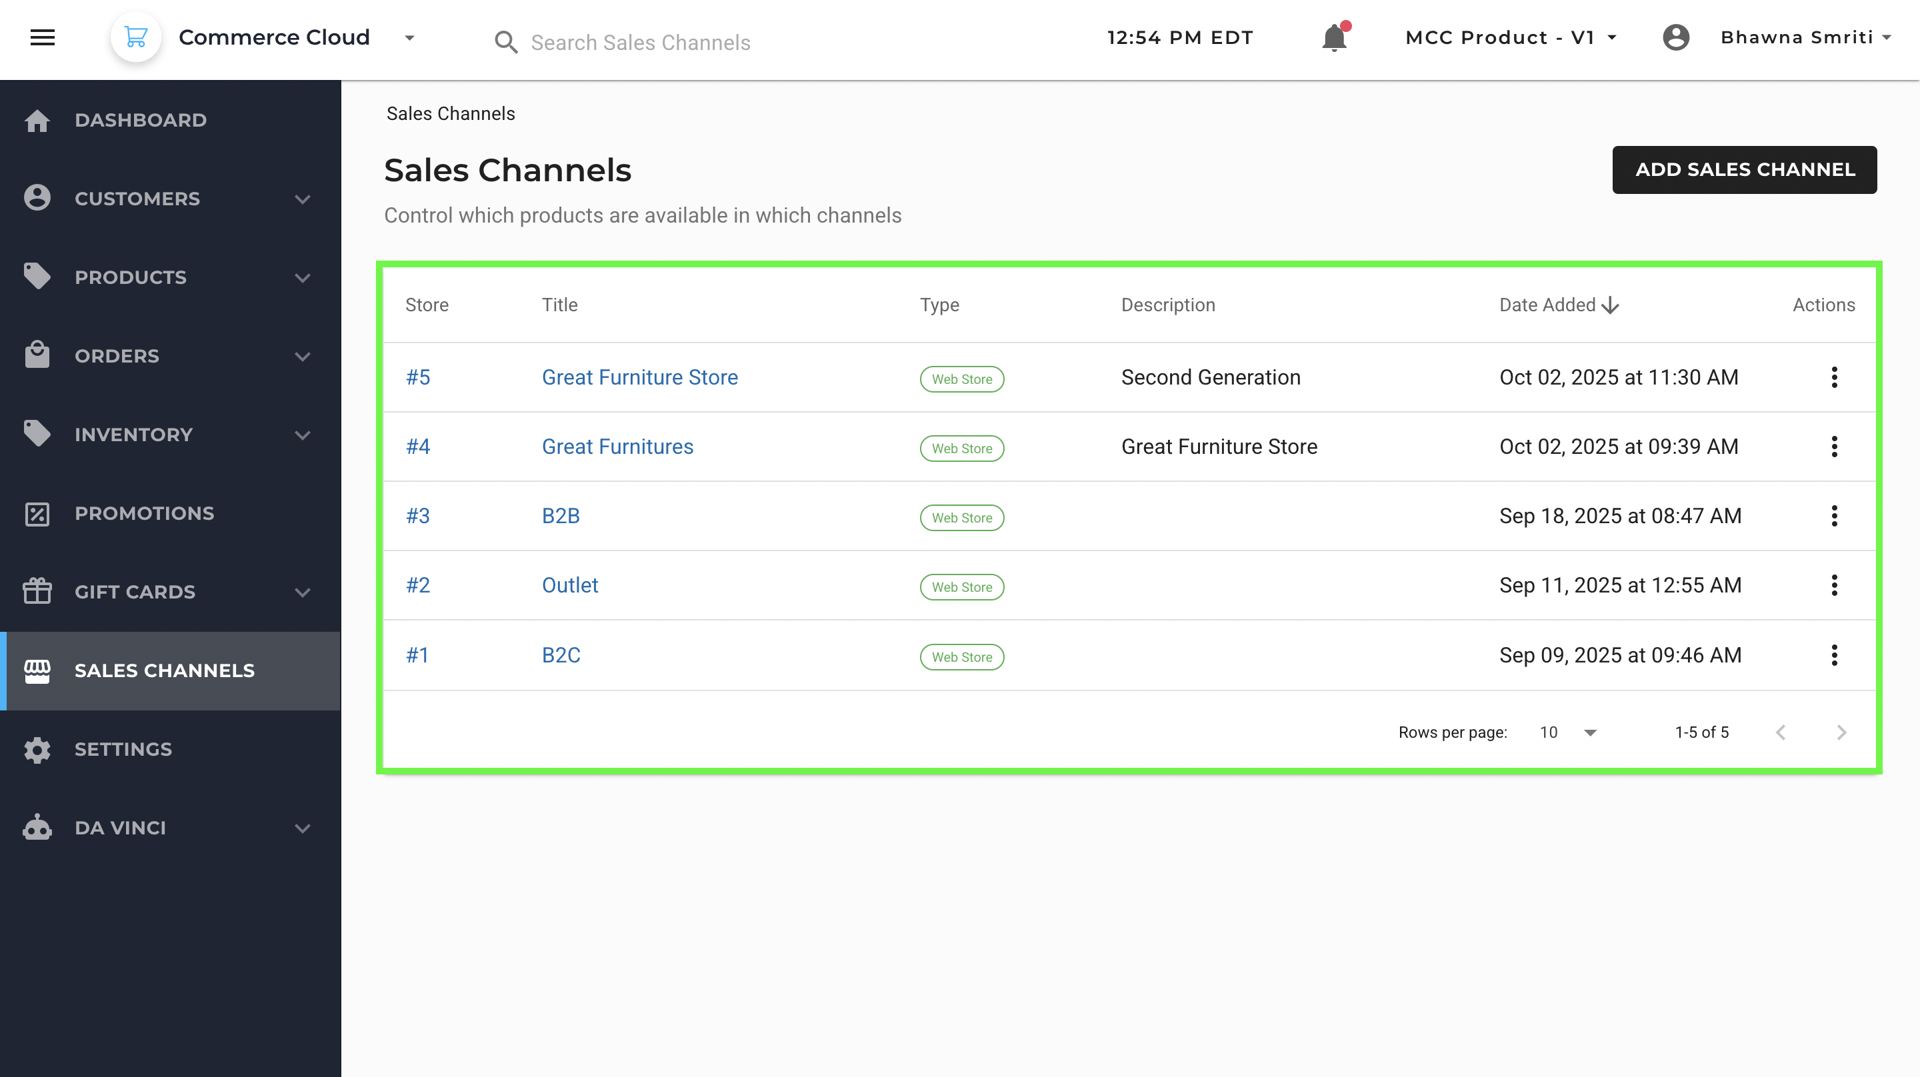
Tip: Click on the Store Title or three dot menu to open the Storefront customization area for that specific channel.
Adding a Sales Channel
To create a new storefront, use the “Add Sales Channel” button located at the top-right of the Sales Channels page. Use this option to create a new, standalone storefront instance within your account.
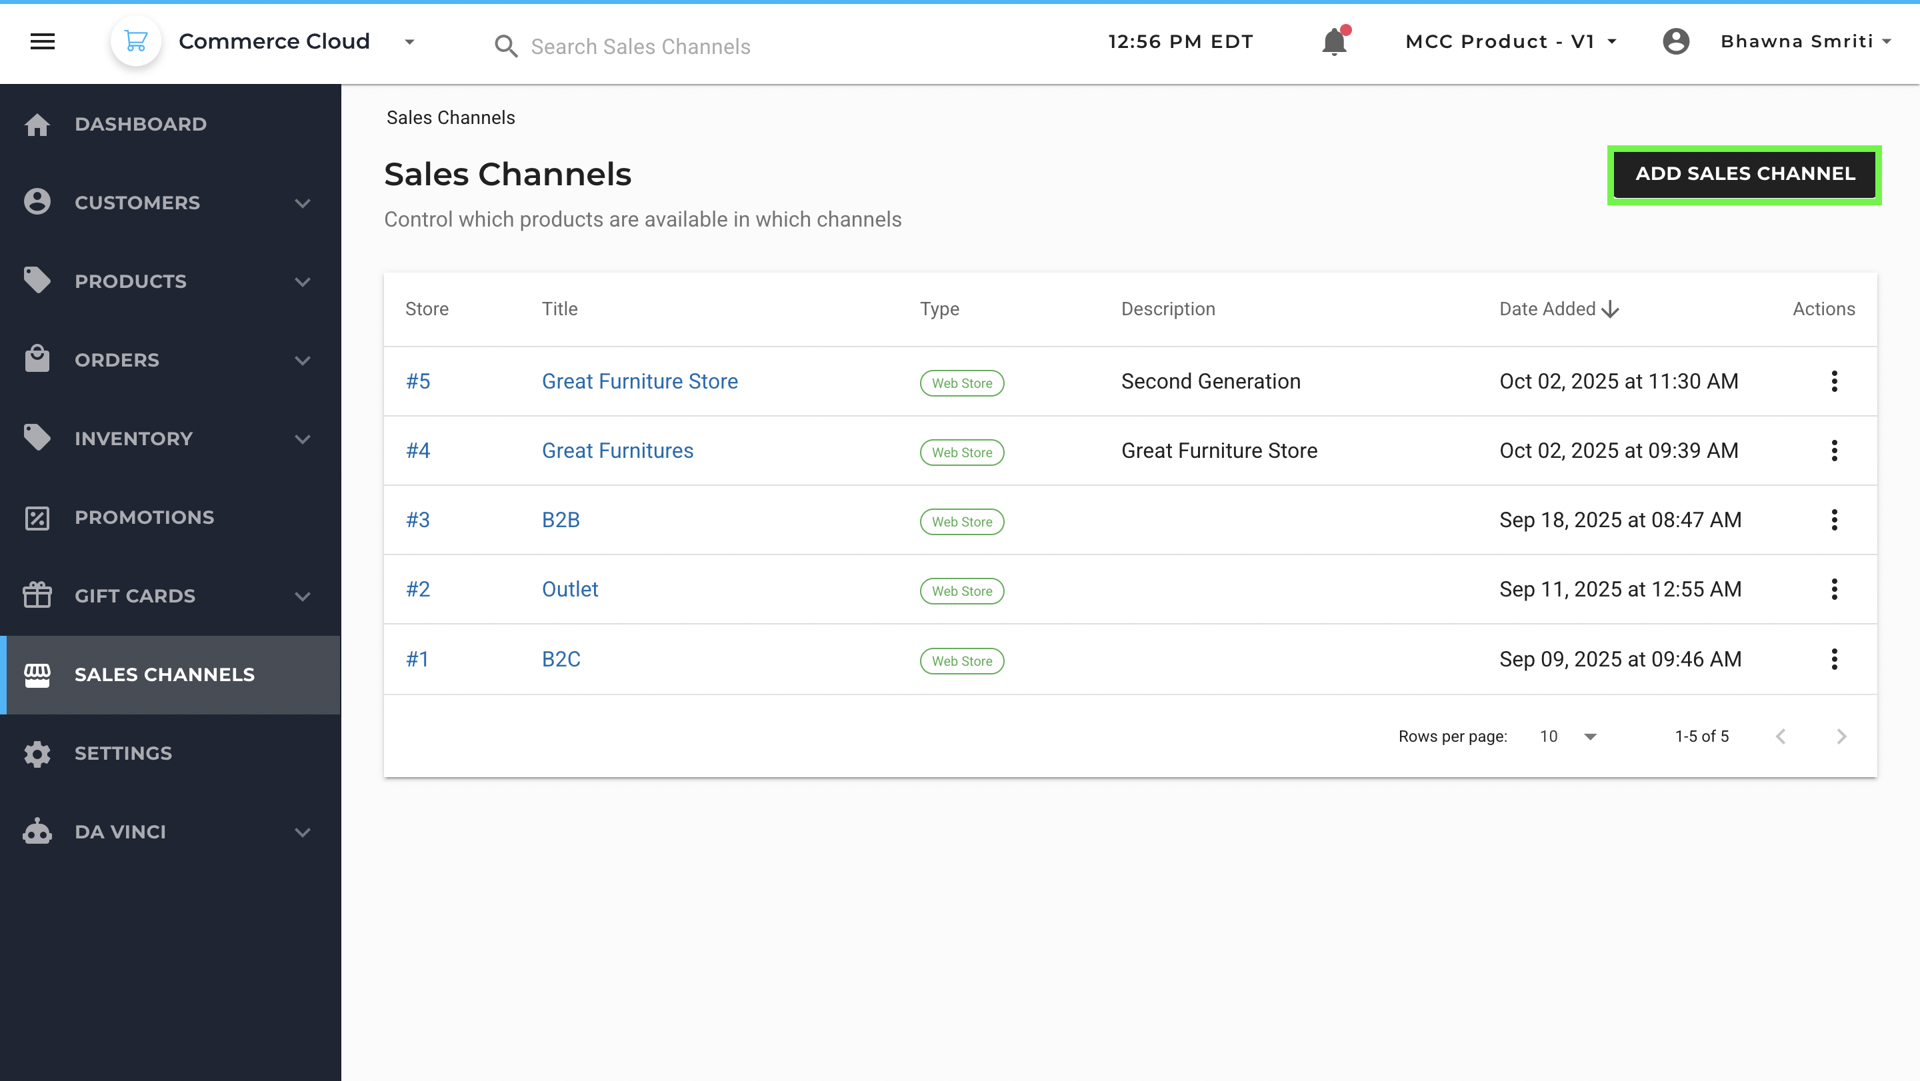
Once created, the new Sales Channel shows up in the Sales Channels Dashboard — listed alongside other storefronts. Each store gets a:
- Store Title: Your internal reference name for the store
- Unique Store ID: A unique identifier that distinguishes each store
- Store Type: Reflects the type of store, For example, Web Store
- Description: Optional note or details about the channel
- Creation Date: When the sales channel was created
For a Step-by-step guide on how to add a Sales Channel, click here.
Setup Interface
Clicking on a store’s Title opens the Setup Interface. Here, you’ll find a left-hand navigation panel with a series of tabs, each dedicated to a different aspect of your store setup.
This interface is built to guide you through a step-by-step process for customizing your online store.
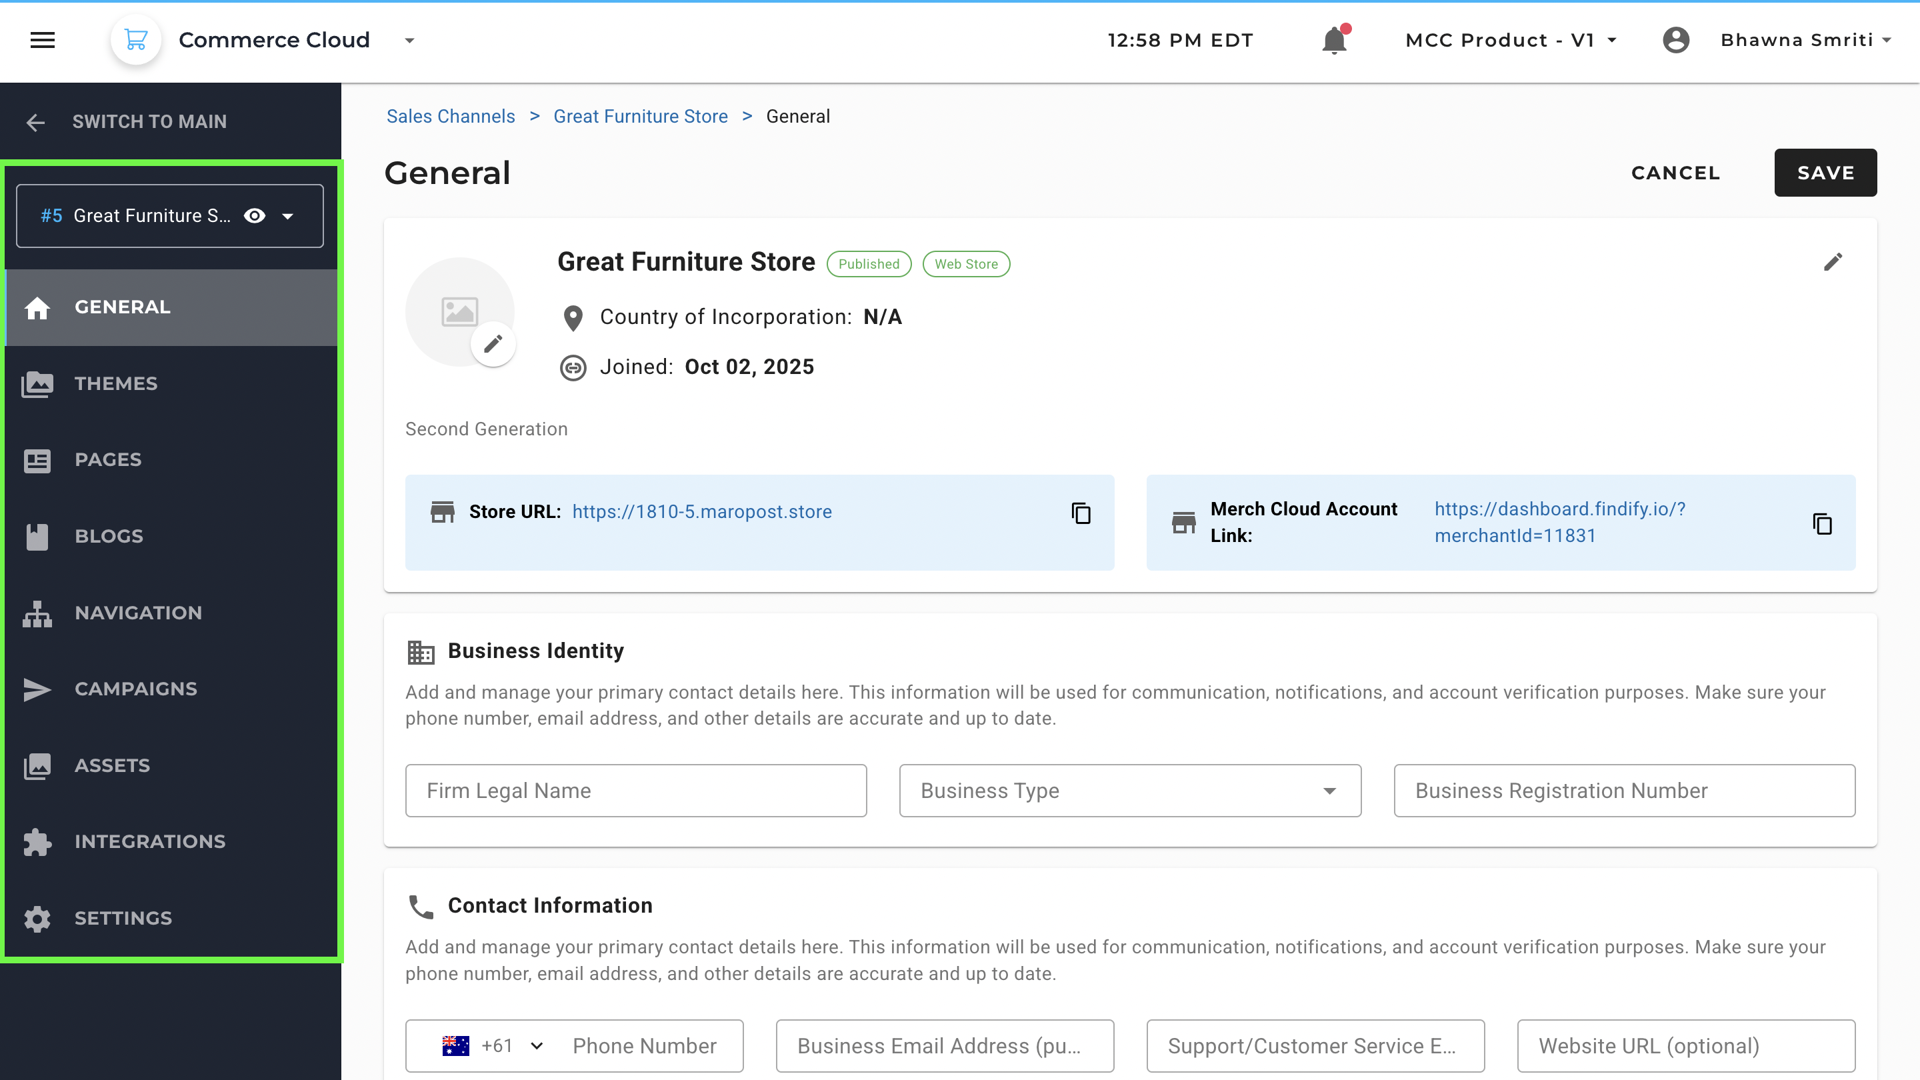
Here’s what each tab allows you to do:
Store Name Dropdown — Easily Switch Between Sales Channels
At the top-left corner of the screen, you’ll find the Store Name Dropdown — it lets you switch between different storefronts in just one click.
If you manage multiple online stores, marketplaces, this dropdown makes it easy to toggle between them without leaving the page.
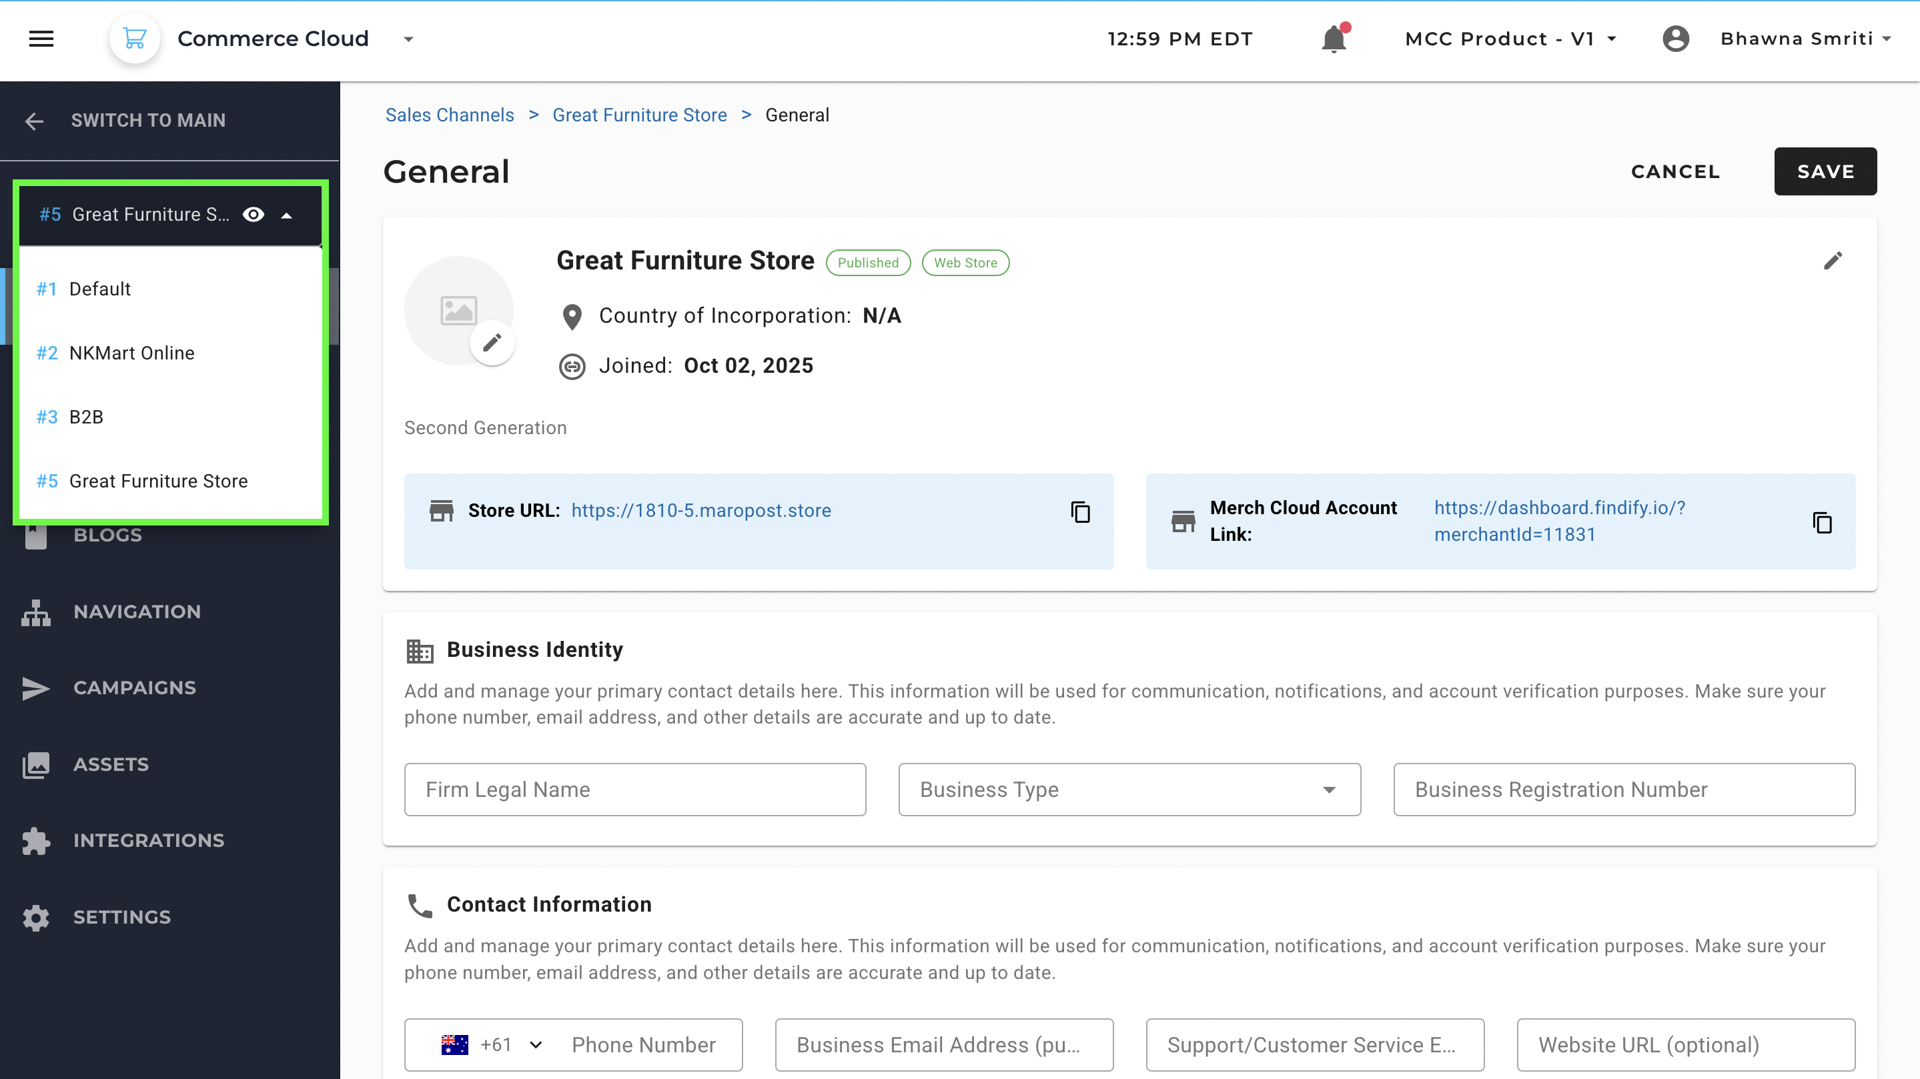
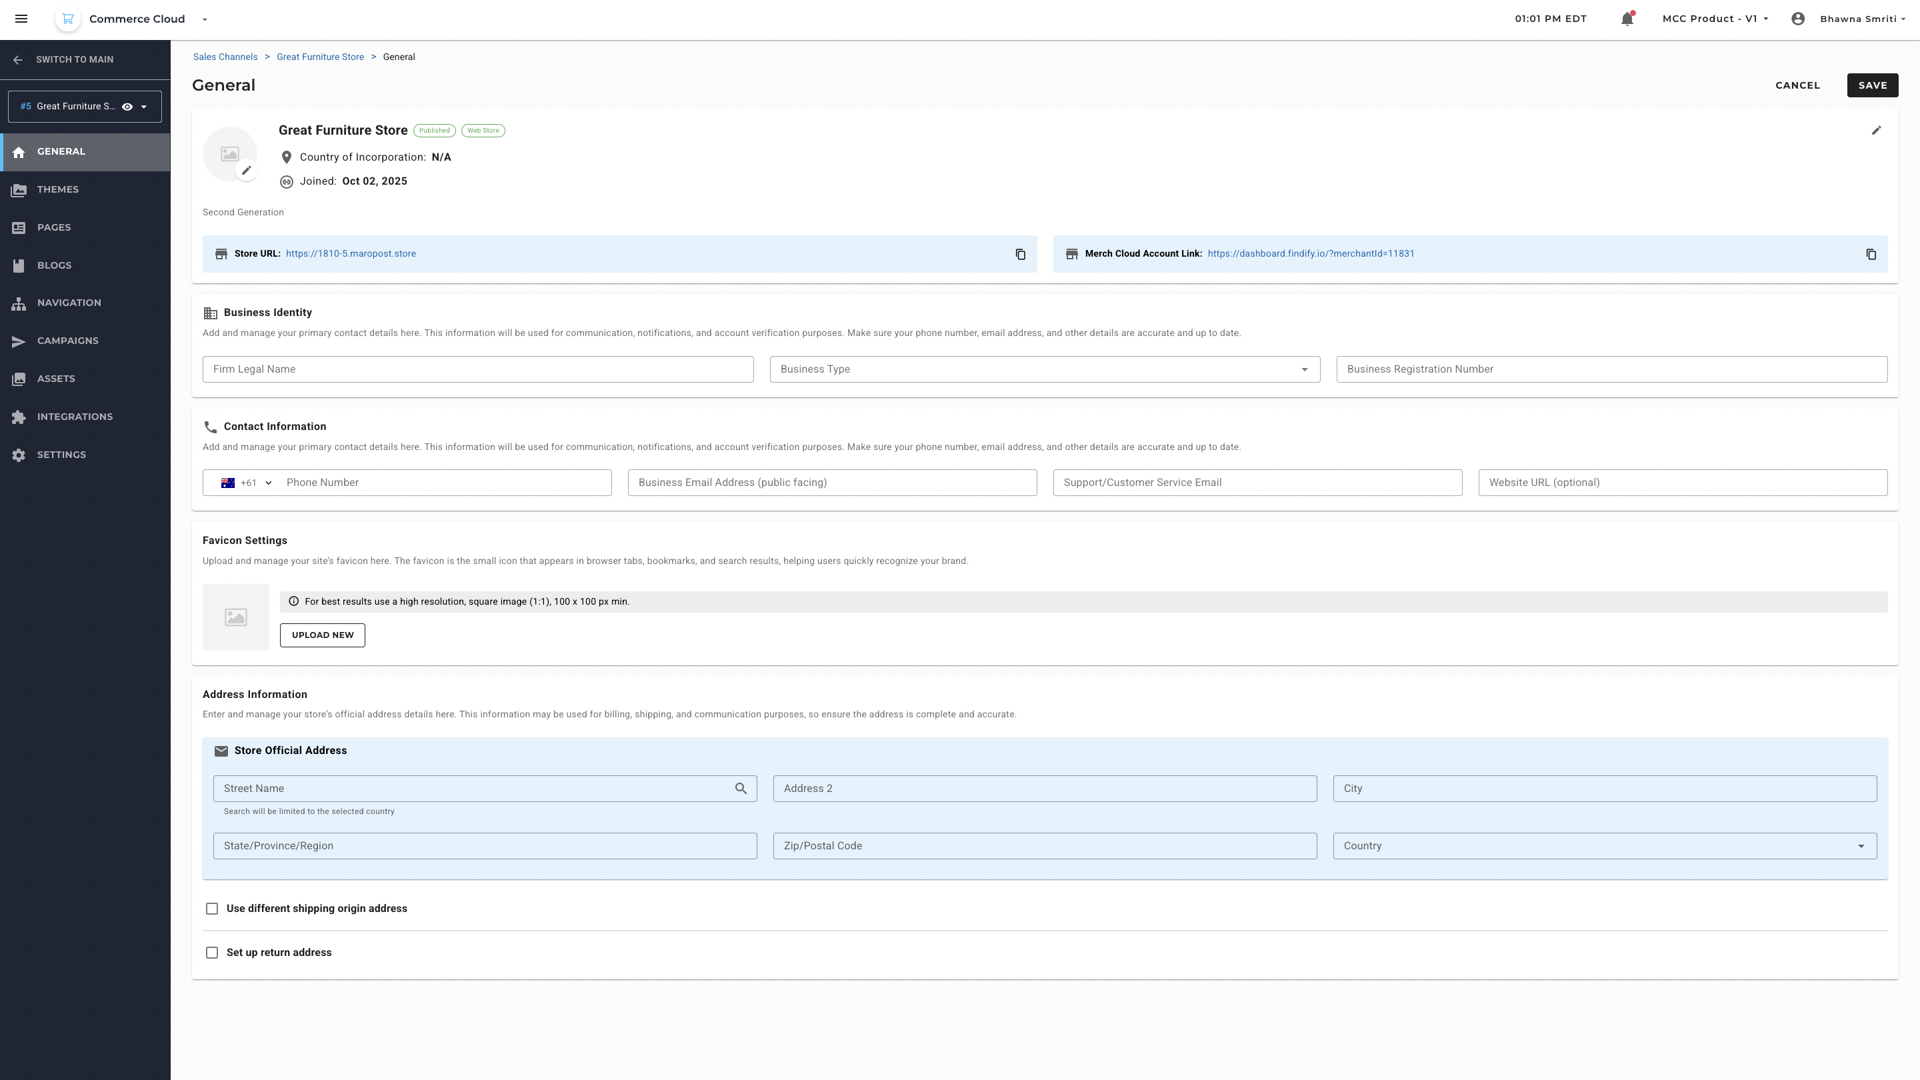
1. General
This is your store’s identity hub. Here, you can set:
- Business information (legal name, type, registration number)
- Contact details (phone, public email, support email)
- Favicon (the small icon shown in browser tabs)
- Store address (official and return/shipping address options)
This tab ensures your store is compliant, professional-looking, and easy to verify.
2. Themes
This tab allows you to choose and customize the visual design of your storefront. From layout to colour schemes, this tab allows you to define your brand’s look and feel online.
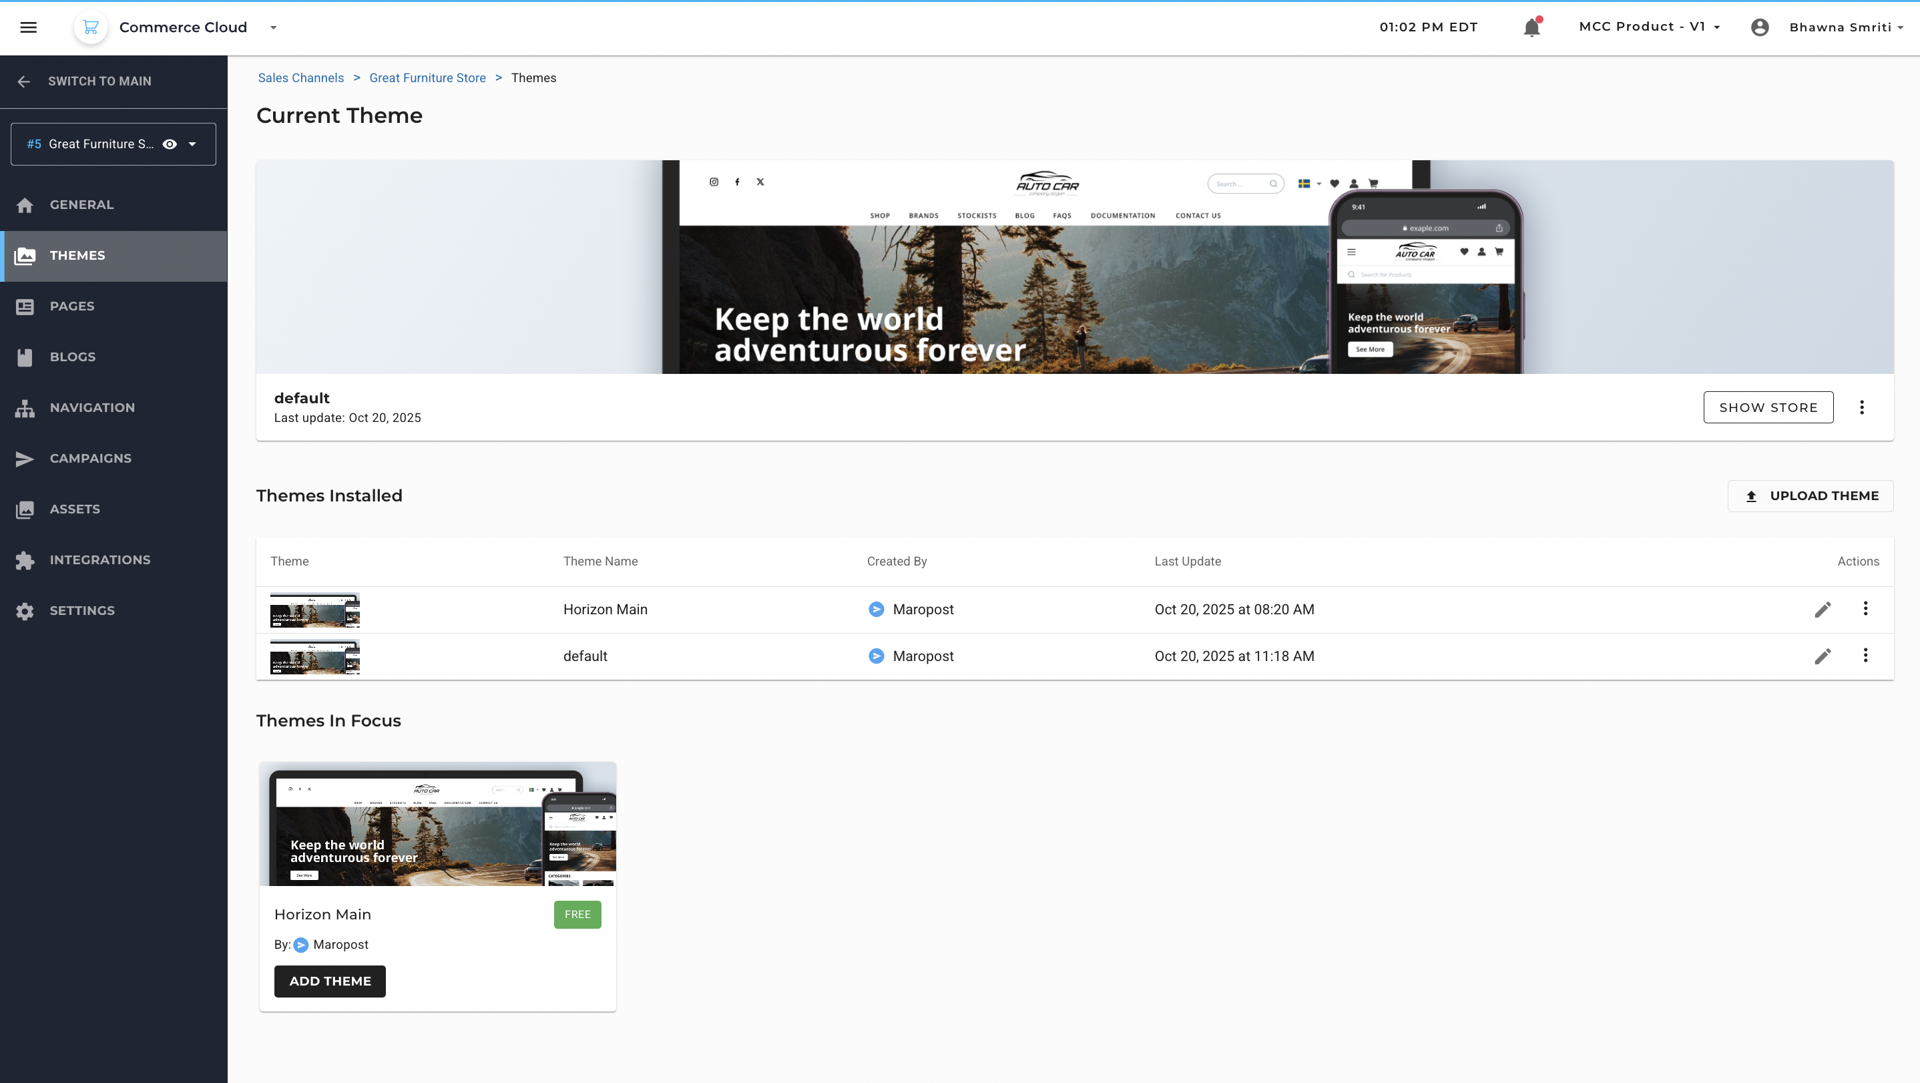
For a step-by-step guide to install and edit themes, click here.
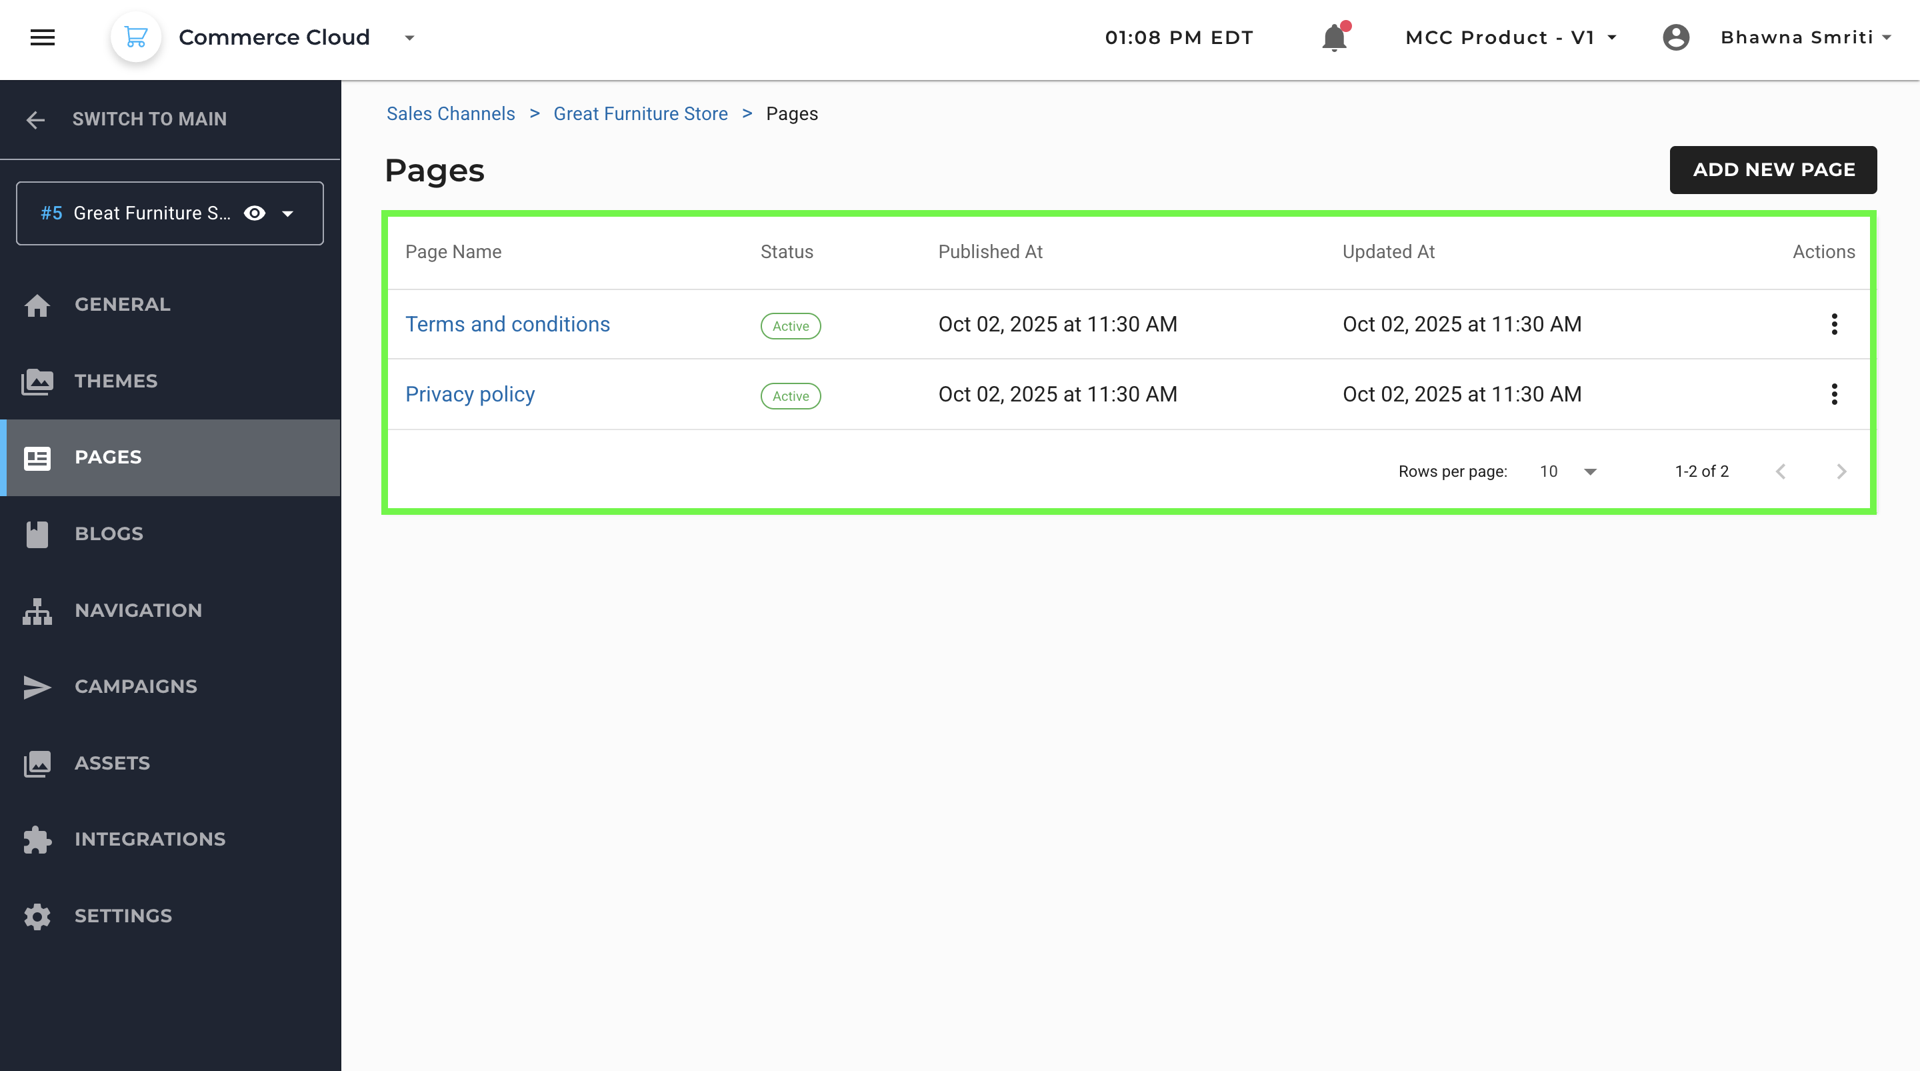
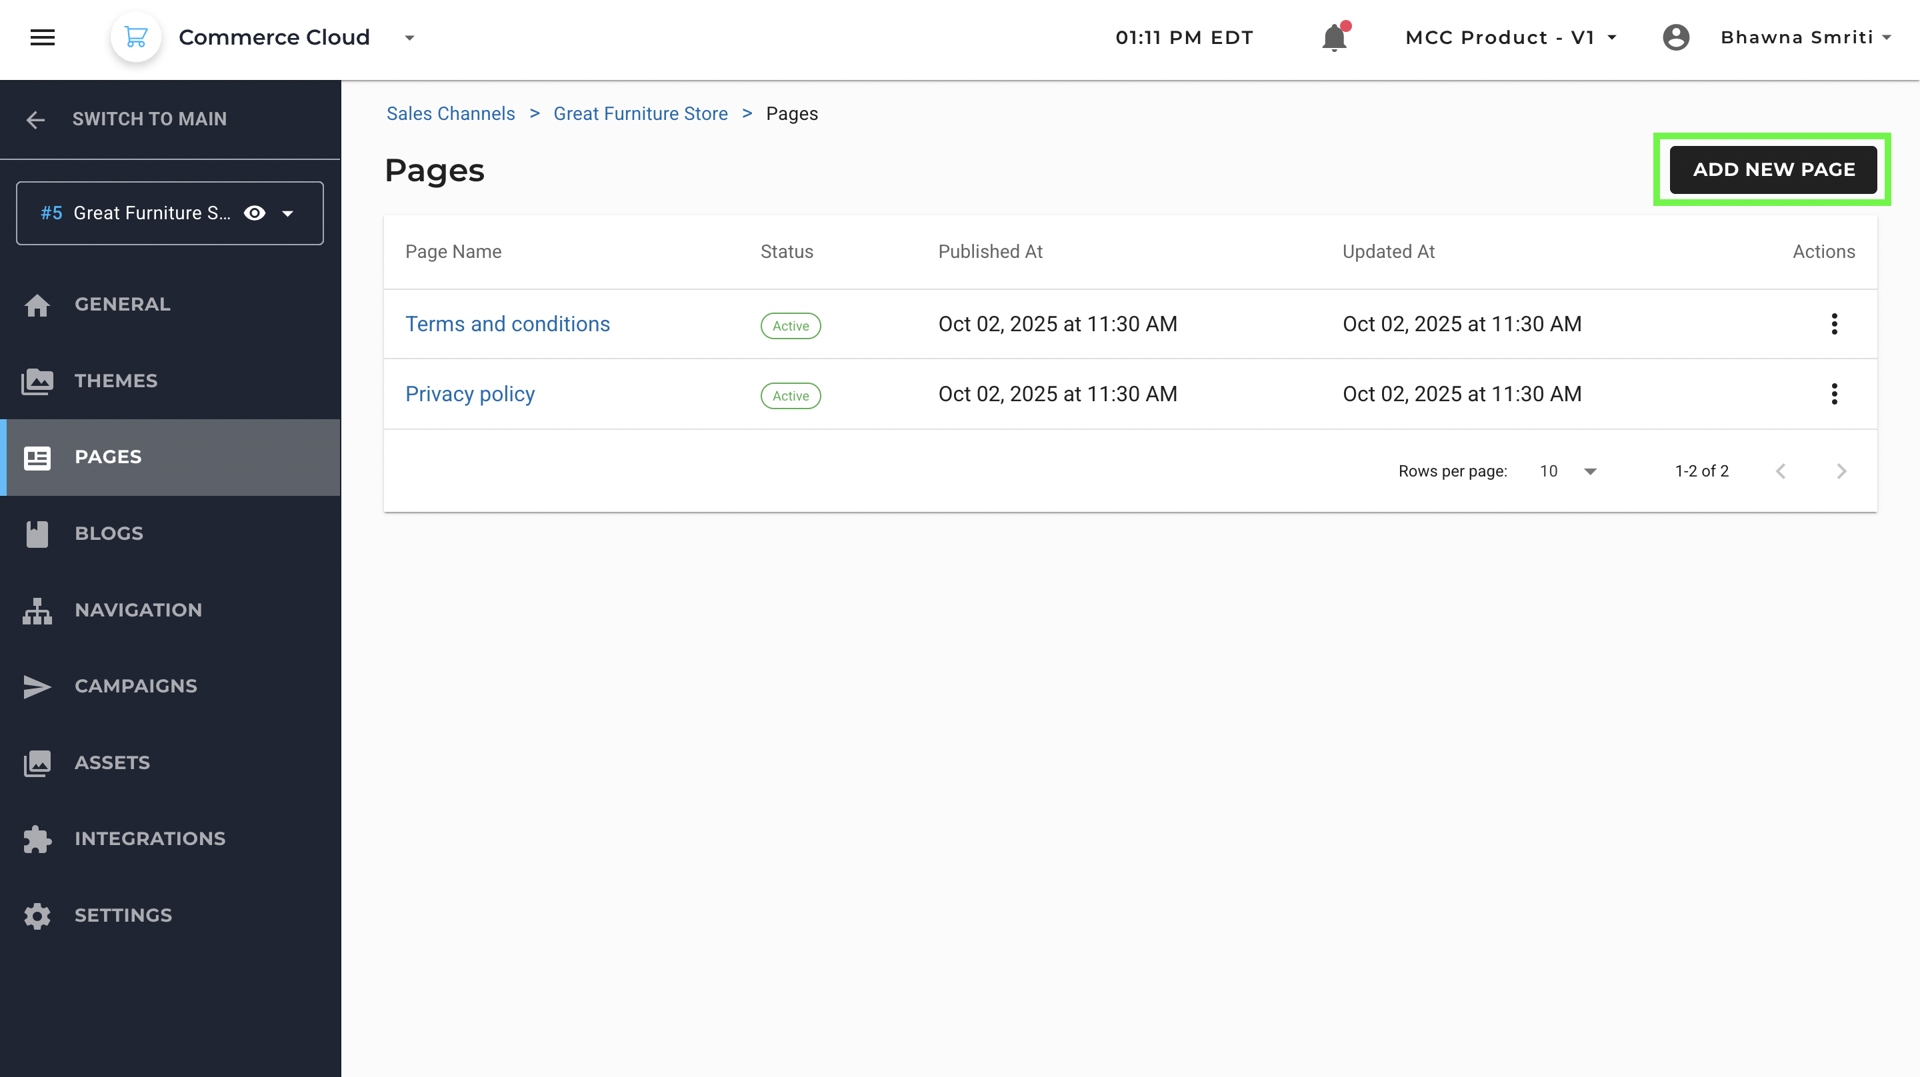
3. Pages
You can view, edit, rearrange, or delete existing pages and create new ones with ease. Each page is a building block of your customer experience, and organizing them well ensures smooth navigation and brand clarity.
Use this tab to manage the pages on your storefront — like Home, About, Contact, or Policy pages. You can create new pages, reorder them, or edit existing content.
“Add New Page” Option: Create a New Page
- On the same page, you will get an option to create a new page.
- Click on the “Add New Page” button to open the Create Page screen.
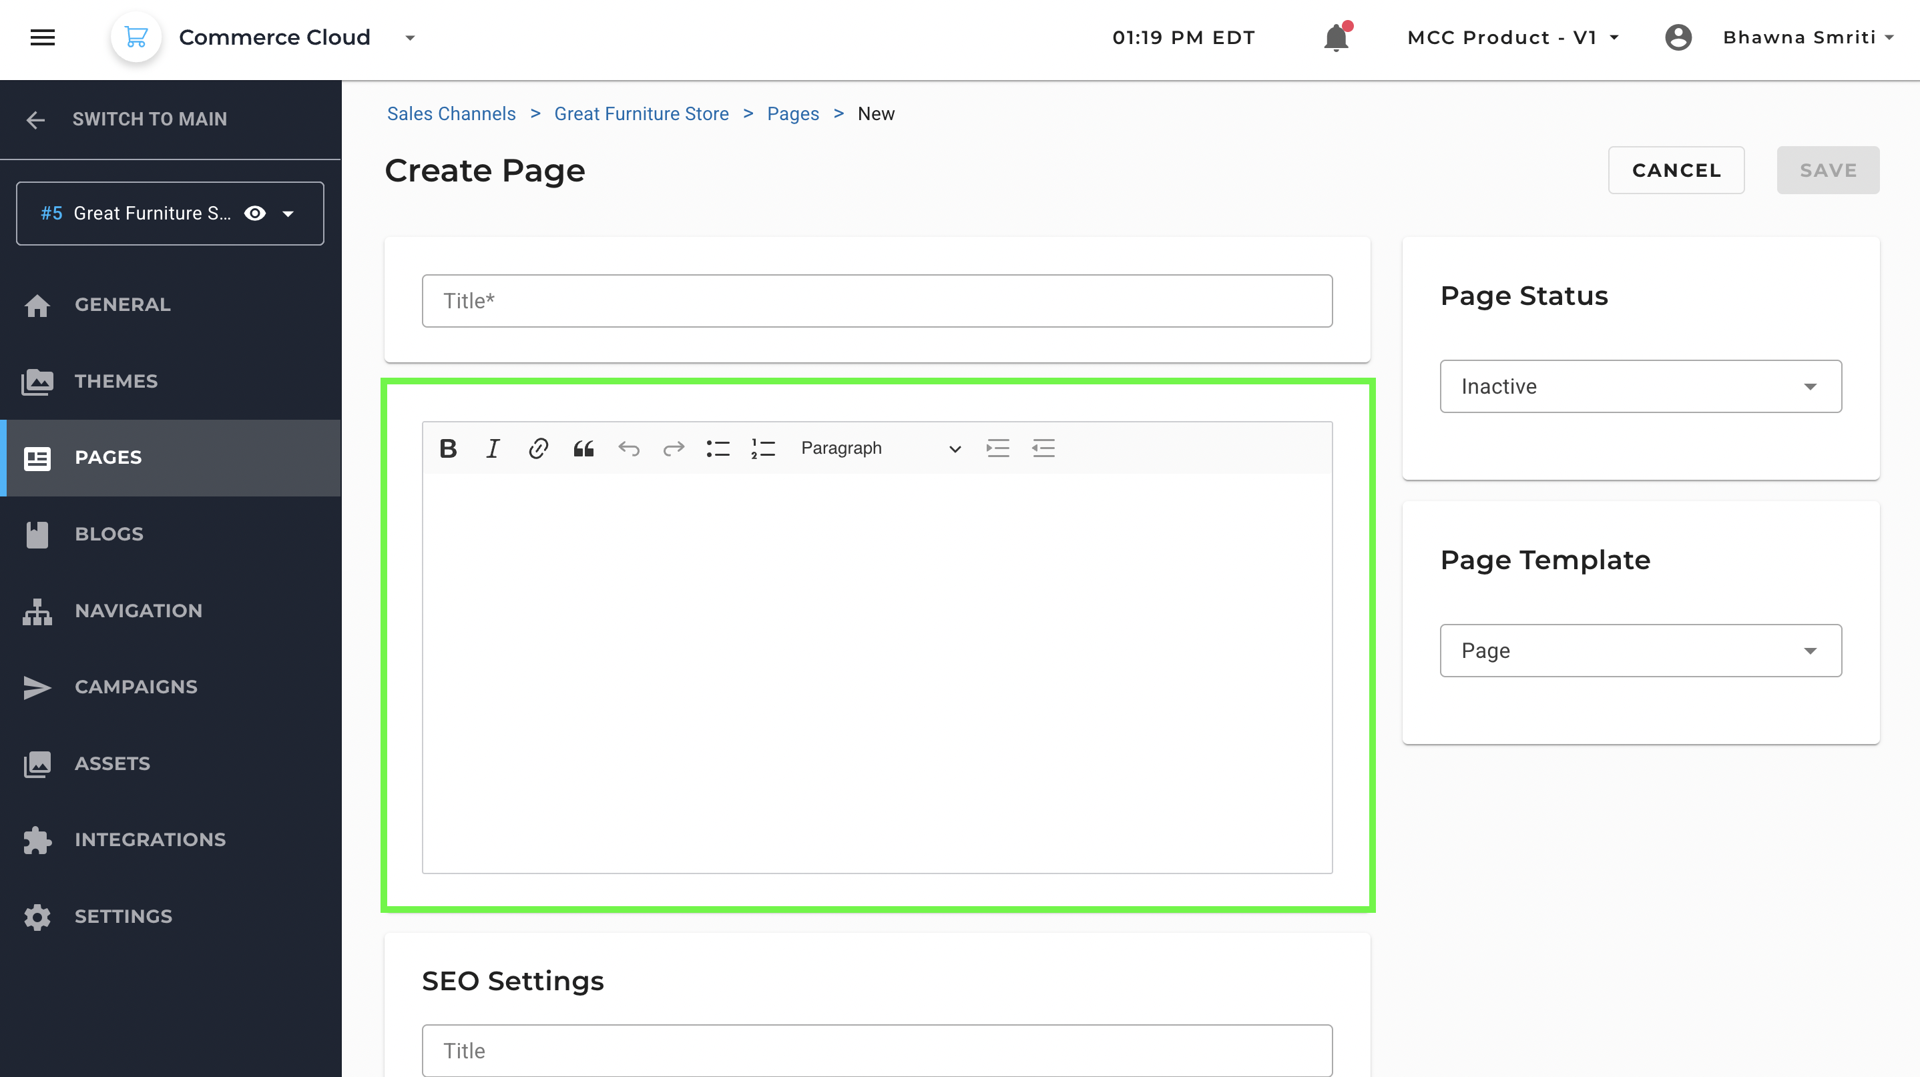
On the Create Page Screen, you can enter the details to create the page.
Page Title
This field defines the name of your page (e.g., “About Us”). It is a required field and often used in menus and tabs across your site.

Page Content Editor
This is a rich text editor where you can design the page and:
- Write and format content using headings, paragraphs, lists, and links.
- Embed style elements.
This section is crucial for delivering compelling content to your customers — whether it’s introducing your business or writing out your return policy.
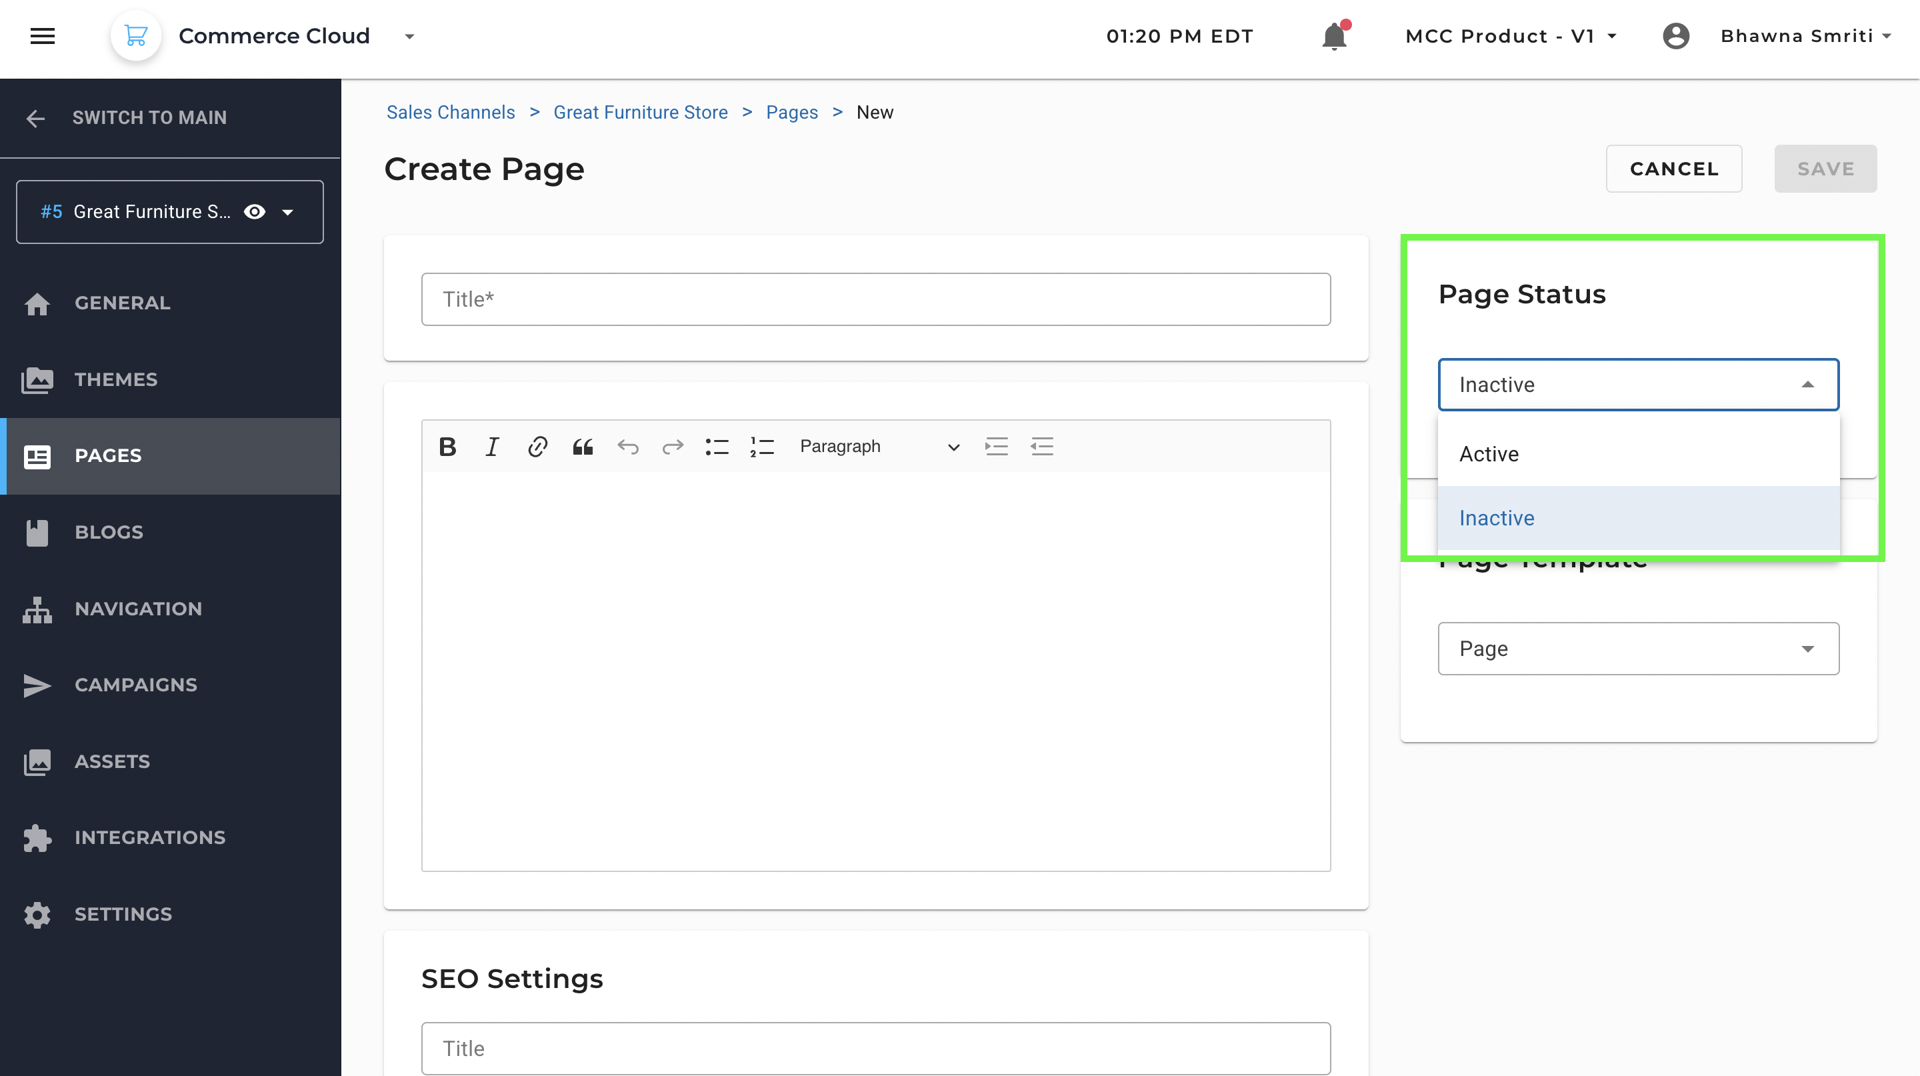
Page Status
You can toggle the page as:
- Active – visible to customers.
- Inactive – hidden from public view but saved in the backend for later.
This helps you draft content and only publish it when it’s ready.
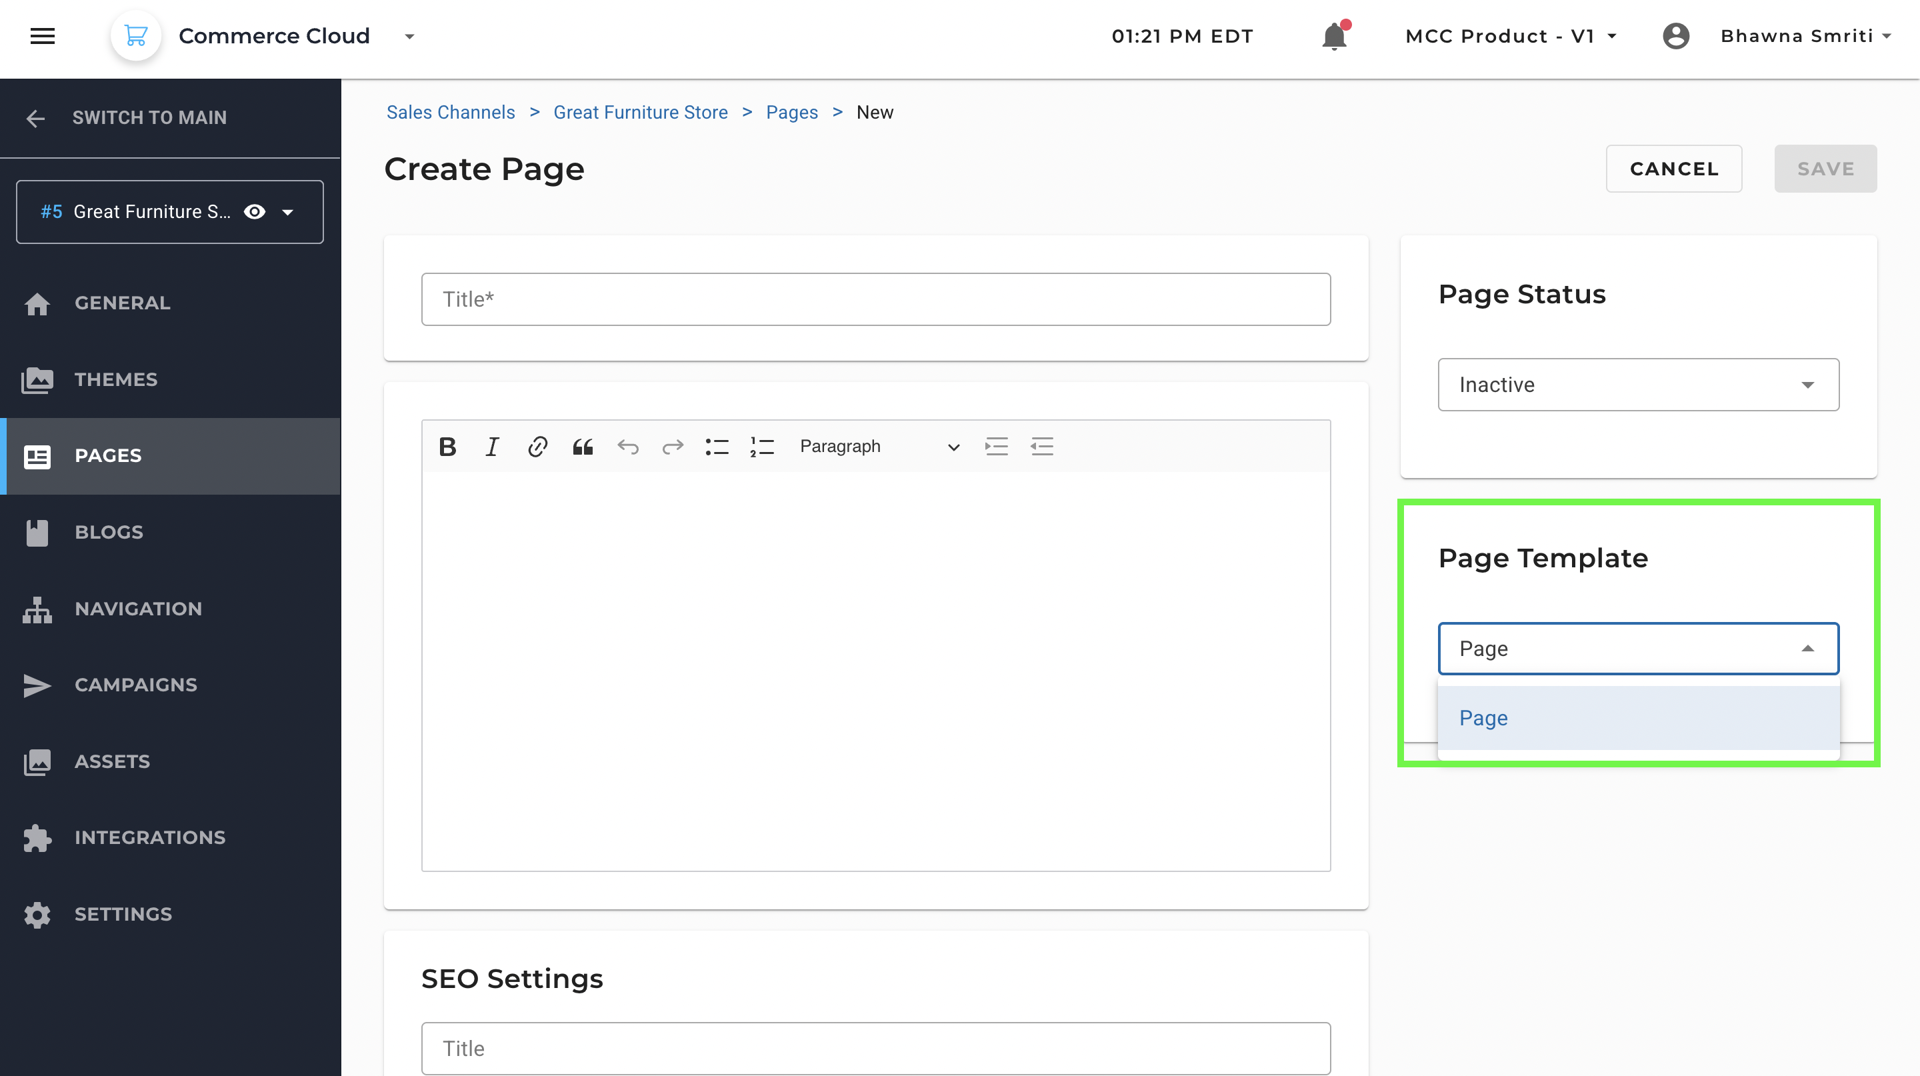
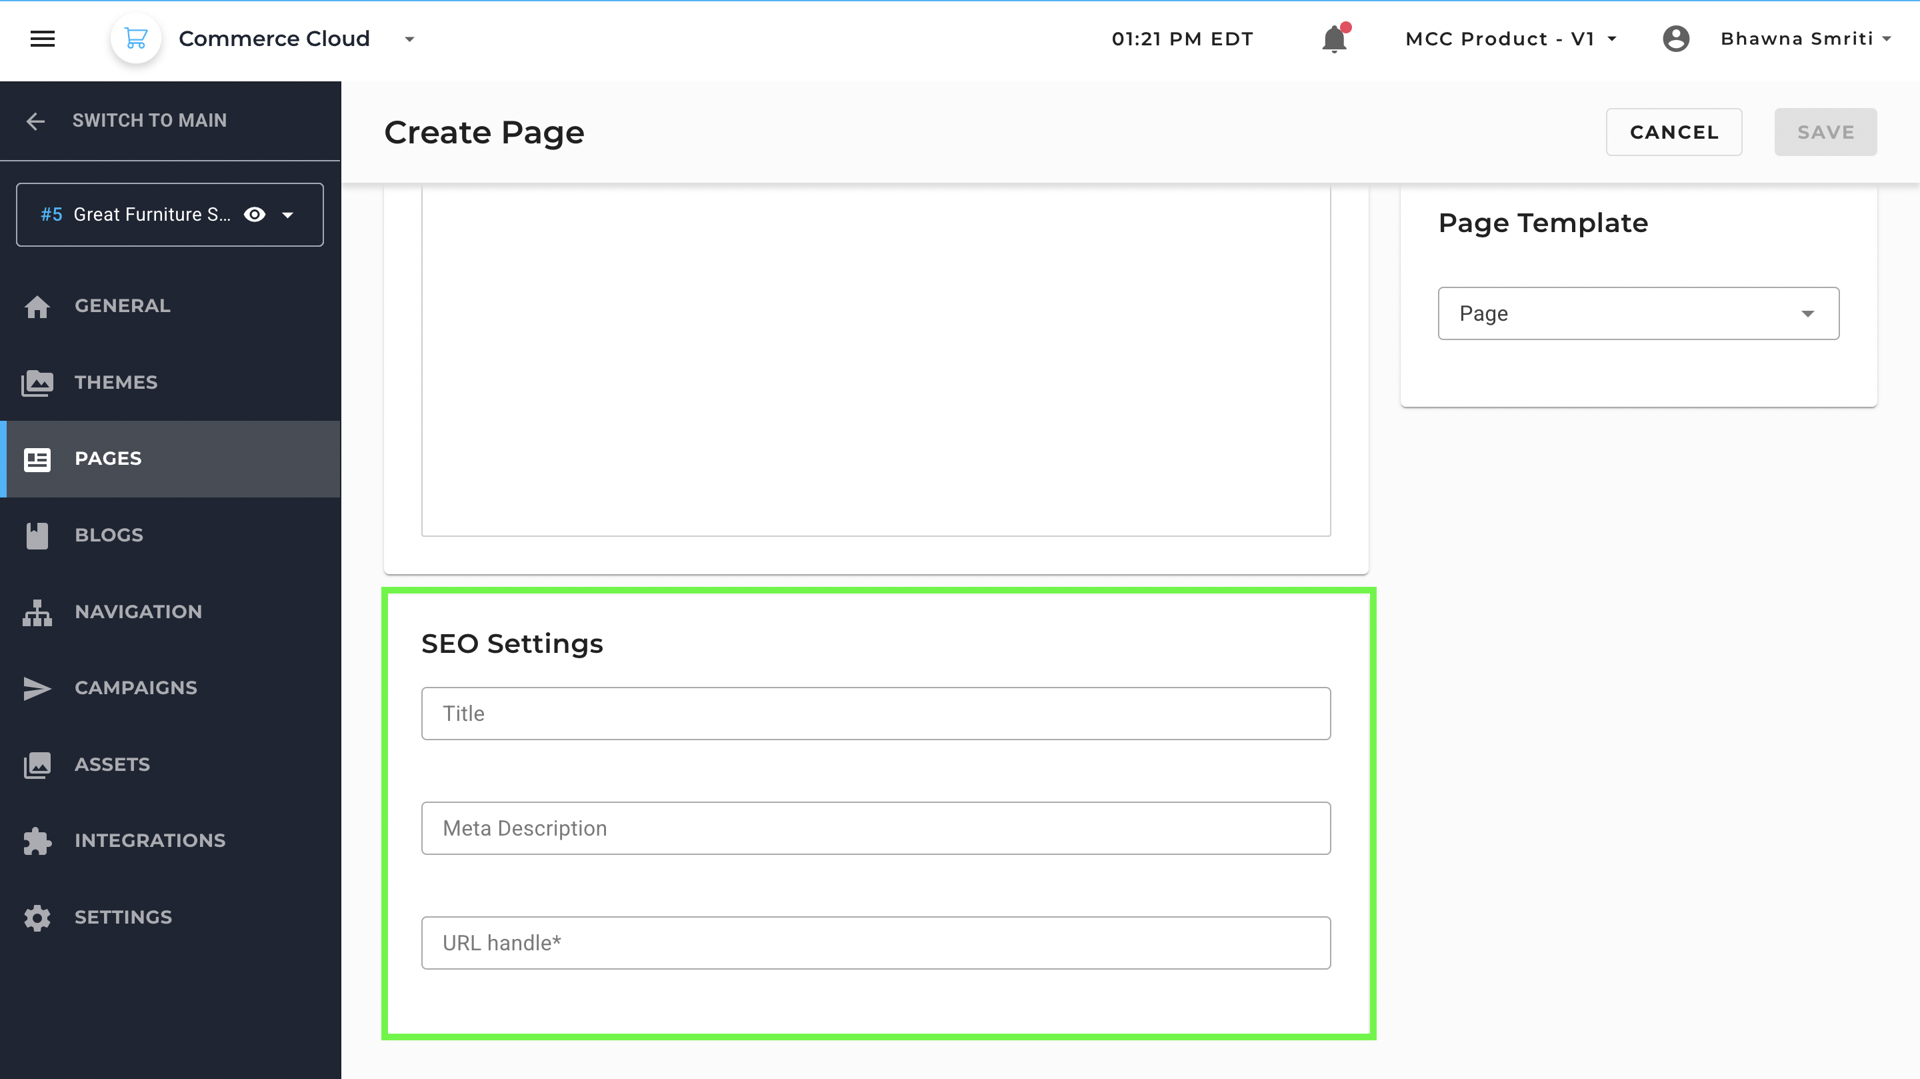
Page Template
This dropdown let’s you select from saved templates of designing the page. You can Select from available templates such as:
- Standard Page
- Custom Templates (if configured)
This allows you to control layout and maintain structure and consistency without the need of creating a page from scratch.
SEO Settings
Optimize how your page appears in search results and improve discoverability:
- Title: Sets the page’s browser title and search engine label.
- Meta Description: Summary that appears in search engine previews — very important for SEO.
- URL Handle: Defines the page’s direct URL path (e.g.,
/about-us). This must be unique.
A clean and keyword-friendly URL improves your visibility and user trust.
Once done, click on Save and the page will show on the Pages home page.
4. Blogs
On this page, you can create and manage blog content to drive engagement and improve SEO. This is where you can publish stories, updates, and brand messaging.
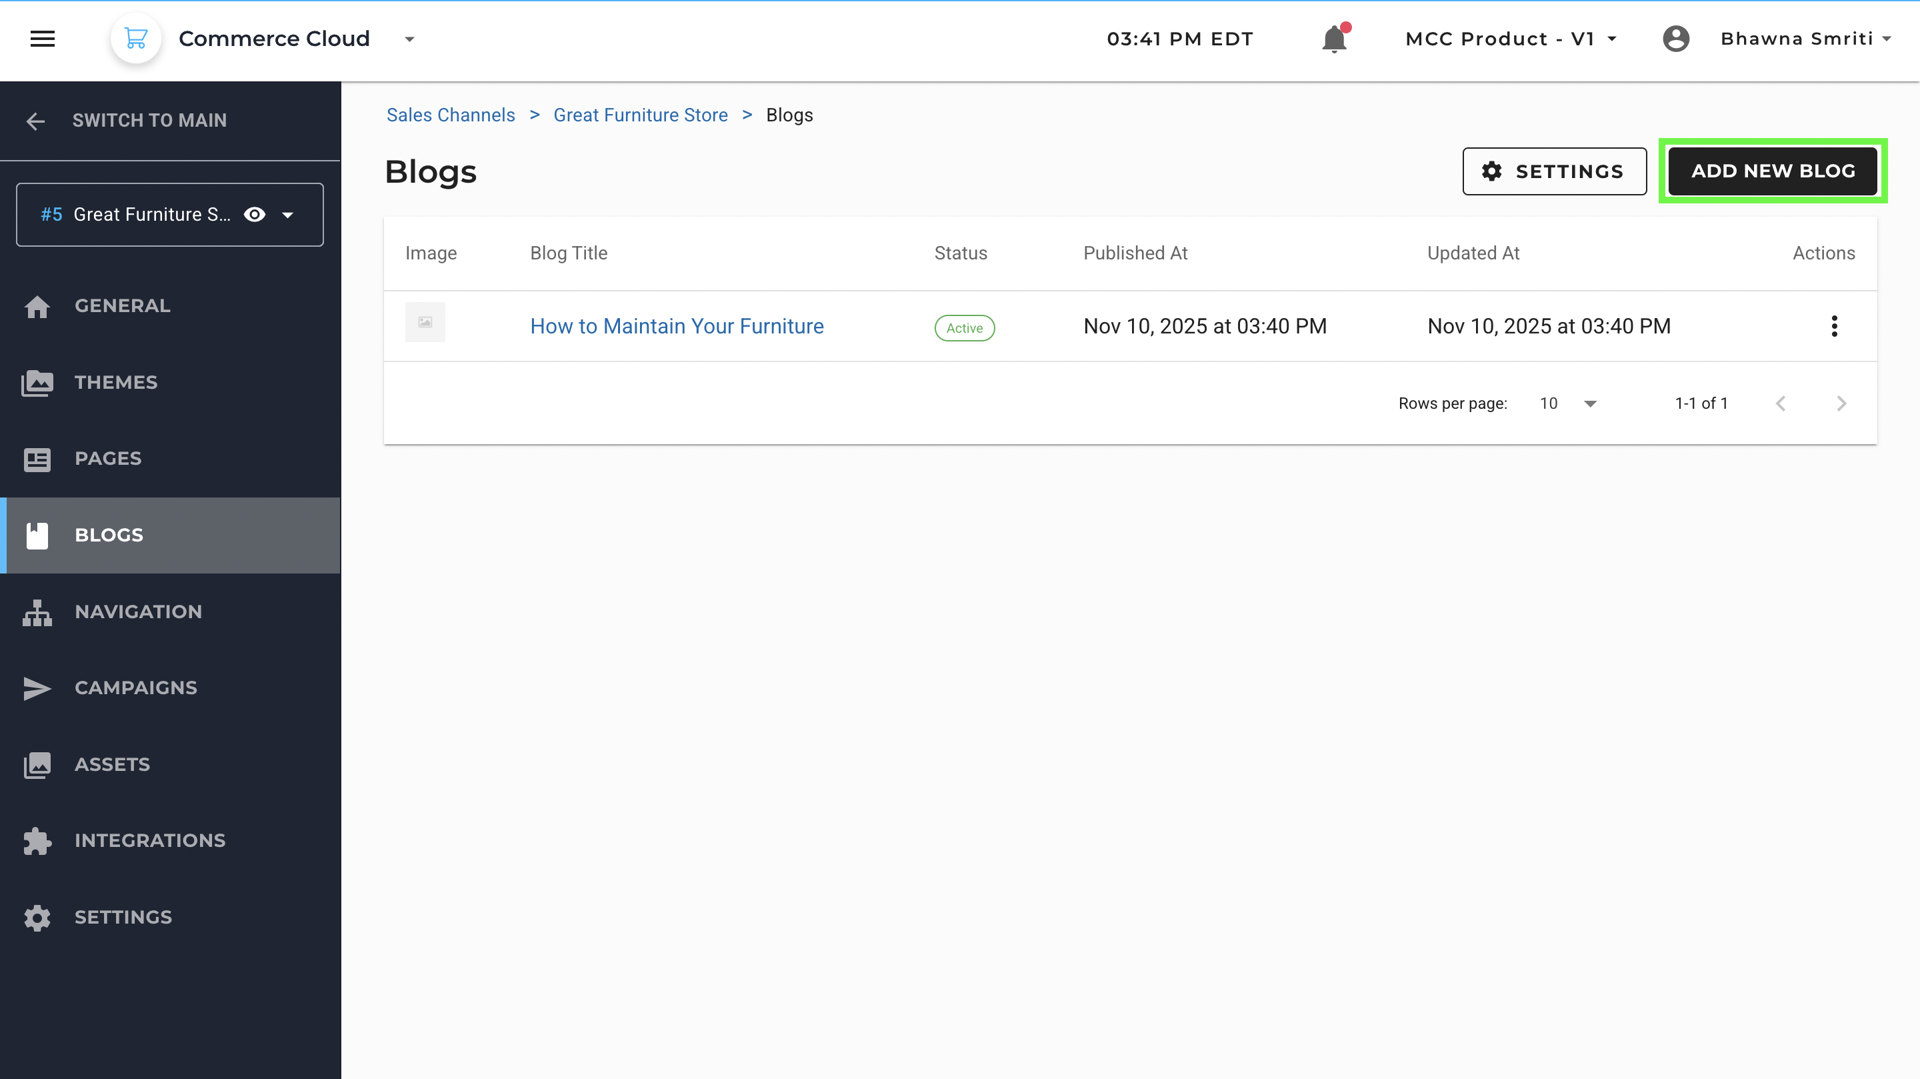
Clicking the Add New Blog button opens the Create Blog page. This page allows you to add new blog posts that engage visitors and enhance SEO performance.
For a detailed step-by-step guide to add and manage blog posts, click here.
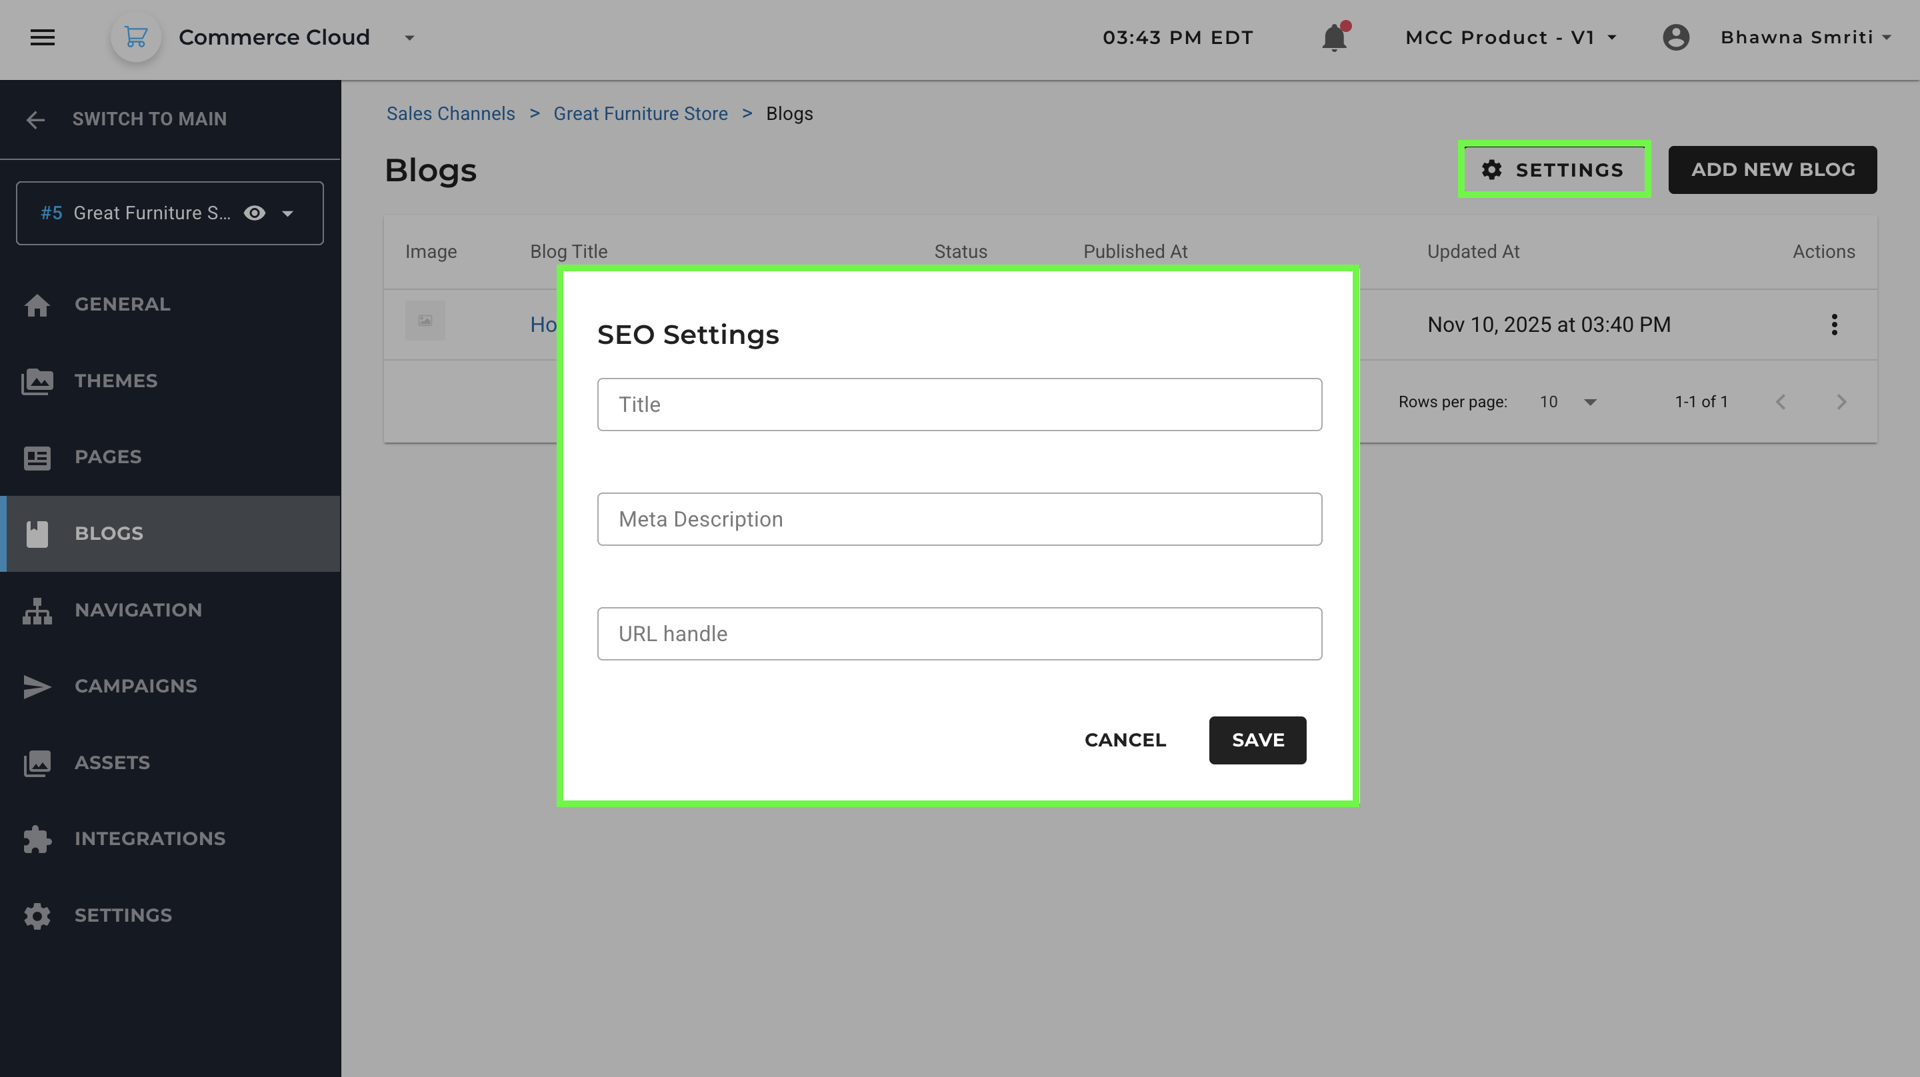
SEO Settings
Similar to the main Settings modal, you can use Settings option on the blog page to define Blog Home Page settings:
- Title: Title for you blog home page.
- Meta Description: A short preview for search engines.
- URL Handle: The unique link for the blog home page (e.g.,
greatfurniture/blog).
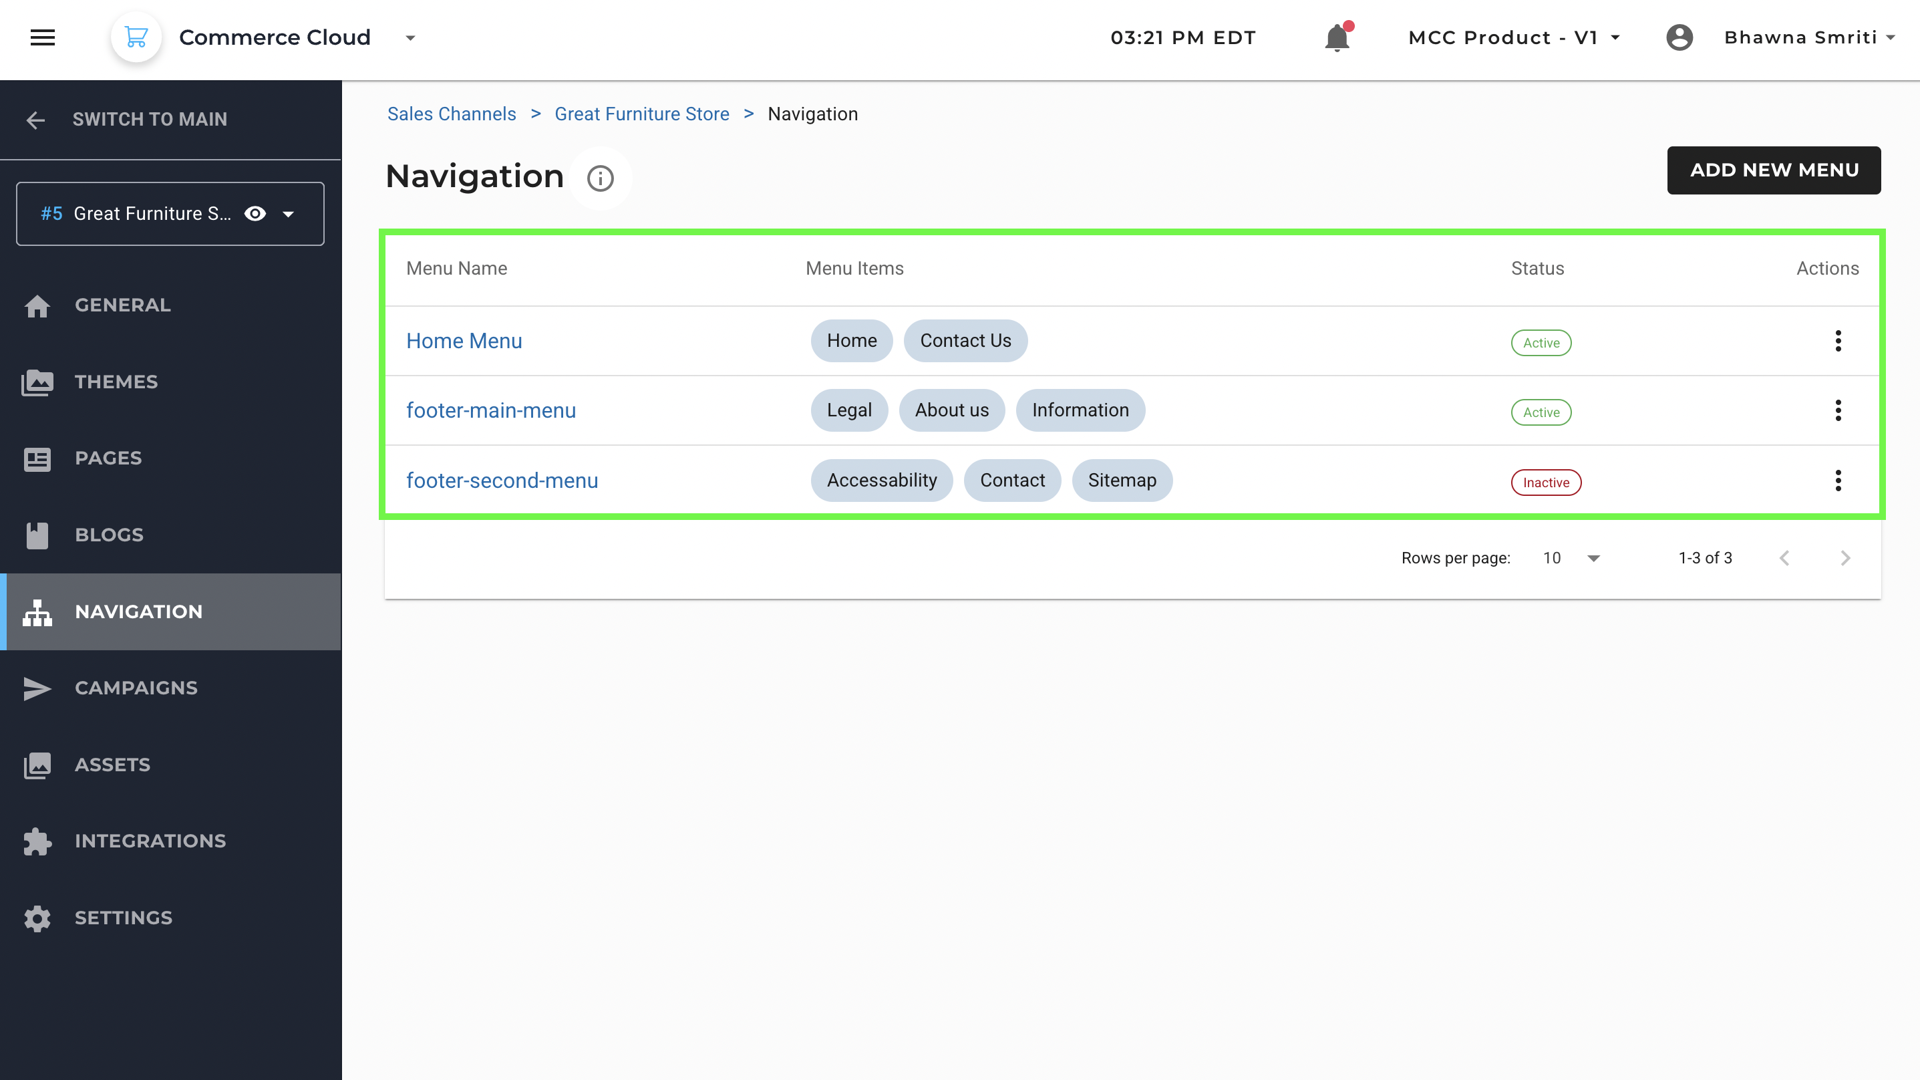
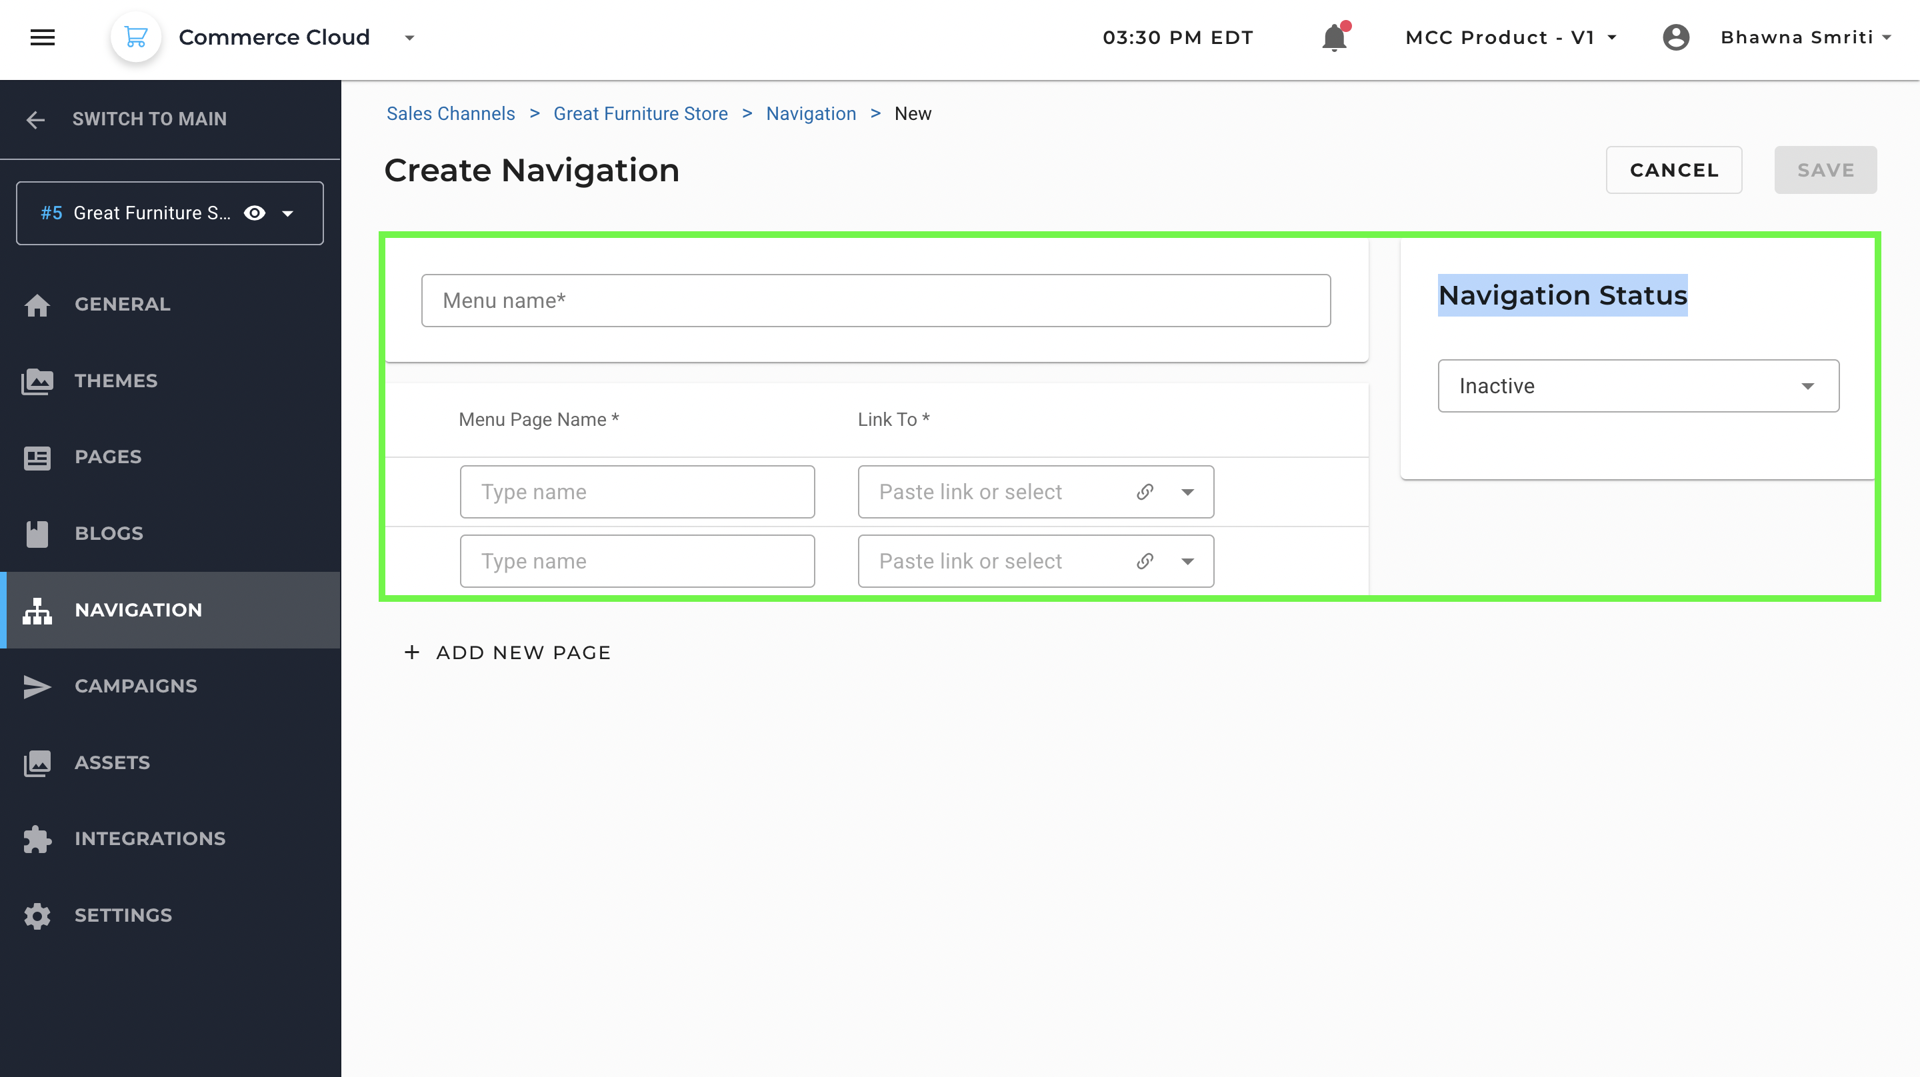
5. Navigation
The Navigation section allows you to control how users move through your storefront. It helps structure and organize links like Home, Contact Us, Legal, About Us, and other important sections.
These menus can be used in the header, footer, or sidebar, depending on your website’s layout.
Common Use Cases
- Header Menu: Often used for main navigation like Home, Shop, Contact Us.
- Footer Menus: Typically include legal links, policies, sitemap, and accessibility links.
- Custom Menus: You can create menus for landing pages, campaign-specific flows, or even temporary event banners.
Creating a New Menu: The “Add New Menu” Button
To create a new set of navigation links:
- Click the Add New Menu button on the top-right corner.
- You'll be taken to a screen where you can:
- Enter the Menu Name (e.g., Header Menu, Support Links, etc.)
- Add Menu Items:
- Each menu item includes a label as Menu Page Name (e.g., "Returns") and a link (internal or external).
- Reorder items using drag-and-drop.
- Navigation Status: Use this to set menu as active or inactive
- Save the menu and and the menu will reflect on the navigation page.
This allows you to organize navigation menus separately for different parts of your store, such as the main header menu and multiple footer menus.
6. Campaigns
The Campaigns tab allows you to manage promotional campaigns within a Sales Channel. This section is designed to support seasonal marketing efforts, helping you deliver relevant offers and content based on customer segments.
- You can manage banners, homepage sliders, and promotional visuals.
- This tab lets you highlight offers and seasonal messaging.
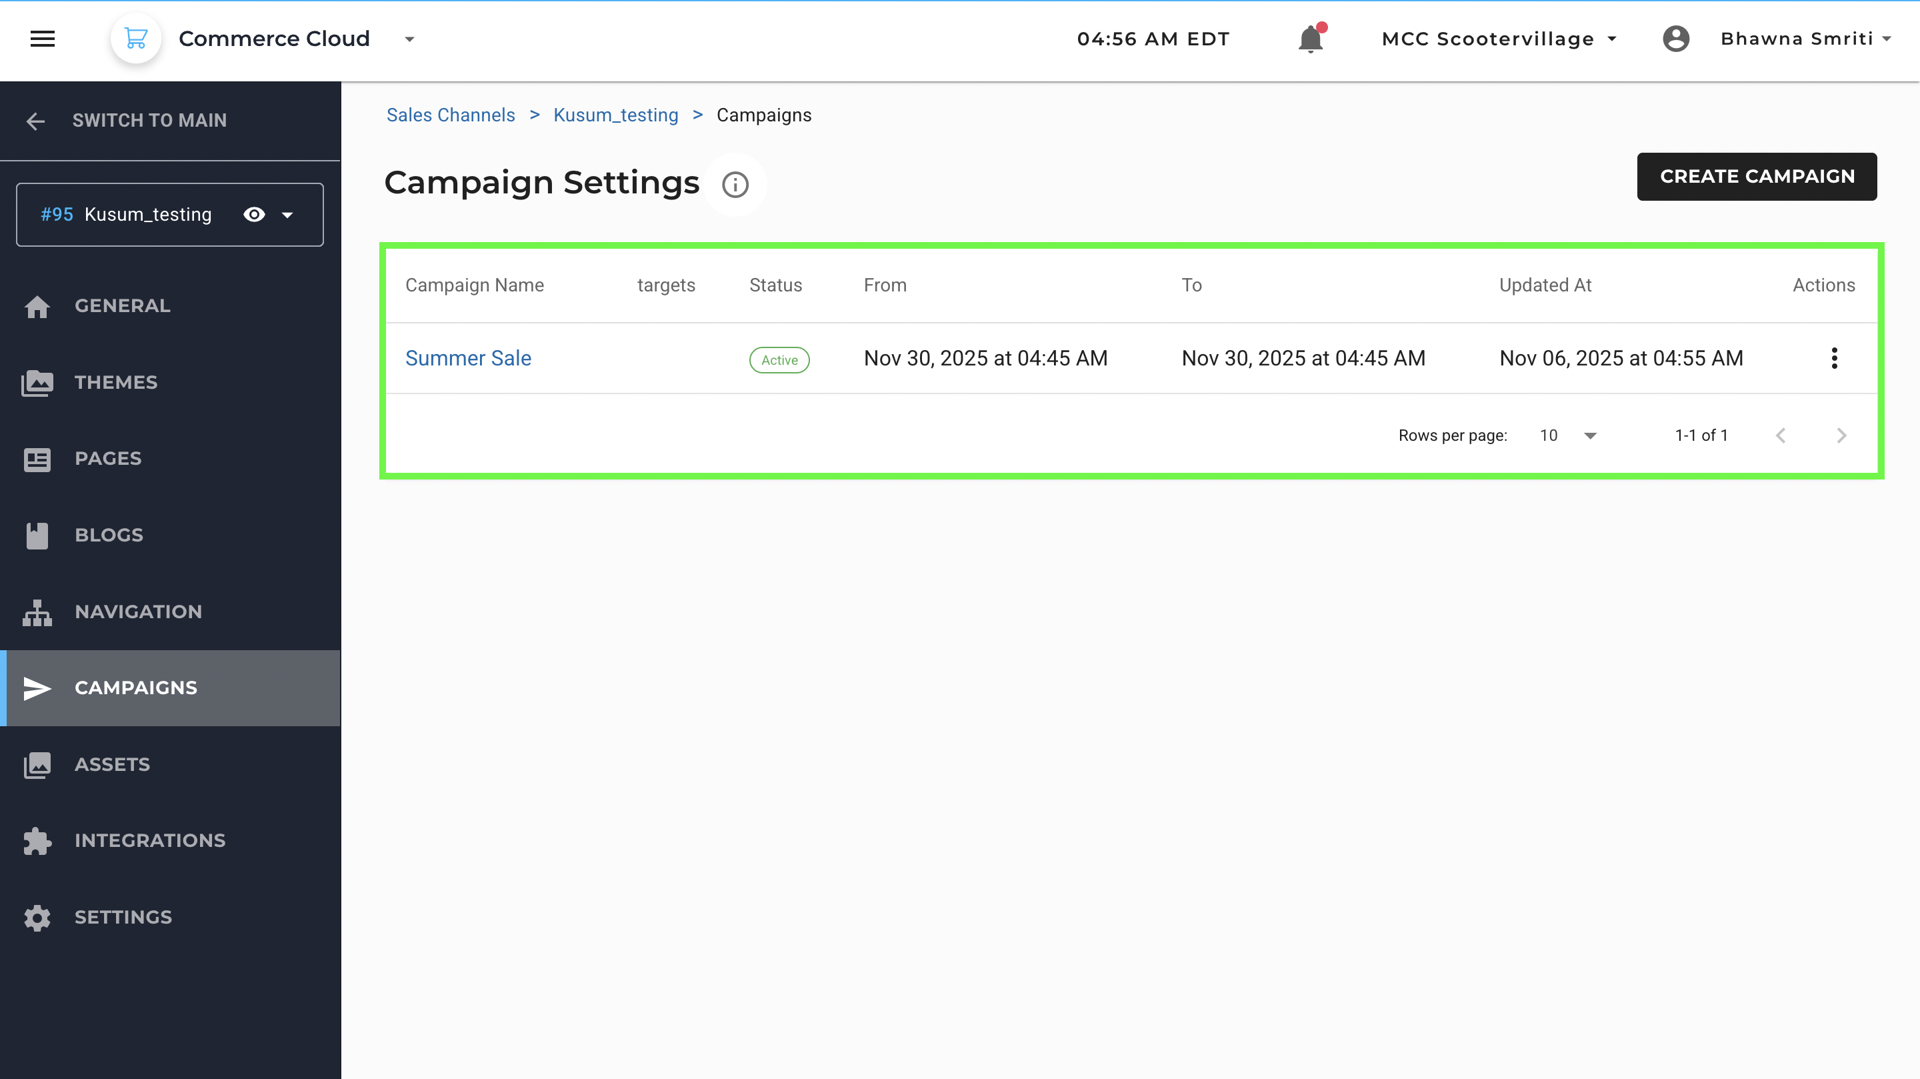
Creating a New Campaign
To create a new campaign, click the “Create Campaign” button at the top right corner on the campaigns page.
Enter the details required to create a campaign:
- Campaign Name: Name of the campaign
- Targets: Select the specific customer group or audience you want to include in this campaign. You can choose from the customer group dropdown
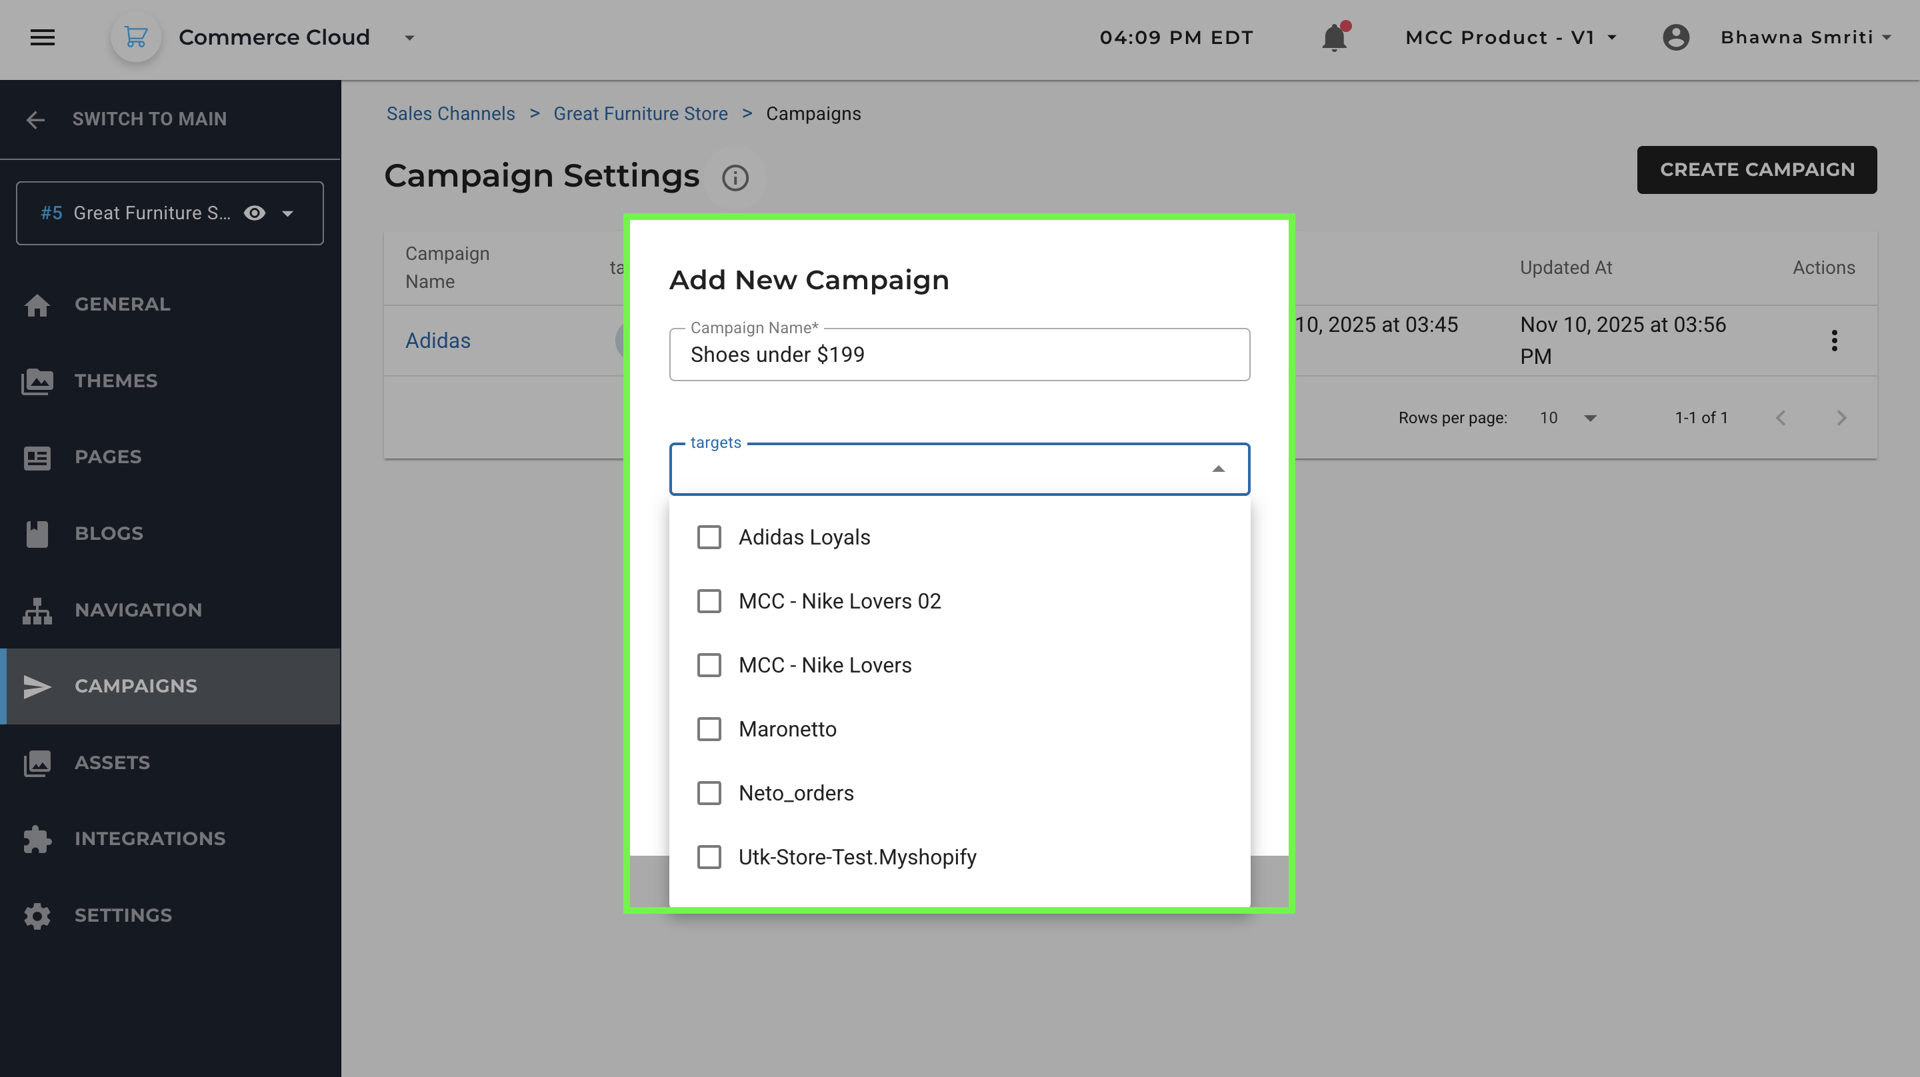
- Start Date: Set the date when the campaign should begin.
- Start Time: Define the exact time the campaign will go live on the start date.
- End Date: Choose the date when the campaign will automatically end.
- End Time: Specify the time the campaign will stop running on the end date.
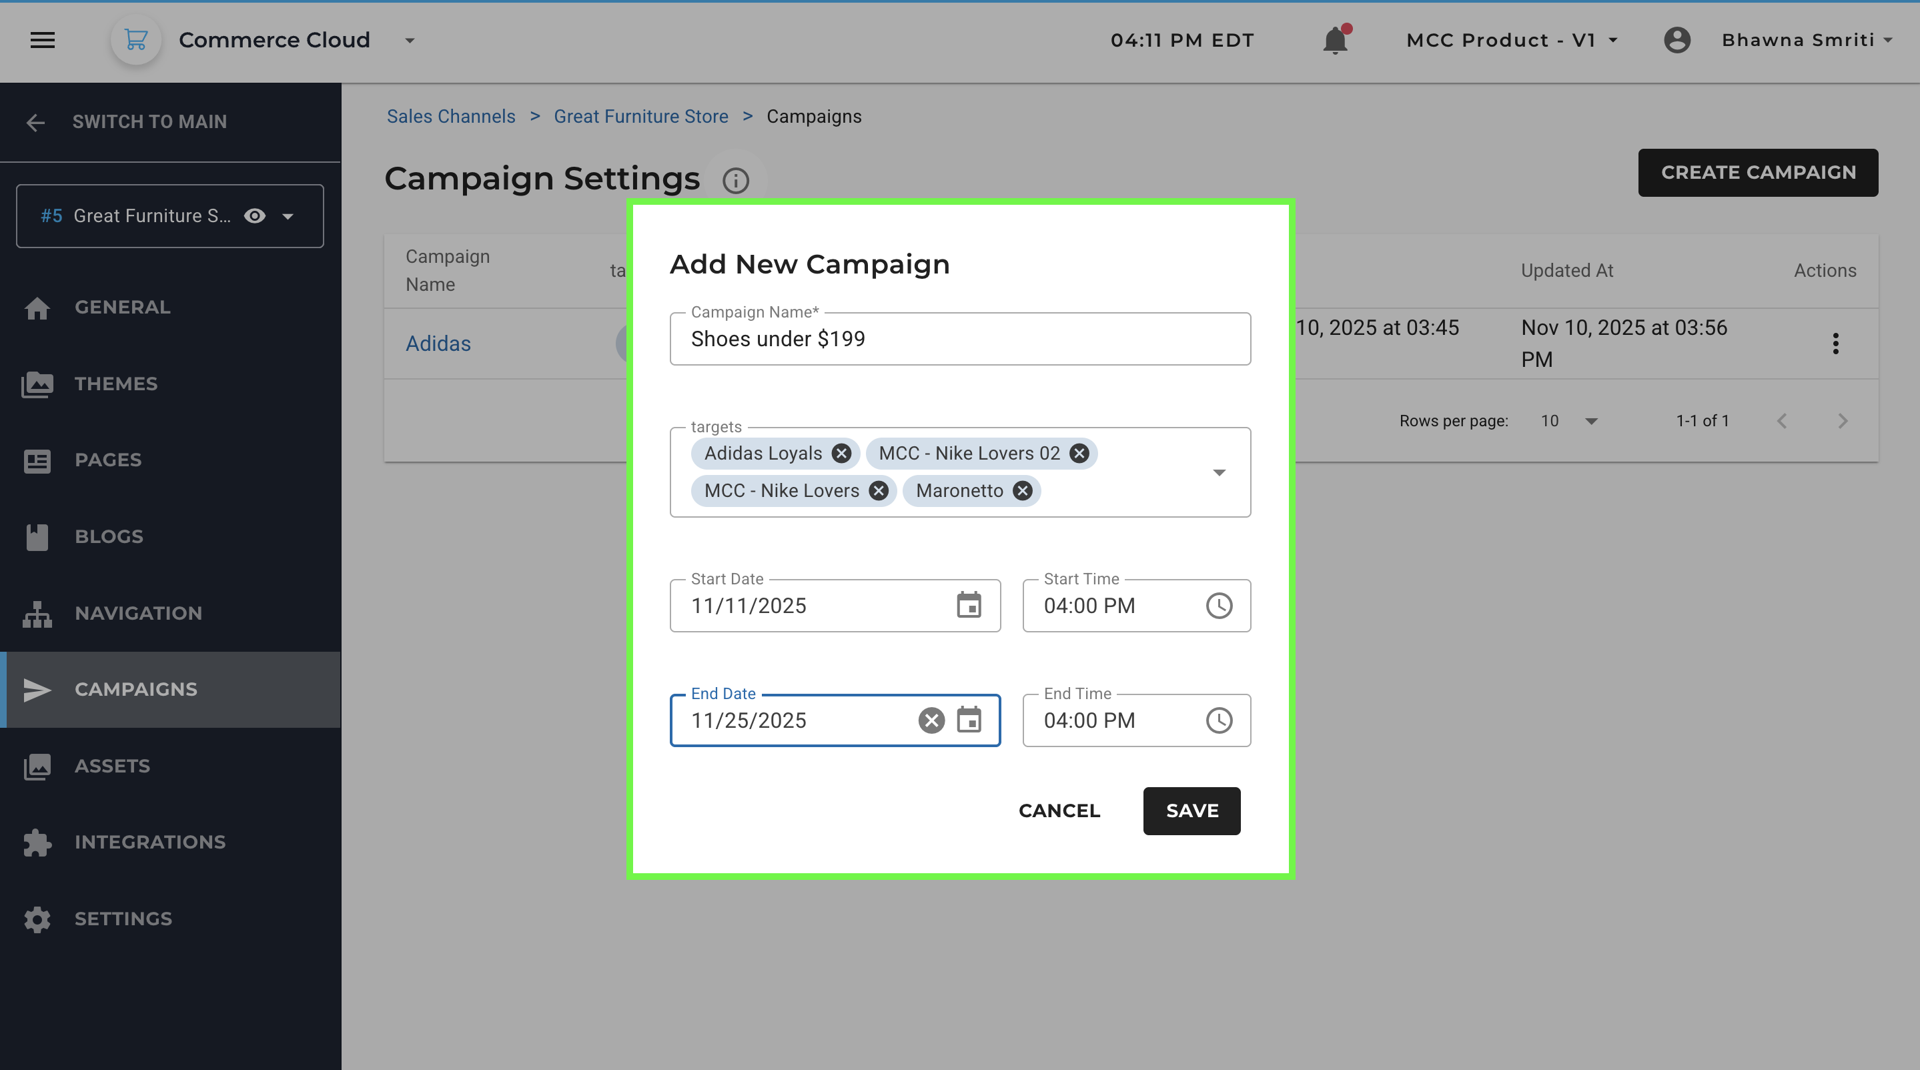
Once you enter all the details, click on save. It will save the campaign and reflect on the campaigns page as an inactive campaign.
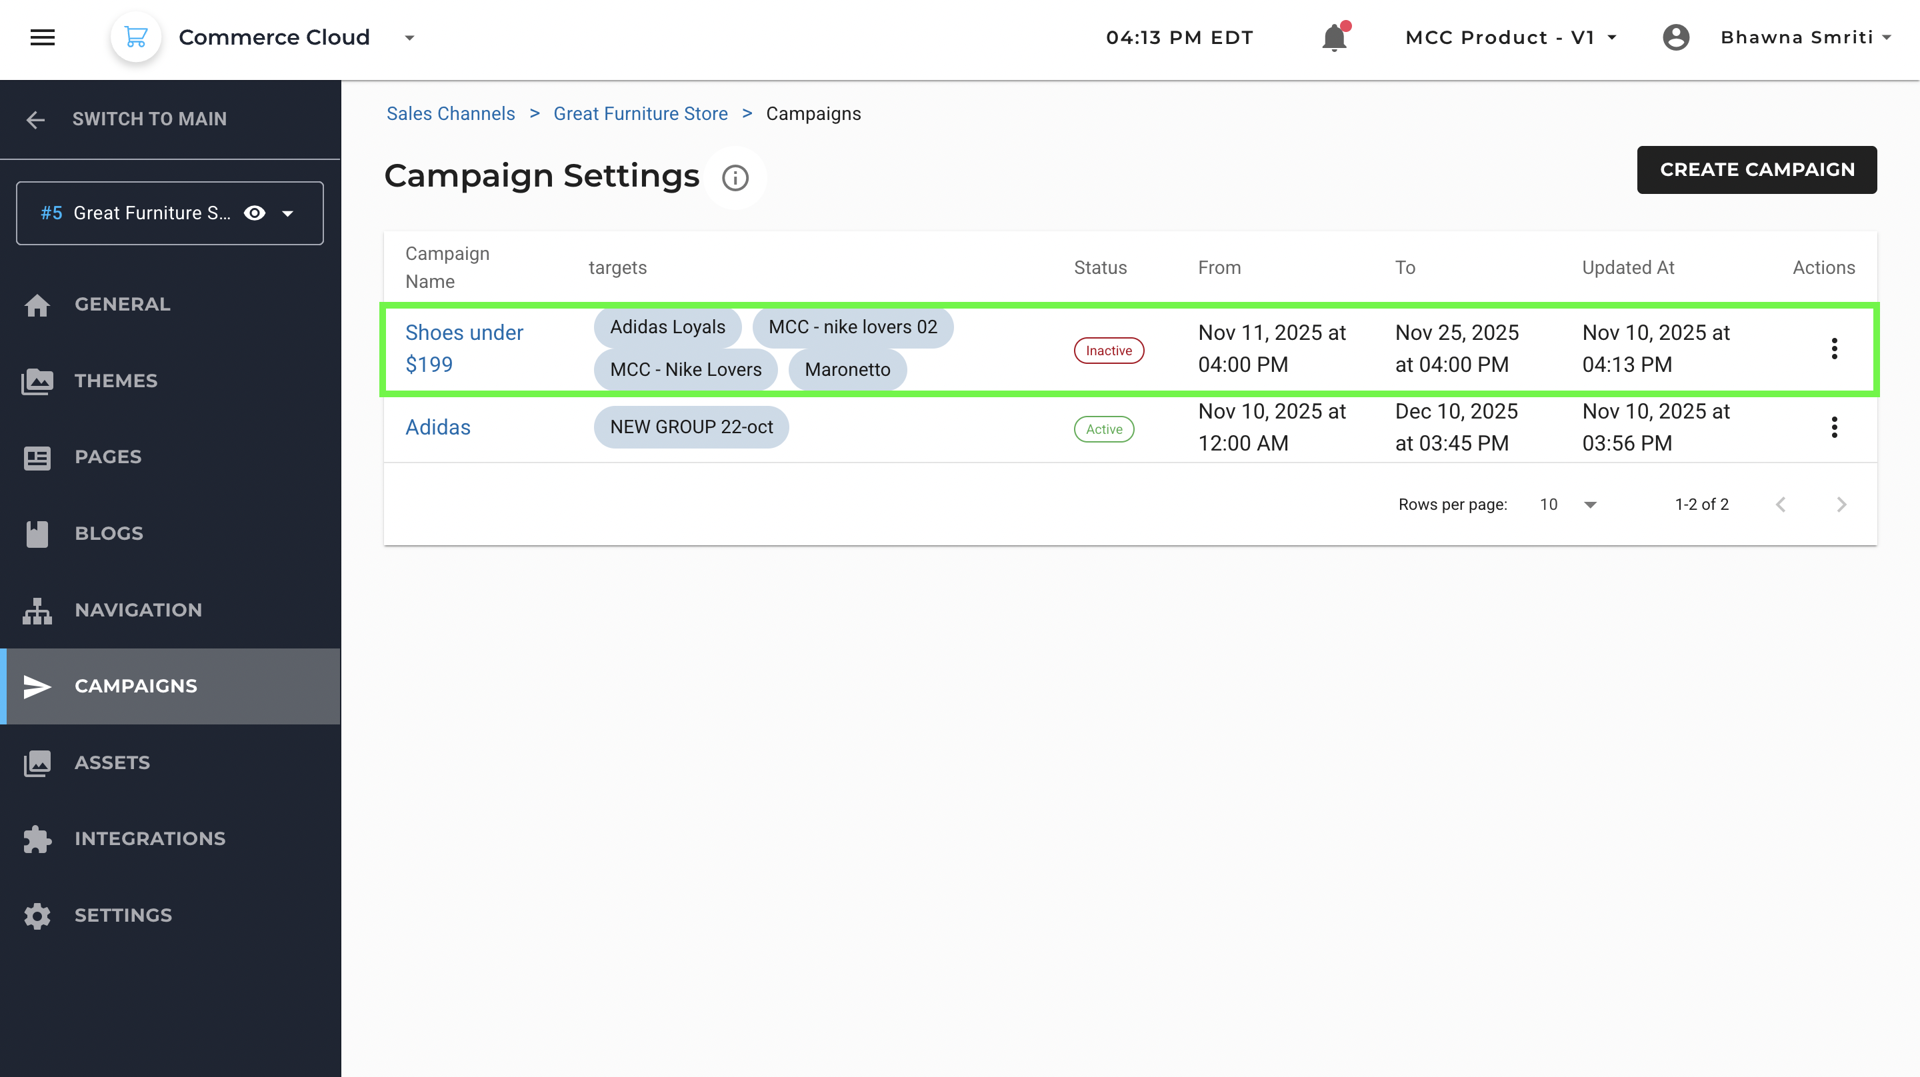
To activate/schedule the campaign, click on the three dot menu and select “Update Status” and then click on Confirm.
7. Assets
Upload and manage your store’s visual assets — including logos, images, banners, and videos. A centralized space to manage your media.
At the top of the Assets page, you will find the Search Assets box. It allows you to quickly find specific files from your uploaded assets library without scrolling through multiple pages.
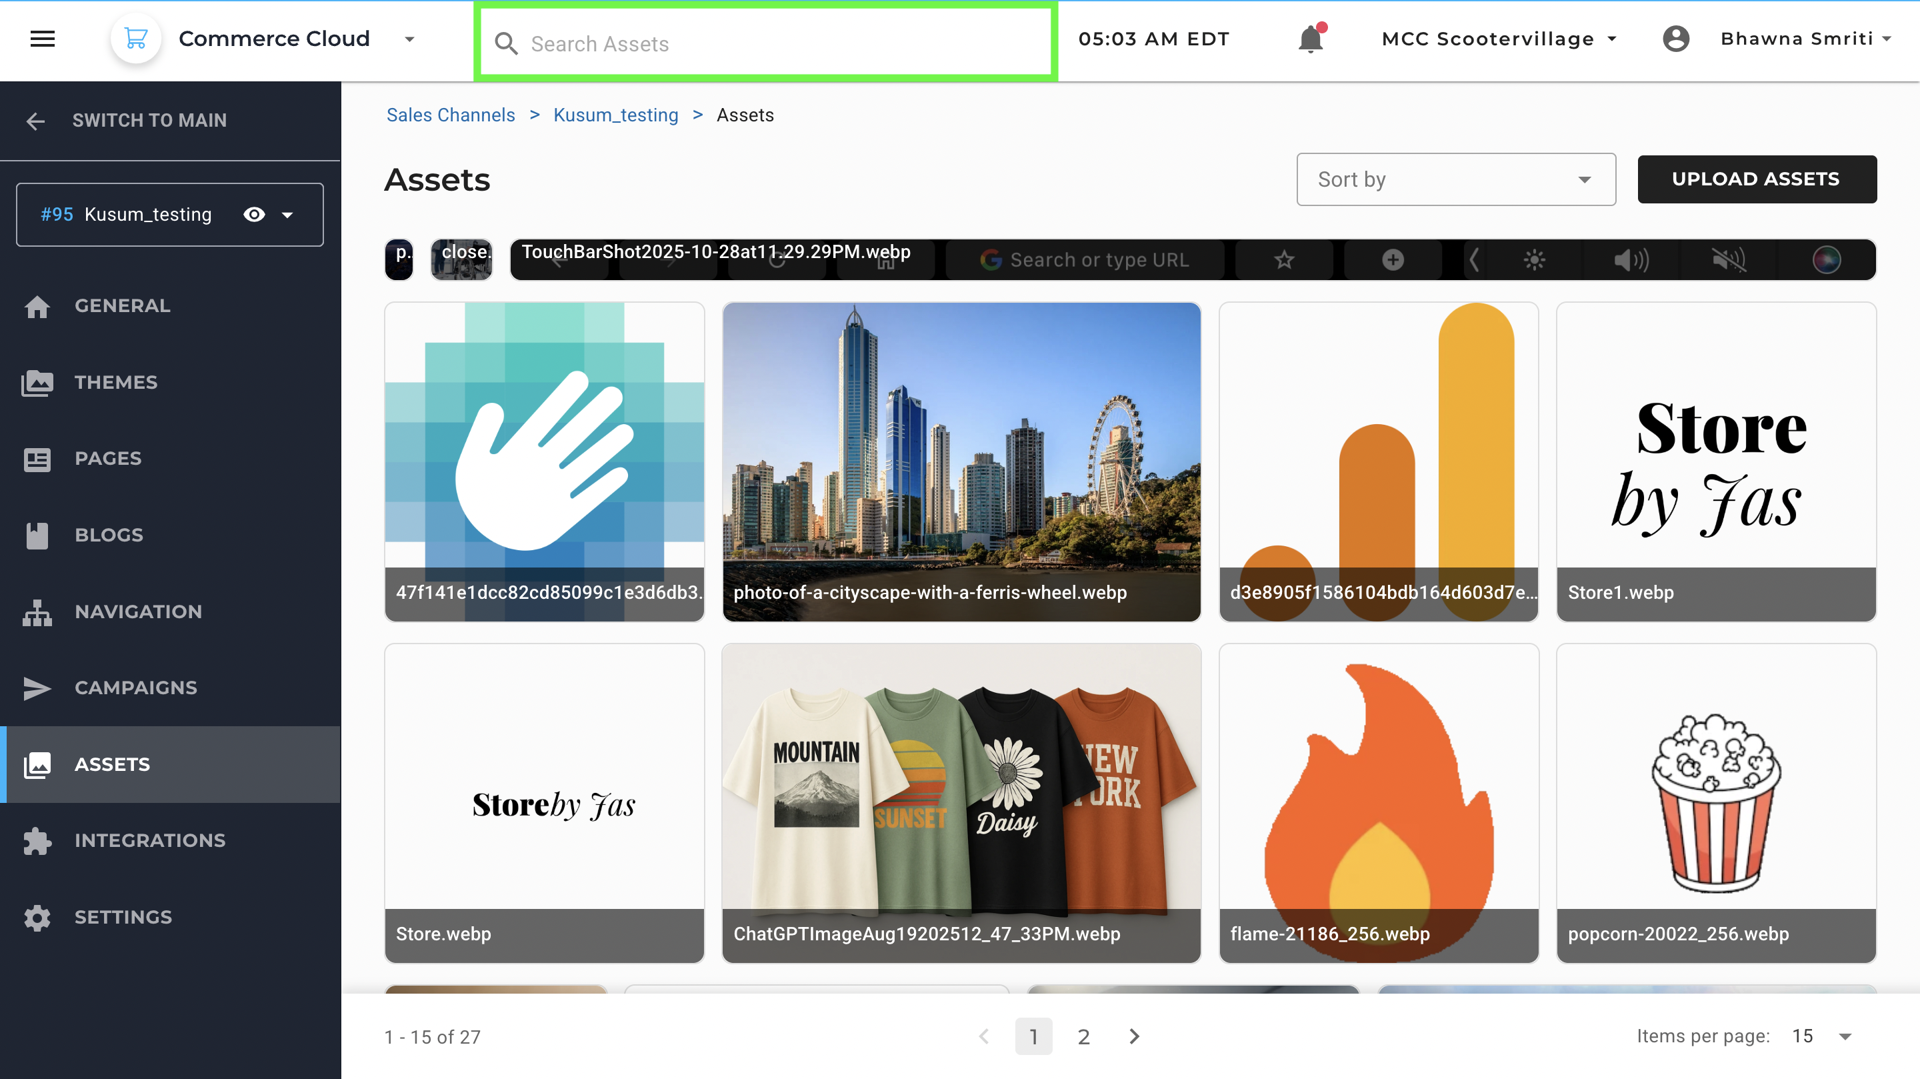
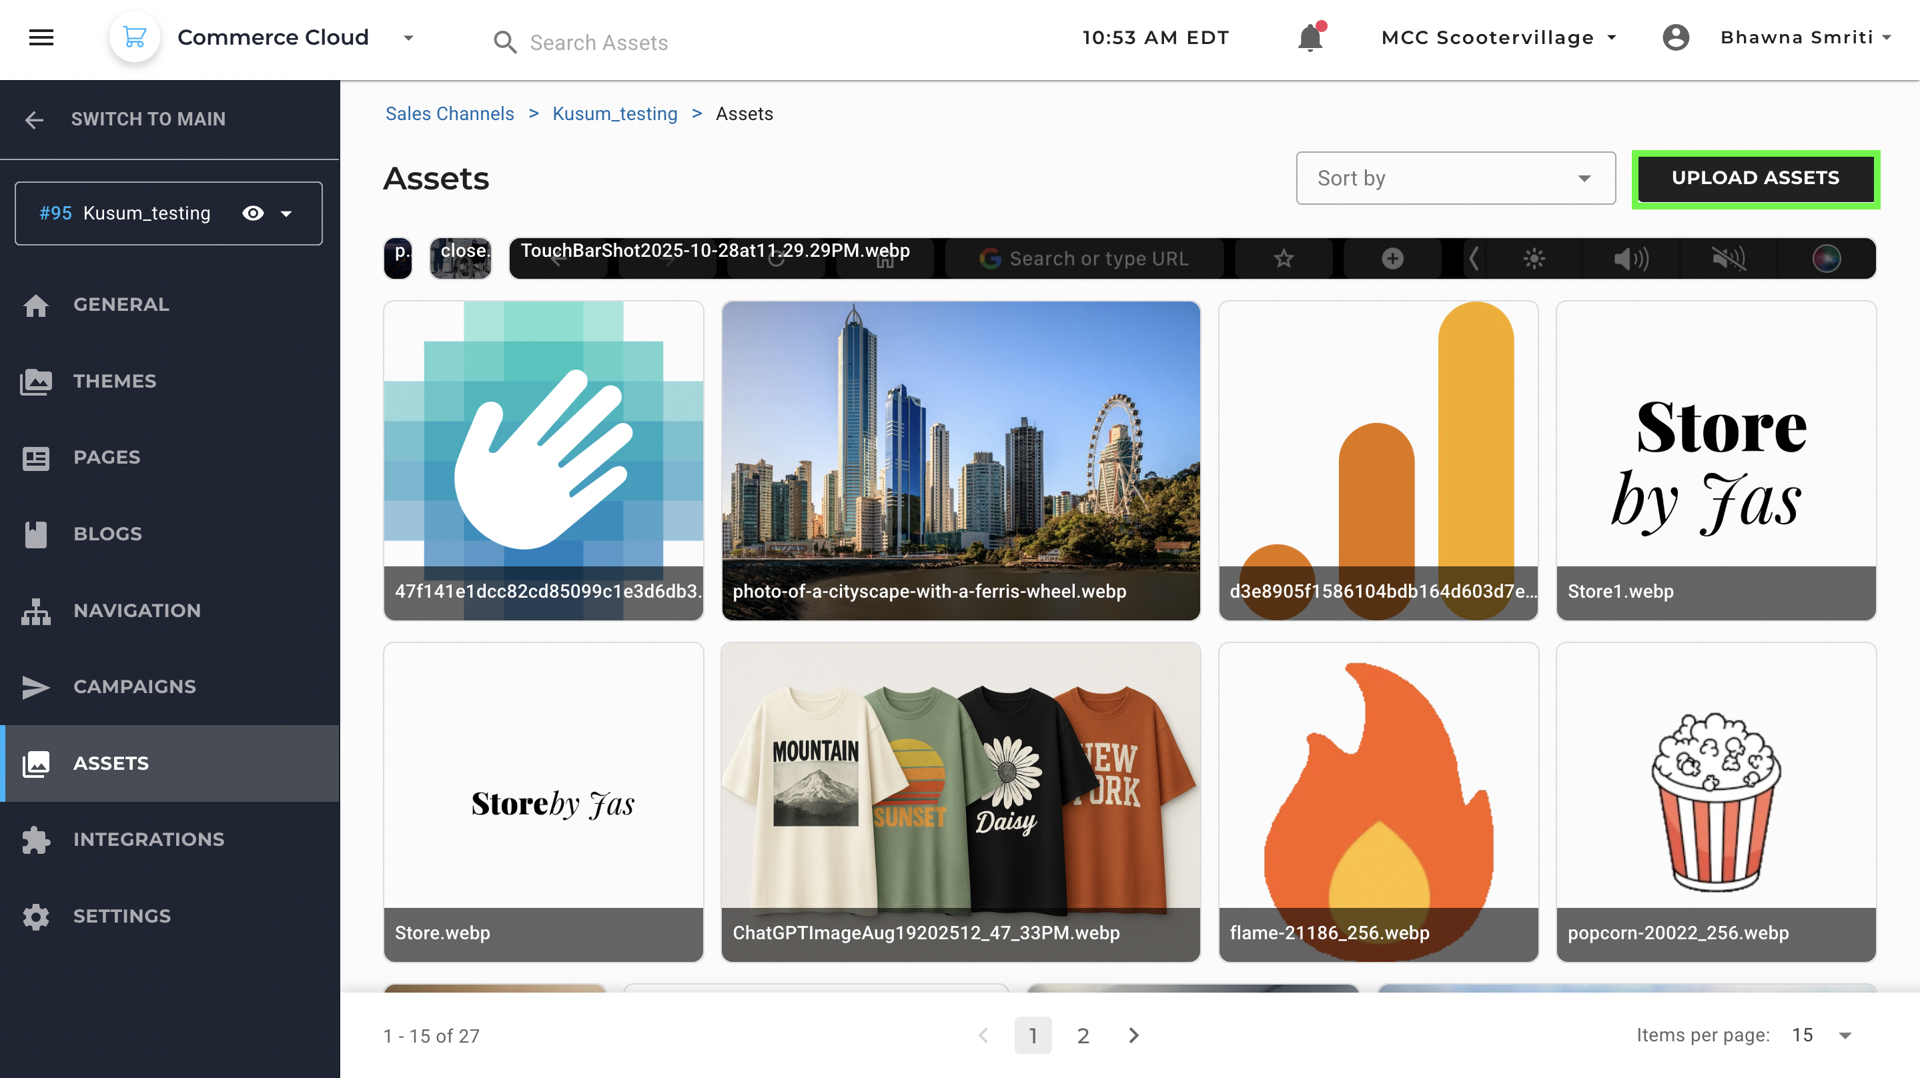
Upload Assets
The “Upload Assets” button (top-right corner) allows users to upload images or files that will be used across the storefront — including for product images, banners, backgrounds, brand logos, etc.
- Click Upload Assets to open a file picker.
- Supported formats include common image types such as
.webp, .jpeg, .GIF, .PDFetc. - Once uploaded, these assets are saved and can be used to update/add an image in the store (e.g.,
Kusum_testing in this example).
Maximum supported file size is 2MB
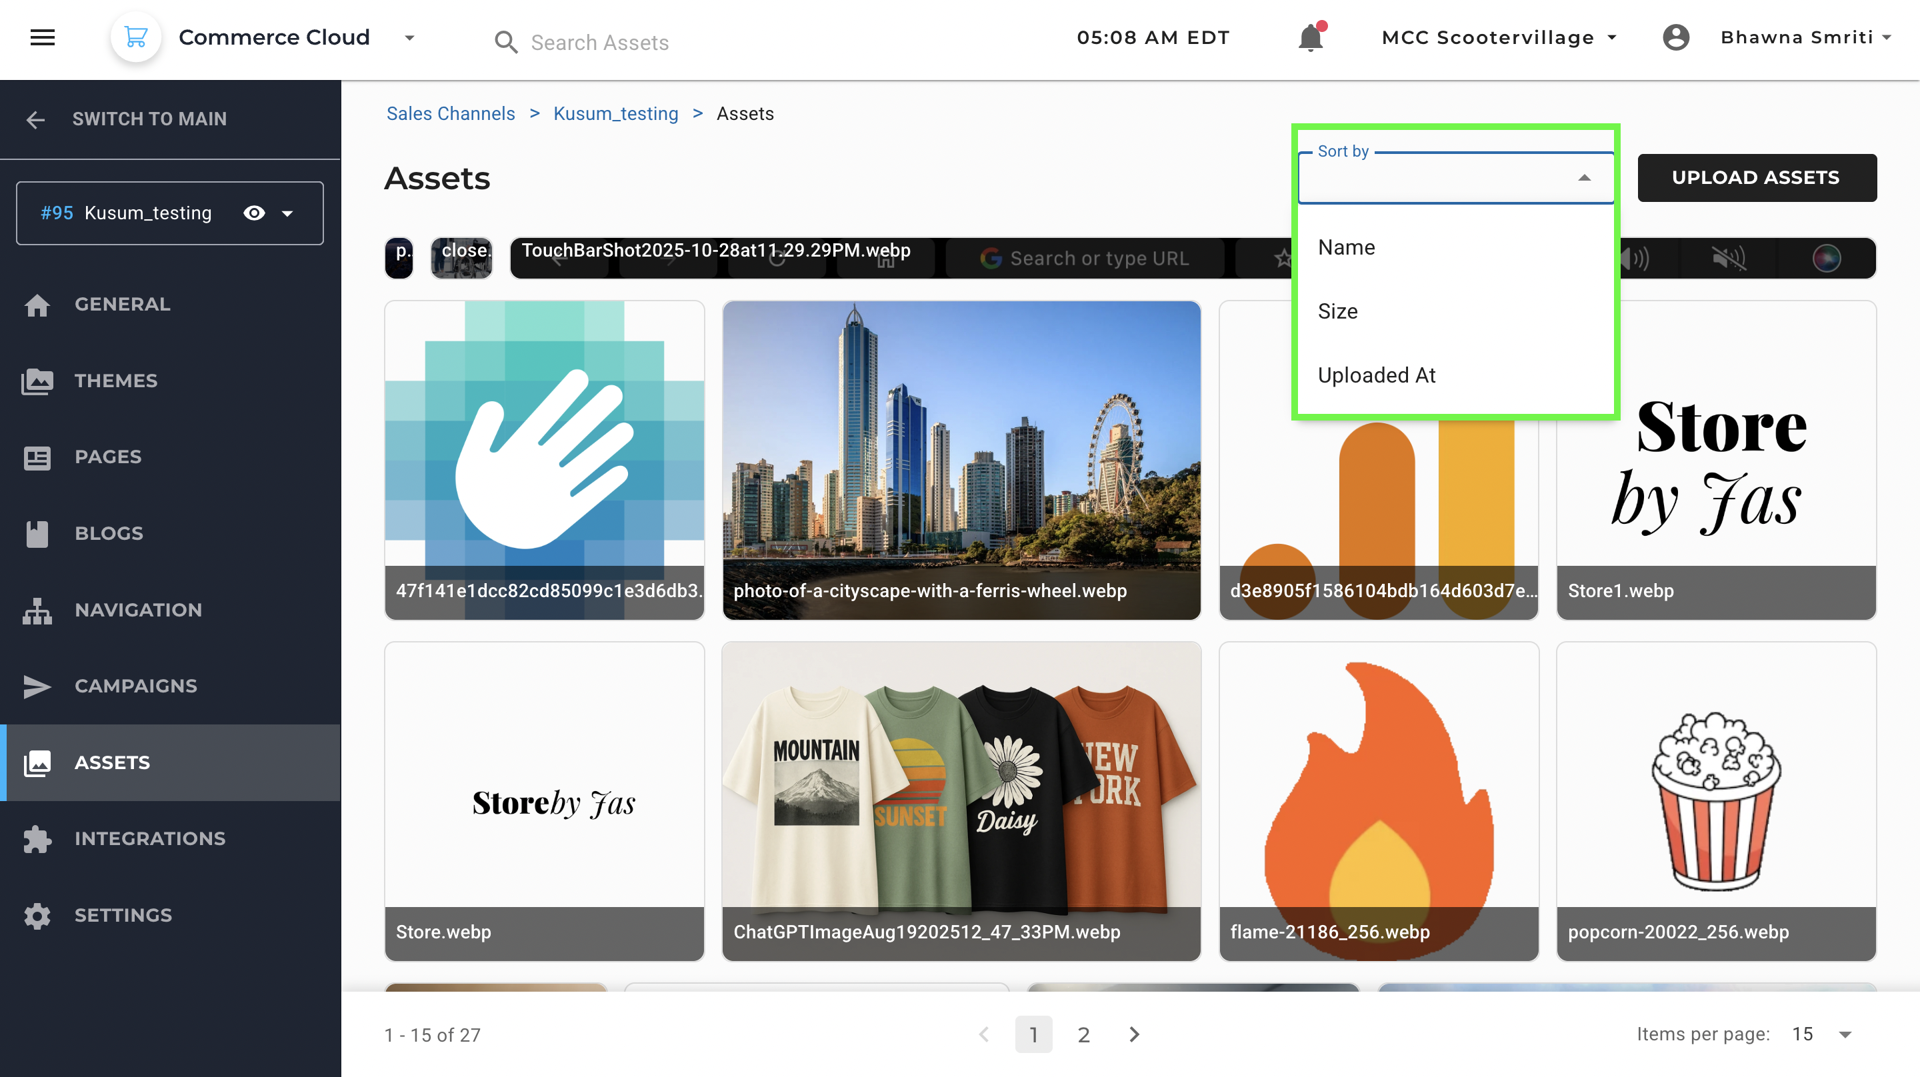
Sort By Options
The “Sort By” dropdown menu (top-right, just beside Upload Assets) allows you to rearrange the asset list based on:
- Name – Sort alphabetically by file name.
- Size – Sort by the file size, either ascending or descending.
- Uploaded At – Sort by the date/time the asset was uploaded (most recent or oldest first).
This makes it easier to locate recent uploads, find large files, or quickly browse in alphabetical order.
8. Integrations
The Integrations tab in the Maropost Commerce Cloud dashboard allows you to connect your storefront (Sales Channel) with third-party tools and services to enhance your store’s performance, customer experience, and operational efficiency.
Currently, we support Integrations for:

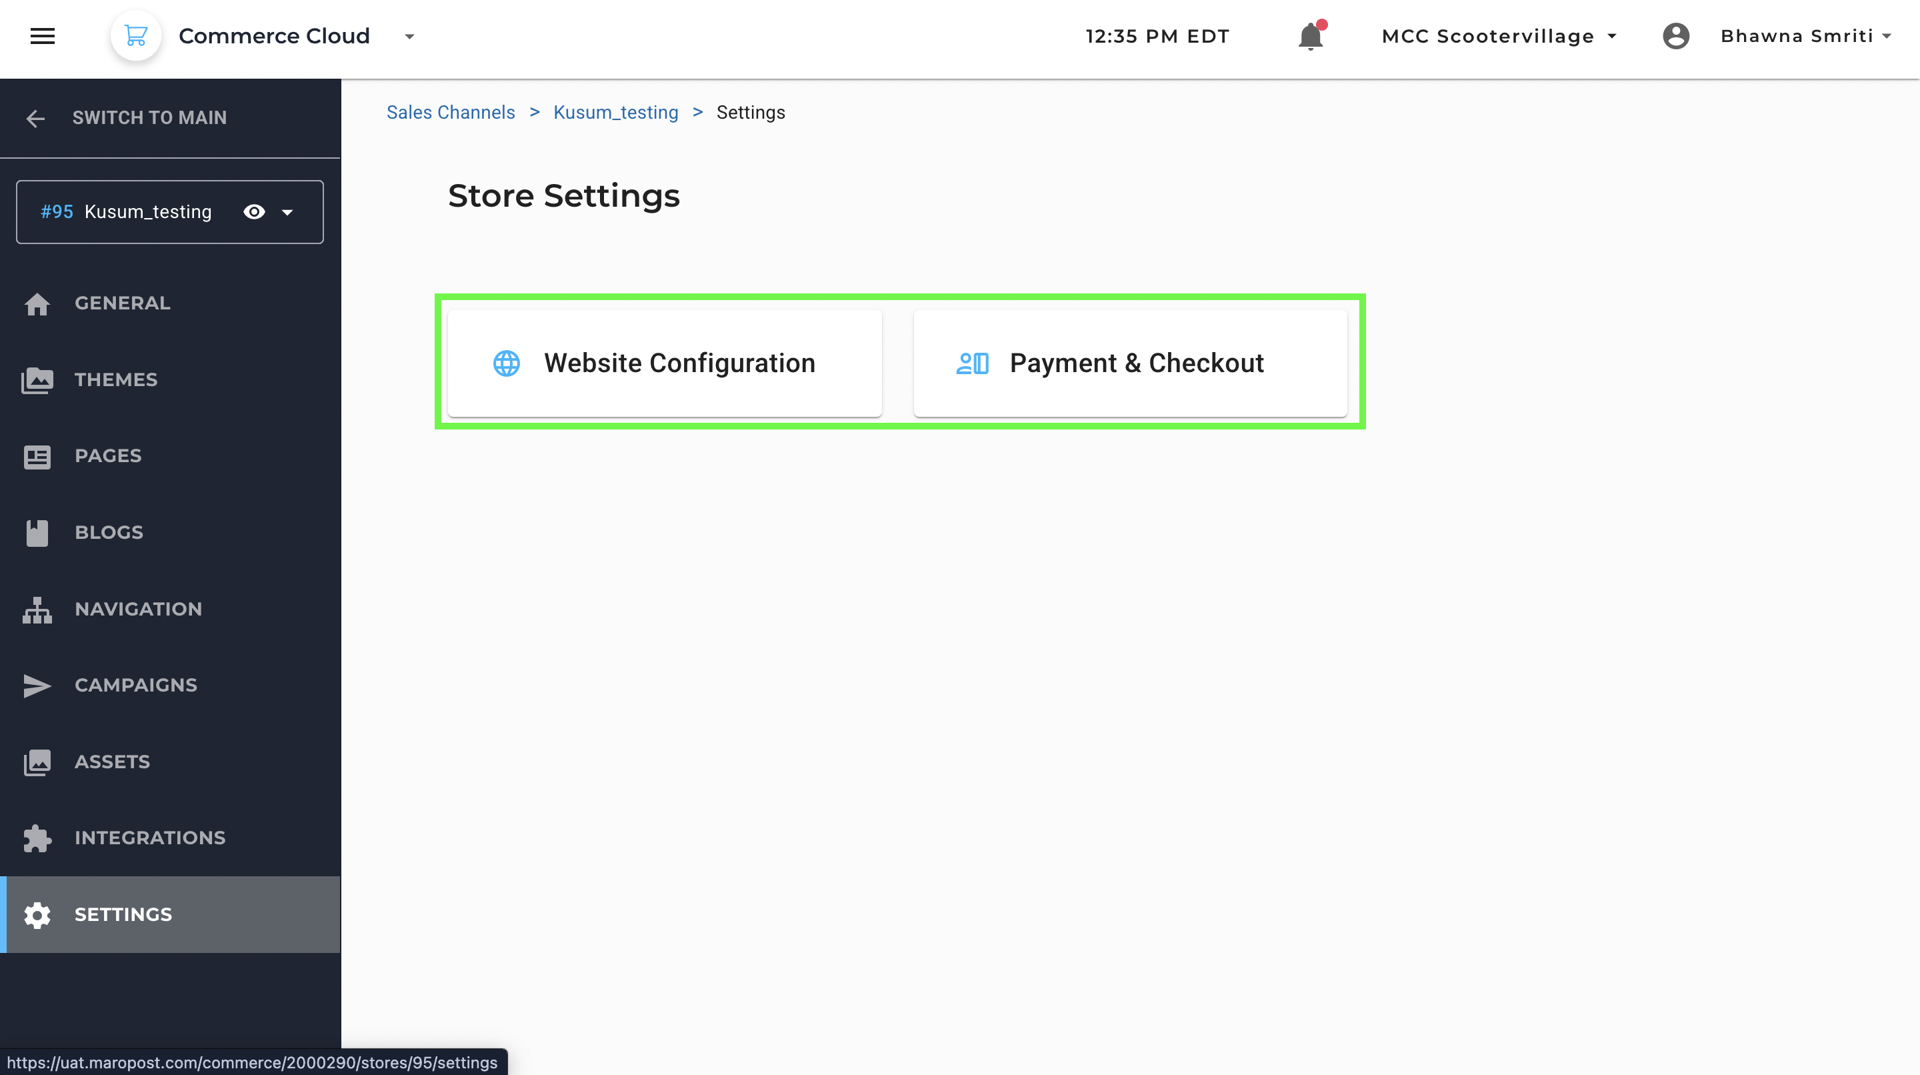
9. Settings
To create a Sales Channel, the Settings section becomes your control hub for finalizing key store configurations. Within this page, you’ll see two critical setup options, each focused on an essential aspect of your store’s readiness:
- Website Configuration – Controls privacy and SEO behavior.
- Payment & Checkout – Connects your store to payment gateways like Stripe or PayPal.
Website Configuration
This section helps you manage what customers see on your storefront and how search engines understand your homepage.
Cookie Settings
- Cookie Banner Toggle: Turn this on to display a privacy notice to customers when they visit your site — required for GDPR and other compliance laws.
- This is crucial for:
- Complying with GDPR and other privacy laws
- Building trust with site visitors
- Giving users control over their data
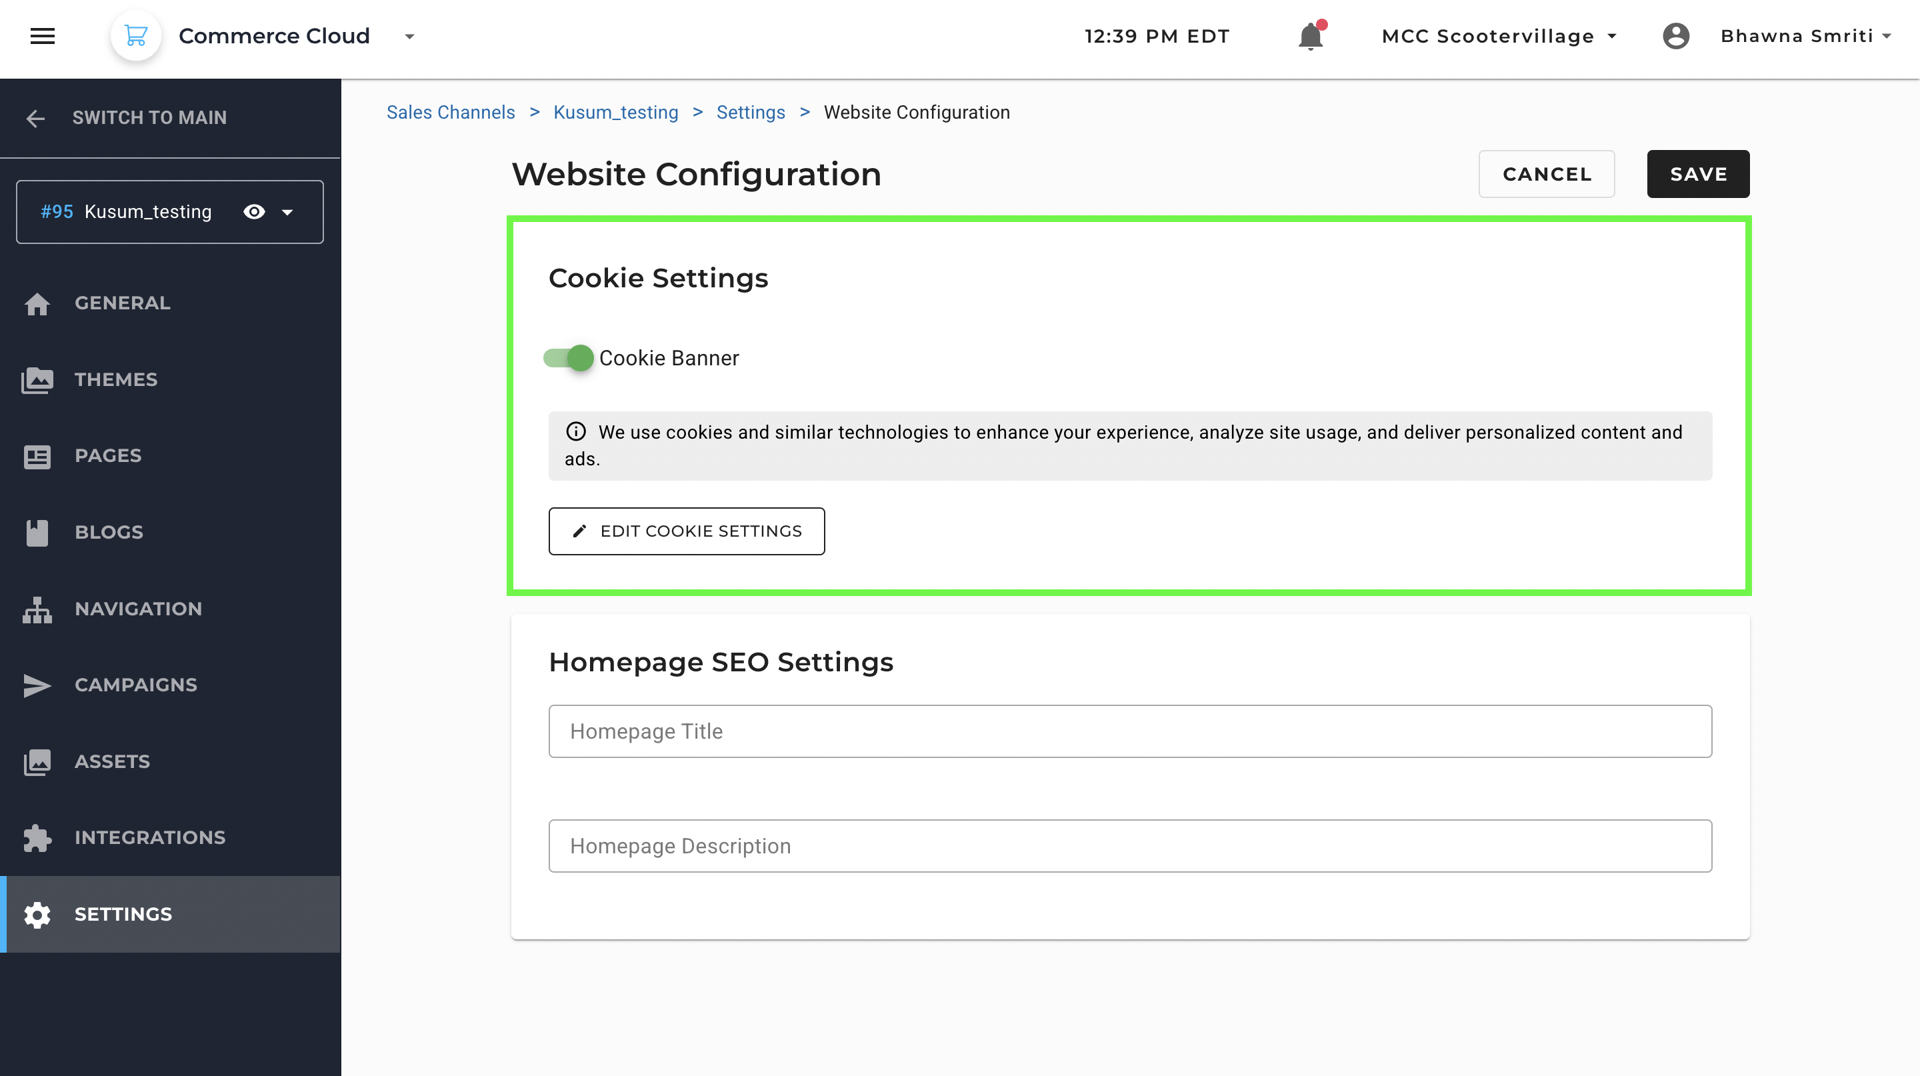
When the cookie banner is enabled, a message is displayed on your storefront:
“We use cookies and similar technologies to enhance your experience, analyze site usage, and deliver personalized content and ads.”
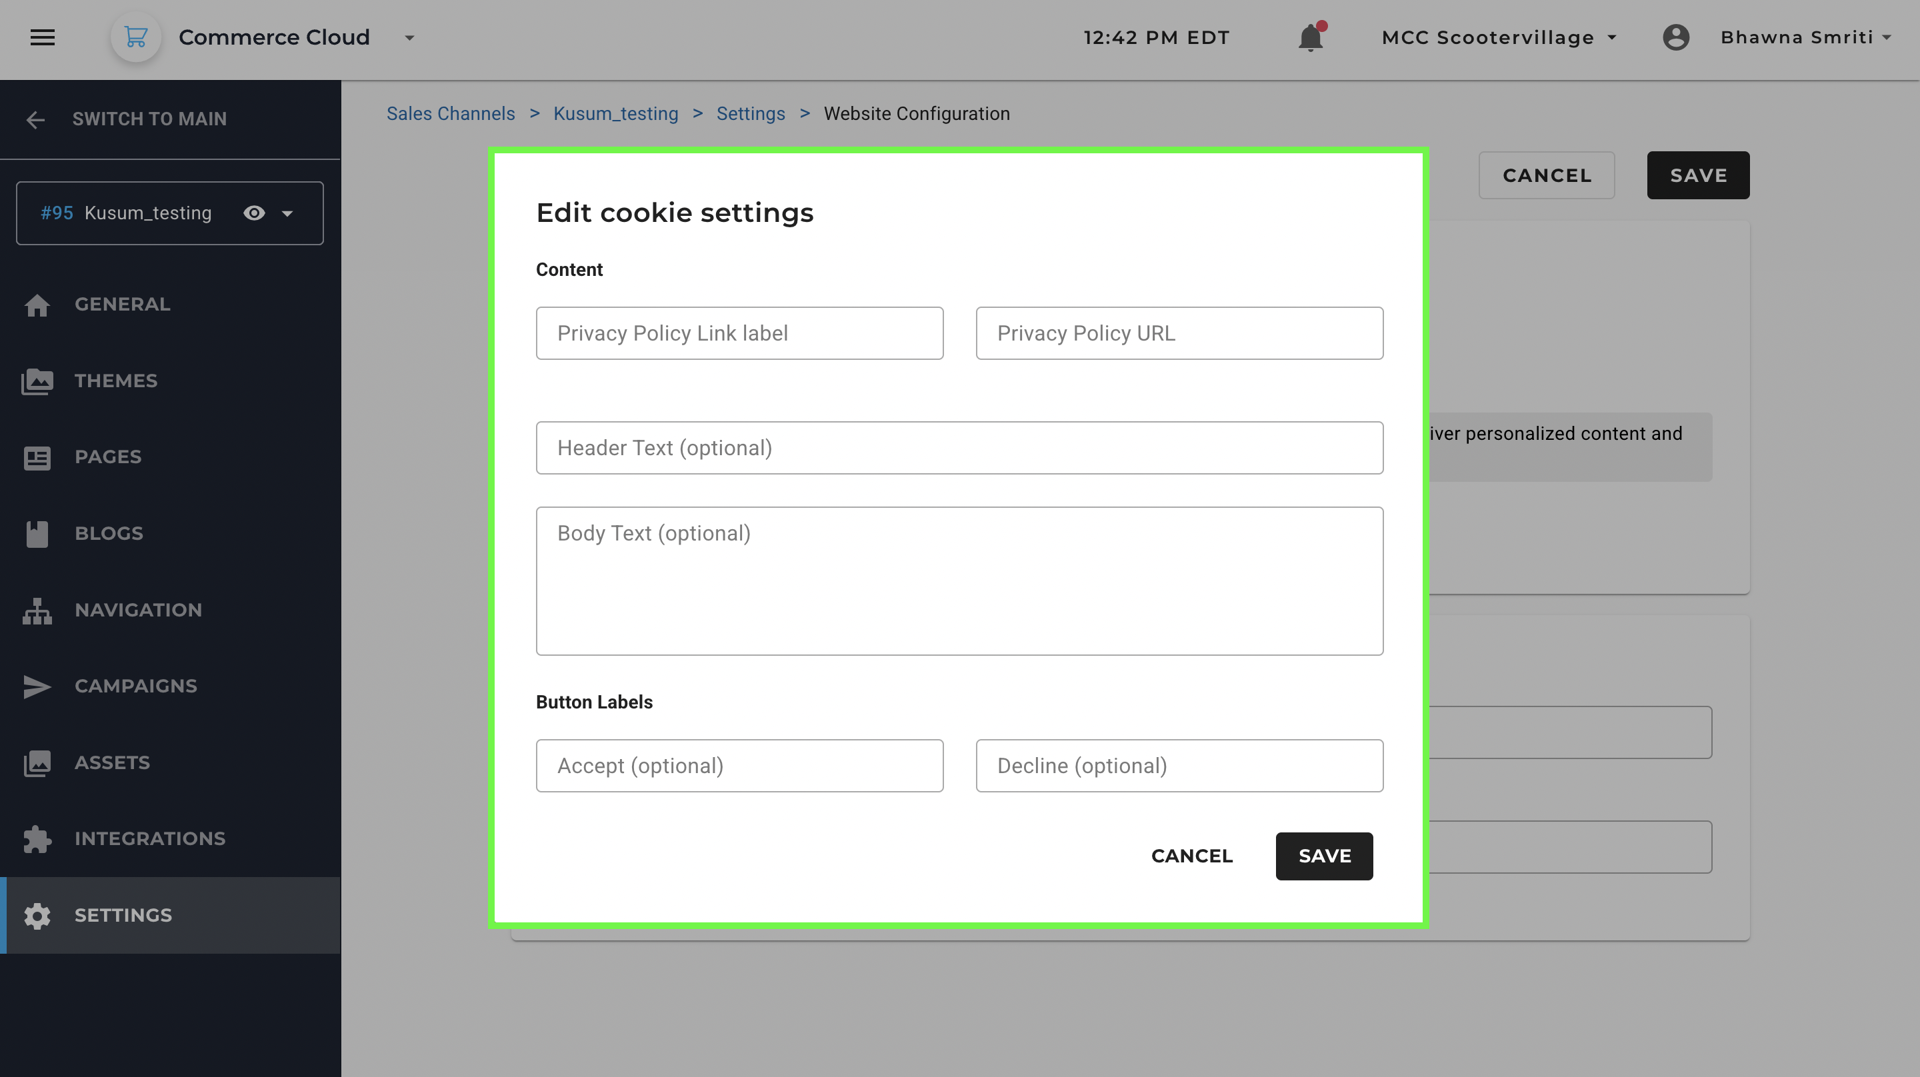
Edit Cookie Settings: Customize the cookie message text and behavior.
- Clicking Edit Cookie Settings opens a configuration panel (see 3rd screenshot), where you can further customize this banner.
Edit Cookie Settings Fields
Field | Purpose |
|---|
Privacy Policy Link Label | The clickable text for your privacy policy (e.g., “Privacy Policy”). |
Privacy Policy URL | The link to your privacy policy page. |
Header Text (Optional) | Add a bold heading for your cookie notice (e.g., “We value your privacy”). |
Body Text (Optional) | Describe how and why cookies are used (e.g., “We use cookies to improve your experience...”). |
Accept / Decline Button Labels | Customize button text (e.g., “Yes, I agree” / “No, thanks”). |
A properly configured cookie banner ensures you're compliant with data privacy laws while improving transparency with your customers. It reassures visitors that their data is handled responsibly.
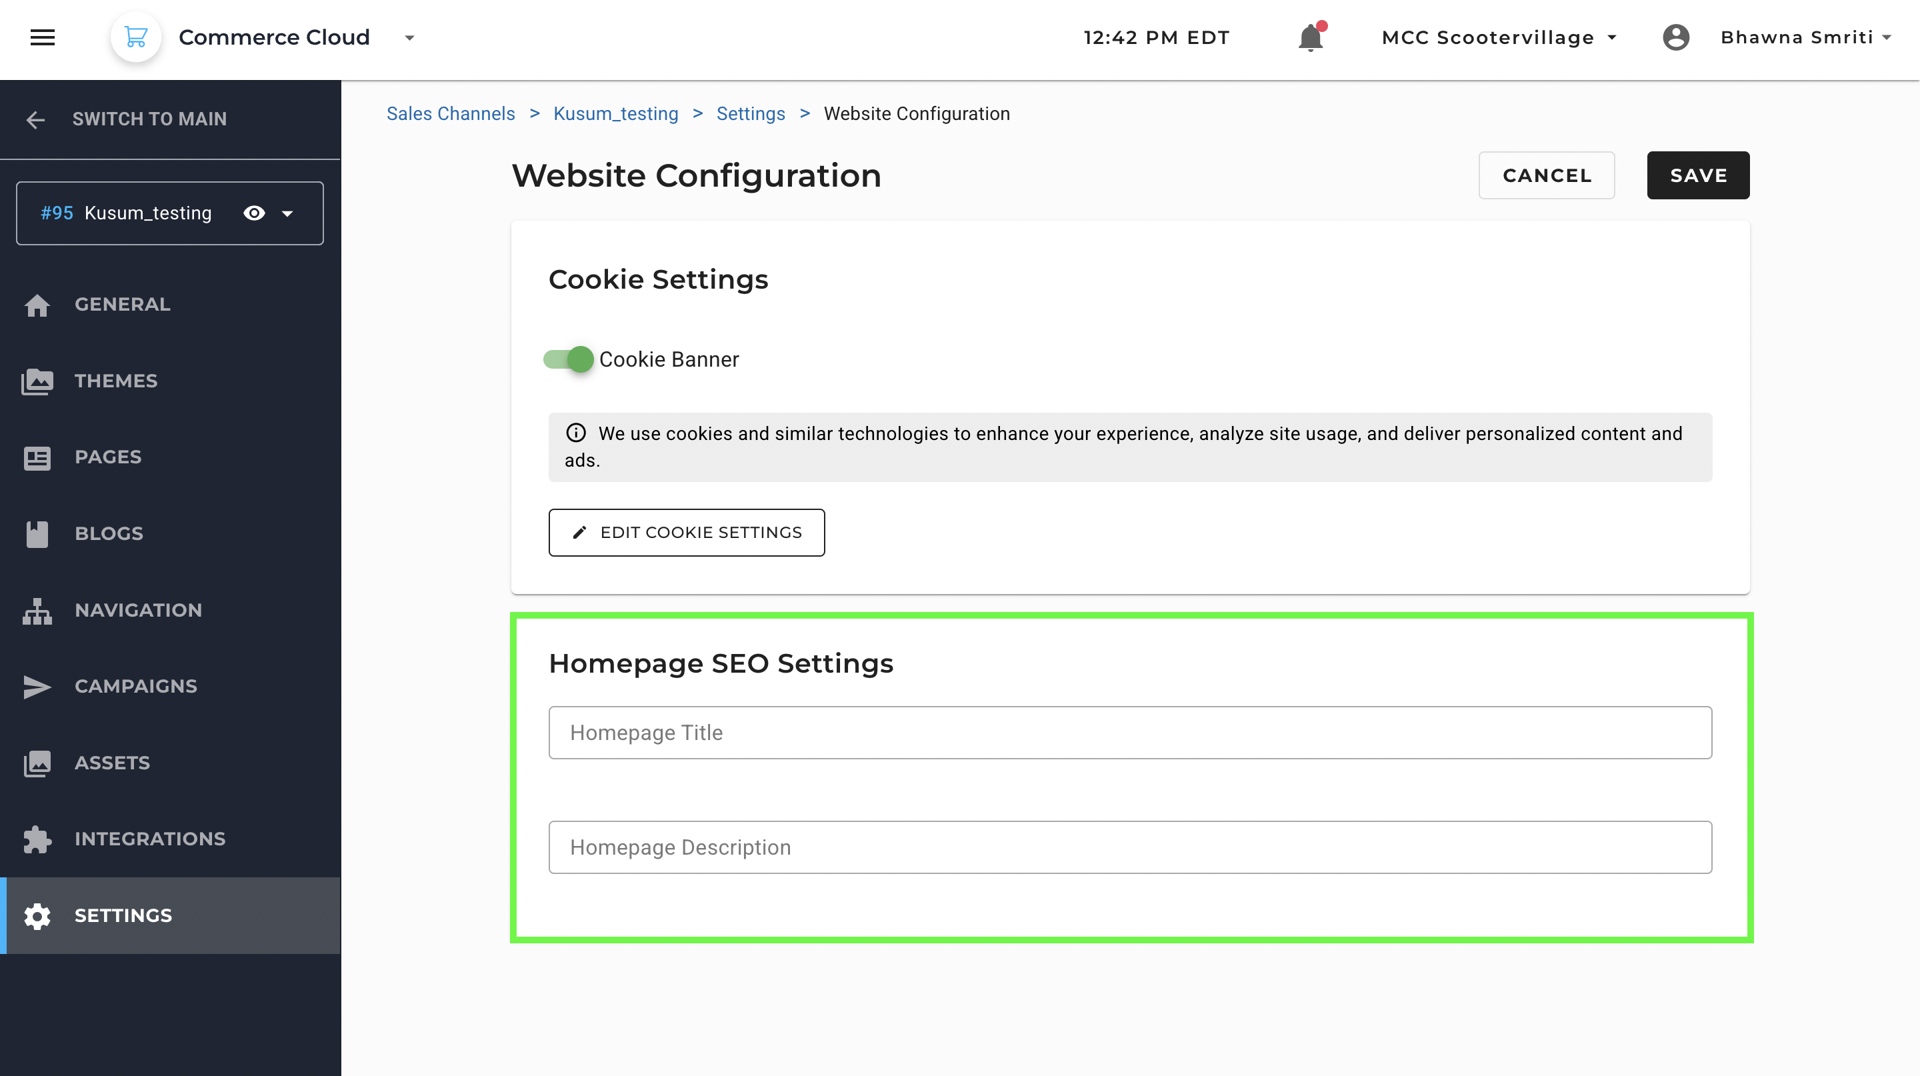
Homepage SEO Settings
This area allows you to define the title and description that search engines use to understand and rank your homepage. This metadata directly impacts your store’s visibility and click-through rates in search engine results.
Field | Example |
|---|
Homepage Title | “Eco-Friendly Shoes for Urban Explorers” |
Homepage Description | “Discover our collection of sustainable and stylish shoes perfect for everyday adventures.” |
Tip: Use concise, keyword-rich titles and descriptions to improve your SEO and attract the right audience.
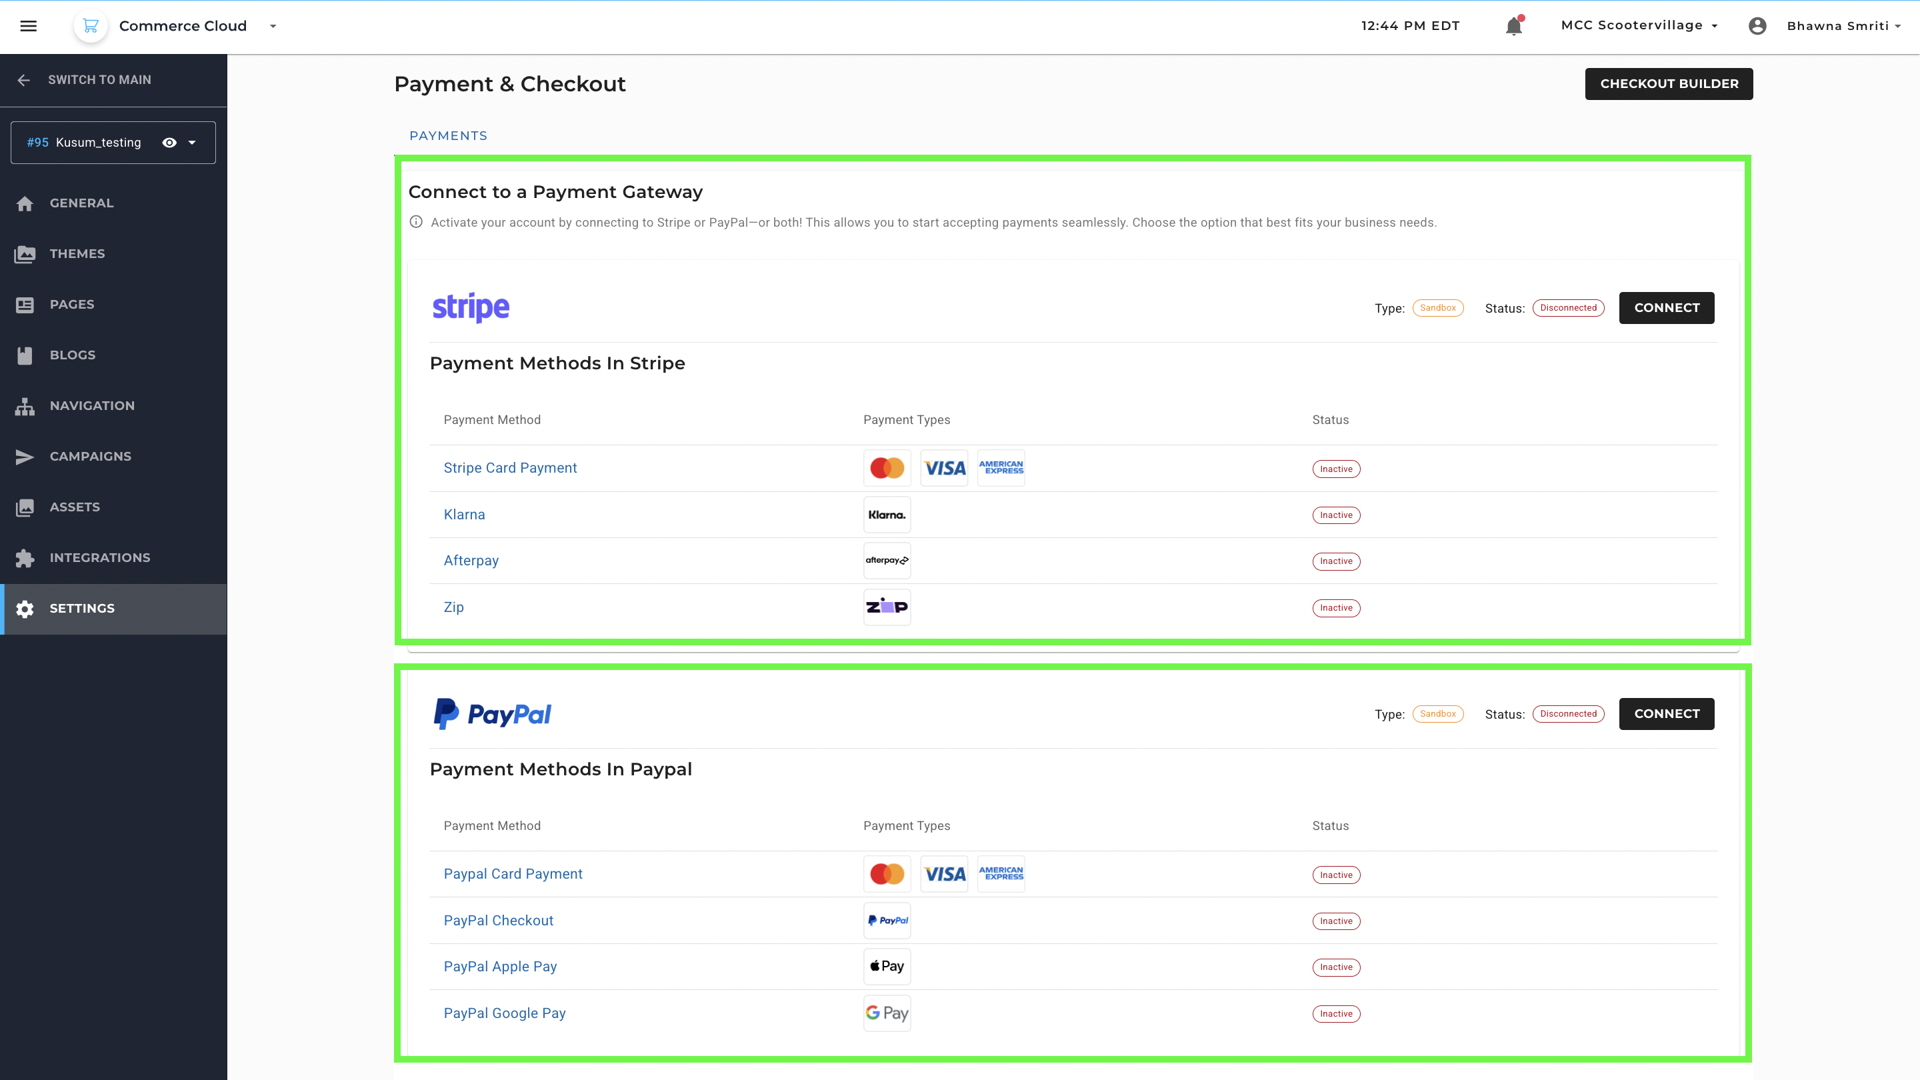
Payment & Checkout
This section is where you connect your store to one or more payment gateways, it enables you to activate secure payment methods so your store can start accepting customer payments.
Connect a Payment Gateway
To activate a payment gateway, you can choose from:
- Stripe — Ideal for card payments, Klarna, Afterpay, Zip, etc.
- PayPal — Enables PayPal Checkout, Apple Pay, Google Pay, and card payments.
You can click Connect and log in to your payment provider account to activate each gateway. Each gateway supports multiple methods.
Against each option, you can see the status of Active and Inactive Payment type within the gateway. It helps you verify the status of available option within the gateway.
For a detailed step-by-step guide to connect a payment gateway, click here