Note: To know the maximum number of sending domains you are eligible for, refer to your pricing plan.
Managing Sending Domains
In Navigation, go to SETTINGS, and select Email to go to the Email Settings page. On the SENDING DOMAINS tab of the Email Settings page, you can create and manage your sending domains.
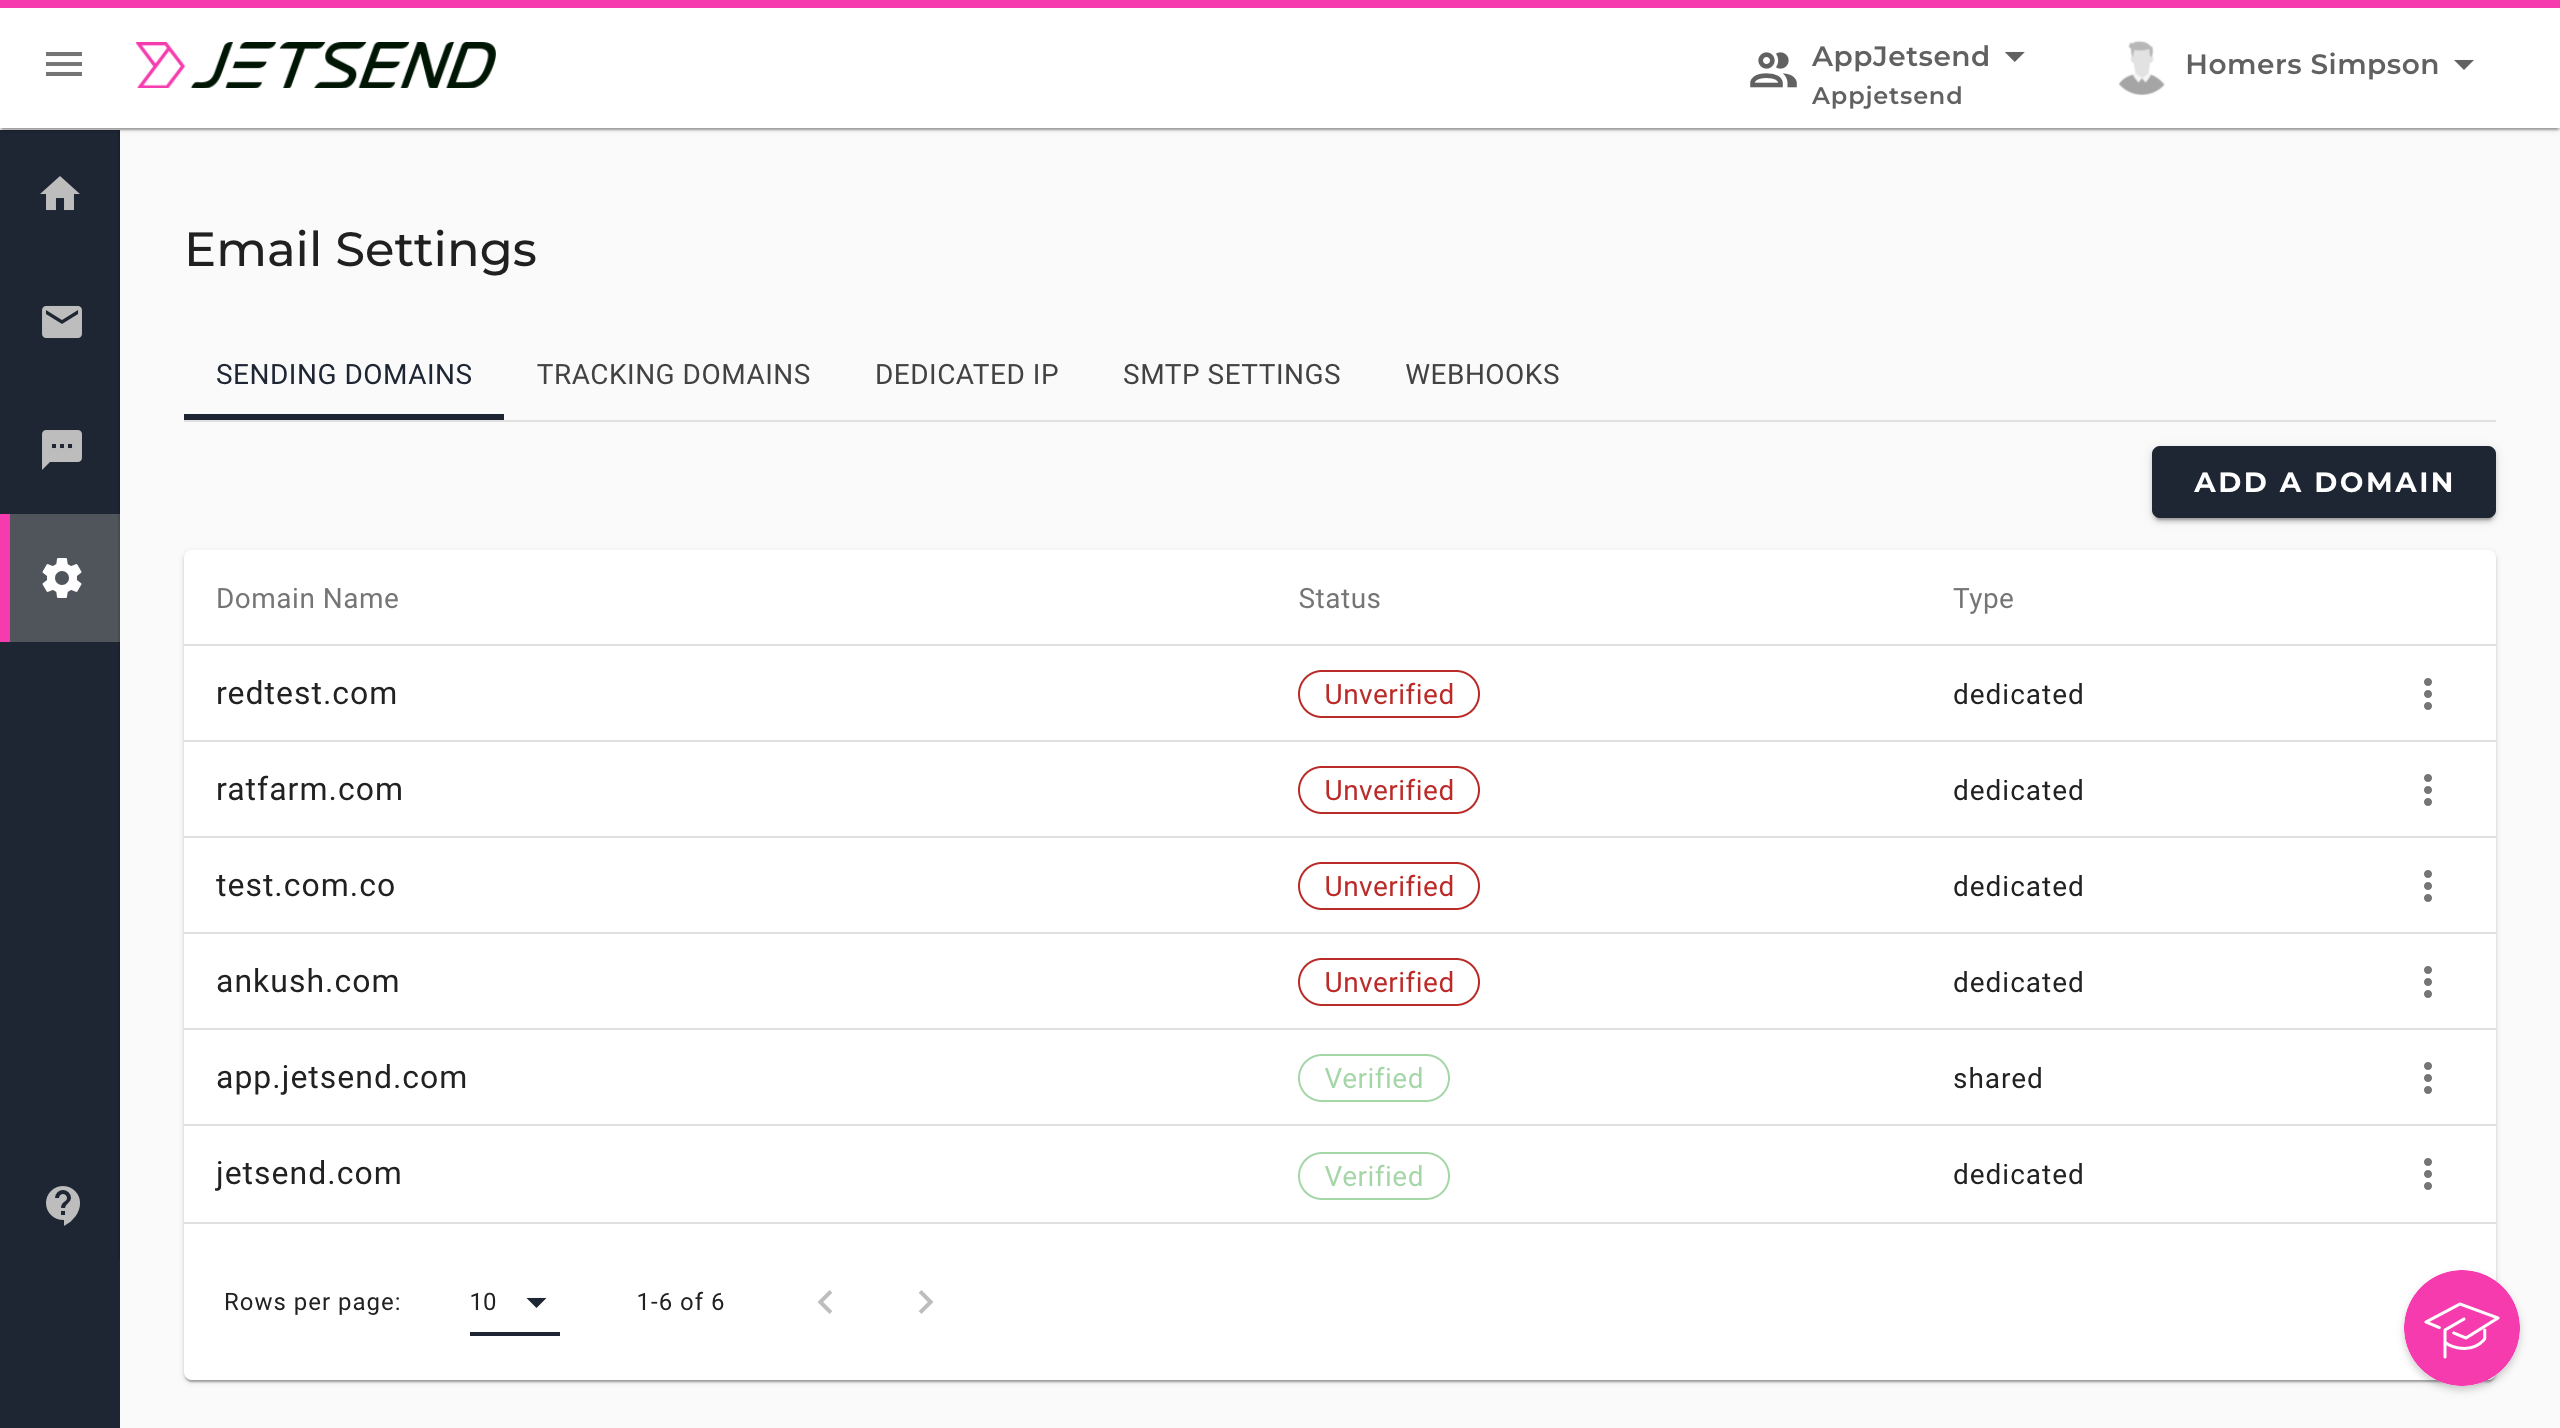
For each domain added as a sending domain, the following actions are available:
- Delete (available for both verified and unverified domains): Use this option to remove the sending domain from your account.
- Verify (available for unverified domains): Use this option to go to the verification page where you can perform the verification steps for the domain.
- Share (available for verified domains)
- Unshare (available for verified domains)
Setting Up Sending Domains
Setting up a functioning sending domain requires that you complete the following processes:
- Adding a domain
- Verifying the domain
Adding a Domain
To add a domain as sending domain, do the following:
- in Navigation, go to SETTINGS and select Email.
- On the Email Settings page, in the SENDING DOMAINS tab, click the ADD A DOMAIN button.

- In the Add a Sending Domain dialog box, enter a suitable domain name (which is mandatory) that you wish to utilize as a sending domain.
Ensure the sending domain name doesn’t start with a space or a capital letter. The domain name should be unique and should reflect the brand you are promoting to your audience. If you intend to set up a custom return path for your domain (DMARC alignment), you mustn't use your website domain as your sending domain.
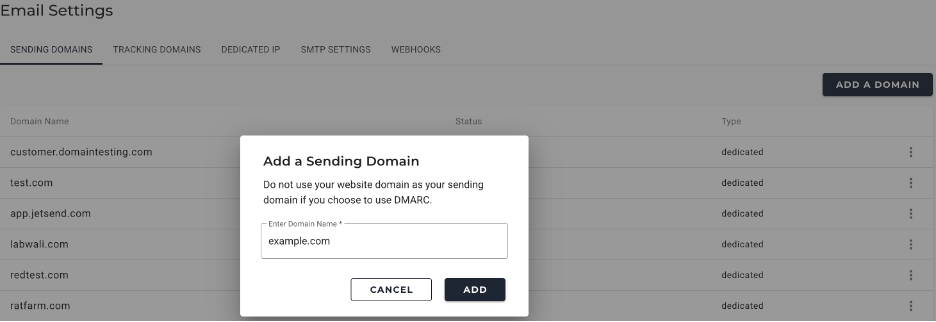
- Click ADD. The domain is added with the status as Unverified.
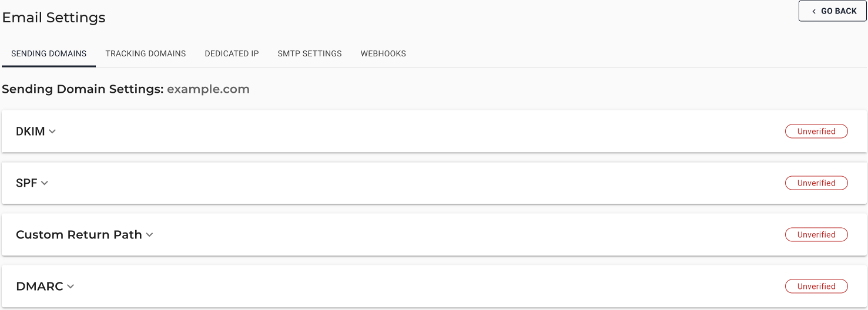
Verifying the Domain
After you add a domain, you must verify the domain before you can use it to send emails. The following verifications are required: SPF, DKIM, DMARC and Custom Return Path.
Once the required verifications are done, the domain is shown as Verified and is ready to be used.
SPF (Required)
The Sender Policy Framework (SPF) defines a standard for validating an email message sent from an authorized mail server to detect forgery and prevent spam.
Do the following to complete the SPF verification:
- Go to your domain's DNS settings and create a TXT-type record.
- Copy the SPF hostname and value from the Domain Verification page of the JetsSend application.
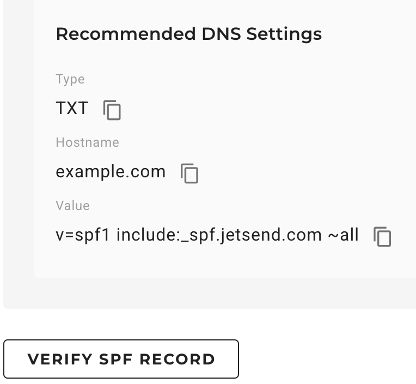
- Paste the copied information into the TXT record of your DNS settings. An SPF TXT record contains a list of all the IP addresses that are permitted to send emails on behalf of your domain.
- Go back to the Domain Verification page, and then click VERIFY SPF RECORD for the SPF verification.
DKIM (Required)
The DKIM (DomainKeys Identified Mail) authentication method helps the email receiver determine whether the email was sent from an authorized domain or not.
Do the following to complete the DKIM verification:
- Go to your domain's DNS settings and create a TXT-type record.
- Copy the DKIM hostname and value from the Domain Verification page of the JetSend application.
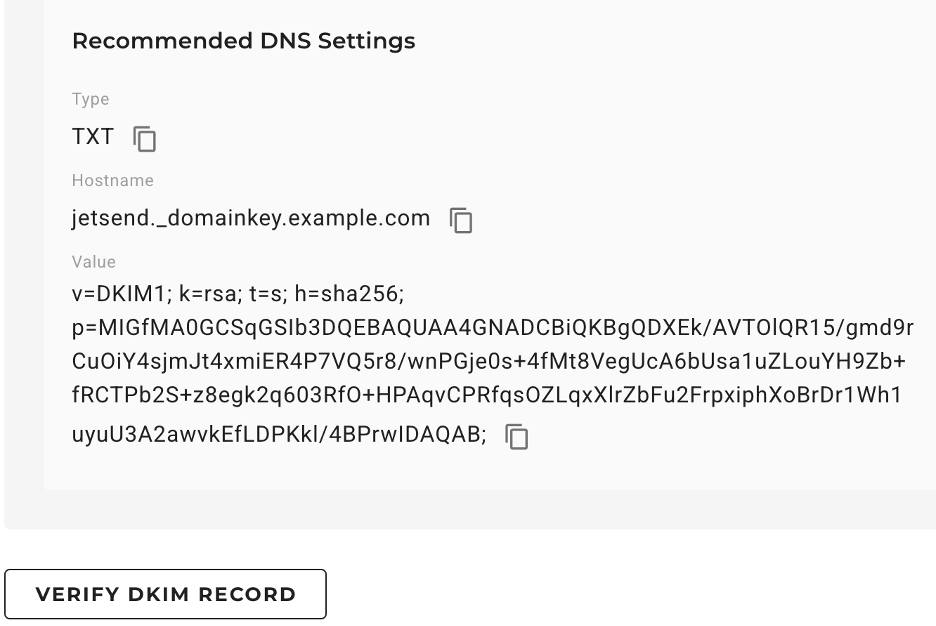
- Paste the copied information into the TXT record of the DNS settings. Email servers can use this information to verify your email's DKIM signatures.
- Return to the Domain Verification page and click VERIFY DKIM RECORD for the DKIM verification.
DMARC Alignment (Required)
Domain-based Message Authentication, Reporting, and Conformance (DMARC) is an email protocol that enables an organization to publish a policy that defines its email authentication practices and provides instructions to receiving mail servers on how to enforce them.
DMARC relies on the established SPF and DKIM standards for email authentication. So, if the SPF record test fails, then the DMARC record tells the receiver how the sender wants them to treat the email.
Do the following:
- Go to your domain's DNS settings and create a TXT-type record.
- In the TXT record name, add the DMARC hostname.
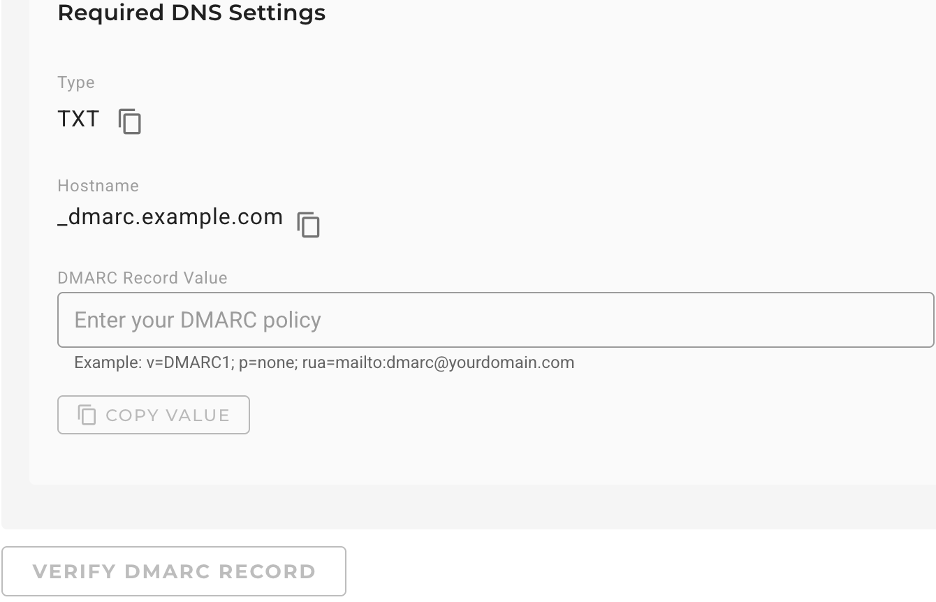
- In the TXT record value, enter the record information and save your changes. The syntax of the record is a combination of tags separated by semicolons in which the v and p tags are the only mandatory tags. An example record value can be as follows: v=DMARC1; p=none; rua=mailto:dmarc-aggregate@mydomain .com
Note: The v tag refers to the DMARC version, and there's only one version available, that is, DMARC1. The p tag specifies the instruction for email service providers on how to handle emails that fail DMARC, and the possible values are none, quarantine, and reject. - Go back to the Domain Verification page and enter the same TXT record value into the DMARC Record Value field on the Domain Verification page.
- Finally, click VERIFY DMARC RECORD to complete the verification.
Custom Return Path (Required)
A "Return Path" is a hidden email header that indicates the address to which the bounces and other email feedback are to be sent. A custom return path that aligns with your sending domain improves your deliverability and sending reputation. It also helps you achieve full DMARC alignment. One of the checks DMARC does is verification for alignment between the from domain and return path domain.
Do the following:
- Go to your domain’s DNS records.
- In the DNS settings, add a record with CNAME as the record type.
- On the Domain Verification page in the JetSend application, enable the Custom Return Path toggle. Click the Custom Return Path checkbox and enter the full subdomain prefix in the Host field.

- Copy the CNAME host from the Domain Verification page and paste it into the label or host field of the DNS record.
- Copy the CNAME value from the Domain Verification page and paste it into the Destination or Target field of the DNS record.
- Then, back on the Domain Verification page, click VERIFY CNAME PATH RECORD.