The process of sending an email using SMTP roughly consists of the following steps:
- Establishing a connection with the host server
- Sending the email
- Closing the connection
Before You Get Started
You will need the API key to authenticate yourself when connecting to our server. If not done already, you must create an API key. For more information, see Create and Manage API Keys.
-
-
Find JetSend's SMTP Server Details
You can see JetSend's SMTP server details and authentication information on the SMTP SETTINGS tab of the Settings page.
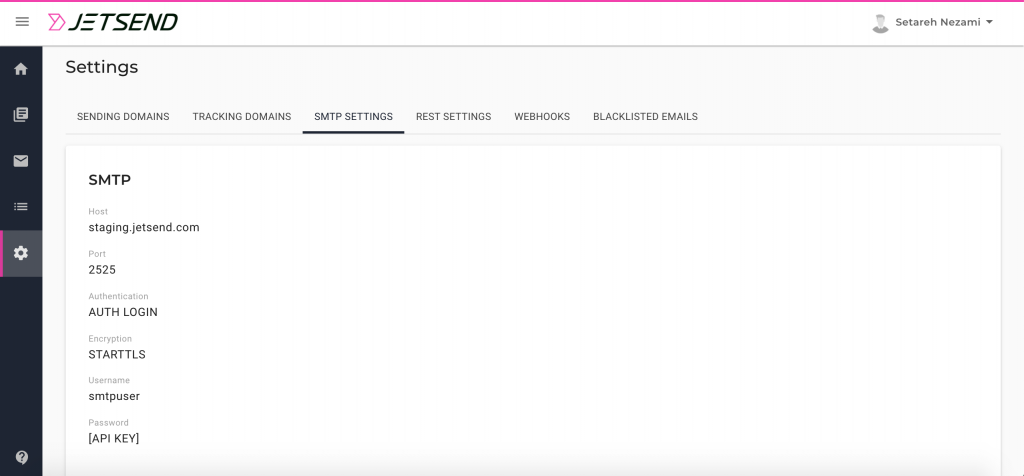
-
Your Username and Password should be Base64 encoded
JetSend authentication requires you to use the username and password be encoded in Base64. Therefore, before you start the sending process, ensure your username and password to is encoded in Base64.
Steps to Send an Email Using SMTP
This example uses Telnet to get you started with sending emails using SMTP. It covers authenticating yourself and connecting to JetSend's server, sending an email in the correct format, and familiarizing yourself with the response messages from the server. Perform the following steps to send an email using the SMTP:
- Start a session with JetSend's SMTP server. In the terminal, type the following and press Enter:
openssl s_client -starttls smtp -crlf -connect <hostname>:<port>
Note that you can find the hostname and port information in the SMTP SETTINGS tab. - Initiate a connection. Type the following and press Enter:
EHLO <domain name of sending host>
The server responds after a successful connection is established. Initiate logging into the server. - Initiate logging into the server. Type the following and press Enter:
AUTH LOGIN
The server responds with '334 VXNlcm5hbWU6' message, which is a request for your username. - Enter your Base64 encoded username and press enter. The server responds with '334 UGFzc3dvcmQ6' message, which is a request for your password.
- Enter your Base64 encoded password and press enter. Any of your API keys can be used as the password. On successful authentication, the server responds with '235 2.7.0 Authentication successful' message.
- Enter the sender email address in the following format:
MAIL FROM: <sender email address>
The server responds with '250 2.0.0 MAIL FROM accepted' message. - Enter the recipient email address in the following format:
RCPT TO: <recipient email address>
The server responds with '250 2.0.0 RCPT TO accepted' message. - Now, start adding the email content. Type the following and press Enter:
Data
The server responds with '354 3.0.0 continue. finished with <CR><LF>.<CR><LF>' message. - Optionally, you can add a ‘to email’ header. Type the following and press enter:
To: <recipient name> <recipient email address>
- Add ‘from email’ header. Type the following and press enter:
From: <sender name> <sender email address>
- Add the email subject line. Type the following and press enter:
Subject: <email subject line>
- Add the email content. Type the following and press enter:
<email content>
- Type . (period/dot) and press Enter to send the email. The server responds with '250 2.0.0 OK' message, which means the email is queued to be sent.
- Close the telnet connection. Type the following and press enter.
QUIT