Release Notes v3.10.0 - POS and Back Office
Release Date: 28th November 2019
In this release we've introduced some great new time-saving features, made it easier than ever to set up your price groups and loyalty scheme for your customers, and even introduced some new POS themes so you can personalise Retail Express! Along with our exciting headline features, there's also a total of 21 Improvements and Resolutions.
More information on all these features can be found below.
Default Price Groups for Customers
You can now set a default Price Group for customers when they're created - a great way to encourage customers to create accounts (both online and instore). For example, new customers can be automatically added to VIP groups and instantly start earning discounts on all transactions.
Tip: Combine this with the Loyalty system to create an automated Loyalty program, increasing discounts as customers reach certain points thresholds e.g. start at the Bronze level by default, and increase to silver, gold etc.
To configure the default Price Group:
- Navigate to Settings > POS Settings > Customer Settings
- Select the Default Price Group
- Click Save Changes

Note: You can't use fixed price groups for your default, only loyalty price groups
Back to top
Configurable Voucher Type Settings
You can now configure a different message and expiry date for each voucher type.
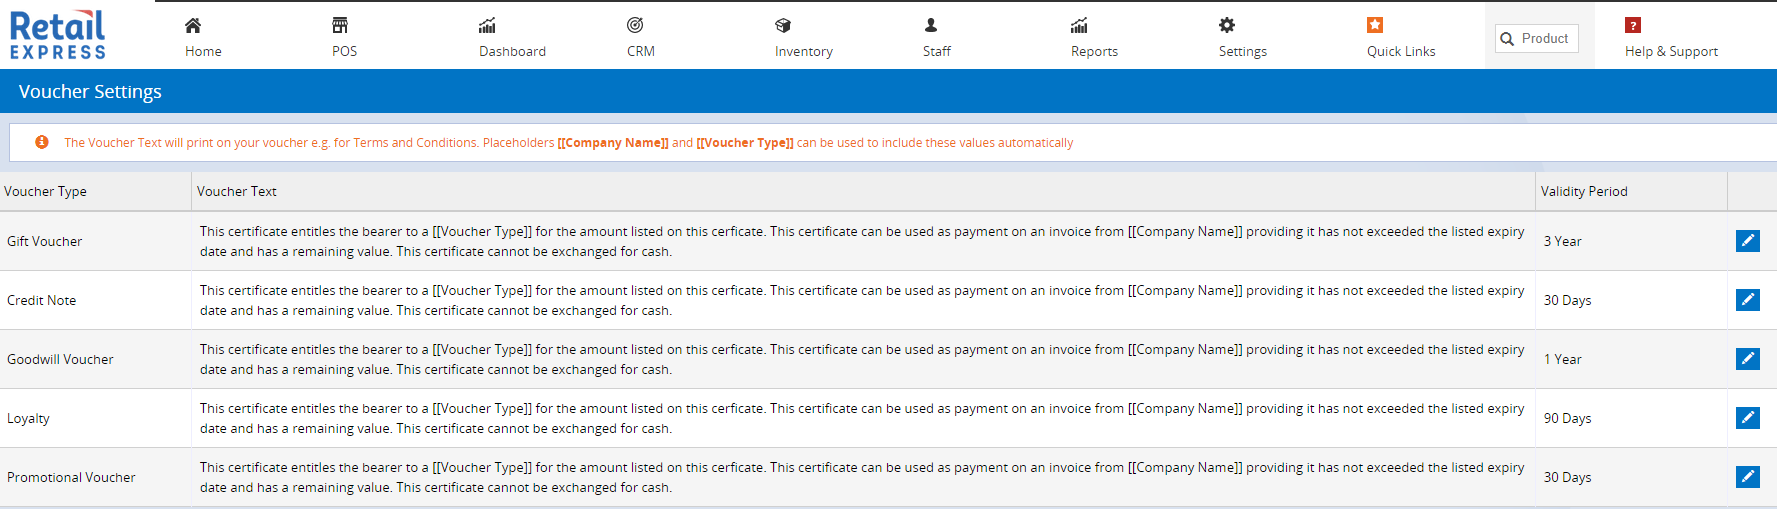
For example, your Gift Vouchers may expire after 3 years, while your Goodwill promotional vouchers might only be valid for 30 days. Using the new settings you can configure each of the expiry dates by default, and update the Voucher Text to explain the terms and conditions.
Important: The ACCC introduced new requirements for Gift Voucher expiry periods in November 2019.
To access the new settings:
- Navigate to Settings > POS Settings > Voucher Settings
- Click the pencil icon to edit the required Voucher Type
- Click Update
Back to top
POS Themes
Personalise Retail Express with new POS themes! Show your personality with over 20 new themes, including landscapes, animals, retail industries, office desktops and even a bit of pop art.

Tip: Themes can be customised per register, so each till can be unique.
To access the new themes:
- Open POS
- Log into your Outlet
- From the main window click on Change Theme in the top right-hand corner

- Enter your Login details
- Select a new theme
- Click Done
Back to top
Accounting report for reconciling Surcharges
A new report is now available, designed to help reconcile your Surcharges with the Financial Summary Report.
Using the new report you can filter by:
- Date from/to
- Order Number
- Outlet/s
- Surcharge types
- Sale type (sale, laybys etc)
The report will then display for you information on the order, including the surcharge value (both including and excluding tax, and the tax value itself).
To access the new report, navigate to Reports > Accounting Reports > Surcharges Report

Back to top
Shopify Automatic Sync
When your Shopify integration is first enabled, a full sync of products and customers will be automatically initiated and any further changes to products and customers will be synchronised automatically.
The ability to manually trigger a full bulk sync of all products and customers is no longer needed and has been removed from the Shopify integration page in Back Office.
Back to top
Customer Email address placeholder on POS templates
A new placeholder has been added to the POS Email Templates feature, allowing you to automatically insert the customer's email address on your email templates.
Back to top
Improvements
Below is a list of improvements included in the latest Maintenance Release:
| Account Payments | Account Payments can no longer be set to a date in the future to avoid confusion when entering back dated payments. |
| Attributes |
Attribute names can now use additional characters:
- _ (underscore)
- - (hyphen)
- / (forward slash)
- + (plus)
- . (full stop)
|
| Customer Activity Report | A new filter has been added to allow for filtering based on the Customer Type e.g. Retail, Employee etc |
| Reports - Income Report | The Customer number has been added to the Income Report available via Reports > Accounting Reports > Income Report |
| Reports - Stock Value Vs Sales | The report can now be grouped by Supplier |
| Transfers | The Internal Transfer Order report is now displayed in Landscape mode to improve the visual layout |
Resolutions
Below is a list of resolutions included in the latest Maintenance Release:
| Offline POS | An issue where IP address changes weren't detected on some hardware has been rectified |
| Offline POS | Stalled sync services will now be automatically re-started |
| Offline POS | The sync status messages have been updated to make the status clearer |
| Packages | When updating the quantity of products in a package the new cost price will be saved immediately |
| POS | Transfers processed through POS are successfully created even where the transfer has been temporarily placed On Hold |
| POS | The ETA date now shows the correct available quantity on incoming Transfers |
| Profile Security | An issue where the "POS Configuration Settings" permission was displayed twice under certain circumstances has been rectified |
| Quotes (POS) | An issue has been rectified where the content overlaps the main table if a barcode is displayed under the Quote number |
| Receipts | The amount paid and change returned to customers is correctly displayed on receipts |
| Reports - Picking/Dispatch Summary | The information in the Legend has been updated to display the correct fields for the report |
| Reports - Staff Sales Report | The "Cost of Sales" correctly displays when using the "Include GST" filter |
| Reports - Style Performance Report | The correct total GP % figure is now displayed |
| Statements | Statements can now be processed in batches of 50 e.g. 50, 100 etc |
| Stock Replenishment via PO | Purchase Orders created via the Stock Replenishment process will populate the email's CC field as per the Global Settings |
| Transfers | Supplier SKU barcodes can now be scanned to increase the quantity when dispatching and receiving stock through the Transfer Edit screen |
Tip: Stay up-to-date with news from the Support team - subscribe now
Want more information? Find related articles here: